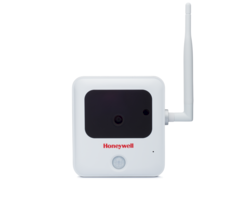
How Do I Add an IPCAM-WO to My Security System?
You can add an IPCAM-WO to your security system by connecting the camera to the internet and then having your alarm monitoring company activate the device with Total Connect 2.0. The camera must have been online when Resideo pushed down a critical firmware update to be used with TC2 today.

The IPCAM-WO is designed for use with Honeywell Security Systems using the Total Connect 2.0 Platform. When connecting a IPCAM-WO to the internet, users have the choice of using a hard-wired ethernet connection or using a wireless WPS (WIFI Protected Setup) connection. Both methods are designed to be very secure, thereby preventing unauthorized access or viewing.
Users should remember that the IPCAM-WO will only use about 15 bytes of data per second when in standby mode. However, this usage will skyrocket to roughly 1.5 megabytes of data per second when the device is streaming video. It is recommended that a minimum upload speed of 2.3 Mbps is used when 1 to 3 IPCAM-WO devices are being used. But if 4 to 6 cameras are connected, then a minimum upload speed of 4.6 Mbps is advised.
Please note that it is possible to view the live feed of a IPCAM-WO camera from certain Honeywell Panels and on the Honeywell Tuxedo Touch Keypad. The panel or Tuxedo Keypad will need to be on the same WIFI network as the IPCAM-WO in order to do this. This is useful for accessing the live feed of the camera without using the Total Connect 2.0 platform. However, accessing the camera in this fashion will provide the user with very limited functionality and control over the camera. Also remember that using Total Connect in conjunction with an alarm monitoring plan that includes video surveillance is the only way for an end user to access the live feed of their IPCAM-WO from a remote location.
Note: The Total Connect 2.0 Legacy IP Cameras like the IPCAM-WO can only be used if they were online at the time when Resideo pushed down an OTA update to make them compatible with an updated TC2 platform. Any legacy camera that was not online to receive this update can no longer be used. You must be very careful when purchasing used legacy TC2 IP Cameras, as many people will try to pass off bricked models on unsuspecting buyers. Please read this FAQ for more information.


Complete the following steps to add an IPCAM-WO to your security system using a WPS connection:
1. Connect to the network. Before you connect your IPCAM-WO to your wireless network, you should make sure that you have a router that supports WPS. Examine your router, and look for a WPS logo. If your router does not have one, it is most likely an older model that does not support WPS. You can still use the router by adding a WAP-PLUS to your wireless network. This will provide your router with the tools it needs to support the IPCAM-WO. You can connect the WAP-PLUS to your router using an ethernet cable. After powering-up the WAP-PLUS for the first time, you will need to wait about 2 minutes for it to complete its boot cycle.
To connect the camera to the network, press and hold the WPS button on the WAP-PLUS or on the router. After doing this, use a paperclip or a similar thin object to press and hold the Reset / WPS button on the IPCAM-WO for 3 - 5 seconds. This button can be found on the back of the camera, next to the power connector.
Assuming that the camera has received the latest firmware update, the red LED light on the camera will flash, and the device will beep every 2 to 3 seconds. Upon successfully joining the network, the LED light will turn green, and the device will emit 5 consecutive beeps.
2. Install the camera. Mount the camera in the desired location. By installing the camera before activating it, you will be sure that it will work in the location. We recommend only temporarily mounting the device at this time, in case it needs to be moved later on in the setup process.
3. Activate the camera. Contact your alarm monitoring company, and let them know that you would like to activate your IPCAM-WO. Your monitoring company will need to know the MAC address for the device in order to complete this process. This 12-digit code can be found on a sticker on the back of the camera.
4. Test the camera. Log-in to your Total Connect 2.0 account, and then select the "Cameras" button. Make sure that the live video feed for the camera is visible. From there, you can access the settings for the device and make any changes that are needed. You can also set recording schedules, set motion capture settings and more.
5. Permanently mount the camera. Once you have verified that the camera is working, you should then permanently mount the camera in its final location. The camera comes included with the necessary hardware to permanently mount the device.
Did you find this answer useful?
We offer alarm monitoring as low as $10 / month
Click Here to Learn MoreRelated Products

- Answered
