How Do I Connect My 2GIG GC3 to My Garage Door?
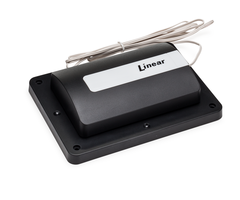
You can connect a 2GIG GC3 to a garage door by using a GD00Z-4. The kit includes a Z-Wave garage motor trigger and a tilt sensor. After you have installed the device and enrolled it, the GC3 allows you to control the garage door. A separate GD00Z-4 is needed for each garage door.
The Linear GD00Z-4 is compatible with most garage door motor models. However, the device is not compatible with Assure Link or MyQ models. The GC3 will need to be on firmware 3.0.1 or greater to support the GD00Z-4. The Z-Wave motor controller of the GD00Z-4 will be installed near your garage door motor, while the tilt sensor will be installed on the garage door itself. Power the motor controller using its included transformer. Once powered up, the tilt sensor should automatically interface with the motor controller. The tilt sensor is only used to provide door status to the GD00Z-4 and is not monitored as a burglary zone by the GC3. If you would like to have the door monitored by the alarm system, a second door sensor, such as the Honeywell 5822T, would need to be installed and programmed to the GC3.
Complete the following steps to connect a GC3 to a garage door:
-
Exclude the Z-Wave device. It is best to perform the first two steps prior to mounting the GD00Z-4. Exclusion is recommended before inclusion. Devices are often enrolled at the factory as part of a quality control check, which can prevent them from enrolling properly in a new network.
On the home screen of the GC3, press the 2GIG logo in the upper-right corner > enter the Installer Code (the default code is 1561) > Smart Home Controls > Remove Device. The system will now be in Z-Wave exclusion mode. Click the link button on the GD00Z-4. The GC3 should confirm that it has removed a device from the network.
-
Include the Z-Wave device. Press the back arrow in the upper-left corner of the screen. Click “ Add Devices”. This will put the system into Z-Wave enrollment mode. Once again, click the link button on the GD00Z-4. The system should see the device and learn it in. Once learned in, you will have an opportunity to rename the device.


-
Install the motor controller. The motor controller can be mounted anywhere. Connect the two wires from the GD00Z-4 to the appropriate input on the garage door motor. This is usually where the push-button (door bell) control is connected. The device must receive power from its included transformer. In most cases, there are available outlets near the garage door motor. The GD00Z-4 has screw holes that can be used to mount the device. If needed or desired, the included adjustable mounting bracket can be used to make mounting easier.

-
Install the tilt sensor. The tilt sensor installs on the inside of the garage door. Before mounting, open the device and pull its battery tab. Install the device on the interior of the garage door using the included tape or screws. If you are using screws, open the device and screw the base into the garage door. Be sure to mount it with the arrow displayed on the side of the device pointing up.

- Test the garage door. Press the back arrow in the upper-left corner of the screen until the GC3 is on its home screen. Click “Smart Home Controls” in the bottom-left corner, and then select “Garage Doors”. If the garage door was successfully enrolled, it will be displayed on the screen. Clicking the switch to the right of the door will open and close the garage door.
-
Troubleshoot if necessary. In some cases, though the tilt sensor should be paired with the GD00Z-4 from the factory, the tilt sensor and the Z-wave garage door controller may not be connected. If this is the case, you will be unable to control the garage door from the system because the GD00Z-4 is unaware of the current status of the door. If this happens, an error will be shown on the garage door screen in the GC3. To pair the tilt sensor to the garage door controller:
- With the tilt sensor in the vertical position (arrow pointing up), press and hold the link button on the GD00Z-4 until you hear a beep. This is the same button used for Z-Wave enrollment to the panel.
- Once you hear the beep, release the button.
- Move the tilt sensor into the horizontal position (arrow pointing right). Then press and hold the link button again. The strobe on the GD00Z-4 should flash, and you should hear a sequence of beeps. The tilt sensor should now be paired with the GD00Z-4.


Did you find this answer useful?
We offer alarm monitoring as low as $10 / month
Click Here to Learn MoreRelated Products


Related Categories
- Answered
- Answered By
- Julia Ross