How Do I Disarm My Honeywell Home PROA7?
You can disarm your Honeywell Home PROA7 by pressing the Disarm button on the front of the panel, and then entering a valid code. You should then confirm that the system disarmed. You can also disarm using a keypad, a key fob, or Total Connect 2.0. The same applies to the Resideo PROA7C.
When you are working with a PROA7 or PROA7C, there are some things you can easily check to see if the system is armed or disarmed. First, you can check the right-side LED light above the panel's display screen. A green light means that the system is disarmed, while a red light means that that the system is armed. Note that the light may also be orange to indicate a trouble condition, or OFF to indicate that the system is not armed and in a "Not Ready to Arm" state. Make sure you are checking the right-side LED light, as the left-side LED light isn't for arming status, but rather for AC power status. Also note that if multiple partitions are set up with the system, then the right-side LED will show the arming status of the currently selected system partition, rather than the entire system as whole. As a general reference, up to four (4) partitions are available on a PROA7 or PROA7C.
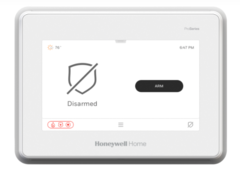
Another way to check arming status is to check the shield on the left-hand side of the home screen. If the shield is black with the message "Disarmed", then the system is disarmed. If the shield is red, then it will say that the system is either Armed Home (also referred to as Armed Stay) or Armed Away. Again, if multiple partitions are set up on the system, then this shield only provides the status of the currently selected partition. Just because the selected partition is armed doesn't mean that the rest of the system is armed, so make sure to keep that in mind. The upper LED light on the right-hand side and the shield are the best ways to check arming status from the panel. Other ways to check arming status include looking at a system keypad or checking TC2 from the website or mobile app.
It is important to know how your system behaves differently when it is armed versus disarmed, and also the main arming types. When the system is disarmed, then general rule is that only 24-hour zones can trigger system alarms. If you fault, or activate, a security zone (e.g. Perimeter, Entry/Exit) while the system is disarmed, then nothing will happen, other than the panel making a chime sound and/or speaking the Zone Description if such functionality is set up. That being said, as far as any actual system actions, none are taken for zone faults while the system is disarmed.
It's usually a different story if a non-24-Hour security zone is activated while a system is armed. The exact action that a system takes depends upon the Response Type for the zone associated with the faulted sensor. For an Entry/Exit Zone, the system will go into an Entry Delay period once the sensor is faulted, and the system must be disarmed within this countdown, or else an alarm will occur. For a Perimeter Zone, there is no Entry Delay period, and faulting the zone will trigger an immediate system alarm. There are also Interior Zones, which are bypassed and ignored when the system is Armed Home (Armed Stay), and are only active and able to cause an alarm when the system is Armed Away. The idea is that when the system is Armed Away, there should be nobody inside the building to activate the Interior Zones, so having one of those zones faulted indicates an intrusion. Though when the system is Armed Home, it means that at least one person is still inside the building, so the system bypasses (ignores) Interior Zones. This allows anyone still inside the building to move around freely, without worrying about triggering an alarm.
As far as disarming a PROA7 or PROA7C, there are many methods. The primary method is to just disarm at the panel, and we will cover that method in a step-by-step process at the end of this FAQ. Another method is to use a keypad. The PROSIXLCDKP Alphanumeric Keypad can be readily paired with a PROA7 or PROA7C. The PROWLTOUCH, and the PROWLTOUCHC are touchscreen keypads that can be used, but only if a WIFI card is added to the system. The available WIFI cards for the PROA7 and PROA7C are the PROWIFI (WIFI only) and the PROWIFIZW (WIFI + Z-Wave). When using a keypad to disarm, a valid code will be required to verify authorization. That is not the case for a handheld key fob, as a programmed key fob device can disarm with the press of a button, and no code entry is required. A keypad or key fob will need to be purchased separately.
You can also disarm remotely through Total Connect 2.0, which is an interactive service platform that can be set up with the system once it is monitored. In order to get a PROA7 or PROA7C monitored, you must add a communicator. This can be one of the aforementioned WIFI modules, or you can add a compatible cellular communicator, like a PROLTE-A (AT&T LTE) or a PROLTE-V (Verizon LTE). If you want, you can add both a WIFI module and a cellular communicator so that the PROA7 or PROA7C System supports dual-path connectivity. This will allow the system to stay connected for alarm monitoring service even if one pathway goes down or becomes unavailable. Regardless, using TC2 is only possible for a PROA7 or PROA7C once the system has been set up with a compatible communicator and alarm monitoring service. TC2 can also be used to schedule automatic disarming at a set time of the day. Again, though, the system must be monitored for that to work, and a big limitation of scheduled automatic disarming through TC2 is that it can only be used on Partition 1. We also want to mention that disarming a PROA7 or PROA7C is also possible by creating a smart scene for automatic disarming with a specific predetermined event. A very popular option is to use a Z-Wave Smart Lock and have the system disarm automatically upon unlocking the lock. Don't forget though that the only way to use Z-Wave devices with these systems is to add a PROWIFIZW Module, as the PROA7 and PROA7C do not offer Z-Wave functionality on their own.
Remember, the PROA7 and PROA7C are multi-partition systems, and up to four (4) partitions can be set up. If partitions are not set up, then you are technically just controlling Partition 1. That said, once you set up a second partition, and any additional partitions beyond that, then each enabled partition is armed and disarmed individually. Another way to phrase this is that you are essentially arming/disarming a certain section of the security system, while leaving the other section(s) in their current arming state(s). Whenever you disarm from the main panel or a touchscreen keypad (requires and added WIFI module), you will be able to choose the partition you want to arm or disarm, provided that you have a valid code with authority over the selected partition. If you are the main system user, then you should just use the Master Code, which has authority over every system partition. The Master Code is 1234 by default, but it is almost always changed for security purposes. Meanwhile, a PROSIXLCDKP Keypad or a key fob will be assigned a single partition, and the device will only be able to arm or disarm that single partition. You can select different partitions to control from Total Connect 2.0, but only Partition 1 can be set up for scheduled automatic disarming using the TC2 service.
The remainder of this FAQ will focus on disarming a PROA7 or PROA7C from the main panel. For simplicity, we will assume that the system (or the desired partition) is already in an armed state. Complete the following steps to disarm a PROA7 or PROA7C Security System:
1. Choose a partition. If multiple partitions are set up on the system, then you must choose the partition that you want to control. You can do this from the main screen of the panel. On the main screen, on the left-hand side, there will be a shield that shows the selected partition's current arming status. Directly above this shield is a dropdown bar that you can use to select a different system partition. Only active system partitions are able to be selected. This can be up to four (4) selectable partitions. In order to switch partitions, you must provide a code. This can be any user code with authority over the partition, or you can use the Master Code, which has authority over every partition. Remember, the Master Code is 1234 by default, but it is almost always changed.
If you have not set up any additional partitions, then the system is considered to be a single-partition system. Technically speaking, you are controlling Partition 1, which represents the entire system. If you do not have any partitions set up, or if the desired partition is already selected, then you can skip this step and go directly to disarming the system. It's just very important to make sure that you are controlling the correct system partition, as mixing things up and disarming the wrong partition could lead to some serious consequences, such as false alarms on the system. If there is no dropdown bar above the shield, then the system is a single-partition system, with no additional partitions set up. That is an easy way to tell if your system has additional partitions set up. Continue to the next step once either the proper partition is selected, or if there are no additional partitions set up, and you are just controlling the system as a whole on Partition 1.
2. Disarm the system/partition. With the proper partition selected, or just the system as a whole if no additional partitions are set up, press the black Disarm button on the right-hand side of the main screen. A keypad will show up on the screen. Enter the Master Code (default 1234, but usually changed), or any other user code with authority over the selected partition. The system (or the selected partition) should disarm.
3. Confirm the disarm. You can confirm the disarm in a couple of different ways. The shield on the left-hand side of the main screen will show that the system (or selected partition) is disarmed. Also, the LED light on the right-hand side above the touchscreen display will be green when the system (or selected partition) is disarmed. If the light is red, then it is still armed. If the light is orange, then there is a trouble condition. If the light is OFF, then the system is disarmed, but it is in a "not ready to arm" state.
Did you find this answer useful?
We offer alarm monitoring as low as $10 / month
Click Here to Learn MoreRelated Products

Related Categories
- Alarm Keypads
- Alarm Keypads
- Wireless Alarm Keypads
- Wireless Touchscreen Keypads
- Honeywell 5800 Key Fobs
- Honeywell SiX Key Fobs
- Answered