How Do I Program a Kwikset 910 to a Honeywell L5210, L7000?
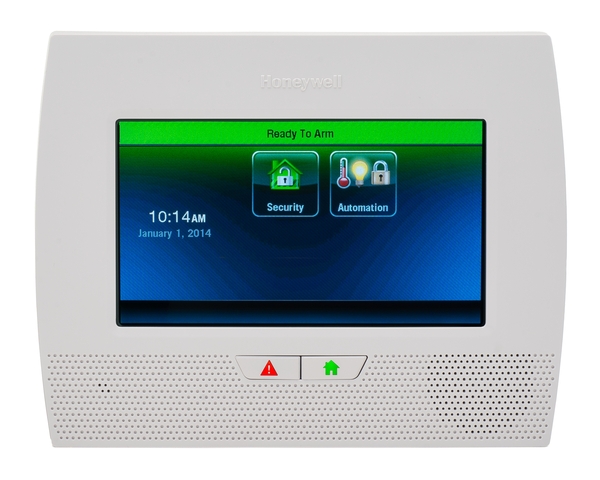
Programming any Z-Wave device with the LYNX Touch L5210 and L7000 will require the L5100-ZWAVE module. Once installed place the controller into inclusion mode and press the ID sequence on the lock. If the lock is already included in a different controller it may require exclusion first.


-
Install the Kwikset 910 Z-Wave lock into your door.
Remove the existing deadbolt lock from the door. Pop off the cover and remove the screws which hold the deadbolt into place, after which remove the deadbolt from the door and remove the existing latch and strike as well. Install the new deadbolt into the side of the door and test that the bolt can fully extend and retract. With the bolt extended, install the strike and screw it into place.
Now remove the case from the 910 by sliding the casing upwards; remove the battery pack from within the unit by sliding it upwards as well. Install the exterior assembly by placing the cylinder into the exterior assembly with the key placed into the port. Align the torque blade with the hole in the latch and feed the wire underneath said latch and place the assembly onto the door. Grab the mounting plate for the interior assembly and feed the wire through the center hole on the plate. Insert the mounting bolts into the appropriate holes on the interior plate and tighten them so the exterior and interior plates are both firmly held into place.
Verify the functionality of the bolt by turning the key into the locked and unlocked positions. If satisfied with the bolt, insert the end of the wire into the interior assembly by aligning the connecter with the port on the assembly.
Place the assembly on the door, beware of wire pinching, and align the turn piece with the torque blade that was fed through the latch before. Screw the assembly into place. Now insert the batteries into the provided battery pack and while holding down the lock button for approximately 20 seconds, insert the pack into the assembly. DO NOT SET UP USER CODES LOCALLY FROM THE LOCK! These codes will be sent from the panel later on in the process.
-
Include the Kwikset 910 into the LYNX Touch L5210 or L7000 panel
To begin programming you must first include the ZWAVE device into your panel. To include the lock; Press the Home Automation icon on the home screen > press the down arrow > Tools > Include Devices > once the message "Ready to Include" appears, within 60 seconds, press the function button on the z-wave device > a message will appear Device Found > press Abort > press the return icon.If normal inclusion process is not working the first troubleshooting step is to exclude the lock, which is the same process as inclusion but pressing the exclude option instead. If the lock excludes and populates on the screen then the inclusion should work afterwards. If the exclusion does not fix it then you will need to bring the Lynx Touch panel closer to the lock. This can be accomplished by removing the panel from the wall and bringing it to the lock on battery power.
-
Test the Kwikset 910 with your LYNX panel.
After the lock has been programmed into the panel you will want to verify the two are communicating properly. Go into the Automation section from the home screen and tap the Lock icon. This will show all the locks you have included into the panel, select the lock you want to test. First rename the lock by pressing the edit option, after you have renamed the lock select done. This will bring you back to the previous screen, from here select the "Press to Unlock" or "Press to Lock" option. If everything was done properly, your lock will perform the function.
-
Push User Codes from the Alarm System.
Enable "Z-Wave Lock Control" for any user code that you want to be set as an active PIN on the lock for unlocking. Then select "Disarm" for "Z-Wave Unlocking Door" if you want that code to disarm the system when the door is unlocked using that specific PIN.
To do this enter the tools icon and enter your master code. Select the Users icon and then select the user you want to give access to the lock. Select the edit option and toggle the Z-Wave Lock Control option to yes; if you want the same user to be able to disarm your system by unlocking the door, toggle the "Z-Wave Unlocking Door" option to disarm. Repeat these steps for all users that you want to have access to the lock.
-
Configure the Alarm System to Arm when the Door is Locked.
In the automation menu select the down arrow and go into "Tools". Select "Advanced Tools" and enter your installer code. Select the "Locking Door" option and toggle it to the setting you would like. Being either Arm stay, away, or arm without auto-stay.
Arm Stay: This will lock the door when the system is set to Arm Stay.
Arm Away: This will lock the door when the system is set to Arm Away.
Arm without Auto-Stay: This will have the system lock the door and not enable the auto-stay feature when you arm away, which happens if you Arm Away but do not fault an entry/exit zone during the exit countdown.
If you want to set the lock to work for both Arm Stay and Arm Away, a scene will need to be created.
-
Build scenes, rules, and schedules
A scene can be programmed ether through the LYNX touch panel or through Total Connect. Scenes are commands that work with your Z-Wave devices, these are used to help save time and money for the End User. The LYNX touch has 20 scenes which can have up to 10 devices used for each scene. To set up a scene from the panel, access the Automation section on the home screen and select the down arrow. Select Scenes and then select "add new scene", the panel will give you the option to name the scene. After the scene has been named select the "add new device option" and select the devices you want to have linked to the scene.
To link your lock to the scenes you create, simply press the lock option during the scene set up and toggle if you would like the lock to be locked or unlocked during a scene. This way when you activate a scene that has the lock linked to it, your Kwikset 910 will lock or unlock depending on how you set it to work with the scene.
Did you find this answer useful?
We offer alarm monitoring as low as $10 / month
Click Here to Learn More
That is a sign that the panel and the lock did not pair properly. You should exclude and when you include make sure that the lock is at maximum 5 feet away and to give the pairing process at least ten - fifteen minutes.
I have this lock with this panel. If I include the locks in the system the lock battery drains in about a day. I had given up thinking they were incompatible, but you seem to think they work. Any idea how to fix that problem?
Related Products
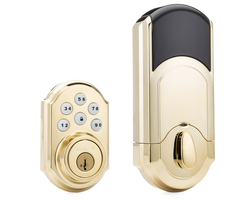
Kwikset 910
Z-Wave Push Button Deadbolt Lock
Related Categories
- Answered