Can I Do a DIY Installation of a Honeywell L7000?
The Honeywell L7000 is surprisingly simple to install. If you were looking for the simplest installation option, installing the panel above a wall outlet would be best. You can either have the wire installed external to the wall, or fish it into the wall for a more professional look.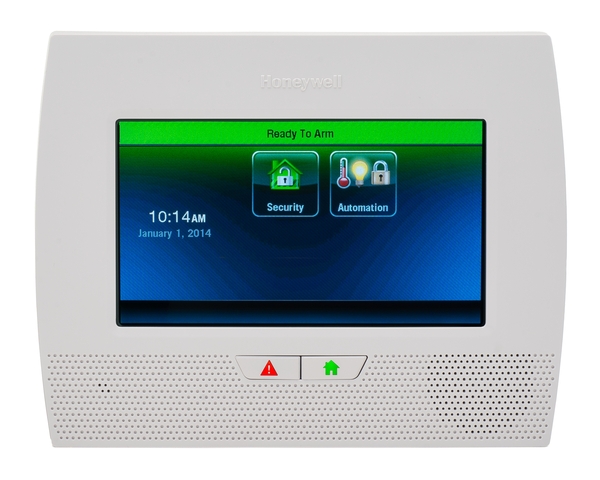
-
Mounting the controller. When you first get the panel you will want to open the casing. To do this, depress the two tabs located on the top of the panel and then pop open the front casing. Now you will separate the two casings. The front casing will hang perpendicular to the back, you will see that the hooks that hold the two casings together have an opening where you can push the top casing to unhook the panels. Now you will feed your wire through the openings in the back casing. You will now mount the back plating to your wall, make sure you mark where you will drill in screws on the wall with a pencil. Align the holes on the back plate with the marks you created. Drill the panel into place and verify it is snug and secure. Reattach the front case and then we will begin attaching the wires to the panel.
-
Wiring. The simplest option for wiring is installing the panel close enough to an outlet so you can externally feed the wire from the transformer to the panel. It is recommended that you have an LT-Cable for easy installation. You can also feed the wire though the wall if you wanted a more professional look. You will need to loosen the screw contacts on the transformer and feed in the wire ends into the proper ports, tighten the screws down to hold the wire in place. Now that the wire is secured into the transformer, run the wire to the panel. Make sure you observe polarity when attaching the wires to the panel. Negative will go to GND port and positive will go to the HWZ1 port. If you have the LT-Cable you can simply plug in the male end of the barrel connector into the female port on the panel. Do not plug in the transformer just yet
-
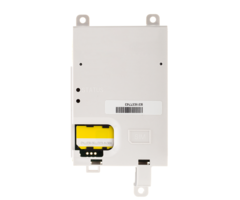
Installing Communicator. Install any communicator modules you may have. A L5100-WIFI module gets installed underneath the speaker on the right side of the panel. Simply match up the black port on the chip with the golden connector on the panel and push the two together until the golden chip is all the way into the black port. The process is similar if you were to install a L5100-ZWAVE module on the left side of the panel, simply match the black port to the golden chip on the panel and push the two together. A Honeywell 3GL will be installed on the left side of the panel as well, but instead of attaching it to the side of the panel, you will see a black port protruding upward from the panel. Align the protruding chip on the 3GL with the port on the panel and push the 3GL into place. Then secure the communicator with screws into the proper ports.
-
Installing the battery. You will insert the battery into the back casing, there will be an open slot on the right hand side. Secure the battery in place by placing and screwing in the provided retainer. Feed the wire from the battery through the holder clips and attach the end of the wire into the proper port, being either two pin or three pin depending on the capacity of the battery.
-
Programming. After you have attached the battery, close the panel and plug the transformer into an outlet to give power to the system. Your next step is going to be programming your compatible devices to the system. Programming is very simple for the L7000, Alarm Grid has plenty of videos and written material that go step-by-step on how to program the L7000.
Ideally you want to install and program all your sensors before the activation of your service. You can install your sensors first by physically mounting them. Then they can be auto-enrolled into programming one at a time when you are in the serial number field in zone programming. Feel free to use our videos to get familiar with the general process. After you do one or two sensors you will be whiz!
- Registration. Now you will need to register the panel with a Honeywell certified alarm company. They will require the MAC and MAC CRC addresses from the communication modules you installed. You can locate these in programming by going to Comm Diagnostics and pressing the down key followed by "Communication ID Numbers." You can send a screenshot of this or just document them and email them over to your alarm company. Be sure to check out our no contract monitoring plans if you are not already under contract with a monitoring provider.
Did you find this answer useful?
We offer alarm monitoring as low as $10 / month
Click Here to Learn MoreRelated Products

Honeywell 3GL
AT&T Cellular Communicator for the L5200, L5210 & L7000

Honeywell LT-CABLE
Universal Security System Power Supply Cable
List Price:
$24.00
Our Price:
$22.99
Related Categories
- Answered