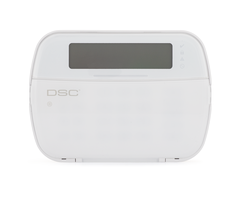
How Do I Add a Wired Alphanumeric Keypad to a DSC PowerSeries NEO?
You can add a wired alphanumeric keypad to a DSC PowerSeries NEO by powering down the panel, wiring the keypad, powering the panel back on, enrolling the keypad with the system, and assigning it to a partition. There are multiple wired alphanumeric keypad options for the PowerSeries NEO.

When choosing the first keypad for a DSC PowerSeries NEO, you will want to go with an alphanumeric keypad. This keypad can then serve as a base for programming the rest of the system. Even if you want to add a touchscreen keypad to serve as the main controller for the NEO, you will still need a regular alpha keypad to set up. With that in mind, the initial keypad for a DSC PowerSeries NEO is almost always an alphanumeric touchpad keypad.
Most DSC PowerSeries NEO Systems can support a maximum of eight (8) keypads. However, the 128-zone DSC HS2128NK PowerSeries NEO can support a maximum of (16) keypads. Keep this in mind before attempting to add a new keypad to the system. There is no way to exceed the NEO System keypad device limitations.
There are technically a few different alphanumeric keypad options available for a DSC PowerSeries NEO. If you are truly starting from scratch, then the DSC HS2LCDRF9 N is generally the go-to first option. This keypad includes a built-in PowerG Transceiver. By adding it to your system, you will be able to enroll PowerG Wireless Sensors with your PowerSeries NEO. This will give you lots of flexibility in expanding upon your system.
Remember though that you only need one PowerG Transceiver in most situations. After you add an initial keypad PowerG support, then your subsequent keypads can just be DSC HS2LCD N Keypads. These are the same as the DSC HS2LCDRF9 N, except that they lack the PowerG Transceiver. These are also great to use if your NEO System already has a standalone transceiver module, the DSC HSM2HOST9. You might also consider the DSC HS2LCDP N, which is the same as the DSC HS2LCD N, but with added proximity tag support.
All three (3) of the wired alphanumeric keypads for the NEO (HS2LCD N, HS2LCDP N, and HS2LCDRF9 N) are enrolled in the same manner. You must power down the panel when connecting the new hardware. Once you are finished wiring, the keypad should power on when you apply panel power. The keypad must be enrolled with the system and assigned a Keypad Slot. The initial keypad will allow you to press any key for quick enrollment. Subsequent keypads must enrolled within programming. You will also want to assign keypads to partitions.
Please note that you will want to be aware of any power limitations when setting up new keypads for your DSC PowerSeries NEO System. If the new keypad will exceed the maximum allowed power for your panel, then an external power supply will be required. The recommended power supply for the DSC PowerSeries NEO System is the DSC HSM2300, which provides up to 1.0A of additional current. For this FAQ, we will assume that no external power supply is being used.
Complete the following steps to add a wired alphanumeric keypad to a DSC PowerSeries NEO System:
1. Power down the panel. The panel must be powered down before making hardware changes. Disconnect the system's backup battery and unplug its transformer to power down.
2. Wire the keypad. In order to wire the keypad, you must open it up. Use a small flathead screwdriver to push in the two (2) tabs at the bottom on the keypad on the front. You can then separate the main keypad from its back plate.
The use of 18-gauge or 22-gauge 4-conductor stranded wire is recommended. You will need a small flathead screwdriver to secure the connections. Normally, you will connect the Red wire to R, the Black wire to B, the Yellow wire to Y, and the Green wire to G. However, color doesn't matter, as long as the connection go to the proper location on the panel. If your wire has White wire instead of Yellow wire, then connect the White wire to Y in its place. Make sure the connections are nice and secure, but not overly tight.

Take the other end of the wire, and run it through both the keypad back plate and the back of the panel's metal enclosure. This way, you can close both the keypad and the panel. The Red wire should connect at RED, the Black wire at BLK, the Yellow/White wire at YEL, and the Green wire at GRN. Again, make sure the connections are nice and secure, without being overly tight. You can close the keypad when finished. Note that our NEO Panel shown below has two (2) keypads connected.

3. Power on the panel. You can now power the panel back on. Connect the AC transformer first, followed by the backup battery. The new keypad should light up, indicating that it is successfully receiving power from the panel.
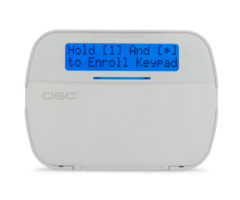
4. Enroll the keypad. If you are setting up an initial keypad with the NEO System, then the message "Press Any Key to Enroll" will appear on the keypad. In that case, just press a key on the keypad, and the device will automatically be assigned to Keypad Slot 1.
Additional keypads will need to be enrolled using the system's primary keypad. We recommend performing an auto-enrollment to add new keypads. From the main keypad, enter [*] + [8] + [Installer Code]. Remember that the default Installer Code is 5555. Then enter [902] to access the System Enrollment Mode Menu. You can confirm the default selection of [000] for auto-enrollment. Press [*] to confirm. Any new keypads should be automatically assigned to open Keypad Slots on the system. You can repeatedly press the [#] key to return to the main screen.
If you want to change the slot assignment for a keypad, re-enter programming, and then enter the [902] System Enrollment Mode Menu. Enter [003] or use the arrow keys (< & >) to scroll to that selection for "Edit Module Slot". Press the [*] key to confirm that selection. Use the arrow keys (< & >) to scroll between different enrolled keypads.
Each keypad will be identified by its Serial Number (SN), so make sure to check the SN for the displayed keypad if you aren't sure which keypad you are working with. Once the appropriate keypad is displayed, enter in the desired two-digit slot number to assign to the keypad. Remember, available slot numbers are 01 thru 16, though you may be limited to a maximum of eight (8) keypads, depending on the NEO System you are using. Each Keypad Slot should only have one (1) keypad. Repeatedly press the [#] key to save any changes and return to the main screen.
5. Assign keypad partitions. To assign keypad partitions, start by entering programming with the command [*] + [8] + [Installer Code], with the default Installer Code being 5555. You must then enter the corresponding Programming Field for the Keypad Slot you want to adjust. These are Programming Fields [861] thru [876]. Keypad Slot 01 is Programming Field [861], Keypad Slot 02 is Programming Field [862], etc., all the way up to Keypad Slot 16 being Programming Field [876].
After entering the appropriate Programming Field for the Keypad Slot you want to adjust, confirm the selection of [000] for "Kypd Part. Mask" by entering the [*] key. You can then use the arrow keys (< & >) to scroll between the different Partition Number selections. You can also manually enter the two-digit Partition Number for the partition that you want to assign to the keypad. Partitions 01 thru 08 will be displayed. But remember, depending on the DSC PowerSeries NEO System you are using, there will actually only be two (2), four (4), or eight (8) system partitions. Press the [*] key to confirm the partition selection once the desired Partition Number is displayed on the screen. You can then repeatedly press the [#] key to save the changes and return to the main keypad screen.
If you want to use a keypad to control multiple system partitions, then it must be assigned as a Global Keypad. This will allow it to control every system partition. You can set a keypad as a Global Keypad by assigning it a Partition Number selection of [00]. If that is the desired option, then press [*] at the selection to confirm. Then repeatedly press the [#] key to return to the main screen. Any confirmed selections will be automatically saved. Please note that if you only intend on using one (1) partition with the system, then you should assign any keypads to that partition, rather than assigning them as "Global Keypads".

Did you find this answer useful?
We offer alarm monitoring as low as $10 / month
Click Here to Learn MoreRelated Products
Related Videos

Related Categories
- Answered