How Do I Add Another Keypad to a PROA7 or PROA7PLUS?
Both PROA7 and PROA7PLUS panels support the PROSIXLCDKP due to their inherent support of the PROSIX wireless protocol. The PROWLTOUCH requires a WIFI connection. So to support it, a PROA7 will need a PROWIFI or PROWIFIZW to be added first. The PROA7PLUS comes with the PROWIFIZW pre-installed.
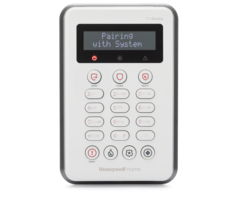
Honeywell Home PROSIXLCDKP (Left) and Resideo PROWLTOUCHC (Right)


The PROSeries panels from Resideo and Honeywell Home are a group of panels that include the Honeywell Home PROA7 and PROA7PLUS, and the Resideo PROA7C and PROA7PLUSC. The PROA7 and PROA7C are practically identical, and the PROA7PLUS and PROA7PLUSC are practically identical. The only exception is that the Resideo panels are branded as such, and the Honeywell Home panels carry the Honeywell Home brand name. You can read more about that here.
Because the only differences are in the branding, anything we say about the Honeywell Home PROA7 will also be true of the Resideo PROA7C. And anything we say here about the Honeywell Home PROA7PLUS will be true of the Resideo PROA7PLUSC. You can review a feature comparison between the PLUS and NON-PLUS panel versions in this article.
Adding a Honeywell Home PROSIXLCDKP or Resideo PROSIXLCDKPC to a PROSeries Panel:
All versions of the above-referenced PROSeries panels can support the use of the Honeywell Home PROSIXLCDKP or the Resideo PROSIXLCDKPC (both will be referred to as PROSIXLCDKP throughout the remainder of this FAQ). Again, the only difference between these two keypads is the branding on the front. The reason all panel versions support this keypad is that it communicates with the panel using the PROSIX RF protocol. All versions of the panel can support this protocol straight out of the box. Each panel can support up to eight (8) PROSIXLCDKP keypads.
To pair a PROSIXLCDKP to a PROSeries panel, perform the following steps:
-
Choose a mounting option. The PROSIXLCDKP keypads can either be wall-mounted or desk-mounted. A plate for wall mounting comes included with the keypad. If you choose the desk mount option, the desk mount kit is sold separately. Included in this kit is an 8' (2.4m) plug-in power cord with a barrel connector at the keypad end. The transmitting range for the PROSIXLCDKP keypads is approximately 300' (91.4m). If you must use a custom length of wire for the DC power adapter, please adhere to the wire length limits that are listed below:
- #22 AWG - Up to 19' (5.8m)
- #20 AWG - Up to 30' (9m)
- #18 AWG - Up to 51' (15.5m)
- #16 AWG - Up to 75' (23m)
-
Connect the battery. Before you can mount the keypad using either mounting option, you'll need to unscrew the set screw and separate the front of the keypad from the back plate. Then plug in the included battery. The battery connector can only be plugged in using the proper orientation. This prevents a user from reversing polarity on the battery and damaging the unit. Once the battery is plugged in, seat the battery in the provided space. Proceed to mount the keypad using either the wall mount or the desk mount instructions.

-
Pair the keypad. When the keypad first powers up, it will automatically attempt to pair with a panel. For this reason, it is easiest to begin the pairing process on the panel, and then plug in the keypad's transformer to power it on for the first time. To enter pairing mode from the panel's keypad click the menu icon in the bottom-center of the screen (≡) then scroll down to Tools > Enter Installer Code (4112 by default) > Programming > Peripherals > Add (+). This puts the panel into pairing mode. It is now listening for any PROSIX or SIX RF devices that are attempting to pair.

Plug in the DC power adapter for the PROSIXLCDKP. This will power on the keypad and it should immediately attempt to pair with the panel. If not, pressing any key on the keypad should begin the process. If pairing is successful, the keypad will display "Paired with System". Then it will display "Waiting for Status Update" and this message will remain until the panel exits programming mode. Only then can it send the current panel status to the keypad. - Exit programming mode. At the panel, repeatedly press the back arrow (< ) located on the upper-left side of the screen until it displays "Exiting Programming Mode". You can press the Shield Icon in the lower right to return to the home screen or press the back arrow (<) once more. The PROSIXLCDKP should retrieve the system status and display current panel and zone information.


Important Note: The wireless connection between the PROSIXLCDKP and the panel is always supervised, regardless of which panel version you have. Each keypad that is added will be assigned a supervision zone in the 800-zone range. If the panel loses connection to the keypad for 15 minutes, it will indicate a trouble condition on the corresponding keypad zone. The trouble won't clear until the panel hears from the keypad again.
Adding a Honeywell Home PROWLTOUCH or Resideo PROWLTOUCHC to a PROSeries Panel:
The earliest versions of the PROSeries panels required WIFI in order to add a touchscreen keypad. In later versions (firmware version 03.1297.50.0+), the option to pair a touchscreen keypad with the panel via Access Point Mode was added. However, in either case, the panel must have the WIFI card installed.
The PLUS versions of these panels come from the factory with a PROWIFIZW card installed. This allows them to support both WIFI and Z-Wave Plus. For the PROA7 and PROA7C, the ability to support WIFI will need to be added via either a PROWIFI (WIFI-Only) or a PROWIFIZW (WIFI and Z-Wave).
The ability to connect a PROWLTOUCH using Access Point Mode is helpful for systems installed in places where there is no WIFI, but a secondary keypad is desired. For the purpose of this FAQ, we will only be covering how to add the PROWLTOUCH keypad using WIFI. There will be a separate FAQ regarding how to add the PROWLTOUCH to the panel using Access Point Mode.
Once your panel can support WIFI and has been connected to WIFI, follow these steps to add a touchscreen keypad:
-
Determine mounting option. The PROWLTOUCH and PROWLTOUCHC (hereinafter referred to collectively as PROWLTOUCH for this FAQ) can be wall-mounted or desk-mounted. Out of the box, the PROWLTOUCH offers a kickstand, which allows it to be propped at a comfortable angle on a desk or counter.

To wall mount the keypad, you'll need to purchase the PROWLTOUCHWM (shown above), wall mounting kit. This kit provides a neat and clean installation where the power wire can be fished through the wall and hidden from view. In addition, once it's mounted and the battery has had a chance to charge, the touchscreen keypad can easily be removed from the wall mount, carried around the home or business as necessary, and then returned to the wall mount to continue charging the battery.
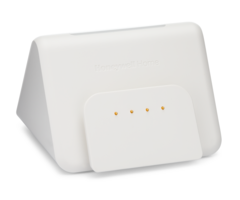
For a similar experience, but in a desk-mounted PROWLTOUCH, you can purchase the PROWLTOUCHDM. The desk mount stand acts like a charging station, similar to the wall mount. The power cord plugs into the back of the stand, and the touchscreen keypad then slides down over the charging points on the front of the unit. This allows the keypad's battery to remain charged. But, if you need to go mobile with the PROWLTOUCH you can easily do so. When you're finished, simply return it to the charging stand. -
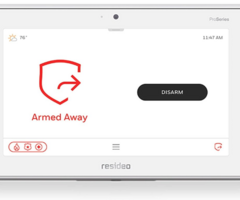
Join keypad to WIFI When you power up the PROWLTOUCH it will immediately want to pair with the panel. When you click "Pair to Panel" you'll be taken to the screen where you can join WIFI. You have the option to scan for networks, add your network information manually, or use WPS. We will show the method of scanning for available networks. Tap the line that says "Wi-Fi Networks" then tap your network SSID once the list populates:


Once you've selected your network SSID, you'll be taken to the screen where you can enter the proper password. Then click "Connect." Remember that network passwords are case-sensitive.
-
Pair Keypad to Panel. Once the PROWLTOUCH has been joined to the same WIFI network as the PROSeries panel, you're ready to pair them together. At the panel tap the Menu icon (≡) then scroll down, tap "Tools" > Enter the Installer code (4112 is the default) > Programming > Peripherals. Tap the Add (+) icon in the upper right.

On the "Add A Peripheral" screen, tap the option to "Add WiFi Touchscreen." You will see an SSID and Password displayed. This is used in Access Point Mode only. Just ignore that information for now, but leave the panel on this screen while you complete pairing on the PROWLTOUCH.
On the PROWLTOUCH, you may need to press the "Pair to Panel" button. The keypad will begin attempting to pair with the panel. It will acquire the control panel's IP address. It may also go through an optimization process.
Finally, you'll be asked to enter either the Installer Code (default 4112) or the Master Code (default 1234) into the PROWLTOUCH keypad. Once you enter a valid code, the PROWLTOUCH will retrieve panel status.
Back at the panel, note the supervision zone number assigned to the PROWLTOUCH. Supervision of these keypads is optional and is enabled via programming of the supervision zone. On the screen shown below, you can scroll down and toggle the supervision option ON or OFF.
The supervision option for these panels was made available in firmware version 03. If supervision is enabled, then the zone number displayed here is the one that will be used to notify you and the central station, if monitored, that there is an issue with the PROWLTOUCH keypad. You can also enter a Zone Description that will help you to determine which keypad this is if you have multiple keypads. Be sure to click "Save" before leaving this screen.
The supervision interval is 24-Hours and can't be changed. If the panel doesn't communicate with the PROWLTOUCH keypad for 24-Hours straight, it will display a trouble condition on the corresponding zone number (if enabled). The keypad itself will show a black screen with a message "Please Standby" and will attempt to reconnect to the panel.
To enable or disable supervision after the PROWLTOUCH keypad has initially been added to the system, press Menu (≡) > Tools > Enter Installer Code (default is 4112) > Programming > Peripherals > Tap the appropriate keypad zone to edit. You'll need to scroll down the page to see the Supervision Option. The screenshot below shows Supervision ON. You can easily toggle it OFF by sliding the switch from right to left.


Did you find this answer useful?
We offer alarm monitoring as low as $10 / month
Click Here to Learn MoreRelated Products


Related Videos

- Answered
- Answered By
- Julia Ross