How Do I Install a Honeywell Home PROTAKEOVER in a PROA7PLUS?

You can install a Honeywell Home PROTAKEOVER in a PROA7PLUS by opening up the panel and powering it down, removing its side cover, setting the PROTAKEOVER dial, inserting the unit, applying its set screw, reconnecting the battery pack, and applying the panel to the new PROTAKEOVER backplate*.

The Honeywell Home PROTAKEOVER is a legacy wireless receiver for the PROSeries Alarm Panels. Adding this module allows the system to support non-encrypted wireless sensors from one (1) of five (5) selectable legacy frequencies. The legacy frequency that is supported is chosen by setting a dial on the PROTAKEOVER Module itself.
Installing this module is the only way to unlock the (123) legacy zones on the PROSeries System. Without the module, you can only use the (127) encrypted zones, which are occupied by Honeywell Home and Resideo PROSIX Sensors and the Honeywell SiX Series Sensors. The (123) legacy zones and the (127) encrypted zones combine to give a PROSeries System its total (250) zones. Please note that each of the (250) zones can technically be used as either a legacy zone or as an encrypted zone.
Important Note: The Encore FF345 can be used with the Honeywell Home PROA7 or PROA7PLUS or the Resideo PROA7C or PROA7PLUSC when a PROTAKEOVER module is installed. The PROTAKEOVER must be set to use Honeywell sensors (Dial set to 0).
A new sensor, legacy or encrypted, is assigned the lowest available Zone Number. Depending on the order in which you enroll your sensors, any sensor can be assigned any Zone Number. The only rule is that you can never exceed (123) legacy zones or (127) encrypted zones.
The steps in this FAQ are written with the Honeywell Home PROA7PLUS System in mind. However, these steps can also be used for a Resideo PROA7PLUSC, a Honeywell Home PROA7, or a Resideo PROA7C. The four (4) aforementioned alarm panels are known as the PROSeries Systems.
One extremely important note is that the original stock backplate that comes with a PROSeries System must be replaced when a PROTAKEOVER Module is installed. The PROTAKEOVER comes with its own backplate that you must use in place of the original panel backplate. The reason why you must use the new PROTAKEOVER backplate is that its backplate has an integrated antenna that is used with the PROTAKEOVER Module. Without this antenna, the PROTAKEOVER will have virtually no useful range.
Two (2) metal prongs on the PROTAKEOVER Module make direct contact with the integrated antenna when everything is properly fitted. The PROTAKEOVER backplate fits all four (4) of the PROSeries Alarm Panels. When setting up the new backplate, you should remove the blue integrated power terminals from the original backplate, and apply them to the new PROTAKEOVER backplate. This will provide AC power to the ProSeries Panel when it is connected to the backplate.
In the picture shown below, you can see both the original stock backplate for a PROSeries Panel and the PROTAKEOVER backplate. The stock backplate is shown on the top, and the PROTAKEOVER backplate is on the bottom. Note how the PROTAKEOVER backplate has its black antenna running around the upper-left corner.
The basic layout of both backplates is the same. So, if you had the panel mounted using the original backplate, you should be able to unscrew the screws holding the original backplate in place, remove that backplate from the wall, and then use the same screws in the corresponding holes on the PROTAKEOVER backplate. Make sure to remove the blue power terminal block from the original backplate, and then reapply it to the corresponding spot on the new backplate when making the switch.


Complete the following steps to add a Honeywell Home PROTAKEOVER Module to a PROA7PLUS:
1. Remove panel AC power. The very first thing you should do, if the system is already setup with monitoring, is put your system on test with the monitoring company. This process is going to result in several signals being sent to central station for those customers who are already monitored.
Since this process will involve some minor re-wiring, you should drop AC power before beginning. Either unplug the system's transformer or turn off power at the circuit breaker. Alternatively, if you are using an LT-Cable, you can unplug the barrel connector and leave the two wires connected at the blue terminal block. You will get an AC power loss condition on the PROA7PLUS System. Just press the red button at the bottom that says "AC Power Loss" to stop the beeping. You can wait until after the installation is complete to acknowledge the trouble condition.
Please note that this step can be skipped if the system is brand-new and not powered on when you begin this process. You will provide power to the system towards the end of the process.
2. Remove bottom set screw. There should be a set screw at the bottom of the PROA7PLUS Panel. This set screw is what keeps the panel secured to the backplate. Use a Phillips head screwdriver to remove the set screw. Carefully place this set screw aside, and do not lose it. You will use this set screw later with the panel and its new backplate.
Please note that this step can be skipped if the system is brand-new and not secured to its backplate when you begin this process. You will not be using the original "stock" backplate that came with the system. Instead, you will be mounting the panel on the backplate that came included with the PROTAKEOVER. Make sure to account for the small set screw that secures the panel to its backplate.
3. Take panel off backplate. Grip the sides of the PROA7PLUS Panel, and, as carefully as possible, pull the panel off the backplate. You may need to do this in sections, as you go around the border of the panel and part by part get the panel off the original backplate. Once the panel has been removed, continue to the next step. Again, you will not need to do this if the panel is new and has not yet been secured to its backplate.
4. Disconnect panel backup battery. Unplug the PROA7PLUS backup battery connector from its port on the back of the panel. With both AC Power and backup battery power removed, the system should now be completely powered down. Carefully set the panel aside for now, as you will come back to it in a later step. Please note that if the system is new then it may have arrived without its battery connected. You will connect the battery later in the process. Just set the panel aside for now, as you do not need it at this time.
5. Take down stock backplate. If you had the panel mounted on its old "stock" backplate, then you will need to take that backplate off the wall. The original backplate should not be used with a PROTAKEOVER Module. Use a Phillips head screwdriver to remove all the screws holding the backplate in place. Note the location of these screws, as you will be reusing them in the corresponding locations on the new PROTAKEOVER backplate. The screw holes in the wall will help you if you forget where the screws were used before. Carefully set the screws aside for later use.
If you are not dismounting an old backplate, and you are instead mounting the PROTAKEOVER backplate as the system's initial backplate, then you can instead hold the backplate against the wall in the desired location, and mark the location of three (3) or four (4) holes where screws can be installed. You will be mounting the backplate later on in this process.
6. Disconnect the power wires. Assuming you are not working with an unmounted system, then at this time, the power wires are still connected to the terminal block on the stock backplate. Depending on how much "slack" there is from the power wires, you may not be able to take the backplate very far from the wall while these wires are attached. Use a small Phillips head screwdriver to disconnect the two (2) power wires from the blue terminal block. You may want to hold the cable as you undo the second connection, as you do not want the power wires to fall back into the hole in the wall. If necessary, use a small piece of tape to hold the wires in place temporarily so that they do not fall into the wall. Remember that you should not disconnect the wires until power has been dropped by following the process shown in Step 1 of this FAQ. Refer to that step if you still need to drop power. The stock backplate should now be fully loose. Keep it handy for the next step, as you need its blue terminal block. If you are just beginning to perform the installation and running wires for power, this FAQ may be of some assistance.
If you are using an LT-Cable, this process may be slightly easier. Pull the cable through the wall enough so that you can see the barrel connector that connects the short end of the LT-Cable (the end with the two pre-stripped wires as shown below) to the longer 8' section. As long as you can reach this portion of the wire, you can unplug the barrel connector. This will prevent the need for removing the wires from the blue terminal block before moving it to the new PROTAKEOVER backplate. Just be sure that the LT-Cable doesn't fall back behind the wall through the wiring hole. It is still recommended that you unplug the PROA7PLUS' transformer or turn off the breaker. This is so that when you begin putting things back together, you don't accidentally make a poor connection and cause damage to the panel.

If you are working with a new system, where power has not been set up yet, then just skip this step, as you will be applying power to the system later on.
7. Relocate power terminal block. Note the blue power terminal block on the original backplate. You need to move this terminal block from the original backplate, to the new PROTAKEOVER backplate. Start by very carefully "prying" the terminal block off the original backplate. You are now totally done with the original backplate. You can store it somewhere safe, as you will no longer be using it. Now take the terminal block, and apply it to the PROTAKEOVER backplate. It connects to the same spot on the new backplate as it did on the old one. It can be a bit tricky, but you should be able to get it so that it secures into place. When set up properly, the "V+" and "V-" marked ends on the blue terminal block should be facing towards the "+9V" and "GND" markings on the PROTAKEOVER backplate. You can reference the photo shown earlier in this FAQ, prior to the steps, if you need to see how to position the terminal block. Continue to the next step once the blue terminal block is properly fitted on the PROTAKEOVER backplate. Be careful not to bend any of the plastic parts too far, otherwise it may not return to its normal position, and the blue terminal block may not fit correctly.
8. Secure backplate to wall. Start by running the power cable through the opening on the backplate. This is directly above where the blue power terminal block was placed. Running the cable through this opening will make it possible to close the panel later on. Once the wire has been passed through the opening, you should then hold the backplate against the wall, and reapply the screws you set aside earlier, or apply screws for the first time if the system is new. The screws can go in the same corresponding places on the new backplate as they were on the old backplate, or they can go at the locations you marked in Step 5. When mounting, you want to get the backplate to press flat against the wall. Then, carefully connect the screws to secure the backplate. The use of four (4) screws is recommended, but you may be able to get away with three (3) if that's what you used with the original stock backplate.
9. Connect the power wires. With the blue terminal block fitted and the new backplate mounted to the wall, you can now connect the power wires, if you disconnected them earlier, or if you need to connect them for the first time. The wire should already be passed through the opening on the PROTAKEOVER backplate, directly above where the terminal block is secured. Note this in the picture shown earlier in this FAQ. Failing to run the wires through the opening and just bringing them in from the side will make it impossible to secure the panel to the backplate later on.
When connecting the wires, make sure the terminals are fully open. If not, use a Phillips head screwdriver to open them all the way. A counterclockwise turn opens a terminal, and a clockwise turn closes a terminal and secures its connected wire. Take one of the power wires, and insert it into the proper terminal. Remember, the red positive (+) wire should connect to the V+ terminal, and the black (-) negative wire should connect to the V- terminal. Once the wire is in the terminal, use a small Phillips head screwdriver to lock it into place. Give a gentle tug to check and make sure that the wire is secure. Then repeat for the other wire. Do NOT restore AC power by reconnecting the wires or by restoring the circuit breaker power at this time. You will not restore power until after the PROTAKEOVER has been installed. This will help prevent any damage to the panel when it is reconnected to the backplate later on.
If you are using the LT-Cable, you will have moved the blue terminal block without having to disconnect the wires. You can go ahead and complete the LT-Cable barrel connection at this time, as it will be impossible to do so after the panel has been mounted on the backplate. However, you do not want power being supplied to the terminal block at this time. Therefore, you should keep the transformer end of the cable disconnected from the outlet. If the other end has not yet been connected to the PROSeries Transformer, then you can connect it at this time. Remember to observe polarity by connecting the red wire to DC+ and the black wire to DC-. But do not plug the transformer into the outlet at this time. Again, you do not want to restore power until after the PROTAKEOVER Module has been installed. If the transformer is connected to the outlet, then you can just simply unplug it at this time to drop power. Alternatively, you may opt to have the transformer remain connected to the outlet, but instead drop power at the circuit breaker. Either way is acceptable and accomplishes the same thing. Do not continue if power is being supplied to the terminal block.
10. Remove panel slot cover. Now you can finally turn your attention to the PROA7PLUS Panel that you last interacted with way back in Step 4 when you disconnected its backup battery. Lay the panel facedown so that you are looking at the back of the unit. On your right-hand side, there should be a slot cover. Gently slide the slot cover to the right and remove it from the panel. See the removed slot cover in the following picture.

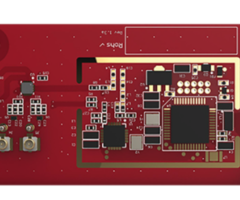
10. Set the PROTAKEOVER dial. Now turn your attention to the red PROTAKEOVER Module that you are going to install inside the PROA7PLUS or other PROSeries Panel. Take a small flathead screwdriver or another small object, and insert it into the indented arrow on the rotary dial on the PROTAKEOVER Module. Rotate the arrow so that it is facing towards the corresponding number for the legacy frequency that you want the system to support. Only one (1) legacy frequency can be chosen. You may think the dial will click when properly seated on each of the number options, but it will not. The only indication of the setting is the arrow as shown in the image below. The PROSeries Panels use numbers 0 thru 4 for this setting. Options 5 thru 9 are not used with the PROSeries Panel. The table below shows what each number represents.

|
PROTAKEOVER Setting |
Supported Frequency - Sensors |
| 0 |
345 MHz - Honeywell 5800 |
| 1 | 345 MHz - 2GIG |
| 2 | 433 MHz - DSC |
| 3 | 319.5 MHz - Qolsys, Interlogix, GE |
| 4 | 433.4 MHz - Bosch |
| 5 thru 9 | Not Used w/ PROSeries Panels |
11. Insert the PROTAKEOVER Module. Now you will insert the PROTAKEOVER Module into the PROA7PLUS Alarm Panel. When you do this, the side with the rotary dial should be facing toward you. The side you will insert is the opposite end from the gold antenna prongs sticking out from the right-hand side of the unit. This is also the opposite end away from the green terminal block on the PROTAKEOVER. You can also refer to the picture shown earlier in this FAQ. You will insert the unit into the slot in the upper-right corner of the PROA7PLUS. This is the part marked "Insert here" in the earlier picture. You should feel the unit slip into place as you insert it. When properly inserted, it should require gentle force to remove it from the panel if needed. Otherwise, it should remain nice and secure. You will help it remain even more secure by applying the PROTAKEOVER set screw. Note how when the unit is properly installed, its set screw slot nicely aligns with the corresponding screw slot on the PROA7PLUS Panel.
12. Apply PROTAKEOVER set screw. Locate the small set screw that came with the PROTAKEOVER Module. Insert it into the set screw slot on the PROTAKEOVER Module, and screw it (clockwise) into place. The set screw slot on the PROTAKEOVER Module should align with the corresponding screw slot on the panel when the unit has been properly installed. The picture below shows the set screw when it has been properly secured. It will prevent the PROTAKEOVER unit from being removed.

13. Reapply panel side cover. Reapply the side panel cover for the PROA7PLUS or other PROSeries System that you removed back in Step 10. The side cover should click nicely into place when properly secured.
14. Connect system backup battery. Take the wire leading from the panel backup battery, and plug the connector into the corresponding port on the panel. This is the same port that you disconnected the backup battery from back in Step 4, assuming the system had its battery connected. Gently tug on the wire to make sure that it has been fully secured. Note that the PROA7PLUS or other PROSeries System will not power back on until AC power is restored.
14. Apply panel to backplate. Now apply the PROA7PLUS or other PROSeries Panel to the PROTAKEOVER backplate that you mounted to the wall in Step 8. Go around the edges of the panel, and make sure that they all "click" securely onto the backplate. There should be no noticeable gaps between the backplate and the panel. Closing the panel properly is only possible if you routed the power wire through the opening of the backplate back in Step 8, rather than just running the wire in from the side. If you incorrectly ran the wire from the side, and not through the backplate opening, then the wire will get in the way when you go to close the panel. Make sure that all sides of the panel are secured on the backplate before continuing.
15. Secure panel set screw. Take the bottom set screw that you may have removed back in Step 2, and secure it to the bottom of the PROA7PLUS Panel or other PROSeries Panel. You will turn the screw clockwise to secure it. If the panel was mounted on its backplate correctly, then you should be able to insert the screw all the way into the panel.
16. Apply panel AC power. The panel is now connected to its backplate, which is where AC power is supplied to the system. But it won't be receiving AC power at this time. You should either plug the transformer into the wall outlet or restore power at the circuit breaker, depending on how you may have dropped power back in Step 1. You may have also dropped power back in Step 9 if you are using an LT-Cable, as you may have unplugged the transformer or dropped circuit breaker power after completing the barrel connection. Now that the PROTAKEOVER has been properly installed, it is safe to restore panel power. Additionally, if you are working with a new panel, then you will need to connect the other end of the wire to the transformer supplied with the panel, and then plug the transformer into an outlet.
The panel screen should light up as an indication that AC power has been applied. Once the alarm panel fully boots up, there should not be a tamper condition on the system. If there is a tamper condition, then it may means the panel was not fitted to the PROTAKEOVER backplate correctly. If no error is present, then you may begin attempting to enroll legacy sensors. If you are able to successfully auto-enroll legacy sensors from the corresponding frequency that you selected when rotating the PROTAKEOVER dial back in Step 10, then the PROTAKEOVER was properly installed.
Backplate Update: *As of late 2021, the backplate that comes with the PROTAKEOVER Module is now white rather than silver. The older silver backplate is shown in the above images.
Did you find this answer useful?
We offer alarm monitoring as low as $10 / month
Click Here to Learn MoreRelated Products


Related Videos

Related Categories
- Answered
- Answered By
- Julia Ross