How Do I Pair the 2GIG SP1 Keypad with the 2GIG GC3?
You can pair the 2GIG SP1 Keypad with the 2GIG GC3 by accessing the Keypads Menu of the GC3 System. The system must be running firmware version 3.1.0.5572 or higher. If it isn't, you will need to update the firmware first. Up to four (4) SP1 Keypads can be paired with the 2GIG GC3 System.
 Please note that the following instructions assume that the 2GIG GC3 System is running firmware version 3.1.0.5572 or higher. If the system is not running firmware version 3.1.0.5572 or higher, then the SP1 Keypad cannot be paired.
To check the panel's firmware, click on System Info and Usage from the main screen. Then choose System Info. The installed firmware version will be displayed. If you need to update the panel's firmware, click here. A monitored GC3 System can also be updated conveniently over the air (OTA) from Alarm.com. To do this, simply contact your alarm monitoring company, and tell them you would like to upgrade the firmware for your 2GIG GC3. Please note that there will be a small fee to update the firmware this way. Alarm Grid passes this fee directly to our customers, with no mark-up.
Complete the following steps to pair a 2GIG SP1 Keypad with the 2GIG GC3:
1. Access the Keypads Menu. Start from the main screen of the 2GIG GC3. Click the 2GIG logo in the top-right corner of the screen. Enter the system's Installer Code. The default Installer Code is 1561. This will enter the Installer Toolbox directly. Then choose System Configuration, followed by Keypads. This will take you into the Keypads Menu.
2. Enable the keypad. Choose one of the four keypad slots, and click the blue "Edit Keypad" button. For Keypad Used, choose "Enabled". For Equipment Code, choose "1060 - 2GIG SP1 Keypad". Then press the "Pair" button under Device ID. This will allow the SP1 Keypad to be paired with the System.
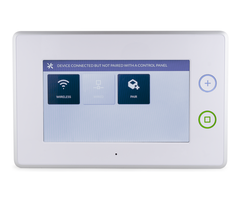
3. Pair the keypad. Power up the 2GIG SP1 Keypad, and connect it to the same WIFI network as the GC3 System. Both the GC3 and the SP1 can use either a 2.4 GHZ or a 5 GHz network connection. If the GC3 System needs to be connected with WIFI, please consult this FAQ. Then on the 2GIG SP1 Keypad, press the "Pair" button. The SP1 Keypad should pair with the 2GIG GC3 System.

4. Configure settings and exit. From the 2GIG GC3, configure the settings for the SP1 as desired. This is when the keypad can be given a name, and emergency buttons can be enabled or disabled. Once you have finished, press the blue "Back to Keypads" button. Then press "Return to System Configuration" in the top-right corner. Then press the blue return arrow on the left side of the screen. Press the green "Save" button to save the changes. Finally, press the return arrow on the left side of the screen. The changes will be saved, and the system will return to the home screen.

Did you find this answer useful?
We offer alarm monitoring as low as $10 / month
Click Here to Learn MoreRelated Products

Related Videos

Related Categories
- Answered