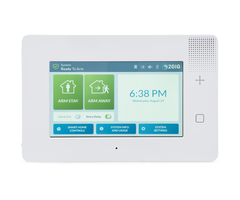
How Do I Pair the 2GIG SP1 with the 2GIG GC3e?
You can pair the 2GIG SP1 Keypad with the 2GIG GC3e by connecting both devices to the same WIFI network and completing the pairing process through the GC3e Keypads Menu. No firmware update should be needed on the GC3e to complete the process. Up to four (4) SP1 Keypads can be paired.

For this FAQ, we will assume that both the 2GIG GC3e and the 2GIG SP1 Keypad are already powered on. We will also assume that the 2GIG GC3e is already connected with a local WIFI network. Please note that it is also possible to pair a 2GIG SP1 with a 2GIG GC3e using Access Point (AP) Mode. However, that process will not be covered in this FAQ. For more information on using AP Mode, please see this FAQ, which, while written for the original 2GIG GC3, can also be applied to the GC3e.
Complete the following steps to pair a 2GIG SP1 with a 2GIG GC3e:
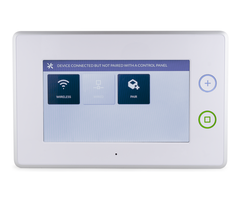
1. Connect SP1 to WIFI. On the default screen of the 2GIG SP1, choose Wireless. Scroll through the list of wireless networks to find the one used by the 2GIG GC3e, and then click on that network. Enter the network password, and click Next in the bottom-right. The SP1 will then connect to that network. Then press the return arrow on the left-hand side of the SP1 screen to be taken back to the the default screen.
2. Enter GC3e Keypads Menu. Now turn your attention to the 2GIG GC3e. From the main screen, click the 2GIG logo in the upper-right. Enter the system's Installer Code, which is 1561 by default. Choose System Configuration, followed by Keypads. You will now be in the GC3e Keypads Menu.
3. Configure the Keypad Zone. Choose one of the eight (8) Keypad Zones on the left-hand side of the screen. Although there are eight (8) Keypad Zones, only four (4) SP1 Keypads can be added to the system. Click on the desired zone to begin configuring that zone. The configurations are made on the right-hand side of the screen.
Make the following selections and inputs:
- Keypad Used: Set to Enabled
- Equipment Code: Set to 1060 - 2GIG SP1 Touchscreen
- Device ID: Click the blue Pair button. The GC3e should indicate that it is listening. Then, on the 2GIG SP1, click its Pair button on the default screen. The pairing process should complete successfully after a few moments, assuming the 2GIG GC3e and 2GIG SP1 are on the same WIFI network and within signal range. A Pairing Key and Serial Number should appear on the 2GIG SP1. You do not need this information, and no further action is needed on the SP1. You can turn your attention back to the GC3e. Do not click the Pair New button. You can go back to configuring the other settings.
- Smart Areas Assignment: This determines which Smart Area Partition will display trouble conditions affecting the SP1 Keypad, such as AC Power Loss or a Cover Tamper. You can still use the 2GIG SP1 to control any Smart Area, regardless of which one it is assigned. Choose based on which partition should display SP1 trouble conditions.
- Equipment Age: This has no effect. Set to New or Existing.
- Emergency Keys: Set to Enabled if you want to give the SP1 the ability to trigger an emergency panic.
- Voice Descriptor: This is used to set a name for the 2GIG SP1 Keypad for identification purposes. The 2GIG GC3e will speak out this name when it needs to acknowledge the SP1. This setting is optional.
4. Save changes and test. Once you have finished configuring the settings, click the Return to System Configuration button in the upper-right corner. Note how the Keypads option is orange, which indicates that you have made changes to the Keypad Settings. Press the return arrow on the left side of the screen. Click the green Save button to finish.
Now turn your attention to the 2GIG SP1. It should either display the same main screen as the 2GIG GC3e, or it should be at a loading screen. If it is at the loading screen, just wait a few minutes. It should load up with the same main screen as the GC3e. Once it does, try using it to arm and disarm the system. Any change in arming state should also appear on the GC3e. This indicates that the keypad is working properly.
Please note that the GC3e will only display Smart Areas if they are enabled on the GC3e. You can use that Smart Areas option to control any enabled partition for the GC3e, regardless of which partition you assigned the 2GIG SP1. The only requirement is that you have a valid user code for the Smart Area you want to control. Remember, the Smart Area assignment for the SP1 is only for determining which partition will display trouble conditions that directly affect the keypad.

Did you find this answer useful?
We offer alarm monitoring as low as $10 / month
Click Here to Learn MoreRelated Products
Related Videos

Related Categories
- Answered