How Do I Enroll a 2GIG SP1 or SP2 Keypad in AP Mode?
You can enroll a 2GIG SP1 or SP2 Keypad in AP Mode by first enabling the access point on the 2GIG GC3 System. Then, on the 2GIG SP1 or SP2, find the "2GIG GC3" option in the list of wireless networks. Enter in the Password and IP Address displayed on the GC3, and pair the wireless keypad.
 Pairing a 2GIG SP1 or SP2 Keypad in AP mode is a good idea when the area's local WIFI network is not strong enough to support a reliable connection between the system and the keypad. But keep in mind that by using AP mode on the GC3 System, it will no longer be able to utilize a WIFI connection. The GC3 System may not allow you to enable Access Point Mode until you disconnect the system from the local WIFI network. Alternatively, the system may also display the alert "Console: Broadband Network Failure", which indicates that its WIFI communication path with Alarm.com is not working. However, this is not of major concern, as the panel will still be able to communicate reliably through cellular.
Note: The 2GIG GC3 must be on firmware version 3.0.2 or higher to support the 2GIG SP2 and firmware version 3.1.0.5572 or higher to support the 2GIG SP1.
Complete the following steps to pair a 2GIG SP1 or SP2 Keypad in AP Mode:
1. Enable AP Mode. Start from the main screen of the 2GIG GC3 with the system disarmed. Click the 2GIG logo in the upper-right corner. Then enter in the Installer Code for the system (default is 1561). Then choose "Network Settings. Then choose "Access Point". Click the Enable button. Access Point Mode will now be enabled for the 2GIG GC3 System. Leave the GC3 System on this screen so that you can reference the information for the next step. Please note that you may be unable to enable Access Point Mode until you disconnect the system from the local WIFI network.

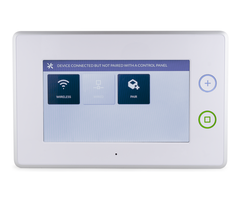
2. Connect to the GC3. Now that AP Mode is enabled from the 2GIG GC3 System, turn your attention to the 2GIG SP1 or SP2 Keypad. Upon powering up the keypad, you should be prompted to connect to a network. Look for the SSID that represents the GC3. By default, the SSID is "2GIG GC3". If you do not see the associated SSID for the GC3 System, try refreshing the network list. Then enter the Password and the IP Address that are currently displayed on the 2GIG GC3 Screen. Continue to the next step when you reach the "Enter the Pairing Key from the Master Panel" screen.


3. Pair the keypad. Press the return arrow on the left side of the GC3 Screen twice. This will take you back to the Installer Toolbox Menu. Then choose the option "System Pairing". Click the "Pair Device" button in the upper-right corner. The system will display "Listening for Devices to Pair". Then, very quickly, before it times out, click the blue check box in the bottom-right corner of the touchscreen keypad that is currently displayed on the SP1 or SP2. The system should display that the keypad has been successfully paired.


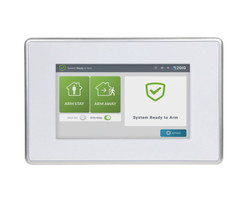
4. Exit the menu. The keypad will likely display the message "System Unavailable. Please Check Master Panel". This is to be expected, as the keypad will not be able to be controlled while the GC3 System is in programming mode. To gain functionality of the external keypad, simply return the GC3 System to its main screen. To do this, press the return arrow on the left side of the GC3 screen twice. The panel will return to its home screen. You will then be able to use the SP1 or SP2 Keypad.
Did you find this answer useful?
We offer alarm monitoring as low as $10 / month
Click Here to Learn MoreRelated Products

Related Videos


Related Categories
- Answered