How Do I Program a Honeywell SiXMINICT to the Lyric Security System?
As of April 15, 2026, Lyric panels can no longer be activated or remotely programmed using AlarmNet360. For full details, please read this notice.
You can program a Honeywell SiXMINICT to the Lyric Security System by putting the Lyric into its SiX Programming mode and then powering on the SiXMINICT sensor. This will tell the sensor to send a wireless enrollment signal to the alarm panel so that it can be paired with the system.
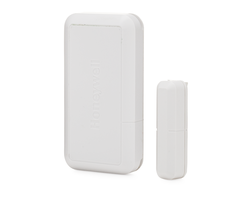
The Honeywell SiXMINICT is a wireless door and window sensor that is part of the Honeywell SiX Series Lineup. The sensor is built exclusively for use with the Honeywell Lyric Controller. This is a very small and compact surface-mount sensor, that is virtually unnoticeable when installed on a door or window frame. The sensor has a wireless range of about 200 nominal feet, and it uses 128-bit AES encryption for enhanced wireless security. The sensor is powered by a single lithium CR2450 coin battery.
Complete the following steps to program a Honeywell SiXMINICT to the Lyric Security System:
1. Enter SiX Programming. Start from the main screen of the Lyric. Select Security > Tools > enter Installer Code (default 4112) > Program > down arrow on right-hand side > SiX Programming.
2. Transmit enrollment signal. When you enter SiX Programming, you are putting the Lyric into a wireless enrollment mode where it listens for new sensors. To transmit an enrollment signal to the system, you simply need to power on the SiXMINICT. If the sensor is being used for the first time, then just remove the battery tab. If the battery tab has already been removed for prior enrollment, then open up the sensor to remove the battery and re-insert it. The SiXMINICT sensor should appear on the screen. If it isn't showing up, then try activating the device's tamper switch to force an enrollment signal to be sent. It can take up to thirty (30) seconds for the sensor to appear.

3. Configure zone settings. Have the newly added sensor highlighted blue in the SiX Programming Menu. Then click Edit in the lower-left corner. Click on the Edit button next to Reed Switch. This will take you to the screen where you can configure the settings for the wireless zone. You need to configure each setting properly so that the system responds properly when the sensor is faulted.

The Serial Number and Service fields can be left alone. Use the Zone Description fields to provide a name for the sensor. We recommend choosing a name that will will help you easily identify the sensor. Set the Device Type based on how you plan to use the sensor. Most users will set a Device Type of Door or Window. However, you may also select a Device Type of Other to gain access to a wider selection of Response Types.
The Response Type setting is very important, as this determines what action the system will take when the sensor is faulted. Entry/Exit Response Types are popular as they will put the system into its Exit Delay if the system if faulted while the system is Armed. You must then Disarm the system before the Exit Delay countdown expires, or an alarm will occur. Another popular Response Type for the SiXMINICT is Perimeter, which will trigger an immediate alarm if the sensor is faulted while the system is armed. Refer to this FAQ for a full list of Lyric System Response Types.
Alarm Report should be set to Yes if you want the system to transmit an alarm signal to AlarmNet when the sensor causes an alarm. AlarmNet then forwards the signal to a central station and/or Total Connect 2.0, depending on the user's alarm monitoring plan. Set the Chime if you want the panel to produce an audible tone when the sensor is faulted. For Supervision, choose Supervised if you want the system to require periodic check-in signals from the sensor. If Supervision is enabled, and the sensor is powered down or taken out of signal range, then you can get an RF Supervision Loss trouble condition on the panel. You can also press the down arrow on the right side of the screen to access the field for Supervision Check-In Time. If you don't want the system to supervise the sensor, then choose Unsupervised instead.
Click the Save button in the bottom-right corner once you have finished configuring the zone settings. You will then be taken back to the SiX Programming Screen, click Save in the bottom-right corner again to finish.
4. Return home. After clicking the save button, you can return to the Lyric home screen by repeatedly pressing the return arrow in the upper-right corner of the screen.
Did you find this answer useful?
We offer alarm monitoring as low as $10 / month
Click Here to Learn MoreRelated Videos

Related Categories
- Wireless Door Alarm Sensors
- Encrypted Door Alarm Sensors
- Wireless Door Alarm Sensors
- Encrypted Door Alarm Sensors
- Wireless Door Sensors and Window Alarm Sensors
- Wireless Door Sensors and Window Alarm Sensors
- Honeywell SiX Door Sensors and Window Sensors
- Answered