How Do I Use the Honeywell 5800C2W With a 2GIG GC2 or GC2e?
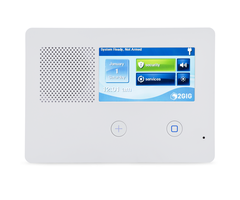
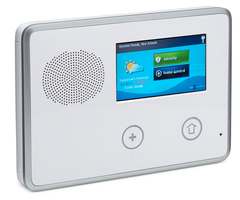
You can use the Honeywell 5800C2W with a 2GIG GC2 or GC2e by connecting hardwired sensors to the zone inputs on the 5800C2W, and then programming the connected sensors with the GC2 or GC2e. The hardwired sensors will be assigned to wireless zones on the GC2 or GC2e Security System.
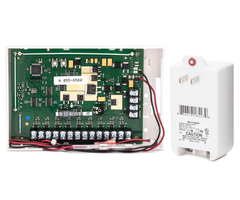
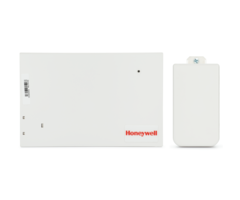
 As wireless security systems, the 2GIG GC2 and GC2e cannot readily support most hardwired sensors. You need to add a compatible wired to wireless converter first. An example of a compatible wired to wireless converter for the task is the Honeywell 5800C2W. Hardwired sensors will connect with the 5800C2W zone terminals, and the 5800C2W will then transmit wireless communication signals to the GC2 or GC2e Panel on behalf of these wired sensors. This way, the otherwise incompatible wired sensors can enroll with the GC2 or GC2e as wireless devices. It will be no different than if you were using regular 345 MHz wireless sensors with the system.
Just remember that there are only nine (9) wired zone terminal pairs on the 5800C2W unit. This means that each converter can only be used to set up a maximum of 9 wireless zones on your GC2 or GC2e System. if you have additional hardwired sensors beyond that, then you will need one or more additional 5800C2W units. You can use as many as you want, as long as each unit has its own power supply and backup battery, and you still have available wireless zones on the 2GIG GC2 or GC2e. One other important thing to keep in mind is that you cannot use any life-safety sensors with the 5800C2W under any circumstance. This includes all smoke detectors and carbon monoxide sensors.
Getting started with the Honeywell 5800C2W is a two (2) part process. First, you need to connect all of the existing wired sensors to the 5800C2W. Second, you must program the connected hardwired devices to wireless zones on the 2GIG GC2 or GC2e. We will cover both processes in separate sequences.
Complete the following steps to set up the wired sensors with the 5800C2W:
1. Mark the wires. The most important thing when bringing over existing hardwired sensors from an old wired alarm panel to the new 5800C2W is to always stay organized. Marking all the existing wires will help you in this regard. You may find that the wires are already labeled, in which case you can skip this step. Otherwise, you should mark the wires before getting started. To mark the wires, have one person go through the premises and fault all the wired sensors (e.g. open doors/windows, walk in front of motion sensors, etc.), and have another person watch the system keypad to see which zone number and/or zone descriptor is associated with each device. After obtaining this info, check the wiring diagram on the old panel, and map the zone numbers to the wires on the existing system zones. Then mark each wire accordingly so that you know the purpose of each one. Continue to the next step once all the wires are marked and you know where each one goes.
2. Power down old panel. Next you should drop power to the old alarm system. Remove both AC power and battery power so that the system powers down completely. Remove AC power by unplugging the system transformer, or by turning off the breaker that provides power to the system. Remove the positive (+) battery wire at the battery. Verify that the system is fully powered down before continuing. Keypads should be dark, and no LED lights on the system should be lit.
3. Replace panel with 5800C2W. With the zone wires all marked and the system powered down, you can now begin the process of transitioning to the 5800C2W. Disconnect all of the marked zone wires from the old panel. If the old panel was housed inside a metal or plastic enclosure, then there is a good chance that you can continue using it to house the 5800C2W Backup Battery. But you shouldn't install the 5800C2W inside of a metal enclosure, because doing so will disrupt wireless communication. You might also continue using the existing battery with the 5800C2W. You can do so if the panel's existing backup battery is a 12V 4Ah battery that is still properly charging. If the existing battery is more than a few years old and you need to purchase a new battery, then the UltraTech 1240 is a good option. You can mount the Honeywell 5800C2W unit right next to the enclosure, assuming you are using the enclosure to store the backup battery. Take each wired zone input from the old alarm panel, and connect it to a zone input on the 5800C2W.
If you haven't already, unplug the old panel's transformer from its outlet. Disconnect the old transformer's wires, and reconnect them to the 5800C2W Transformer, remembering to observe polarity as you do this. If the wires are color-coded, then red is for positive (+), and black is for negative (-). If the wires are not properly color-coded, then that's fine, just be very careful not to mix them up by mistake. Connect one of the wires you removed from the old transformer to positive (+) on the 5800C2W transformer. Then connect the other wire from the old transformer to negative (-) on the 5800C2W transformer. Make a note of which wire is connected to positive (+) and which is connected to negative (-). Disconnect the power wires from the existing wired panel. Determine which of the two power wires is currently connected to the 5800C2W transformer positive (+) terminal. Connect this wire to Terminal 1, as shown in the image below. This terminal is marked 15.5V IN. Connect the other power wire from the old hardwired panel to Terminal 2 on the 5800C2W module, as shown below. This terminal is marked GND. The other end of this wire should be connected to the 5800C2W transformer negative (-).

Remember that each 5800C2W unit can only support nine (9) zones. If you need support beyond that, then you can use one or more additional 5800C2W units as needed. Don't forget that each one will need its own power supply and backup battery. You cannot share power supplies and batteries between multiple 5800C2W units. Every active zone on the 5800C2W will need an End-of-Line Resistor (EOLR) ranging in value from 1k to 10k. The 5800C2W comes with nine (9) 2.2k ohm resistors (Red-Red-Red-Gold) for this purpose. If you need to wire in new resistors, then they should be wired in Series for Normally Closed (NC) sensors, or wired in Parallel for Normally Open (NO) sensors. If you have any 4-wire sensors that draw power, such as motion sensors and glass break detectors, then the power wires will go to the auxiliary terminals on the 5800C2W. These are labeled 12VAUX and GND.
4. Calibrate the 5800C2W. After you have wired everything, including all the zone wires and EOLRs, go through and make sure that all of the connected sensors are in their "normal" state. All doors and windows should be closed, and all motion sensors and glass breaks should not be detecting any activity. Once that is the case, you can then calibrate the unit. This is done by simply pressing and releasing the Zone Calibration Button (SW2) on the 5800C2W. When you do this, LED #1 will flash red briefly, before turning solid green to indicate a successful calibration. If you have any connected zone that isn't in its "normal" state (e.g. a door open, a motion sensor detecting movement, etc.), or any connected zone lacking an EOLR, then that zone won't be calibrated, and the 5800C2W will act as if that zone doesn't exist. In that case, you will need to recalibrate the entire unit. You can try again by putting every connected sensor into its "normal", non-faulted state, connecting an EOLR with every sensor, and then pressing and releasing the SW2 Calibration Button to perform the calibration.
 |
|
 |
With the 5800C2W and the connected sensors all set up, you must now enroll the zones to the GC2 or GC2e. Both systems follow the same programming process. For a complete overview of the process, check out our programming guide for the GC2, or check out this FAQ covering GC2e programming. The steps below provide a very basic overview of the process. Complete the following steps to program 5800C2W zones into a GC2 or GC2e:
1. Access System Configuration. Start from the main GC2 or GC2e screen. Click the 2GIG logo in the bottom-right. Enter the system's Installer Code, which is 1561 by default. Choose System Configuration. You are now in the System Configuration Menu.
2. Start programming a zone. Q1 of System Configuration is used for programming wireless zones. You will use a wireless zone with each 5800C2W zone. Wireless zone slots 1 thru 48 and 63 thru 74 are available for 5800C2W zones. You can use the left and right arrows to scroll between different zones, or you can enter the 2-digit Zone Number for the zone you want to program. Press the down arrow once the desired zone is in parenthesis in the white box under Q1. You will use the down arrow to go to the next programming option, or up to return to the previous one. Use the left and right arrows to scroll through available options, and press the down arrow to continue onward once the appropriate selection is made.
The first option is for Sensor Type. You can refer to this FAQ for a list of GC2 and GC2e Response Types. Then for Equipment Code, select an appropriate "existing" option for the sensor type (e.g. 0655 Existing door/window contact, 0609 Existing Motion detector, etc). Continue to the next step when you reach the selection for Serial Number.
3. Enroll the Serial Number. When you get to the option for "Enter RF Sensor Serial Number", press Shift, followed by Learn. The GC2 or GC2e will begin listening for a signal transmission. Fault (activate) the sensor you are trying to enroll, and then restore it. The system will display a Serial Number on the screen, based on the Serial Number for the 5800C2W unit itself. Press OK to enroll the Serial Number. You can then continue programming the zone. The 5800C2W will have a serial number sticker attached to it. If, for example, this serial number is 1234560, then the Zone 1 serial number will be 1234561, Zone 2 serial number will be 1234562, and so on.
4, Finish programming and repeat. Go through the rest of the programming options for the zone, and set them accordingly. Sensor Equipment Age has no impact on the zone, and you can set it to either option. For Loop Number, you should choose Loop 1 for all 5800C2W sensors. Other settings will vary depending upon the sensor in question, with Voice Descriptor serving as a "name" for the zone. Continue onward until you reach a summary screen. Press Edit Next if you have additional zones to program, and repeat the process for each sensor. Continue until you reach the summary screen for the final zone you need to program.

5. Save the changes. When you reach the final summary screen, choose Skip in the bottom-right. Then press End in the bottom-right. Make sure that the middle box at the bottom for "Save Changes" is marked, and then press Exit in the bottom-right. The system will reboot to apply the changes. All of the wired sensors should be enrolled.
6. Test your system. Make sure that your system is on test mode with the central station if your system is currently being monitored. This is to prevent any false alarms. Fault (activate) each newly enrolled sensor, and make sure the GC2 or GC2e System displays the corresponding zone faults. You can also reach a Walk Test Menu by clicking the 2GIG logo in the bottom-right corner of the main screen, entering the Installer Code (default 1561), and choosing Walk Test on the right-hand side. This menu will show which zones have been faulted, and which ones still need to be faulted for the test. The Walk Test Menu can be preferable to faulting each system zone blindly on the main screen, especially if you are working with a large number of system zones, or are working alone.
Did you find this answer useful?
We offer alarm monitoring as low as $10 / month
Click Here to Learn MoreRelated Products
Related Categories
- Answered