How Do I Add an Additional Keypad to a VISTA 20P?
You can add an additional keypad to a VISTA 20P by wiring it to the panel and assigning it an appropriate address. A keypad will connect with panel terminals 4 thru 7. A push-button keypad will use an address of 16 thru 23, while an AUI touchscreen keypad will use address 1, 2, 5 or 6.
Complete the following steps to add an additional keypad to a VISTA 20P:
1. Power down the panel. You should power down the panel before attempting to connect a new keypad. Start by disconnecting the backup battery. Then unplug the AC transformer. The system should power down, and all LED lights should turn off. Any existing keypads should go blank. This indicates that the system has been powered off.
NOTE: In some installations, one or more of the panel's keypads may be using an auxiliary power supply instead of using panel power. Keypads being powered in this way will not power down when the panel is powered down. Instead, after a few seconds, their display will begin to show "Open CKT" (Alpha Keypad), "OC" (Fixed Keypad), or "ECP Error" (AUI/Tuxedo Keypad).
2. Wire the keypad. The keypad will connect with the VISTA 20P using a four-wire connection. The keypad will use two wires for power (red and black) and two for data (green and yellow). An 18-gauge, 4-conductor is perfect for this process, but you can use a slightly smaller or larger gauge if that's what you have on-hand.
The black wire for negative power (-) should go to panel terminal 4. The red wire for positive power (+) should go to panel terminal 5. The green wire is for data in, and it should go to panel terminal 6. The yellow wire is for data out, and it should go to panel terminal 7.
NOTE: If the added keypad should get its power from an auxiliary power supply, the black wire should instead be connected to DC negative (-) on the power supply. Additionally, the red wire should then be connected to DC positive (+) on the power supply.
Next, connect the other end of the 4-conductor cable to the keypad itself. Remember to run the wire through the back of the keypad before completing the connections. You should check the instruction manual for the keypad regarding which keypad terminals to use. For a push-button keypad like a 6160 or a 6150, you will use terminals G, -, +, and Y. The touchscreen Tuxedo Touch and 6280 Keypads should have something similar. Make sure all the connections are nice and secure. You can then close the back of the keypad when finished.
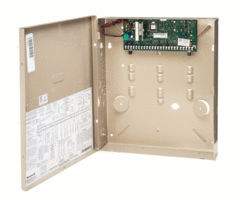
The diagram below shows the panel terminals to use:

3. Address the keypad. The keypad will need to be assigned an available keypad address. You can only have one keypad per address. Push-button keypads use addresses 16 thru 23, with the default keypad being assigned address 16. AUI keypads are assigned an AUI device address of 1, 2, 5 or 6. Remember, Total Connect 2.0 will take up one of the four available AUI slots. Be default, the TC2 device is set to address 2.
Power the system back on by reconnecting the transformer. You can reconnect the backup battery later. If the new keypad was wired correctly, it should power on. Go to your new keypad to start the addressing process. If you have a touch-button keypad, press and hold the [1] and [3] keys within 60 seconds of powering on. The existing address should be displayed, with the default address being 31. Enter in [00] to clear the address. Then enter the desired 2-digit address you want to use. Remember, a VISTA 20P will use an address of 16 thru 23 for a new push-button keypad. Since address 16 is generally used with the default keypad, you will most likely use an address of 17 thru 23. Enter in the appropriate 2-digit address, and then press the [*] key to continue.
If you have a touchscreen keypad, start from the main keypad screen. Choose Setup 


4. Enable the address. You must enable the address using your system's primary keypad. You cannot do this using the new keypad, since it isn't addressed yet. On your old keypad, enter the command [Installer Code] + [800] to access programming. Then enter the appropriate star programming field. All AUI devices are programmed through field [*189]. An AUI device will use address 1, 2, 5 or 6. As a result, a maximum of four AUI devices can be used with a Honeywell VISTA 20P System. The Total Connect 2.0 service will take up one of these slots.
Please Note: If you only have a single keypad on your system, and you intend to replace that single keypad with another keypad, then you would be better served by this FAQ.
When enabling AUI keypad addresses, the partition on which the keypad will be used is usually entered. However, there are special designations that can be enabled so that Total Connect 2.0 does not adhere to Auto-Stay arming logic. For example, to enable AUI keypad addresses 1, 2, and 5, with address 2 being enabled for Total Connect 2.0 make this entry while in programming: [*] 189 + 1, 5, 1, 0. This enables AUI address 1, and 5 for partition 1, and enables AUI address 2 for partition 1 with no Auto-Stay arming logic. In this entry, AUI address 6 remains disabled.
Addresses 17 thru 23 for push-button keypads are programmed using fields [*190] thru [*196] respectively. If you need help enabling the address, pages 16 and 17 of the VISTA Programming Guide may be able to help you. You may also refer to this FAQ on addressing a Honeywell Keypad for further information. Remember, the address should be enabled using your system's primary keypad. This is a system setting, and it should be configured using a keypad that is already working with the system.
NOTE: In the Vista-15P and Vista-20P panels, revision 10.23 or higher, all addresses 16 - 23 are enabled by default, with no additional panel programming required. The same is true of the Vista-21iP revision 4.21 or higher.
5. Test the keypad. Try using your new keypad to arm and disarm the system. If the new keypad can arm and disarm, then it was installed and programmed correctly. If it doesn't work, then there are a few things to do. First, you should try power cycling the panel to see if the keypad loads upon reboot. Second, check the address settings to make sure the keypad is assigned a proper address and that the associated panel address is enabled. Also, verify that no two devices are set to the same address. Lastly, check the wiring to make sure the power and data connections for the keypad are wired properly.
Did you find this answer useful?
We offer alarm monitoring as low as $10 / month
Click Here to Learn MoreRelated Products

Related Categories
- Answered