How Do I Install A 2GIG GC3?
Before actually mounting your 2GIG GC3 control panel and devices, it’s a good idea to plan the installation. Keep in mind the location where the panel should go and the requirements to install each device.
The 2GIG GC3 is a self contained wireless control panel that uses wireless devices. The devices send signals to the 2GIG GC3 panel via RF frequency so direct line of site should be kept in mind when deciding where to install the devices. Installing a device next to or in line of site to stainless steel appliances, mirrors and some electronic equipment can interfere with the devices RF signal. Glass Break detectors and Motion detectors require a certain height from floor to ceiling for best coverage (please refer to the device install instructions for proper installation requirements).
For the best protection coverage, all perimeter doors and windows should be protected along with installing interior motion detectors. A key element for protection is redundancy.
Once a plan has been established, the installation can take place.
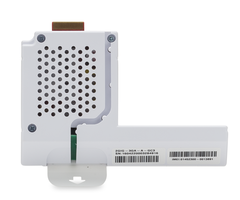
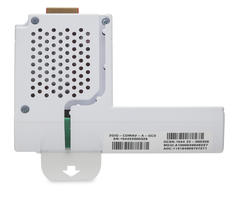
The 2GIG GC3 requires a cellular communicator to send signals to a central station and Alarm.com. Install the compatible cellular communicator. The compatibles cell units are the 2GIG CDMAV-A-GC3, Verizon, the 2GIG 3GA-A-GC3 , AT&T and the 2GIG 3GR-A-GC3, Rogers (Canada).
The cellular communicator inserts inside the panel. There is a hinged door on the side of the GC3 panel. Open the door, insert the cell communicator until it snaps, close the door.
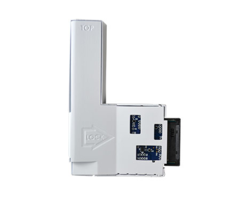
Remove the backplate of the GC3 panel by inserting a small flathead screwdriver. Mount the backplate using all four screws and anchors (included).
Users have the option to purchase a desk mount if not installing on a wall.
If installing any hardwired contacts (no hardwired smoke detectors or co detectors are compatible) run the wire from the contact location to the panel and run the wire through the hole in the backplate.
Install the battery backup and plug the pin into the battery connector located behind the DC power adapter barrel jack.
Install the GC3 panel to backplate and connect the panel to the transformer. Users can either run 2 conductor wire or use the 2GIG AC2 Plug or theLT Cable.
Plug in the transformer and power up the panel.
Mount and program your sensors.
Did you find this answer useful?
We offer alarm monitoring as low as $10 / month
Click Here to Learn MoreRelated Products


Related Categories
- Answered
- Answered By
- Connie Michael