How do I install a 4-wire smoke on my VISTA-P system?
There are 2 types of wired smoke detectors that can be used on the Vista-21IP, Vista-20P, Vista-15P panels, 2-wire, or 4-wire.
2-wire smokes are only supported on zone 1 of the panel, and the logic for resetting the smoke after an alarm is built in, and happens automatically on the 2nd disarm after an alarm on that zone.
4-wire smokes can be used on any hardwired zone other than zone 1. When a 4-wire smoke goes into alarm, it latches, and in order to reset it, power to the smoke has to be dropped for several seconds. On some older style panels, this was handled automatically by the panel, but on the P series panels, you must perform additional wiring and programming to make the reset happen. Fire reset logic works like this: If any zone programmed as fire, other than zone 1, has a short on the zone after an alarm with the first code and off sequence have been entered, the 2nd code and off sequence causes the output to activate for 2 seconds, dropping power and resetting the smokes.
The reset for a 4-wire smoke can be accomplished using an on-board trigger (panel version 2 or higher) or by using a programmable relay, such as the ones found on a 4229 or the 4204. We’re going to discuss, and show wiring for using the on-board trigger. This output, called Trigger 1, or Output 17, has 100 mA of current available, and can usually be used by itself to power up to two 4-wire smokes. If more than 2 4-wire smokes or more than 100 mA of current are needed, a relay would need to be used. Wire the smokes as shown in the diagram, and perform the following programming:
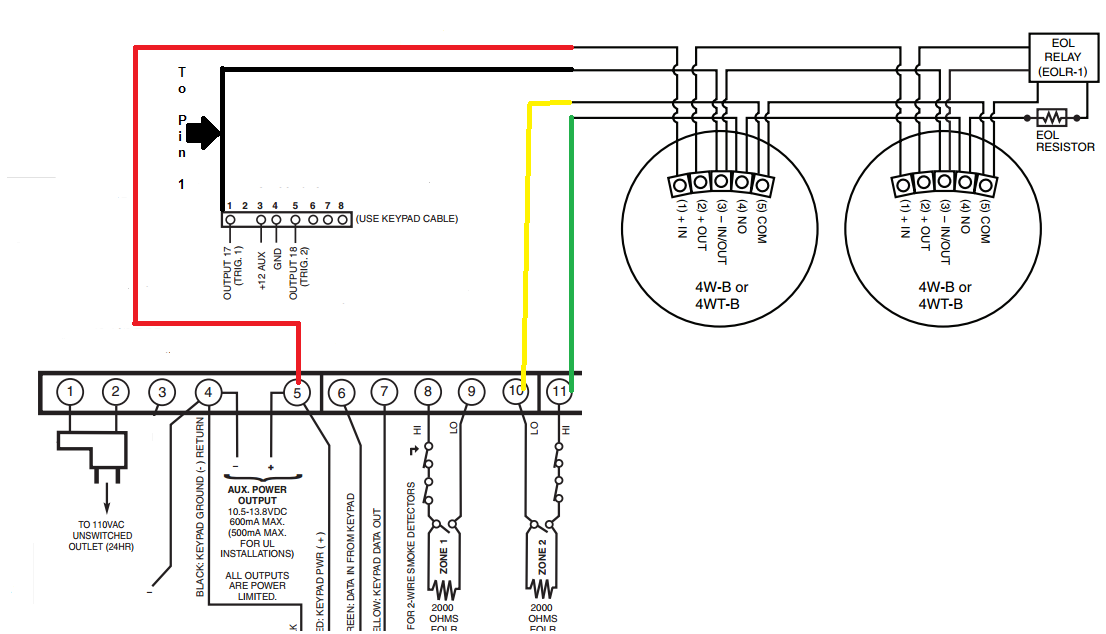
First, we must invert the trigger, so that in the normal, deactivated state it provides the power negative for the smokes:
- Enter program: [Installer Code] (default 4112) + [8] + [00]. Be sure to use an alpha display keypad, such as a 6160.
- Enter Output Mapping: Enter [*79], at the “Enter Output Number" prompt, enter [17], then [*].
- Invert Trigger 1, Output 17: At the “Output Norm Low” prompt, enter [1], then [*].
- Exit Output Mapping: Back at the “Enter Output Number” prompt enter [00].
Next, we program the trigger to "float" or remove the negative, for a Fire Reset:
- Enter Output Function Programming: Enter [*80], and at the “Output Funct #.” prompt, choose the next available output function number. If this is the first, enter [01], then [*]
- Continue through programming: You’ll see a summary screen, press [*] again.
- Enter the output trigger: At the “Activated By” prompt press [2], for “Zone Type” then [*].
- Enter the type output trigger type: At the “Enter Zn Type” prompt enter [54] “Fire Zn Reset”, then [*].
- Enter partition, if applicable: If prompted for partition, enter the partition number for the Fire Zone to be reset, or enter [0] for “All” then press [*].
- Specify which output is being used: At the “Enter Output No.” prompt, enter [17] then [*].
- Continue through programming: You’ll see another summary screen, showing your programming, press [*].
- Exit programming: Back at the “Output Funct #” prompt press [00], this will put you back in regular programming, and you can press [*99] to exit.
Did you find this answer useful?
We offer alarm monitoring as low as $10 / month
Click Here to Learn MoreRelated Products


Related Categories
- Answered
- Answered By
- Julia Ross