How Do I Install a Honeywell LTEM-XA or LTEM-XV On a VISTA-15P or 20P?
You can install a Honeywell LTEM-XA or LTEM-XV on a VISTA-15P or 20P by making the 4-wire connection between the communicator and the panel. You must also mount the module to either the wall or outside the metal enclosure for the VISTA Panel. Check cell signals before permanently mounting.

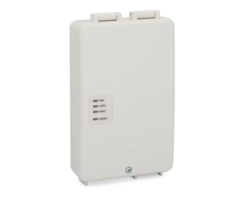
The Honeywell LTEM-XA and Honeywell LTEM-XV are both cellular communicators for Honeywell VISTA Systems that support ECP mode. They connect with highly advanced LTE Cat M1 Networks, with the LTEM-XA using AT&T LTE service and the LTEM-XV using Verizon LTE service. They replace the older Honeywell LTE-XA and Honeywell LTE-XV, respectively, as the new LTEM-X Communicators offer superior security and signal penetration. The setup for the LTEM-XA and LTEM-XV remains the same as their predecessors. By installing and activating one of these communicators, your VISTA Panel will be able to communicate with the Resideo AlarmNet Servers across a cellular network, and you will be able to use Total Connect 2.0 with your system, provided that access to the service is included in your alarm monitoring plan and supported by your alarm panel. Remember that the minimum firmware requirement to integrate with Total Connect 2.0 for a Honeywell VISTA-15P or 20P is 9.12. Alarm Grid sells PROM Chip upgrades for the 15P and for the 20P if needed. Please see this FAQ on identifying and replacing PROM Chips.
For this FAQ, we will be assuming that you are mounting the communicator outside the panel's metal enclosure. If you intend to mount the communicator to the wall, then you must run the 4-connector wire accordingly. Complete the following steps to install a Honeywell LTEM-XA or Honeywell LTEM-XV on a Honeywell VISTA-15P or VISTA-20P:
1. Test signal strength. Start by checking the signal strength for the communicator in the intended mounting area to see if it is a good location. You must power the unit either by using a 12V battery or by using power from the panel.
To use panel power, start by powering down the panel entirely by disconnecting both its transformer and its backup battery. From there, you want to connect the black wire from the communicator's harness to Panel Terminal 4. Also connect the red wire from the communicator's harness or Panel Terminal 5. There is no need to connect the yellow and green wires at this time. For instructions on how to make these connections, refer to Step 3 below. Next, power the panel back on by plugging in the transformer and reconnecting the battery. After a brief moment, the signal LED on the communicator should also come on. A solid green LED light indicates adequate signal strength. Otherwise, the signal is not adequate, and you can try mounting the communicator in a different location. If no area provides an adequate signal, then consider adding a cellular antenna or a cellular amplifier.

2. Mount the module. It is possible to mount the communicator to a wall by using zip-it anchors or wall anchors. But most users will mount the unit outside the panel's metal enclosure. To do this, start by knocking out the round indented hole in the enclosure's upper-right corner if you haven't done so already. The communicator will be mounted in this spot. A metal washer comes included for securing the communicator to the enclosure.

Next, you should secure the threaded plastic hole-cap to the communicator. The plastic hole-cap slides into the knock-out hole on the metal enclosure for the VISTA Panel. You can see the threaded plastic hole-cap in the picture below. The hole-cap should "snap" into place when being secured to the LTEM-XA or LTEM-XV.

With its plastic hole-cap secured, take the LTEM-XA or LTEM-XV, and insert it into the knock-out hole opening in the upper-right corner of the metal enclosure for the VISTA Alarm Panel. From there, use the provided metal washer to lock it into place. Keep in mind that the ECP wiring will also be passing through this opening. Refer to the diagram below.

3. Complete the connections. If your VISTA System isn't already powered down, then do that at this time. Disconnect its backup battery, and unplug its transformer to power down the system. Take the communicator's included wiring harness, and connect it to the port labeled ECP Cable in the above diagram. From there, pass the connecting wires through the hole-cap and down to the main VISTA Panel. The terminals you will use for connecting are VISTA Panel Terminals 4 thru 7. Make the following connections:
- Black wire at Terminal 4 for Negative (-) Power.
- Red Wire at Terminal 5 for Positive (+) Power.
- Green Wire at Terminal 6 for Data to Panel.
- Yellow Wire at Terminal 7 for Data to Communicator.

4. Activate for monitoring service. Power your VISTA System back on by plugging in its transformer first and then connecting its backup battery. Then have your alarm monitoring company activate the communicator for alarm monitoring service. You must provide both the MAC and CRC codes for the communicator. A white sticker on the inside of the communicator should provide this information.
If you signed up for service with Alarm Grid as a new customer, then you should have selected an activation appointment during sign-up. An activator will call you at that time to complete the activation. Please have all of the prior steps completed before your scheduled activation. Activation slots are available from 9am to 8pm ET Monday thru Friday, unless otherwise indicated.
For any existing Alarm Grid customer upgrading to LTE you can email us at support@alarmgrid.com to provide the new MAC and CRC and to request a time to complete the upgrade. The selected time must be during our regular support hours of 9am to 8pm ET M-F. We will do our best to accommodate you at your desired time, but we may work with you to set up a different time if that time is unavailable for any reason.
Did you find this answer useful?
We offer alarm monitoring as low as $10 / month
Click Here to Learn MoreRelated Products


Related Categories
- LTE Cellular Communicators
- Verizon LTE Cellular Communicators
- LTE Cellular Communicators
- AT&T LTE Cellular Communicators
- Answered