How Do I Install the XCVR3-GC3 to a 2GIG Edge?
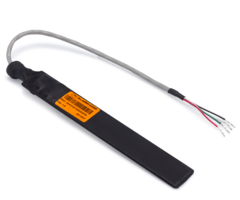
You install the XCVR3-GC3 to the 2GIG Edge by opening up the panel, powering down the system, and completing the 4-wire connection between the XCVR3-GC3 and the panel. The Black wire goes to GND, the Red wire goes to AUX+ (or DCOUT+), the White wire goes to TX, and the Green wire goes to RX.
![]()
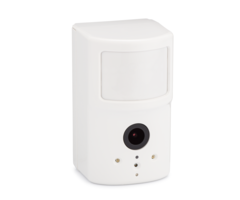
The 2GIG XCVR3-GC3 is a 900 MHz transceiver add-on that works with the 2GIG GC3, the 2GIG GC3e, and the 2GIG Edge. The purpose of this module is to facilitate image sensor support for the alarm system it is connected with. In the case of the 2GIG Edge, installing the XCVR3-GC3 will allow you to use the 2GIG IMAGE3 Image Sensor with the system. For reference, the older 2GIG IMAGE2 cannot be used with the 2GIG Edge, as that image sensor device only works with the GC3 and GC3e. As of June 2021, the only image sensor supported by the 2GIG Edge is the 2GIG IMAGE3. For information on enrolling the IMAGE3 with the 2GIG Edge, see this FAQ.
If you are not familiar with image sensors, they basically combine a motion detection sensor with a still-motion camera. The way that an image sensor is supposed to work is that if the image sensor device detects movement while the system is armed away, then an alarm will be triggered on the system, and the image sensor will capture one or more photographs. The images are then sent to an interactive platform, which for the 2GIG Edge is Alarm.com. The interactive platform then forwards the captured photos to the end-user via text message and/or email. This way, the user can examine the images and possibly determine whether the system alarm is false or legitimate.
In some cases, the captured photos can also be passed onto the central station for a trained operator to review. If the security system is being used in an area where verified alarm response is required before the authorities can be dispatched, then the image sensor photos can provide proof that an alarm is legitimate and satisfy the requirement for a verified response. This can make image sensors a useful alarm verification tool and a less expensive alternative to security cameras. Up to ten (10) 2GIG IMAGE3 devices can be enrolled per 2GIG Edge System.
Complete the following steps to install the 2GIG XCVR3-GC3 to a 2GIG Edge:
1. Open the panel. Before you attempt to open the 2GIG Edge, make sure that the top and bottom set screws on the panel are loosened. If the 2GIG Edge is mounted to a wall, then you can open the panel by gripping its lower portion and pulling away from the wall to swing it upward and off its backplate. If the panel is not mounted, then just use a screwdriver or another similar object to pry the backplate off and open the panel.
2. Power down the system. Adding the 2GIG XCVR3-GC3 to the Edge is considered to be a hardware change. You must always power down a security system completely before making a hardware change, or else you risk damaging the system and its components. To power down the 2GIG Edge, you must remove both AC power and battery power. AC power can be removed by unplugging the system's transformer from the outlet, or by turning off power at the circuit breaker. Alternatively, if you are using a Honeywell LT Cable, you can disconnect the barrel connector between the main portion of the cable and the panel end of the cable, or you can unplug the connector from the DC IN port, depending upon how you have the LT-Cable connected with the Edge.
Please note that you should never remove AC power by physically removing the wires from the DCIN+ and DCIN- terminals, especially if electrical power is still being supplied from the plug-in transformer and outlet. To remove battery power, simply unplug the backup battery's connector from the port on the panel's board. Check and make sure that the 2GIG Edge touchscreen is totally blank as verification that the system is fully powered down.
Note the LT-Cable in the picture below if you are using one in your setup.

3. Install the 2GIG XCVR-GC3. Pass the four (4) colored wires from the 2GIG XCVR-GC3 through the 2GIG Edge backplate so that you can close the panel later. Make the following connections on the panel board:
- Red Wire to DCOUT+ Terminal (Note: The DCOUT+ Terminal may instead be labeled as AUX+)
- Black Wire to GND Terminal (Note: Use the GND Terminal that is just above the DCOUT+ or AUX+ Terminal where you connected the Red wire)
- White Wire to TX Terminal
- Green Wire to RX Terminal
After completing the wired connections, take the other end of the 2GIG XCVR3-GC3, and pass it through the panel's wiring hole if the system is wall-mounted, and allow it to "hang" down behind the panel. If the system is not wall-mounted, then just position the other end up and away from the panel. Please see the image below for a summary of the wired connections. Note that the orange "outline" of the arrows pointing to the correct terminals is just there to help the arrows standout more effectively. Each arrow is color-coded based on which color wire should connect at each terminal.

4. Restore system power. When restoring system power, reconnect the backup battery first. Just plug the battery's connector back into the port that you disconnected it from earlier. Then restore AC power by plugging the transformer back into the outlet, turning power back on at the circuit breaker, or reconnecting the Honeywell LT-Cable, depending on how you dropped power earlier. Note that the 2GIG Edge touchscreen will not show anything until AC power is properly restored. The system will not power back on using battery power alone. This is normal system behavior.
5. Close the Edge Panel. When closing the 2GIG Edge, align the upper portion of the panel with the top of the backplate first, and then click the lower portion into place second. Once the panel is on its backplate, you can re-tighten the top and bottom set screws to help ensure that the panel is not taken off its backplate later.
Did you find this answer useful?
We offer alarm monitoring as low as $10 / month
Click Here to Learn MoreRelated Products


Related Videos

Related Categories
- Answered