How Do I Install a Honeywell 7847i for a VISTA P-Series Panel?
You can install a Honeywell 7847i for a VISTA P-Series Panel by powering down the system and completing the 4-wire connection between the panel and the communicator. Then connect an ethernet cable from your IP router to the Honeywell 7847i module. You can power on the panel once finished.

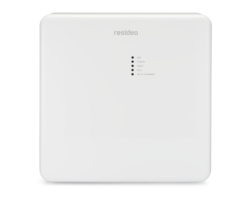
The Honeywell 7847i is an internet communicator that allows a compatible VISTA System to connect with the AlarmNet360 servers for alarm monitoring service. The user will need a compatible monitoring plan to activate the module. The 7847i can also be used with Total Connect 2.0, provided that user's panel supports the service, and that access to the service is included in the user's monitoring plan. A VISTA-15P or VISTA-20P will need to be running Firmware Version 9.12 or higher to access Total Connect 2.0. A system that is not running a high enough firmware version may be able to be updated by replacing its PROM Chip. More information on PROM Chip upgrades is available in this FAQ.
Please note that the Honeywell 7847i receives all its power from the panel. It is not powered using its own transformer. The module will draw up to 75 mA of current during data transmissions. Make sure to calculate that into your current load when determining power calculations. As long as 75 mA doesn't push your panel over the maximum current load, you should not experience any issues.
If you will have trouble getting an ethernet cable to the mounting location for the 7847i, then you can consider using an Ethernet to WIFI module, such as the Alarm.com ADC-W110. This device plugs into an outlet near the 7847i, then an ethernet cable is run from the 7847i to it. From there, the ADC-W110 uses WIFI to connect to the internet through the router. In order to keep your communicator online, both the modem/router, and the ADC-W110 would need a backup power source, like an uninterrupted power supply (UPS) in the event of an AC power outage.
In addition to the above option, Resideo has now released the LTEM-PA and LTEM-PV ProSeries Dual-Path communicators. In addition to the option to use Ethernet and/or LTE M1 cellular communication, these communicators support the option to add a PROWIFI or PROWIFIZW module, allowing them to connect directly to WIFI without an additional adapter. Click here to see how to install the WIFI module in the LTEM-P Series Communicator. Installation of the LTEM-P Series communicator is nearly identical to the 7847i on the VISTA-20P, VISTA-15P, or VISTA-21iP.
Complete the following steps to install a Honeywell 7847i for a VISTA P-Series Panel:
1. Power down the panel. Power your panel completely down by disconnecting its backup battery and unplugging its transformer. You always want the system be completely powered down before making hardware changes.
2. Wire the connections. The Honeywell 7847i uses a 4-wire connection. We recommend using 18-4 cable, though 22-4 cable will also work quite well. You can also double-up 2-conductor cable, just make sure to keep proper track of the color-coded wires. For this FAQ, we will assume that 4-conductor wiring color-coded Red, Black, Yellow, and Green is being used. Remember to run the wires through the back of the Honeywell 7847i module and the VISTA Panel before completing the connections so that you can close their respective enclosures. The connections should be nice and secure, but not overly tight.

Complete the following connections:
- Connect the Black wire at Panel Terminal 4 for GND, and connect the other end of this wire to Terminal 4 GND on the 7847i.
- Connect the Red wire at Panel Terminal 5 for +12V Aux, and connect the other end of this wire to Terminal 3 V+ on the 7847i.
- Connect the Green wire at Panel Terminal 6 for Data In, and connect the other end of this wire to Terminal 6 ECP Data Out on the 7847i.
- Connect the Yellow wire at Panel Terminal 7 for Data Out, and connect the other end of this wire to Terminal 5 ECP Data In on the 7847i.
Remember, if you are using different colored wires, that's fine. Just make sure the terminal connections match according to the terminal numbers used above. Continue to the next step once all the connections have been made.
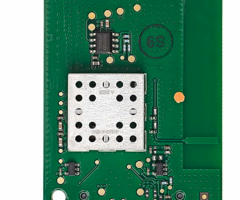
3. Connect an ethernet cable. Run an ethernet cable from your IP router to the Honeywell 7847i unit. Connect this ethernet cable to the RJ45 port on the Honeywell 7847i. The ethernet cable should click into place. Remember to run the wire through the back of the 7847i so that you can properly close the module. The RJ45 port is located at the bottom center of the 7847i, do not confuse this with the 7720P programming port, which is located at the upper left side of the board.
Note: If you want to have your Honeywell 7847i connect with the router wirelessly across WIFI, then you can use an ethernet to WIFI bridge. Just connect the ethernet to WIFI bridge to the Honeywell 7847i through an Ethernet cable, and follow the instructions outlined for the ethernet to WIFI bridge module to connect it to your local WIFI network. A good ethernet to WIFI converter to use is the Alarm.com ADC-W110. These modules, as well as all other network equipment use AC power. Be aware that you should either provide a battery backup for all network equipment in use, or know that when AC power is lost, the system will not be able to communicate.
4. Power on your system. You can now power your VISTA System. Plug-in the transformer before reconnecting the backup battery. Your panel should power back on, and the Honeywell 7847i will start up.
Did you find this answer useful?
We offer alarm monitoring as low as $10 / month
Click Here to Learn MoreRelated Products


Related Videos

Related Categories
- Answered