How Do I Install Multiple Sirens Using the Qolsys IQ Hardwire 16-F?
You can install multiple sirens using the Qolsys IQ Hardwire 16-F by using an added external relay and a power supply. This is done when the total power for the sirens exceeds 500mA. The IQ Hardwire 16-F is telling the relay to activate. This provides external power to the sirens.
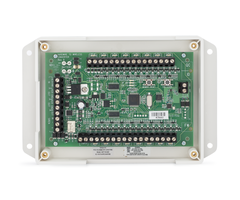 The Qolsys IQ Hardwire 16-F is a wired to wireless converter built for the 319.5 MHz version of the Qolsys IQ Panel 2 Plus. It can be used as a wireless relay between the 319.5 MHz IQ Panel 2 Plus System and a hardwired siren. However, the Hardwire 16-F can only support a 500mA siren on its own. If you intend on exceeding that limitation by using multiple sirens, then a separate relay and power supply must be used. A separate relay will connect with the Qolsys IQ Hardwire 16-F in the same way as if a regular siren were being connected. The relay will connect with the Hardwire 16-F, the power supply and the first siren in the circuit. The power supply will have its own plug-in transformer and a backup battery in case of electrical outages. The sirens will be daisy chained together.
When using the Qolsys IQ Hardwire 16-F, the Qolsys IQ Panel 2 Plus will be treating the 16-F as a wireless siren relay. An IQ Panel 2 Plus can only utilize this feature if it is running RF PIC Version 11.1.4 G2 or higher. If the panel is running a lower version, it cannot be upgraded, so you must be absolutely sure it is running at least that version. If you want to check the RF PIC Version, click the small grey bar at the top of the main IQ Panel 2 screen, and choose Settings > Advanced Settings > Installer Code (default 1111) > About > Hardware > RF PIC Version.

Remember that you will need to run a power calculation to make sure that the sirens you add do not overload the power supply. In our example, we will be using a Honeywell AD12612 Auxiliary Power Supply, which is a 1.2A power supply. Stronger power supplies are available if needed. For a relay, we will be using an Altronix RB5 Relay. The other equipment we are using includes a Honeywell 1361 Transformer and an UltraTeach 1240 Backup Battery. Remember that alarm cabling is also needed. We recommend using 18-2 wire.
Also keep in mind that the Qolsys IQ Hardwire 16-F needs to be programmed with the panel, and each of its 16 zones must be set up with an end of line resistor (EOLR). More information on programming a Qolsys IQ Hardwire 16-F to a 319.5 MHz IQ Panel 2 Plus can be found in this FAQ. For more information on using resistors with a 16-F module, please review this FAQ.
For this FAQ, we will strictly be focusing on completing the connections needed to make the sirens function. We will assume that end of line resistors have already been installed and that the 16-F module has been successfully programmed with the panel. Remember to install the resistors before programming the 16-F to the panel. Here is a brief overview of the connections that will be made:
- Jumper between AUX Out and Siren IN on the Hardwire 16-F.
- Negative (-) Terminal on the Hardwire 16-F to Negative (-) Terminal on the Altronix RB5 Relay.
- Positive (+) Terminal on the Hardwire 16-F to Positive (+) Terminal on the Altronix RB5 Relay.
- Common (C) on the Altronix RB5 Relay to NEG (-) on the Honeywell AD12612 Power Supply.
- Normally Open (NO) on the Altronix RB5 Relay to NEG (-) on the first siren in the sequence.
- POS (+) on the Honeywell AD12612 Power Supply to POS (+) on the first siren in the sequence.
- Connect POS (+) from any additional siren in the sequence to POS (+) on the previous siren in the sequence.
- Connect NEG (-) from any additional siren in the sequence to NEG (-) on the previous siren in the sequence.
- Connect two (2) wires from the Honeywell 1361-GT Transformer to the AC Transformer Terminals on the Honeywell AD12612 Power Supply. Polarity does not matter here.
- Connect the UltraTech 1240 Backup Battery to the Honeywell AD12612 Power Supply where indicated.
- Set SW1 OFF on the Altronix RB5 Relay for 12V operation.
- Have the jumper in-place on the Honeywell AD12612 Power Supply for 12V operation.
All of this can be seen in the diagram below:

For this FAQ, we will assume that the Qolsys IQ Hardwire 16-F has already been enrolled with with the panel. Check the FAQs linked above for more information on enrolling a Qolsys IQ Hardwire 16-F. Complete the following steps to install multiple sirens using the Qolsys IQ Hardwire 16-F:
1. Connect the relay. The Altronix RB5 Relay connects with the IQ Panel 2 just like a regular siren would. A jumper will go from the AUX OUT terminal to the Siren IN terminal on the Hardwire 16-F. In between that jumper, a wire will run from GND (-) on the 16-F to Negative (-) on the RB5 Relay. Another wire will run from OUT (+) on the Hardwire 16-F to Positive (+) on the RB5 Relay. You can set SW1 on the RB5 Relay to OFF for 12V operation.
2. Connect the power supply. First connect the Common (C) terminal on the RB5 Relay to Negative (DC-) on the Honeywell AD12612 Power Supply. Then connect Normally Open (NO) on the RB5 Relay to Negative (-) on the first siren in the sequence. Then connect Positive (DC+) on the Honeywell AD12612 Power Supply to Positive (+) on the first siren in the sequence. You can then connect the two (2) wires from the Honeywell 1361-GT Transformer to the AC transformer terminals on the Honeywell AD12612 Power Supply. Polarity does not matter here, so don't worry about mixing up the wires. You do not need to plug in the transformer at this time. You can also connect the UltraTech 1240 Battery to the battery leads on the power supply. Be sure to observe proper polarity. Make sure to have the jumper in-place on the Honeywell AD12612 Power Supply for 12V operation.
Note: You cannot share a transformer between the IQ2+ and the added power supply.
3. Connect the sirens. Starting from the first siren in the line, connect the Positive (+) terminal on that siren to the positive (+) terminal on the next siren, and so on until you reach the end of the line. Then do the same for the Negative (-) terminals. You can plug in the power supply now that all the connections have been completed.
4. Test the sirens. Put the IQ Panel 2 Plus System into test mode before testing the sirens. To do this, start by clicking the small grey bar at the top of the system screen. Choose Settings > Advanced Settings > Installer Code (default 1111) > System Tests > Panel Test. Scroll down to the Sirens option, and select Run. All of the sirens should begin sounding. If not, check your wiring, and try again. It may help if you reboot the system before testing.
Did you find this answer useful?
We offer alarm monitoring as low as $10 / month
Click Here to Learn MoreRelated Products

Related Categories
- Answered