How Do I Add A Z-Wave Device To a Qolsys IQ4 NS?
To add a Z-Wave device to the Qolsys IQ4 NS, you can use one of several options. Once the system is registered with Alarm.com, then using their app or webpage is the easiest way to add a Z-Wave device. If you're adding a device during initial setup, you can easily add Z-Wave at that time.
Adding a Z-Wave Device via the IQ Installer Interface App
Adding a Z-Wave Device via the Alarm.com customer App
If you're in the midst of panel programming, and you're using the IQ Installer Interface app, then it's just as easy to add Z-Wave devices using that app. However, once the panel has been initially configured, it is easier to make changes to Z-Wave devices using the Alarm.com app or website. The IQ Installer Interface will require that you scan the panel's QR Code every time you want to connect, and you must be onsite with the panel to do so. With Alarm.com, you can make changes from nearly anywhere.
Now of course, when we're talking about Z-Wave devices someone will have to be onsite to physically enroll the device into the panel, but it doesn't necessarily have to be the same person who is performing the programming. Just someone who can follow simple instructions.
When you first connect the IQ Installer Interface to the IQ4 NS, you're offered the opportunity to complete a setup wizard that guides you through the main setup parameters. It walks you through connecting the panel to WIFI, an initial system diagnostic, zone programming, and Z-Wave programming. In this FAQ you can see how we went through the first part of that process, stopping short of performing the Z-Wave setup. Here, we want to show how to add a Z-Wave device without going through the installation wizard. You can go back through the wizard at any time by clicking the icon in the upper right of the IQ Installer Interface that looks like a magic wand.
To add a Z-Wave device to the IQ4 NS using the IQ Installer Interface app, follow these steps:
-
Connect app to IQ4 NS. Each time you connect the IQ Installer Interface app to the panel, you must scan the panel's QR Code, or manually enter the IMEI and Serial Number. If you already have the panel mounted to the wall, this can be inconvenient. The box the panel comes in also has the QR code on the side. Not the decorative sleeve around the box, but the plain white box itself. It's a good idea to save this QR Code for future use.
Open the IQ Installer Interface app and press "Start" then press "Scan QR" and scan your panel's QR Code. If you need a full walkthrough on connecting to the panel with the IQ Installer Interface, check out the FAQ linked above. -
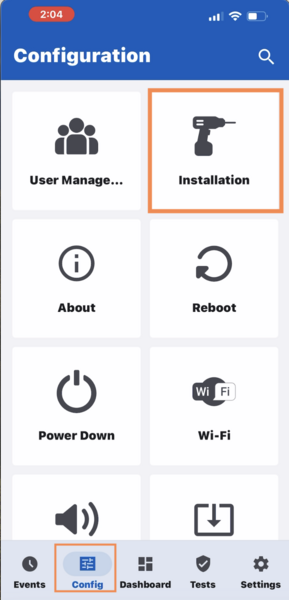
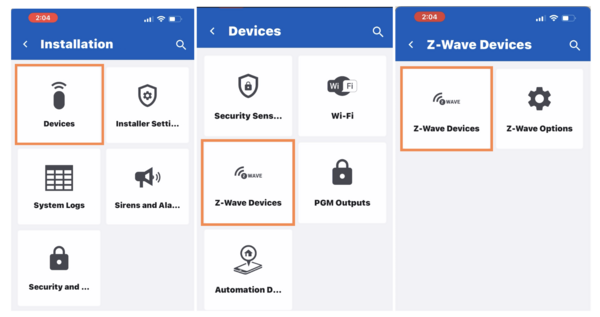
Clear Z-Wave device. It's usually recommended that you exclude a Z-Wave device before attempting to include it in your network. Devices can sometimes be tested at the factory, and residual network information may remain in the device, making it impossible to learn into a new network. To exclude/clear the device tap Config > Installation > Devices > Z-Wave Devices > Z-Wave Devices > Tap the three (3) horizontal dots in the upper right, and select "Clear Z-Wave Devices" > "Start Clear Device". Then follow the steps outlined in the Z-Wave device documentation to exclude the device. When it has been excluded, you should see a message within the Installer Interface App. You can then press "Stop Clear Device" and proceed with inclusion.

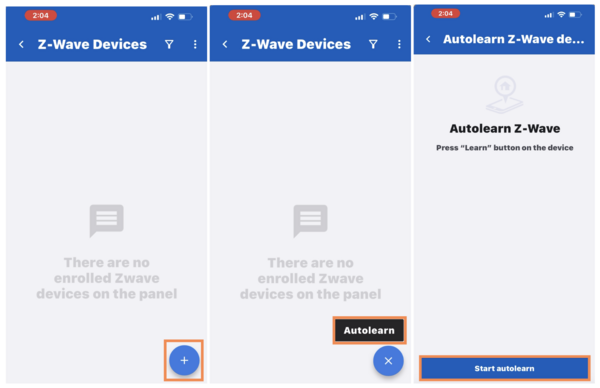
- Configure Z-Wave device. Assuming you're not starting immediately after excluding the device, once you are connected to the panel using the IQ Installer Interface, tap on Config > Installation > Devices > Z-Wave Devices > Z-Wave Devices > + (Add) > Autolearn > Start Autolearn. It took me a while to figure out that I wasn't getting anywhere because I had to tap the word Autolearn when it popped up, then I had to press "Start autolearn" before I could activate the Z-Wave device.
-
Activate the Z-Wave device. Each Z-Wave device is potentially different in the way it must be activated to pair with the controller. Be sure to check your device's installation guide to see how to properly include it. The device we used for this demonstration is a Z-Wave Plus Zen16 by ZooZ. It supports S2 encryption. During inclusion, we received this message:

Per Qolsys, when a device supports S2, it is recommended to enable both Unauthenticated, S2 and Authenticated, S2. The more secure option is always attempted first when communicating, but if that fails, then the less secure Unauthenticated, S2 method will be used, if enabled. Not all Z-Wave devices support S2 encryption, enabling both allows the node to communicate with network devices that don't support it. If you are highly concerned about Z-Wave network security, you can choose only the Authenticated, S2. Just be aware that this may cause signal delivery failures in some circumstances. Once you make a selection, press "Continue." - Enter DSK (Device Specific Key). When Authenticated, S2 is enabled, you'll see this screen next. There are two (2) ways to get the DSK. You can manually enter the five (5) digit DSK PIN based on the number shown on the QR Code on the device itself, or, you can tap the QR Code icon in the upper right of the Installer Interface (outlined in orange below) and use the device's camera to capture it. We chose to use the camera.
-
Configure Z-Wave device. Initially, the device will show up in the list of automation devices as not configured. Tap the right arrow next to the default device name to see your configuration options. The options you see will depend on the Z-Wave device you learned in. It may be that the only thing you can change is the device name.
Note: If this is the only Z-Wave device you're learning in, you can press "Stop Autolearn" at any time. The system will ask you to confirm that you want to cancel, once you do you can continue device configuration.


- Test device. Once you have configured the device, you should exit programming on the IQ Installer Interface by closing the app. There is no logout option. Wait a few minutes to allow the panel and the Alarm.com platform to synchronize, then log into Alarm.com and verify that you can control your new automation device. You're now ready to create rules and scenes around the new module.


To add a Z-Wave device to the IQ4 NS using the Alarm.com customer app, follow these steps:
As stated at the beginning of this FAQ, once the IQ4 NS is registered with Alarm.com, it is much easier to add a Z-Wave device using the Alarm.com customer app. To do so, follow these steps:
- Default the device. It isn't possible to exclude a device using the Alarm.com customer app unless that device has been included with the panel to begin with. In this case, if you have any trouble adding the device, you'll need to either go through the steps to exclude it using the IQ Installer Interface, as shown in the previous section, or you'll need to set the device back to factory defaults. The way to default the device differs per device, so be sure to check the instruction manual for the proper procedure.
-
Include the device. From the Home Screen of the Alarm.com App, tap More (≡) > + Add Device > then choose Lighting and Appliance Control, or Other Z-Wave. What you choose will depend on the type of device you're enrolling. Most devices will fit into the Lighting and Appliance Control category. If your device is listed by name and type, choose the appropriate option. If not, choose "Other Device."

Assuming the device has already been physically installed, click "Next." The Alarm.com server will send a signal to the IQ4NS putting it into inclusion mode. Once it's ready to include the new device, you'll see a System Ready message. Click "Next."

When prompted, trigger the device as instructed in its documentation. If the device supports S2 encryption, you'll be asked for the DSK (Device Specific Key) PIN, otherwise known as the first five (5) characters of the DSK. This can be found next to a QR code on the device, and probably also on the device's packaging. Once you enter the code, encryption between the panel and the device will take place. This can take a few minutes. Then, you can choose a name for your device. Click "Next."
You may have noticed that when including the device via the Alarm.com customer app, we weren't prompted to enable Authenticated, S2, Unauthenticated, S2, or both as we were when adding through the IQ Installer Interface app. However, when we look at the configuration of the device through the Alarm.com dealer portal, we can see that both have been enabled automatically when adding through the customer app.


Did you find this answer useful?
We offer alarm monitoring as low as $10 / month
Click Here to Learn MoreRelated Products


- Answered
- Answered By
- Julia Ross