How Do I Setup A Qolsys IQ4 NS With The IQ Installer App?
With no screen, the Qolsys IQ4 NS requires that you use the Qolsys IQ Installer Interface App to program the panel locally. Dealers can program using the Alarm.com Dealer Portal. To begin programming, use the IQ Installer app to scan the panel's QR code, then follow the onscreen prompts.


Included in the box with the Qolsys IQ4 NS are the panel, a DC power adapter with an attached 15' (4.5m) cable, a power adapter bracket, a screw for the bracket, and a plastic zip tie. Also included is a Quick Guide. The power wire comes from the factory already attached to the power adapter, but check to be sure it is connected with the proper polarity before plugging it into an outlet. The included wire with the gray dashes is the positive conductor. At the panel end, there is a handy barrel connector which provides for an easy connection.

If the provided power wire is not long enough, you can use 18 AWG wire, and run it up to 98.5' (30m) between the panel and the adapter. However, the DC power adapter and the panel should be installed within the same room, per the full Install Guide (Page 11). There are no terminals on the IQ4 NS, so if you have to extend the power wire, you'll need to splice your custom wire length into the provided wire so that you can use the barrel connector.
When you're ready to power the panel up, loosen the set screw in the bottom edge of the panel and remove the mounting plate (shown removed in the image below). If you will be wall-mounting the IQ4 NS, this is the portion you will attach to the wall first. There is no wire channel on the back of the panel, so if you plan to wall mount, you'll need to fish the power wire through the wall for the best results. Once the wall plate has been removed, find the battery connector and connect it to the proper port on the panel.
Alternatively, you can purchase a separate table stand. If you decide to use a table stand, you will remove the wall mount that comes with the panel and replace it with the backplate that is included with the table stand. Be sure to route the power wiring through the hole provided in the table stand and connect it securely to the barrel plug. Once the barrel connector is plugged in and the table stand and mounting plate have been properly installed, tighten the set screw on the panel's bottom edge to secure it in place. This information is located on Page 10 in the Install Guide.


Before you begin configuring the panel, be sure the Alarm.com account for the IQ4 NS is created. For Alarm Grid customers, you can choose to activate your account before configuring, or you can configure the panel and then activate the monitoring account. To create the account, your activator will need the panel's IMEI number which can be found on the sticker on the back of the panel as well as on the box it comes in.
To configure the Qolsys IQ4 NS using the IQ Installer Interface App, follow these steps:
- Power on the panel. Plug the DC Power Adapter into an unswitched outlet. This will likely cause the panel to power on by itself. If not, then hold the power button on the right side of the panel (if you're facing it) for three (3) seconds until the panel's LEDs light up. Then release the power button.
-
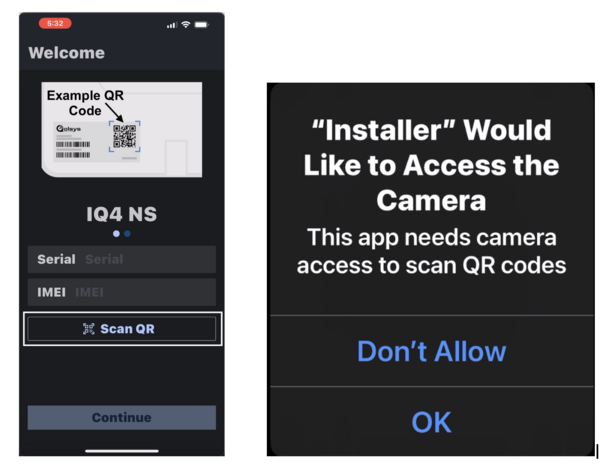
Open the IQ Installer Interface. The IQ Installer Interface app is available as a free download from both the iOS App Store and the Google Play Store. Be sure you have the latest app version before you begin. When you open the app, you'll be prompted with a Start button. Press it to move to the next step.

- Scan QR Code. The app will show you an example QR code. Press "Scan QR Code" and then give the app permission to access your device's camera. Scan the QR code located on the sticker on the lower left portion of the panel's backside. You'll see a message that the QR Code was scanned successfully. Press "Continue"
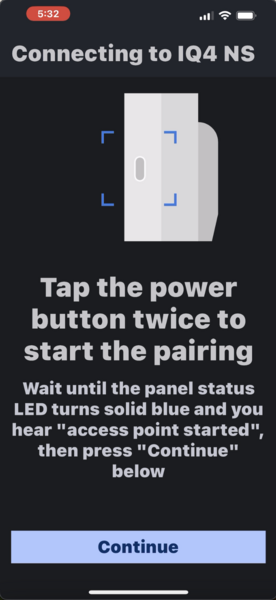
- Begin Installer App pairing. You'll be prompted through the app to double-tap the panel's power button to begin the pairing process. When you do this, you may hear the panel say that a cellular communicator test has been initiated and/or access point started. Wait until you see the Status LED (with the Lock icon) at the top of the panel turn solid blue, then press "Continue."
- Join the panel's network. The next prompt that appears is the IQ Installer App requesting permission to join the IQ4 NS Access Point network. Click "Join" to continue.
- Authenticate to panel. The Installer Interface will request permission to connect to devices on the network. Press "Allow." Next, you'll be asked to enter your access code. This is the panel's Installer Code. The default is 1111. Enter your panel's Installer Code at this prompt.
-
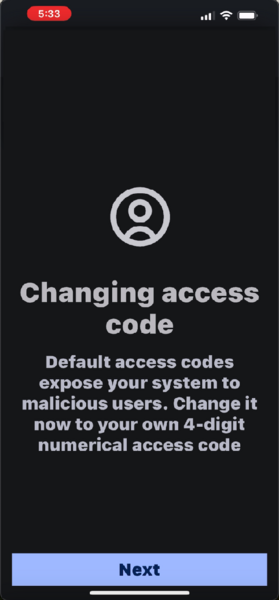
Change Installer Code. In the past, we at Alarm Grid have always recommended leaving the Installer Code set to the default setting. In this case, that would be 1111. After all, you can't arm or disarm with it. However, when you program via the IQ Installer Interface, one of the first things you're prompted to do is change the Installer Code. Unfortunately, this is required, and not optional. So, be ready to change the Installer Code, and be sure you change it to something you can remember. If you lose the Installer Code, your alarm dealer will be able to edit the code for you remotely via the Alarm.com Dealer Portal.
However, if your system is not monitored and you lose the Installer Code, you will lose the ability to connect using the IQ Installer Interface. You may be able to resolve this issue by adding monitoring.
Click "Next" at the prompt below, and enter the new 4-digit code, then re-enter it when prompted. -
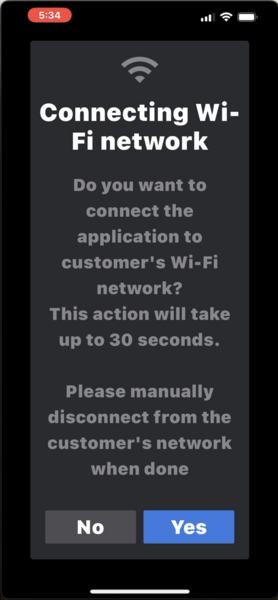
Join customer's WIFI network. You'll now be taken through an installation wizard where you can connect the panel to WIFI, configure zones, and pair Z-Wave devices with the system. To set up the panel's WIFI connection, choose your SSID from the list once it populates, then enter the proper password and hit "Connect."

Next, since the panel will be connecting to the customer's WIFI, you can now switch your smart device to that same network as opposed to remaining connected through the panel's Access Point. You will have to provide the WIFI password again after clicking "Yes" and then click "Join." Remember that this is an app used by installers, so the admonishment to manually disconnect from the network is geared toward professional installers. Once the panel and the smart device running the IQ Installer Interface app have joined the WIFI network, you'll receive a message that the connection was successful (on the app screen).
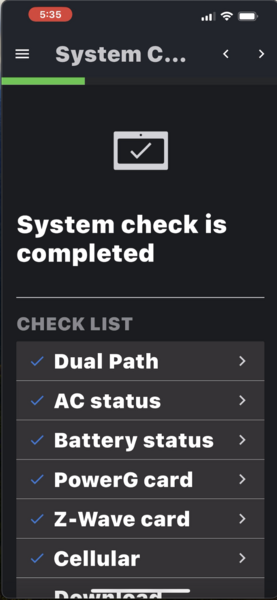
- System Check. The next step in the install wizard is a system check. The panel will go through a system check and provide feedback on each segment of the system.
-
Program zones. The next step in the install wizard is adding zones. The process for adding zones will differ, depending on which panel version you have. My panel offers PowerG sensor support, so the examples shown here will reflect that. At any point during the installation wizard, you can skip forward, or backward, using the two arrows at the top right of the screen. Press "Start" to begin adding zones.

When you press "Start" the panel will be put into Autolearn Mode. At this point, you can perform whatever function on the sensor is required to learn its serial number into the panel. For this example, I'm learning in a DSC PG9312 Outdoor Door/Window Sensor. To enroll, I simply insert the batteries (or pull the battery tab if it's a brand new sensor). Since mine is not a new sensor, I pulled the batteries out prior to beginning this step.

While in Autolearn, when the panel picks up a serial number that it recognizes as the same RF protocol that it supports, it will alert you via the app. You can verify that the serial number is one of yours, then click "OK" and then "Add". This will cause the sensor to be added with the default settings for whatever device type the panel recognizes it to be. On these screens, any field with a right arrow (>) offers editing options. In the next series of screenshots, I'll show editing the Sensor Name.

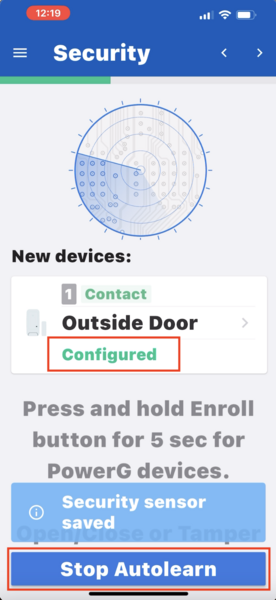
When you tap on any of the editable fields, the ones with (>) next to them, you'll be taken to a new screen where you can make edits. In the screenshot above, the default Sensor Name for our PG9312 was Door-Window. By tapping on that line, we come to a screen where we can choose a pre-existing descriptor, or type in our own. I typed in "Outside Door" and then tapped "Done". The final shot below is just an example of what the Sensor Group option looks like for this sensor. The options provided will, to some extent, depend on the type of sensor that is learned. Once all edits have been made, be sure to press "Save".
After you press "Save" you'll be returned to the main Autolearn screen. You'll see that the zone now shows it has been "Configured." When you have completed adding zones, press "Stop Autolearn" on the app.


The installation wizard also goes through the process of adding Z-Wave devices. You can follow the steps in the wizard to complete that section of programming, but for this FAQ we're going to stop here. We will write separate content on Z-Wave programming in another FAQ.
Did you find this answer useful?
We offer alarm monitoring as low as $10 / month
Click Here to Learn MoreRelated Products


Related Videos

- Answered
- Answered By
- Julia Ross