How Do I Enroll a Z-Wave Device with a DSC PowerSeries Neo Panel?
You can enroll a Z-Wave device with a DSC PowerSeries NEO Panel by getting the system set up and monitored with a compatible Alarm.com Dual-Path Communicator, entering into Programming Field [851], choosing Z-Wave Setup, clearing the device from the network, and then enrolling the device.

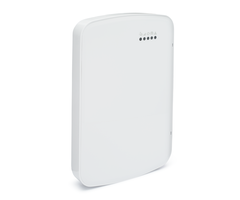
To get a DSC PowerSeries NEO System monitored, you must add a compatible Alarm.com Communicator. It is this communicator that also doubles as a Z-Wave automation controller for your DSC PowerSeries NEO System. The most popular Alarm.com Communication Modules for a DSC PowerSeries NEO System at the time of this writing are the DSC TL880LECAT N AT&T LTE & IP Dual-Path Communicator and the DSC TL880ECVZ N Verizon LTE & IP Dual-Path Communicator. Both communicators provide Z-Wave Plus functionality for the associated DSC PowerSeries NEO System once activated for alarm monitoring.
Once you have the Alarm.com Communicator installed and activated for monitoring service, you can then begin enrolling Z-Wave devices with the system. Enrolled Z-Wave devices can be operated from Alarm.com using the website or mobile app. You can also include any enrolled Z-Wave devices with smart scenes for automatic activation based on a set schedule and/or with predetermined system events. It is advised that you clear any new Z-Wave device from the network before attempting enrollment. More information is explained in the steps below.
Complete the following steps to enroll a Z-Wave device with a DSC PowerSeries NEO System:
1. Install & Activate ADC Communicator. The Alarm.com Communicator serves as the Z-Wave Plus controller for a DSC PowerSeries NEO System. You must install a compatible Alarm.com Communicator and get it activated for alarm monitoring service. A helpful guide for this is available in this comprehensive FAQ.
2. Access Z-Wave Setup Menu. Start from your DSC PowerSeries NEO System with it Disarmed and no troubles on the system. Enter Installer Programming with the command [*] + [8] + [Installer Code], with the default Installer Code being [5555]. You should see "Select (000) Program Labels". This confirms you have successfully entered programming. Key in [851] to enter Programming Field [851] for Interactive Services. Then use the Arrow Keys (< & >) to find the option for Z-Wave Setup. Press [*] to select that option. You will enter into the Z-Wave Setup Menu.
3. Clear the device. It's usually a good practice to clear a device from a Z-Wave network before attempting enrollment. This wipes out any residual Z-Wave data to ensure successful enrollment with a new network. Even if the device is brand-new and fresh out of the box, it might have some Z-Wave network data leftover from factory testing. Therefore, completing this step is usually best practice.
Use the Arrow Keys (< & >) to find "Remove Z-Wave Device". Press the [*] key to select it. Then activate the Exclusion function on your Z-Wave device. It may have a button for this purpose, or you may need to enter in a specific code or command. Refer to the manual for the Z-Wave device for more information. Just make sure that the Z-Wave device is powered on and within range of the DSC PowerSeries NEO Alarm.com Communicator when you do this. You should get confirmation on the keypad that a device was cleared from the network.
4. Enroll the device. After you get a "Device Deleted" confirmation, press [#] to return to the previous screen. Use the Arrow Keys (< & >) to find the option "Add Z-Wave Device". Press the [*] key to select that option. From there, activate the Inclusion function on your Z-Wave device. This may be the same function or command that you entered when you were clearing the device in the previous step. Many Z-Wave devices use the same command or input for Inclusion as they do for Exclusion. Again, refer to the device manual for more information. The Z-Wave device should be powered on and within range of the Alarm.com Communicator when doing this. You should get confirmation on the panel's keypad that a new device was added to the network.
5. Exit Programming. Once you have finished adding Z-Wave devices, exit programming. Do this by pressing [#] multiple times. Each press and release of the [#] key will back out of programming one screen at a time. Continue pressing and releasing until you have exited programming and returned to the panel's normal operating screen.
Did you find this answer useful?
We offer alarm monitoring as low as $10 / month
Click Here to Learn MoreRelated Products


Related Categories
- Answered


