How Do I Remove the VISTA 20P Expansion Module?
Zone expansion on the Vista-20P is accomplished through the panel’s keypad bus. Expansion modules may be supervised for tamper, as well as wiring and addressing issues. In order to remove, or replace, an expansion module, these three things must be taken into account.
Do you plan to remove the expansion module permanently?
Expansion module supervision is based on expansion zone programming, so by removing the zones for a particular module, you’re telling the Vista-20P that it no longer needs to supervise the module address for those zones.

- Enter Panel Programming using an Alpha Keypad like the 6160
- Press *56 to enter zone programming
- If prompted for “Set to Confirm?” Press 0, for No.
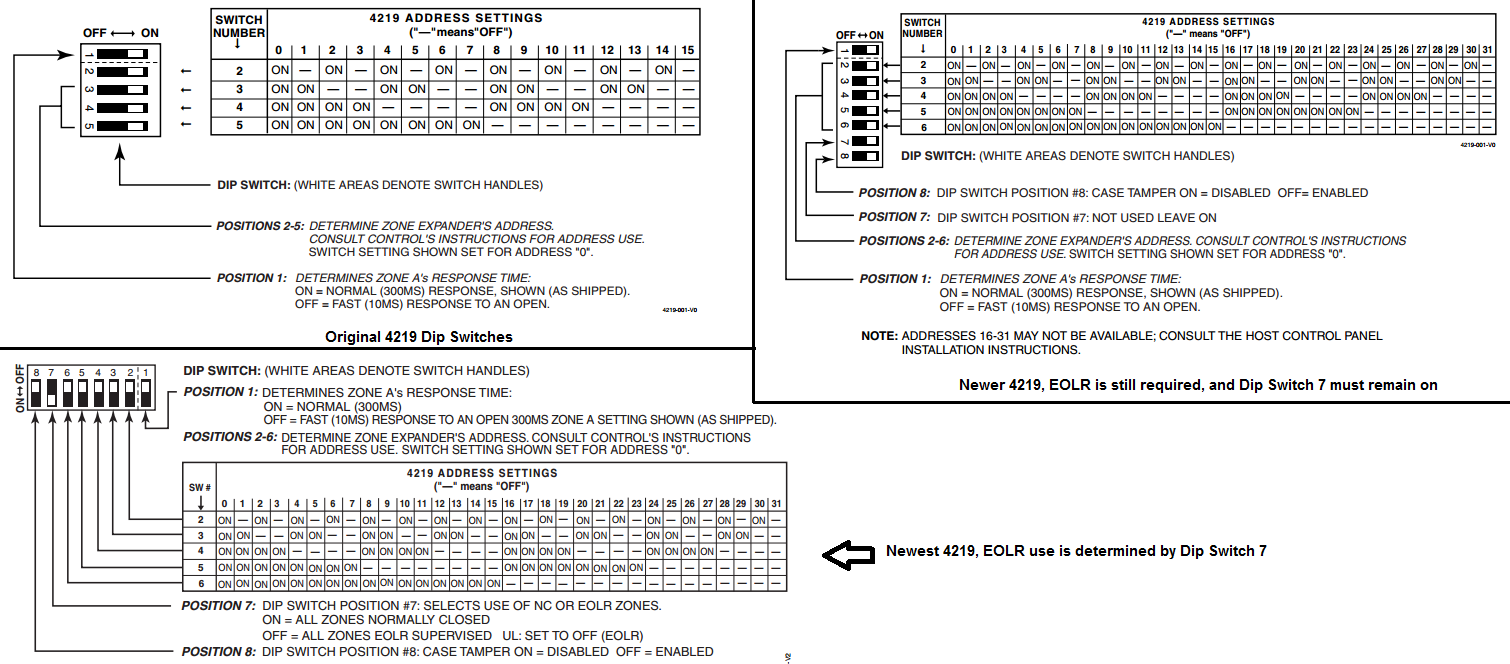
- Remove any zones associated with the expansion module to be removed. If you are removing a 4219 which was set to address 07, then you either need to remove zones 9 - 16, or re-program them as RF zones. To delete a zone, change the zone type to 00, then press *. When prompted to “Delete Zone?” press 1 for yes.
- When finished removing or re-programming zones, press 00 at the “Enter Zone Number” prompt.
- Exit Programming by pressing *99.
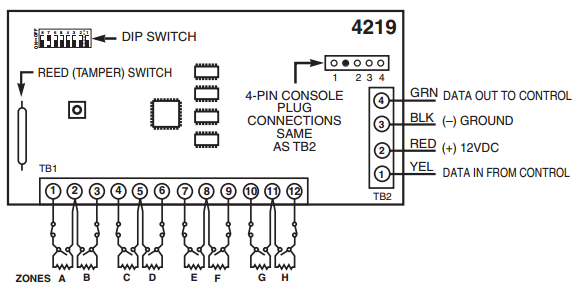
- At the panel, power the system completely down (AC and Battery), then carefully disconnect the 4 wires that were connecting the expansion module to the panel’s keypad bus (terminals 4, 5, 6, and 7.) Make sure that any other device to remain on the panel is still properly connected once you’ve completed this step. If this is a 4219 hardwire zone expander, you’ll need to also disconnect the zone wires, and properly dispose of those, either by cutting the wire off and leaving it in place but unused, or by removing the wired devices along with the wiring. You may also remove the wired device, and leave the wires in place but unused. If removing a receiver, simply disconnect the wiring harness from the receiver, then remove the Black, Red, Green, and Yellow wires from the panel, again, making sure all wires to remain are properly connected when finished.
Are you attempting to replace an existing expansion module?
In this case, assuming the module you’re replacing was working properly at one time, you simply need to physically remove it, verify the address settings on the old device, set them to match on the new device, and then physically connect this device.
- Power the system completely down (AC and Battery)
- Determine the module to be replaced, if multiple modules are in use. Note the dip switch/address settings for the old device.
- Physically remove the expander to be replaced. If this is a wireless receiver, the process is pretty easy, but I would recommend replacing the old wiring harness with the new one that came with the new receiver. If replacing a 4219, carefully mark all wires on the old device before removing anything. It may be a good idea to take some pictures before removing.
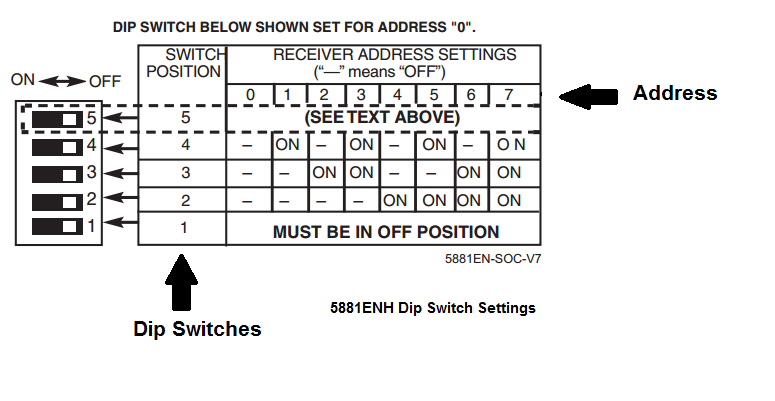
- Note the address set on the device via the dip switches. Some older devices have different dip switch settings than their newer counterparts, so look carefully, and again, it may be good to take a picture. This is another easy one for the RF Receiver, as it should always be set to an address of 00 on the Vista-20P.
- Reconnect the wires to the new module. For the RF Receiver, this will be done using a wiring harness, and is fairly easy. Black, Red, Green, and Yellow will connect to the panel terminals 4, 5, 6, and 7 respectively.
For the 4219, a harness can be used, or you can wire to the ECP terminals. In addition to the connection to the panel, you’ll need to reconnect all the expansion zone wires. Refer to your notes, and any pictures, or wire markings you made in step 3 above.
- Once all wires have been reconnected and properly tightened, be sure to set the dip switches for the proper address. Power up the panel (AC then battery)
- Check the keypad for any check or fault conditions. If a check is displayed pertaining to the expansion zones, verify tamper settings, dips, and wiring, then try to disarm the system twice to see if the check will clear.
Did you find this answer useful?
We offer alarm monitoring as low as $10 / month
Click Here to Learn MoreRelated Products


Related Categories
- Answered
- Answered By
- Julia Ross