How Do I Set Up the Honeywell 5800C2W with a Lyric Controller?
As of April 15, 2026, Lyric panels can no longer be activated or remotely programmed using AlarmNet360. For full details, please read this notice.
Use the 5800C2W with the Lyric System by connecting existing wired devices to the zone inputs on the 5800C2W. Fault and restore each wired input to learn its serial number into a wireless zone on the Lyric Panel. Program the remaining zone parameters, and then repeat for all other zones.

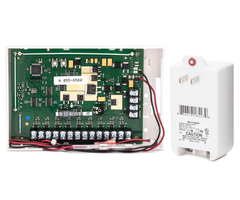
The Honeywell 5800C2W is a converter module. It is used to convert conventional wired zone inputs to a 5800 Series, 345 MHz wireless output. Using this device, a wired system with existing working wired devices can easily be replaced with a wireless all-in-one (AIO) model, such as the Lyric Security System.
Using the 5800C2W with the Lyric Security Panel is a two-step process. First, you must move your wired devices from the old alarm panel to the 5800C2W. Then you can program each of the 5800C2W zones into the Lyric.
To replace existing wired zones with the 5800C2W, follow these steps:
1. Mark existing wires. Make sure you know exactly which wires go with which zones. Hopefully, the original installer properly marked the wires during installation. If not, it may be helpful to have one person go through the location and fault devices (opening doors and windows, walking in front of motions, etc.) while another person watches the keypad to see which zone number and/or descriptor shows up for each device. With this information available, check the wiring diagram for the existing system, and map which wires go to which zones. Mark the wires as necessary.
2. Replace existing panel. Completely power down the existing system. Carefully remove all zone wires from the panel. The metal mounting cabinet for the old panel can remain and be used to house the battery for the 5800C2W. The 5800C2W should not be mounted inside the metal enclosure, as this will interfere with wireless range. If the old panel's battery is still good and is a 12 Volt, 4 Amp Hour battery, it can be used for the 5800C2W. If it is no longer good, replace it with a new battery. Mount the 5800C2W next to the existing cabinet. Connect each of the wired zone inputs from the old panel into the wired zone inputs of the 5800C2W.
Disconnect the existing panel's transformer from the wall, and remove the wires that connected it to the old panel. Connect these wire ends to the 5800C2W transformer. This is a DC transformer, so make sure to mark which wire is positive (+) and which wire is negative (-). Usually, the red wire is positive (+), and the black wire is negative(-) however if the old panel used an AC transformer, there is a good chance these wires are not color coded. The other ends of these wires were previously connected to the old alarm panel. Remove them from the panel. Connect the positive (+) wire to terminal 1 on the 5800C2W, and connect the negative (-) wire to terminal 2 on the 5800C2W.

Each 5800C2W can support up to 9 burglary zones*. If more than 9 zones are being used, additional 5800C2W converters will be required. Each 5800C2W must have its own power supply and its own battery. These cannot be shared with any other device, including another 5800C2W. The zones require the use of resistors. Any resistor value from 1k to 10k can be used and will allow the 5800C2W to calibrate successfully. If the existing zones do not have resistors connected, the 5800C2W comes with nine 2.2k ohm resistors that can be used.
If you must add resistors, wire the resistor in series for normally closed contacts, and in parallel for any normally open contacts. If the existing zones already have resistors, simply move the wires from the old panel to the proper input on the 5800C2W. Once all zone wires and resistors have been connected, make sure that all contacts are in their normal state (doors and windows closed, motions undisturbed, etc.). Then press and release the Zone Calibration button (SW2). LED #1 will flash red for 1/2 second. It will then turn steady green to indicate that calibration has completed successfully.
Please Note: Any Normally Closed zone that happens to be open at the time the calibration button is pressed, or any zone that lacks an end of line resistor, will not be properly calibrated. To the 5800C2W, it will be as if that zone does not exist. If the device has been calibrated successfully, but one or more zones appear not to be working, restore all zones to a non-faulted state, verify they contain resistors, then try calibrating again.
To program the 5800C2W zones to the Lyric Controller, follow these steps:
1. Enter Program Mode. On the Lyric, from the home screen, press Security > Tools > Enter Installer Code > Program > Zones > Add New. The default Installer Code is 4112. This will bring up the edit screen of the next available wireless zone.
2. Program the serial number. Click the space in the upper left titled Serial Number. At the top, a message is displayed "Enter Serial No. or Activate Sensor". At this point, it is best to enroll the 5800C2W zones in order. Fault and restore the first input zone on the converter module three times. After the first fault and restore, the Lyric will produce a single beep. After the second fault and restore, the Lyric will product two beeps, and a serial number and loop number will pop up on the display. After the third fault and restore, the Lyric will produce three beeps, and it will return to the zone edit screen. This signifies that the serial and loop number have been learned and confirmed.
3. Program the zone parameters. Back on the zone edit screen, you will see the serial number for the zone learned, along with the loop number. The loop number for each zone on the 5800C2W should be loop 1. If necessary the loop number can be set correctly by pressing the Loop Number entry until a 1 is displayed.
Next, program the Device Type (door, window, motion, etc.). Based on the Device Type selected, the options for Response Type will vary. For more information on available Response types, please see the Lyric Install Guide, page 20.
Zone Description 1 and Zone Description 2 can also be set. But remember, the panel will automatically display and speak the Device Type as part of the zone description. With that in mind, do not manually enter this as part of the description. For example, if the sensor is programmed as a Device Type "door", and the descriptor is entered as "Front Door", the panel will speak "Front Door Door", instead of "Front Door".
Make sure that the options for Alarm Report, Chime, and Supervision are also set correctly. If reporting to a monitoring station, Alarm Report should be "Yes", unless the zone is being used for informational purposes only and should not report. Chime will automatically be enabled as "Standard" for Doors and Windows, and it can be changed to one of 10 different chime sound options. Supervision should be set to "Supervised" so that the panel can alert the user if the zone fails to check in with the Lyric Panel.
Once all of the programming parameters have been set, select Save in the lower-right. Follow these same steps to program all of the zones being used on the 5800C2W. Once all equipment has been permanently mounted, make sure to perform a thorough walk test. This is so that you can be certain that all wired devices are being seen by the panel and are behaving as they should.
*NOTE: The 5800C2W only supports burglary zones. Smoke, heat, carbon monoxide, and any other life safety sensors can not be used with the 5800C2W.
Did you find this answer useful?
We offer alarm monitoring as low as $10 / month
Click Here to Learn MoreRelated Products

Related Videos

Related Categories
- Home Security Systems
- Home Security Systems
- Business Security Systems
- Business Security Systems
- Monitored Home Security Systems
- DIY Wireless Security Systems
- Small Business Security Systems
- DIY Wired Security Systems
- Wired to Wireless Security System Converters
- Answered
- Answered By
- Julia Ross