If you own a Lyric system and have not already done so, please read this important update regarding AlarmNet360 changes that affect your panel. It may be time for an update!
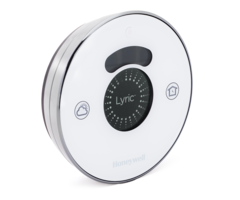
The Honeywell Lyric Thermostat is an excellent smart thermostat that is designed to connect with a user's Total Connect account and their Lyric Controller security system. The device features WIFI connectivity, allowing it to become a fully integrated part of a user's home automation setup. Once the Lyric Thermostat has been installed and programmed, the user can control the device remotely by using the Total Connect mobile app. Many users appreciate the geofencing capability of the Lyric Thermostat. By setting up geofencing, a user can have their Lyric Thermostat automatically start heating or cooling their home when they enter within a specific range of their residence. By the time they return home, their house will already be set to the perfect temperature so that they are comfortable as soon as they walk through the door. Not only is this super convenient, the money saving potential is absolutely tremendous, with some users saving hundreds of dollars per month on their electric bills. The Lyric Thermostat can also be set up to function with various smart devices, such as Apple HomeKit, Samsung Smartthings and Amazon Alexa. All of this makes the Lyric Thermostat an excellent addition to any home that uses the Honeywell Lyric Controller.
Before you can enjoy all of the exciting features that the Lyric Thermostat has to offer, the device must be installed and programmed with your Total Connect account. This guide will focus on the removal of your old thermostat and the installation of the the Lyric Round Thermostat. For more information on integrating your Lyric Thermostat with Total Connect, please consult the Lyric Thermostat enrollment guide. You can also use the Lyric App to help walk you through the installation process. If you do not have the Lyric App, you can download it for free from the App Store or Google Play. You can make a Lyric account to use with your Lyric thermostat. We strongly recommend following the instructions outlined in the app as you complete the installation.
You can install the Lyric Thermostat by completing the following steps:
1. Turn off the heating and cooling system. When installing the Lyric Thermostat, you should start by shutting off the power to the building's heating and cooling system from the circuit breaker. This will help to avoid any electrical issues during the installation process. To confirm that the power for heating and cooling is shut off. Try increasing of decreasing the set temperature by several degrees. If you hear the building's heater or cooler activate, then the power to the system has not been shut off properly. It is also recommended that you feel the area around the building's air vents to make sure that no hot or cool air is coming out.
2. Remove the old thermostat from its backplate and check its wiring. With the heating and cooling system off, you can then begin removing the old thermostat. Most thermostats are attached to a backplate that is mounted to the wall. Some thermostats will be able to be gently unattached from the backplate, while others will require some screws to be removed. Once you have removed the old thermostat from its backplate, you will be able to see the connected wires and determine the type of power supply that is used for the building's heating and cooling system. If you see thick black wires with wire nuts, then the building uses a line voltage system, and the Lyric Thermostat will not be compatible. You should also check the voltage for the old thermostat. If the old thermostat that was used with the building is 110 volts or higher, then again, the Lyric Thermostat will not function with the building's heating and cooling system. These are very important aspects to check, as setting the Lyric Thermostat with an incompatible heating and cooling system could result in serious damage.
3. Note the wiring and detach the wires. Before removing the wires, take a note of the wiring coloring and what terminals they are connected to. Many users find that it is helpful to take a picture of the wires so that they can reference them later. It is also recommended that you label the wires in some way so that you can differentiate them when you go to connect them to the Lyric Thermostat. This is especially true if the wires are of the same color and no labels were previously applied. The Lyric App will also allow you to note the colors of the wires and their corresponding connections so that the app will outline the proper connections when you go to wire the Lyric Thermostat in a later step. After you have finished examining the wiring setup, you can then remove the wires from the thermostat one at a time. Make sure that the wires do not fall into the wall, as you will need them for installing the Lyric Thermostat. Wrapping the wires around a pen or a pencil can prevent this from happening. Finally, you can unscrew and remove the old mounting plate from the wall.
4. Mount the backplate to the wall. At this point, you will begin installing the Lyric Round Thermostat. Start by snapping the backplate onto the wall cover of the Lyric Thermostat. The wall cover is optional, but it can be useful for covering any marks or blemishes that are on the wall. Next, run the wires through the backplate of the Lyric Thermostat. We recommend twisting the wires together so that they can all be easily passed through the backplate at the same time. You can then screw the backplate onto the wall using the included screws that came with the Lyric Thermostat. You will want to make sure that the backplate is nice and level with the wall when doing this. The backplate comes with a built-in level for the installer's convenience. The screws that come with the Lyric Thermostat are self-anchoring, and they can often be installed in the location of the screws for the previous thermostat. If you do need to drill new holes, the drill bit size is 7/32".
5. Connect the wires to the Lyric Thermostat. You will now be able to connect the wires to the Lyric Thermostat backplate. The wires can be connected to the corresponding terminals based on the setup for the previous thermostat. When wiring the Lyric Thermostat, consult the notes or the picture that you took of the previous wiring setup. You can attach a wire by firmly pushing it into the appropriate terminal. If you accidentally misplace a wire and need to move it to a different terminal, you can use a ballpoint pen to press down on the tab for that terminal and then pull the wire out of place. Once all of the wires have been connected, make sure that they are snug and secure by gently tugging on the wires and ensuring that they remain in place. If you are using the Lyric App to assist you with the installation, it will display the connections that you need to make. Please note that the Lyric Thermostat is a 24 volt thermostat that uses power from the heating and cooling system to stay activated. This means that no common "C" wire will need to be connected to the Lyric Thermostat.
6. Activate the Lyric Thermostat. After completing the wiring process, you can then snap the Lyric Thermostat onto its backplate. A gentle press is all that is required to click the device into place. Next, go to the circuit breaker and restore power to the building's heating and cooling system. If the Lyric Thermostat was wired correctly, the device will automatically power up, and you will be prompted to connect the device a WIFI network. This process is outlined in the Lyric Thermostat enrollment guide.


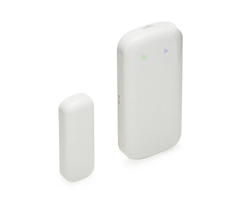

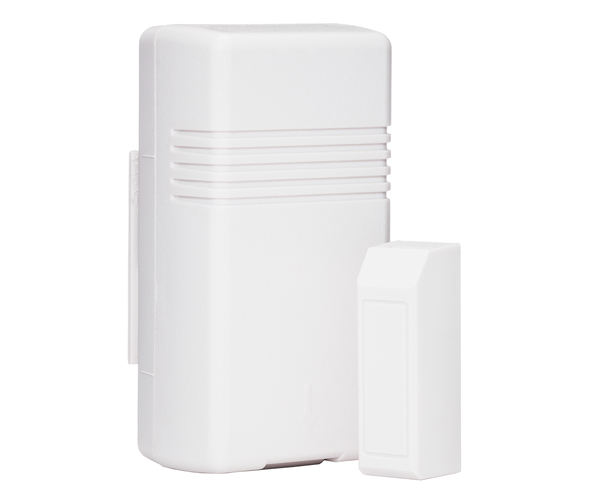 CR123A batteries are also used with Honeywell wireless door sensors. These are shorter and fatter batteries with a cylindrical shape. They are most often used in larger surface-mount sensors. These are thicker sensors that can accommodate their size. One such contact is the