June 2020 Archives

Posted By

Last week, it was announced that the in-person event for ISC West 2020 has been cancelled. An all-virtual event will take place from October 5 - 7 in its place. An in-person event for ISC West 2021 is tentatively scheduled for March 23 - 26 next year at the Sands Expo in Las Vegas, NV.


Originally, ISC West had been scheduled for March 18 - 20. Due to health and safety concerns, it was pushed back to July 20 - 22. It was then postponed again to October. Postponing it any further would cause significant conflict with ISC West 2021. Therefore, it was ultimately decided to just have everyone stay home.

Will Wise, Vice President of event organizer Reed Exhibitions said, "While we are very disappointed to not be able to meet face-to-face this year in Las Vegas, we look forward to continuing to help the ISC West community engage via digital programs, resources and connections. Our team, along with our valued venue partner, Sands Expo and Venetian, is working on detailed planning and protocols for ISC West 2021, which will take place March 23-26, 2021."

While we're disappointed that the event is cancelled (who doesn't like a trip to Vegas???), we're sure that the virtual event will still be informative, and we look forward to covering it so that you know what is coming in the security industry. We will have all the coverage on this blog like always, so stay tuned!

Remember, if you have any questions about alarm monitoring or security systems in general, then you should email us at support@alarmgrid.com. We check our email from 9am to 8pm ET M-F. We look forward to hearing from you.

Tags: ,

Comments


Posted By

After our big return last week, we're back in a major way with 12 new videos this week! As our headquarters has only partially reopened, I had to try doing some videos again. But a familiar face has returned. We're sure you're eager to see who. Anyway, here come the new Alarm Grid videos!


Adjusting Z-Wave Device Limits On My Qolsys IQ Panel 2 Plus

I show you how to adjust the Z-Wave device limits on your Qolsys IQ Panel 2 Plus Security System. The Z-Wave device limits determine how many of each Z-Wave device type you can pair with the system. There are limits for thermostats, smart sockets, door locks, lights, garage doors, and "other" Z-Wave devices. The maximum total limit for all devices combined is 152 Z-Wave devices. You will need the Installer Code or Dealer Code (default 1111 and 2222, respectively) to change these limits. Also note that the Z-Wave device limit for Alarm.com is 122 Z-Wave devices.


Upgrading the Z-Wave Firmware for My Qolsys IQ Panel 2 Plus?

I show you how to upgrade the Z-Wave firmware for a Qolsys IQ Panel 2 Plus System. This is something you may want to do if the system is running a Z-Wave firmware of less than 6.81.03. At that Z-Wave firmware, you unlock the Smart Start feature for quickly adding Z-Wave devices, and you upgrade the system to the S2 security protocol for automation devices. Any Qolsys IQ Panel 2 manufactured with System Firmware Version 2.4.0 or higher (upgrading later doesn't count) will already have this Z-Wave Firmware Version.


Overview of the Smart Start Feature on the Qolsys IQ Panel 2 Plus

I talk about the Smart Start feature that can be used with any Qolsys IQ Panel 2 that is running Z-Wave Firmware Version 6.81.03 or higher. The Smart Start feature allows you to pair Z-Wave devices by scanning a QR code, instead of performing a traditional inclusion/exclusion process. As of June 2020, only a very limited selection of Z-Wave devices from Qolsys, Alarm.com, Eaton, and Danalock are compatible with the feature. But it can save you time if adding a large number of Z-Wave devices.


Using the Smart Start Feature on the Qolsys IQ Panel 2 Plus

I show you how to use the Smart Start feature on a Qolsys IQ Panel 2 Plus to add new Z-Wave devices. If your IQ Panel 2 is on Z-Wave Firmware Version 6.81.03 or higher and you have a compatible Z-Wave device, then you can use the Smart Start feature to add it to the Z-Wave network. Depending on the Z-Wave device, the QR code may be on the packaging or on the device itself. Some may have the code on both the packaging and the device.


How Many Z-Wave Devices are Supported on the 2GIG GC2 or GC2e?

I discuss the Z-Wave device limits for the 2GIG GC2 and the 2GIG GC2e. The classic GC2 has a standard Z-Wave controller, while the newer GC2e has an upgraded Z-Wave Plus controller. Both support the same Z-Wave devices, though Z-Wave Plus devices will get an extended range and battery life when used with the GC2e. The Z-Wave device limit for both systems is 232 Z-Wave devices, though it should be considered that adding a very large number of Z-Wave devices can diminish system performance.


How Many Z-Wave Devices are Supported on the 2GIG GC3 or GC3e?

I discuss the Z-Wave device limits for the 2GIG GC3 and 2GIG GC3e. Both of these systems have built-in Z-Wave Plus controllers for building an automation network of smart devices. Just like the "lower-end" 2GIG Systems, the GC3 and GC3e can support a maximum of 232 Z-Wave devices, though usually far fewer are actually used in practice. You should also keep in mind that Alarm.com has its own Z-Wave device limit of 122 devices. This means that only the first 122 Z-Wave devices paired with the system will get pushed over to Alarm.com.


Excluding the Kwikset Z-Wave Lock from the Lyric Controller

I show you how to exclude a Kwikset Z-Wave Lock from a Z-Wave network using a Honeywell Lyric Alarm System. Clearing the lock from the network will wipe out all of its residual Z-Wave data. This is normally done before adding the lock to the Z-Wave network, or when you need to delete it from the system. The Lyric can be used to clear the Z-Wave network data in the lock, even if the lock wasn’t paired using the Lyric to begin with.


Including the Kwikset Z-Wave Lock from the Lyric Controller

I show you how to pair a Kwikset Z-Wave Lock with your Honeywell Lyric Alarm System. This will allow you to control the lock from the panel and remotely from Total Connect 2.0 if the system is monitored and set up with the service. Normally, an exclusion process is performed before the inclusion process. Most Kwikset Locks have a simple button that is used for including and excluding. Pressing this button while the system is in its inclusion mode will include the lock into the Z-Wave network.


Excluding a Schlage Z-Wave Lock with the Honeywell Lyric

I show you how to exclude a Schlage Z-Wave Lock from a Z-Wave network using the Honeywell Lyric Alarm System. Just like most other Z-Wave devices, an exclusion process is normally performed either before adding the device to the Z-Wave network, or when deleting the device from the Z-Wave hub. For a Schlage Lock, you must access the programming code that is found on a white sticker underneath the lock's main cover. You will need a screwdriver to remove this cover.


Including a Schalge Z-Wave Lock with the Honeywell Lyric

I show you how to include a Schlage Z-Wave Lock to the Lyric's Z-Wave network. A Schlage Lock will follow the same process for inclusion as it does for exclusion. However, you will normally want to exclude the lock first to wipe out any residual Z-Wave data. To include the lock, simply enter the programming code on the lock's sticker, followed by the [0] key while the Lyric System is in the appropriate Z-Wave inclusion mode.


Enrolling a Z-Wave Lock to My Qolsys IQ Panel 2

In his triumphant return, the always fantastic Jorge shows you how to enroll a Z-Wave door lock to your Qolsys IQ Panel 2 System. This is done by putting the IQ Panel 2 into its Z-Wave inclusion mode and then activating the inclusion function on the lock. For most locks, you will want to clear the lock from the network to wipe its residual Z-Wave data before completing the inclusion process. The lock can then be controlled from the panel, as well as from Alarm.com if the system is monitored with access to the service.


Resetting an Interlogix Simon XT to Factory Defaults

This is an update from a previous video shot more than a year ago. Jorge shows you how to reset an Interlogix Simon XT System back to its factory default settings. This will reset the Master Code (1234) and the Installer and Dealer Codes (both 4321), delete any added codes and system zones, and restore all settings and configurations to their default values. It is important to note that if the option for "Phone Lock" in system programming is enabled, then certain settings will not be affected by the default.

Tags: , , , , , , , , , , , , , , , , , ,

Comments


Posted By

Earlier this week, we talked about the new look that will be coming to Apple HomeKit with Apple iOS 14. Well we have more exciting news regarding Apple HomeKit, as it appears that HomeKit-compatible cameras will soon be gaining facial recognition capabilities. This is super exciting stuff!


According to Apple, the face detection feature will be used to identify family members and make sure that there are no unidentified individuals inside the house. If the camera sees a face that it does not recognize, then the user can get an alert through HomeKit regarding the activity. We're sure that this could also work quite well in a small business environment.

As this is a very newly announced feature by Apple, we're not sure whether or not facial recognition will be available for any HomeKit Camera, or if it will only work with certain camera models. We also have no timetable as for when this new feature will be available, though we have heard possibly September. You would need to check with Apple support to receive more specific information.

Unfortunately, Alarm Grid does not offer any Apple HomeKit Cameras at this time. However, we do offer the Honeywell Lyric Alarm System, which offers a great HomeKit integration. Many users will use a Lyric with Alarm Grid monitoring service, while setting up a separate network of HomeKit Security Cameras for video surveillance. This is certainly a viable option.

Another, though admittedly less robust, option is to get a Qolsys IQ Panel 2 Plus System with Alarm.com Security Cameras. Although these cameras are not equipped with facial recognition, they do have powerful Video Analytics features to keep your home or business safe. And the IQ Panel 2 has a built-in camera that uses facial recognition for disarm photos.

Although we don't have much information on the HomeKit Camera Face Recognition feature right now, please stay tuned to our blog, as we will be updating as we learn more. And like always, you can reach out to us for information about our monitoring plans by emailing us at support@alarmgrid.com. We check email from 9am to 8pm ET M-F. We look forward to hearing from you!

Tags: , , , , , , ,

Comments


Posted By

Apple HomeKit will soon be getting a new look to go along with the upcoming Apple iOS 14. This new, refreshed look brings a side-bar to the left-hand side of Apple HomeKit. The functionality should remain largely the same as the current version. But you're sure to love this sleek, new look!


As you know, we are big fans of Apple HomeKit when paired with the Honeywell Lyric Alarm System. By pairing your Lyric System with your Apple HomeKit Network you can control the system from pretty much anywhere using Siri Voice Commands. We have a guide to setting up the Lyric with HomeKit, which you can view here. We also recommend checking out this other guide to setting up HomeKit Automations.

As you can see above, the new look for Apple HomeKit will feature a new side-bar on the left-hand side to make navigation a bit easier. This layout will better utilize the space available on the iPad. However, we still expect the general principles to using Apple HomeKit to remain the same. It's nice to see that Apple hasn't totally overhauled Apple HomeKit, but they are changing it up enough to keep things fresh. From the picture shown at the top of this post, it looks great!

This new HomeKit look won't be arriving until Apple iOS 14 is available. Unfortunately, we don't have a firm release date available quite yet. It is our understanding that it will come out sometime in September. You would need to check with Apple for more info. However, we can assure you that the Apple Home App will automatically update once iOS 14 is installed on your Apple device. Until iOS 14 is out, you'll just have to wait patiently for the time being.

Like we said, we really don't know too much about what Apple is planning for their iOS 14 release. But we can say that we are really excited about the new "change" coming to HomeKit. If you want to learn more about using the Lyric with HomeKit, or if you are interested in our monitoring services, please email us at support@alarmgrid.com. We check email from 9am to 8pm ET M-F. We look forward to hearing from you!

Note: We have learned that this new look for HomeKit for Apple iOS 14 will only be visible for the Apple iPad. The Apple iPhone version of HomeKit will not be getting the same makeover.

Tags: , , , , ,

Comments


Posted By

Resideo (formerly Honeywell) has made a change to Total Connect 2.0 that now prevents Sensor Activity for motion sensors from being displayed in the Activity Log. The purpose of this change is to prevent the TC2 Activity Log from being flooded with "Sensor Open" events from motions.


If you aren't aware, the Activity Log on Total Connect 2.0 shows various activity affecting a Honeywell Security System. This includes sensor open and close events. Previously, motion sensor activity (namely, the sensor detecting movement) could be displayed in this Activity Log. However, Resideo found that many users had setup activity logs for motion zones without realizing what the feature really did. They were therefore flooding their TC2 Activity with "Sensor Open" and "Sensor Close" events as they walked around their property in the disarmed state.

To curb this issue, Resideo has disabled the Sensor Activity toggle switch on Total Connect 2.0 for all motion detection sensors with the Response Type of Interior Follower. This makes it impossible to enable Sensor Activity logging for motion sensors with the Interior Follower Response Type, meaning that motion sensor activity will no longer be displayed in the activity log. In addition, the sensor will not be displayed on the TC2 security card when faulted. The user must access the Sensors List to see the faulted motion sensor zone.

Most users will likely not mind this, as they wouldn't want to have the activity logs for their systems constantly being flooded with motion sensor activity. And fortunately, there are a couple of workarounds for this issue if you do want to be alerted regarding motion sensor activity on a particular sensor. Arguably the easiest solution is to change the Response Type for a motion sensor from Interior Follower to Interior w/ Delay.

The similar Response Type of Interior w/ Delay does not have the same restriction regarding Activity Logs as Interior Follower. The only major change with Interior w/ Delay is that it will always trigger an Entry Delay countdown, rather than an immediate alarm if the motion sensor is the first zone faulted while the system is in an Armed Away state. For more information on Honeywell System Response Types, please see this helpful FAQ.

Another option if you just want to be notified regarding sensor activity is to manually create a notification for the Interior Follower Motion Sensor within Total Connect 2.0. Luckily, we recently made an FAQ that outlines this very process. It will teach you all about text and email notifications for Total Connect 2.0. If you want to take a look, you can check it out here. We also recommend checking out this other guide that is more specific to Sensor Open/Close and Sensor Left Open Notifications.

If you are an Alarm Grid monitored customer and you need any additional help setting up your motion sensor for alerts, please reach out to us by emailing support@alarmgrid.com. We check our email from 9am to 8pm ET M-F. We look forward to hearing from you!

Tags: , , , , , , , , , ,

Comments


Posted By

We're here once again to remind you to upgrade the old 3G or CDMA cellular communicator for your alarm system to an LTE communicator! Once the associated cellular network is shut down, the old communicator will no longer work in any manner. This could leave your home or business vulnerable!

Honeywell lte l57v verizon lte cellular communicator for l5200 l

Security systems use internet and/or cellular communication to send out signals to central monitoring stations and/or interactive monitoring platforms like Total Connect 2.0 and Alarm.com. This is the very core principle of alarm monitoring. And if the associated communication network is shut down or fails, then alarm monitoring will become impossible.

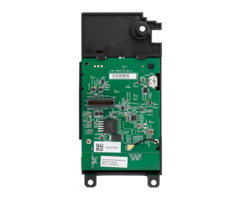
Just like your phone, tablet, or computer, your alarm system cannot just magically send out signals. It needs equipment to accomplish this task. That equipment comes in the form of an alarm monitoring communicator. This is a piece of hardware either inside, or located nearby your alarm panel, much like what you would find inside of another electronic device that needs to communicate out and also receive incoming signals.

In the world of cellular communications, you have likely heard about the new 5G networks. These 5G networks represent the latest and greatest cellular technology available, and they are certainly going to change the game when it comes to mobile communication. But while service providers are working to develop new 5G infrastructure, they are also phasing out older technology. This includes the AT&T 3G Network and the Verizon CDMA Network.

If you have a system with a cellular communicator that works across a 3G network, such as the aforementioned AT&T 3G and Verizon CDMA Networks, then time is running out for you to upgrade. While we cannot provide an exact date of shut down, we can confirm that it is due to occur sometime in 2022.

Now, you might be thinking, "Well gee, 2022 is a long way away. I'll just wait until then." And really, we can't force you to upgrade now. We have already promised to continue supporting older communicators for as long as possible. But if you have the means to buy a new cellular communicator and keep your existing system running, then we urge you, as professionals, to make the jump sooner rather than later.

Time is moving quickly, and we can all but guarantee you that some people will not get the memo, and they will get left behind. We understand. For many people, a security system is not something that is on their minds regularly. Historically, this has been a piece of hardware that you hide away somewhere, while only interacting with a wired keypad. But don't take this deadline lightly. Make the jump sooner rather than later, and save yourself the trouble.

We are also often asked by people upgrading from 3G or CDMA which type of communicator they should get. The answer to that is an LTE communicator. LTE is the direct successor to 3G and CDMA. If you have heard the term "4G LTE", that's where LTE comes from. There have been LTE communicators available for security systems for a few years now. They work great, and they can keep a system monitored well into the very distant future.

You might be wondering why we aren't recommending a 5G alarm monitoring communicator. The truth is that 5G technology is still so new that there aren't really any 5G communicators available quite yet. We are sure that we will have some 5G communicators available to sell and promote in the near future. But for right now, LTE is the best available. And since LTE already provides fast speeds, there really won't be much difference for a security system.

Another common concern we encounter is that end users are fearful that LTE will also one day become obsolete. Our response to this concern is that LTE will most likely remain active and in place for many, many years, even decades into the future. The term LTE itself even stands for "Long Term Evolution". Cellular service providers envision 5G as the primary network of the future, with LTE infrastructure being kept in service as a reliable backup.

It's important to understand that building a new nationwide cellular network is not cheap. Every cellular service provider is spending billions to build the necessary infrastructure. To them, this is not a joke or a game. The 5G networks are being built to last. They enable the remarkably fast speeds needed to support future technology. The idea here is that they are spending huge amounts of money now so that they do not need to build new networks later.

And while 5G cellular networks are the technology of the future, the current LTE networks are also not going anywhere anytime soon. Why? They are designed to serve as backup options once 5G is fully in place. This is much like the current 3G and CDMA networks. They are a backup to the current LTE networks. If you have ever noticed that your LTE phone is also capable of using 3G, that is why. It's in case LTE is ever unavailable for some reason.

The difference with 5G is that, once in place, it is going to be the premier option for a very, very long time. The very idea of a supposed "6G network" isn't really even fathomable at the moment. We're likely talking decades from now. What you can expect in the near future is that 5G will become the primary technology, while LTE will be kept in-service as a backup.

And again, we hear some more cries from people, "Well, I'll just wait for a 5G communicator to come out." The truth is that with alarm systems, the difference between LTE and 5G really won't matter all that much. Security systems do not transmit large amounts of data. Yes, 5G might make some automation commands a hair faster. But LTE can already handle this quite well. And it's very possible that 5G communicators might not be ready before the 3G sunset.

Long story short, you should upgrade to LTE as soon as you can if you intend on using cellular communication with your security system. Remember that cellular service is much more reliable than WIFI connectivity. Even in the year 2020, internet outages are relatively common. They likely always will be. That is why users are willing to pay a premium for cellular monitoring service. Cellular all but ensures your system will always stay connected.

While your 3G or CDMA communicator might be working great right now (as it always has been), you will wake up one day (in 2022) only to find a scary "Comm Fail" message with no quick solution. And if you are cell-only, your panel will be offline, and your home or business will be vulnerable. Don't let that happen. Just make the jump to LTE as soon as you can.

Alarm Grid offers LTE cellular communicators for many types of alarm systems. We can help you get exactly what you need so your transition is as seamless as possible. As of this writing, there won't be any increase in your monthly bill. You will pay exactly the same monthly fee for cellular monitoring service using a new LTE communicator as what you pay with a 3G or CDMA communicator now. You only need to buy the new LTE module. That's it.

And if you're worried about needing to install your new LTE communicator, fear not! These devices are super easy to install. And if you're monitored by Alarm Grid, we will be more than happy to help you through the installation process. That's our job. Every day, we encounter new and inexperienced users and help them monitor their homes and businesses. And that includes keeping existing systems running. We love what we do, and we're happy to help.

Maybe you aren't sure which LTE communicator you need for your system? Hey, we totally understand! It's not like you're completely obsessed with this stuff (like we are). Just shoot us an email with a picture of your panel, and we can help you explore your options. If you can get us a picture of the panel's inside with its current communicator, then that's even better!

Like always, the best email to reach us is support@alarmgrid.com. We'd love to hear from you, whether you're an existing Alarm Grid customer, or if you're looking for the very best in DIY security. Maybe you would prefer to talk on the phone? That's cool too. Our number is (888) 818-7728, and we happily answer phones from 9am to 8pm ET Monday thru Friday.

Our goal is to make the 3G and CDMA sunset as easy and as seamless for our customers (and future customers) as possible. The time to take action is now. We can help you get what you need so that you and the people around you stay safe and protected. The 3G sunset is serious, and we don't want you to get left behind. Please, upgrade now. We are grateful to have you as a member of the Alarm Grid family, and we look forward to hearing from you.

Tags: , , , , , , , , , , , , , , , , ,

Comments


Posted By

After a long hiatus, our video recap makes its triumphant return! With our headquarters only partially reopened, all the new videos feature myself. We promise your favorite video stars Jorge and Jarrett will be back soon. But for now, check out these four (4) new videos about Z-Wave locks!


Including the August Smart Lock Pro to the Lyric Controller

I show you how to pair the August Smart Lock Pro with the Honeywell Lyric Alarm System. All Z-Wave operation for the August Smart Lock Pro is accomplished through the August Home App. You will need to first set up the lock through the app before you will be able to pair it with the Lyric System. The app can be downloaded for free from both the Google Play Store and the Apple App Store.


Excluding the August Smart Lock Pro to the Lyric Controller

I show you how to exclude the August Smart Lock Pro from the Honeywell Lyric Alarm System. Just like with the inclusion process, the exclusion process is done through the August Home App. The app will know whether or not the August Smart Lock Pro is currently paired with a Z-Wave network. Unlike most Z-Wave devices, you do not need to perform an exclusion before attempting to pair the August Smart Lock Pro with a Z-Wave network.


Including the Yale Z-Wave Door Lock to the Lyric Controller

I show you how to pair a Yale Z-Wave Door Lock with the Honeywell Lyric Alarm System. Pairing a Yale Lock with your Lyric Panel will offer several advantages. For one, you can control the lock locally at the panel. And if your system is monitored with access to Total Connect 2.0, then you will also be able to control the lock remotely using a phone or web browser, as well as include the lock with Total Connect 2.0 smart scenes.


Exclude the Yale Z-Wave Door Lock to the Lyric Controller

I show you how to exclude a Yale Z-Wave Door Lock from the Honeywell Lyric System. Excluding a Z-Wave device basically means deleting, or clearing, it from a Z-Wave network. Once you do this, you will need to pair the device with a new Z-Wave network before you will be able to use it with a Z-Wave controller. Unlike most Z-Wave devices, you do not need to exclude a Yale Lock from a Z-Wave network before performing the inclusion process.

Tags: , , , , , , , , , , , , , , , , , ,

Comments


Posted By

If you have a Honeywell System with access to Total Connect 2.0, then you will probably want to set up some TC2 notifications. These are used for sending you text and email alerts regarding activity on your alarm system. You will have no trouble setting them up once you know how they work.


Before fully diving into the process of setting up notifications, it's important to understand exactly how TC2 notifications are organized. Notifications are sent out when predetermined system activity events occur, such as arming, disarming, AC power loss, a system alarm, or even just a faulted zone. The recipients of any given notification are determined based on the assigned notification group. Each notification group will have at least one assigned user, and each user can have multiple email addresses and phone numbers set up on their profile.

To break it down, a user must be assigned to a notification group, and that notification group must be associated with the particular event or events that they want to be notified about. Once the event occurs, every user within the assigned notification group will receive the alert. Each user can assign email addresses for email alerts and/or phone numbers for text alerts. Every assigned email and phone number will ultimately be used for notifications, provided that everything has been set up correctly.

Where some people can have trouble with TC2 notifications is when trying to set them up for multiple users. This is usually the case for families, where multiple people in the household want to each receive their own set of notifications. The solution is often to set up a unique user profile for every person who will be using the system and receiving notifications. Each user will need to choose a user code for controlling the system locally. If you want to limit the number of codes on your system, then the other option is to assign multiple email addresses and/or phone numbers to a single user profile. But the downside to doing that is that you won't have any real way of setting who receives what. The point here is that there are multiple ways to ensure that everyone using the system can receive notifications.

Total Connect 2.0 notification can be set up and configured from both the Total Connect 2.0 website and the Total Connect 2.0 mobile app. For our examples, we will mostly be focusing on the website, but understand that these menus are mostly the same on the app. They just might be organized slightly differently to better fit the smaller dimensions of a mobile phone. Really, both the website and mobile app are laid out very similarly, so if you can use one, then you should have very little trouble switching over to the other if needed. The important thing is to understand what all of the various terms mean and how they are all related.

First, let's take a look at the Users Menu of Total Connect 2.0. Like we said earlier, the most common practice is to set up an individual user account for each person who will be regularly using the system and receiving notifications. But if you are trying to limit the number of codes on your panel, then assigning multiple email addresses and/or phone numbers to a single user profile is also an option. On the TC2 website, you can easily locate the Users drop-down menu on the left-hand side.

As you can see, the available options within Users are All Users, My Profile, and Add New User. The All Users option is useful if you are logged into a Total Connect 2.0 account with admin access. It will show all the users you have set up. My Profile is used for adjusting the settings for the user who is currently logged into TC2. This includes setting the user's name, preferred language, TC2 login password, assigned email addresses, assigned phone numbers, and even the security code they use with the panel. And the Add New User option is used for adding a new user to the Panel and if desired, to the Total Connect 2.0 account.


In the picture above, note the "Add SMS" and "Add Email" buttons. These are used for adding additional phone numbers and email addresses to a profile. Each assigned email and phone number will be used for notifications. If you don't want to create multiple users, then that is a method for ensuring that multiple people receive notifications. Just keep in mind that you will have no way of distinguishing which emails and phone numbers will receive which notifications. All emails and phone numbers assigned to the profile will be getting all the alerts.

Alternatively, if you create multiple user profiles, then you can pick and choose which profiles will be assigned to which notification groups. This is how you can set certain users to receive notifications regarding specific system events, while other users won't necessarily have to receive the same alerts for the same events. Whichever option you choose will work fine, and it's totally up to you. But you will have greater flexibility by creating multiple users.

Next, we would like to turn our attention to the Notifications Menu. This is where you will set up notification groups. Recall that different users can be assigned to different notification groups. Each notification group can correspondingly be assigned to different system events that will trigger notifications being sent out.


From the top, List shows the list of the specific system event triggers that will cause notifications to be sent out. Groups are the famous notification groups that we have been talking about throughout this post. Schedules are used for establishing set schedules for predetermined security and automation events to occur. Sensor Activities allows you to select specific sensors so that you can see if the sensor is faulted right from the main page of TC2, rather than having to access the complete system sensors list. For our purposes here, only List and Groups are really important.

After you have created the necessary user profiles and assigned email addresses and phone numbers to said profiles as needed, the next logical step is to create notification groups using the Groups option under the Notifications drop-down menu. If you click on the button with the two people and the + sign, then you can create a new notification group. This will involve providing a name for the notification group and choosing which users are included.


Upon building notification groups, you now get to the juicy step of actually building the triggers that will cause notifications to be sent out. These notification triggers are the actual system events that you want to be alerted about. To access this section, select List under the Notifications drop-down menu. You will likely find a bunch of notifications pre-assigned to the Default Group if you have never configured these settings before. To build new notifications, click the icon with three horizontal bars and the + sign. This will involve choosing the specific event that will trigger the notification to be sent out, as well as selecting the notification group that will receive the notification.


We know we've covered a lot of information here, so let us give a quick recap of the steps involved:

  1. Make user profiles. Each user profile will be able to control the system locally using their own user code. And Standard and Admin profiles will be able to access Total Connect 2.0 to control the system remotely. In most cases, each user profile will represent a different individual who uses the security system.
  2. Assign phone numbers and/or email addresses to user profiles. These are the contact points for sending notifications. Every added phone number and email will be contacted when a notification is triggered to be sent to the associated user. Note that phone number contacts are for text message alerts, NOT phone calls.
  3. Build notification groups. Each notification group consists of one or more user profiles. Every user in the notification group will receive notifications based on their assigned phone number(s) and/or email address(es) when a notification is triggered to be sent out. If you only want some users to receive a certain type of notification, then build a notification group that includes the relevant users, while leaving out users who do not need to be notified or who may receive the intended notification based on their inclusion in a different group.
  4. Create notifications. These are the actual system triggers that will cause a notification to be sent out. When creating a notification, you must select what system event will trigger the notification, and you must also choose which notification group will receive the alert.

Lastly, we briefly want to touch on push notifications that you can set up on your Android or iOS device. A push notification is sort of like a text message notification, in the aspect that it will appear on your phone. But the big difference is that the alert will not appear through your text messaging app, but rather from the TC2 app itself. These push notifications can only be configured by using the Total Connect 2.0 mobile app on a mobile device or tablet. You cannot set up push notifications using a web browser. After enabling Push Notifications from within the TC2 app on your device, you will be prompted by your phone or tablet to allow the App to perform Push Notifications.

First, we will discuss enabling Push Notifications from within an Android device. Upon opening up the TC2 app and logging into your TC2 account, click the three horizontal bars in the upper-left corner. Then choose Settings, followed by Notifications. You can then toggle the Push Notifications option ON or OFF. To set which system events will trigger push notifications, use the My Notifications option.

When using an iOS device, you will reach the option for Push Notifications by clicking the "More" option in the lower right corner of the main screen. From there, go to Settings > Notifications > Push Notifications, making sure that the option is enabled. Once you enable this option through the app, you will be prompted by the phone or tablet to allow the TC2 App to send you Push Notifications.


We really hope that this helps some users overcome their struggles with receiving TC2 notifications. If you are monitored by Alarm Grid, and you are still struggling with Total Connect 2.0 notifications, please feel free to email us at support@alarmgrid.com for extra assistance. We are certainly happy to help you out so that you can get notifications set up exactly how you want them. Our hours for checking emails run from 9am to 8pm ET M-F, so keep that in mind. We look forward to hearing from you!

Tags: , , , , , ,

Comments


Posted By

If you are looking for a wireless sensor solution that comes fully integrated into a door or window, then Andersen Doors and Windows might be for you. There are many Andersen Doors and Windows that come with integrated 345 MHz wireless sensors for using with a compatible alarm system.

Qolsys iq panel 2 plus verizon lte with powerg and legacy honeyw

The wireless sensors that come built into Andersen Doors and Windows are commonly referred to as Andersen Verilock Sensors. For a complete list of Andersen Doors and Windows that utilize these integrated sensors, please see this FAQ as a reference. While we are specifically using this post to highlight the compatibility between the Andersen Verilock Sensors and the 345 MHz Qolsys IQ Panel 2 Plus, there is no reason why you couldn't also use these sensors with a different 345 MHz system, like the Honeywell Lyric or one of the Honeywell LYNX Touch Panels.

The 345 MHz Qolsys IQ Panel 2 Plus serves as a great system for the integrated Andersen Door and Window Sensors, specifically due to the fact that the IQ2+ supports a large number of wireless zones (up to 128). This is important because each Andersen Verilock Sensor will typically use two (2) wireless zones for full system operation. One zone (Loop 1) will monitor for the door or window being opened/closed. The other zone (Loop 2) will monitor for the door or window being locked/unlocked. These sensors have a wireless range of roughly 500 feet when used in an open air environment. Remember that obstacles like thick walls and large metal objects can reduce wireless range.


One very important thing to note about Andersen products is that they are typically only sold through licensed Andersen dealers. Alarm Grid cannot sell these sensors directly. Also, Andersen mandates in its terms of service that their integrated door and window sensors only be installed by professional installers who are certified and approved by Andersen. Failure to comply with the Andersen terms of service can result in the warranty for your door or window being terminated. It is strongly advised that you visit the Andersen website and contact a dealer in your area if you are serious about installing these doors and/or windows.

While Andersen does have strict policies regarding the sale and installation of their integrated sensors, they also have an extensive YouTube Channel with lots of informational and how-to videos involving their products. It is truly a great resource for everyone from the DIY weekend warrior looking to complete their own installation, to the professional installer certified by Andersen. We posted a general informational video from Andersen above, but there are plenty more to check out if you are hoping to learn more about these products.

The best complement for Andersen Security Doors and Windows is alarm monitoring service. And that is a job for Alarm Grid! We offer monitoring plans for all needs and budgets so that you can have an automatic response if your Andersen Door or Window detects activity. If you are hoping to get started with Alarm Grid monitoring service, feel free to email us at support@alarmgrid.com. Our technicians and security planners will be happy to help you get started with monitoring service for your home or business. We check our email from 9am to 8pm ET M-F. We look forward to hearing from you soon!

Tags: , , , , , , , ,

Comments


Posted By

If you're looking for a versatile and effective smart lock solution, then August Smart Lock devices might be for you! There are all sorts of useful integrations you can set up using August Smart Locks, and you can certainly find an option that works for you with the right equipment!

August smart lock pro dark gray z wave deadbolt lock 3rd generat

The easiest way to interface an August Smart Lock with a security system is through Z-Wave. Many wireless alarm panels readily accept Z-Wave devices, and the pairing process is actually very easy. The important thing to remember though is that only the August Smart Lock PRO offers Z-Wave functionality. The PRO is the version of the August Smart Lock sold by Alarm Grid. If you have a non-PRO model, then it won't be able to do Z-Wave.

The advantage to pairing an August Smart Lock PRO with your security system as a Z-Wave device is that it will be automatically pushed over to an interactive automation platform used with your system. This is typically Total Connect 2.0 or Alarm.com depending on the system you are using. By having your August Smart Lock PRO on the same platform as your other automation devices, you can create robust smart scenes for automatic operation. This truly is a great way to get the most out of your August device!

But let's say that you have the non-Z-Wave, "standard" model. There are still ways in which you can include your August Lock with your automation network. The August Connect WIFI Bridge will allow you to connect your August Smart Lock with a local WIFI network. This is possible for both the PRO and non-PRO models. By doing this, you can complete a server-to-server integration with Total Connect 2.0. We have a handy FAQ on the subject that you can view here. Please note that this WIFI integration is only available for TC2. If you want to integrate an August Lock with Alarm.com, then it has to be through Z-Wave. And if you need to buy both the August Smart Lock PRO and the August Connect Bridge, then make sure to scope out this bundled package that includes both!

Lastly, if you are a frequent user of iOS devices and Apple HomeKit, then you might be interested in pairing your August Smart Lock PRO with your HomeKit network. This can technically be accomplished without any extra equipment, as any August Smart Lock PRO is capable of communicating with a dedicated HomeKit hub across a Bluetooth connection. However, we usually recommend using the August Connect Bridge for this job, as the connection will be more reliable. Using WIFI instead of Bluetooth also allows the lock and the Apple HomeKit hub to be located further apart. For more info on using your August Lock with HomeKit, check out this FAQ.

The August Smart Lock PRO and the optional Connect WIFI Bridge are both available for purchase from Alarm Grid! If you have any questions about the August Smart Lock PRO, or if you want to learn more about monitoring service for access to Total Connect 2.0 or Alarm.com, send us an email to support@alarmgrid.com. We're always happy to help you explore your options so that you can make an informed purchasing decision. Our support and planner teams check email from 9am to 8pm ET M-F. We look forward to hearing from you!

Tags: , , , , , , , ,

Comments