June 2018 Archives

Posted By

Hi DIYers! This is an update on Honeywell's partition support rollout for Total Connect 2.0. We previously posted that Honeywell was releasing partition support for TC2 users in stages. This update will allow users to control multiple partitions for compatible systems from Total Connect.

We just wanted to confirm that this rollout has been completed successfully. Everyone who has a compatible VISTA System and access to Total Connect 2.0 should now be able to control multiple partitions through the service. This update provides users with access to the following features on TC2:

  • Name partitions
  • Arm and disarm individual partitions
  • Bypass sensors
  • Assign partition control to different users
  • Enable or disable event notifications
  • Set remote disarming capabilities for individual partitions
  • Choose which user codes can activate and edit partition settings
  • View activity of fire partitions remotely (cannot control a fire partition remotely)

If your update has not gone through successfully, please contact us at support@alarmgrid.com, or call us at 888-818-7728 during normal business hours, which are 9am - 8pm Monday thru Friday. If you would like to learn more about TC2 partition support, please click here.

Comments


Posted By

Telguard has announced that their HomeControl Flex service now supports Amazon Alexa. Users can provide voice commands through an Amazon Alexa device to operate home automation devices. This makes it easier than ever for Telguard HomeControl users to operate their home automation devices.

In order for this to be possible, users will need a HomeControl Flex subscription and a Telguard FlexHub. To enable voice control, start by enabling the HomeControl Flex Skill through the Amazon Alexa App.The Alexa App will then walk you through the rest of the setup process. From there, you will be able to control your home automation devices using voice commands sent through your Amazon Alexa device.

At this time, it is only possible to control home automation devices through the HomeControl Flex Skill. Telguard says that it will soon be possible for a user to arm their system in this manner as well. Make sure to keep an eye on our blog for further updates.

Tags: , , , ,

Comments


Posted By

When it comes to smoke detectors, these crucial life-safety devices can be split into two main types. These are standalone smoke detectors and system smoke detectors. The difference between these two categories is that system smokes are connected with an alarm system for monitoring.

Honeywell 5806w3 wireless smoke detector

With a standalone smoke detector, the device is nothing more than a local noise-making device for alerting on-site building occupants to the presence of a fire. However, a system smoke detector will provide a greater level of functionality. In addition to providing an audible alert of a fire, a system smoke will also cause a fire alarm on the system with which it is programmed.

With that in mind, a system smoke detector is the only type of smoke detector that can send alerts to the end user and/or a central monitoring station about any fire that has occurred in a building. This means that system smoke detectors are the only devices that can request automatic fire dispatch from a central station or alert off-site users to the presence of a fire.

Both system and standalone smoke detectors can include a feature known as "one-go, all-go". This feature means that the smoke detectors are interconnected, and if one smoke in the network activates, the others will activate as well. The one-go, all go function can be very important for ensuring that the entire building is alerted to a fire. Traditionally, this feature was only available for hardwired smokes. But in more recent years, wireless smoke detectors, like the Honeywell SiXSMOKE, have adopted this feature as well.

Honeywell sixsmoke wireless smoke slash heat detector for lyric

As a company that deals with alarm systems and monitoring, Alarm Grid specializes in system smoke detectors. We believe that it is very important that people use system smoke detectors over standalone smokes. If a fire occurs when there is nobody in the building, only a system smoke can alert those who aren't on the premises. This is very important for ensuring that the situation is under control and that the fire does not spread to surrounding areas. And for customers who are connected with a central station, system smokes will allow them to receive automatic emergency fire dispatch in the event of a fire.

However, there is a way to essentially turn standalone smoke detectors into system smoke detectors. This is accomplished using a takeover module. A takeover module is a type of wireless sensor that listens for the sound of an activated smoke detector. If a takeover module picks up this type of sound, it will send an alert to the alarm system to let it know about the fire. This will allow a standalone smoke detector to function as a system smoke detector with an alarm system. One example of a smoke detector takeover module is the Encore FireFighter FF345. This wireless device will send a 345 MHz wireless signal so that a standalone smoke detector can communicate with a compatible alarm system.

Encore firefighter ff345 circular smoke detector takeover moduleRemember, while standalone smoke detectors can be very useful for alerting building occupants, only a system smoke detector can request emergency help when nobody is on-site. Alarm Grid offers a great selection of system smoke and heat detectors that are designed for use with alarm systems. Protect your home or business, and get one today!

Tags: , , , , , , , , ,

Comments


Posted By

Alarm Grid is now offering the T6 Z-Wave Thermostat from Honeywell. This intuitive device is excellent for controlling the HVAC system inside any home or business. It provides support for complete heating and cooling control, and it is very easy to set up compared to other thermostats.


The Honeywell T6 uses Z-Wave Plus technology for communicating with an alarm system. It was previously known as the Lyric T6 Pro Z-Wave Thermostat, but Honeywell changed the name to simply T6 in order to avoid confusion with the Lyric lineup. The device will work with any alarm system that supports Z-Wave devices, including the Honeywell Lyric Controller. Although it is manufactured by Honeywell, the T6 will work with other brands of systems that support Z-Wave as well. Depending on the system that is used, the T6 can controlled from Total Connect 2.0 or Alarm.com.

One thing that makes the T6 great is its ability to be used without a common power from a C-wire. Instead, the thermostat can operate effectively on battery power alone. But if a C-wire is used (which is usually 24VAC from the HVAC equipment), then the thermostat will allow other Z-Wave devices to operate through it as their wireless signals travel back to the Z-Wave controller. But this feature cannot be performed if the T6 is running on strictly battery power.

We have already tested the T6 Thermostat with the Lyric Controller to great success. Our team is particularly impressed with the device's ease of setup and its overall clean user interface. Z-Wave plus capabilities allow it to function extremely reliably on a Z-Wave network, making it a very dependable device. It also provides excellent flexibility with its ability to be used with a C-wire. All of this makes the T6 our new favorite Z-Wave thermostat. You can purchase yours on the Alarm Grid site right now!

Tags: ,

Comments


Posted By

Hi DIYers! Alarm Grid is proud to officially offer DSC Panels and security sensors. As of today, DSC equipment is now available for purchase from Alarm Grid. This includes the wireless all-in-one DSC Impassa System, legacy DSC 433 MHz Sensors, DSC PowerG Sensors and DSC hardwired sensors.

DSC (Digital Security Controls) is a Canadian company that has been providing great innovations in security technology since 1979. The company is known for its reliable equipment that is used for monitoring homes and businesses worldwide. Their panels and sensors provide exceptional performance, and they are constantly providing great innovations for the security industry as a whole.

Our launch for DSC products is based around the DSC Impassa. This is a wireless all-in-one system with an integrated touch-button controller. The main benefit to the Impassa is that it is the only wireless DSC System that provides support for 433 MHz sensors and offers local installer programming. And with an Alarm.com cellular communicator, the system can readily receive cellular monitoring and access the Alarm.com service. All of the DSC Impassa Systems being sold by Alarm Grid will include an integrated cellular communicator designed for use with either the AT&T or the Verizon network.

We are also extremely excited to offer the new DSC PowerG Sensors as well. These are some of the most powerful and versatile security sensors we have ever seen. The PowerG Sensors operate at a wireless frequency of 915 MHz, which prevents them from interfering with system peripherals that operate on the lower 300-400 MHz bands. What makes these sensors particularly amazing is their ability to operate nearly half a mile away from an alarm system in an indoor setting. This makes them perfect for many applications, such as in barns or detached garages. All PowerG Sensors are also protected by 128-bit AES encryption to prevent them from being taken over.

Please note that the DSC Impassa will NOT work with the DSC PowerG Sensors. At this time, we do not offer any panels that can support these devices. However, Qolsys has stated that they should soon be releasing a PowerG daughtercard for their IQ Panel 2 System. This is a perfect solution for users who want to integrate PowerG Sensors into their setup. Additionally, we plan to add DSC Security Systems that do support the PowerG devices in the near future. We'll make sure to provide you with any updates through our daily blog.

Wireless PowerG Door/Window Contact

Wireless PowerG Digital Pet-Immune PIR Motion Detector Wireless PowerG 4-Button Key

If you need sensors for a DSC Impassa, you should go with the legacy DSC 433 MHz Sensors. These are reliable sensors that have proven to be very effective in countless installations. We are happy to announce that these sensors are now available on our site. Additionally, we also have a brand-new selection of DSC hardwired sensors that are available as well. These hardwired sensors can be used in essentially the same way as hardwired Honeywell sensors, and we have many options to choose from.

If you have any questions about DSC Systems or Sensors, please contact us for additional support. You may email us at support@alarmgrid.com or call us at 888-818-7728 from 9am to 8pm M-F.

Alarm grid inside security stickers

Tags: ,

Comments


Posted By

Hi DIYers! Yes, we just had a video recap a few days ago. But we wanted to get out this week's edition early, since we have an exciting announcement coming Monday - it's a secret! We still have four great videos starring Dylan and Jorge this time. These videos focused on Honeywell products.

Programming a Honeywell 5816 Sensor

Dylan goes over the programming process for a Honeywell 5816 Door and Window Contact. This is a wireless sensor that works with Honeywell and 2GIG Systems. To learn the 5816, access zone programming, and put the system into its sensor enrollment mode. Then separate the sensor from its magnet to activate it. The system should recognize the sensor. Repeat this process two more times to learn it in. Then configure the settings for that wireless zone, and save your changes.


Changing the Master Code on a LYNX Touch System

Dylan talks about how to change the Master Code for a Honeywell LYNX Touch System. The Master Code is the code that is primarily used for system arming and disarming. Unlike the Installer Code, a user will certainly want to change their Master Code. Leaving this code at its default could present a major security risk if an intruder knows the default code. The Master Code on a LYNX Touch can be changed from the user-level programming menu.


Using the Tuxedo Touch as a Keypad for a Lyric Alarm System

Jorge explains that the Tuxedo Touch cannot be used as an external keypad for a Lyric Controller. The Tuxedo Touch is designed to be used with a hardwired Honeywell VISTA Panel. The device will provide a VISTA with a touchscreen controller, and it also serves as a Z-Wave controller for integrating home automation devices with the system. The Tuxedo Touch will not work with the Lyric Controller. If a user wants an external keypad for the Lyric Controller, they should use the Honeywell LKP500.


Self Monitoring on a Lyric Alarm System

Jorge discusses how the Honeywell Lyric Controller can be self-monitored. This means that the system will not connect with a central monitoring station. Instead, it will be up to the end user to report any alarm events to the authorities. This is made possible using a service called Total Connect 2.0. Any alarm event that occurs will be sent from the Lyric System to Total Connect 2.0. The user can then receive a text and/or email alert directly from Total Connect 2.0 to immediately let them know about the alarm. Check out our Monitoring Page to learn more.


Tags:

Comments


Posted By

At Alarm Grid, we often encourage users to "roll with what they got" and get as much as they can out of their current system. But there are some cases where enough is enough, and upgrading to a brand-new panel is the best option. Here are 5 reasons for you to make a system upgrade.

1. You don't know the Installer Code. Virtually every alarm system comes equipped with a default Installer Code that is absolutely necessary for providing basic programming functions. We recommend leaving this code at the default because it can be very difficult to get into programming if you lose this code. Additionally, you might not know the system's Installer Code if it was monitored by a different company that intentionally changed the code.

Some systems will technically allow you to get back into programming even if you lose this code. However, this can be a tedious process, as you may need to reset the system to factory default settings. This would require you to reprogram every sensor for the system. And some systems don't even allow this. So if you lose your Installer Code and can't get back into programming, sometimes the best option is to just start fresh with a completely new security system. Depending on the system you choose, you may even be able to keep all your old sensors as well.

Honeywell 5816 wireless door window sensor

2. You want more reliable communication. Nearly every alarm system on the market today is capable of achieving a dual-path communication setup with WIFI and cellular connectivity. This type of setup will provide ultra-fast speeds and excellent reliability. Even many older systems can be upgraded to achieve a similar setup. Cellular connectivity in particular is highly important for anyone who is serious about receiving reliable alarm monitoring services.

Unfortunately, some older systems are stuck using phone line monitoring, and they cannot be upgraded to a superior communication path. Using a phone line is extremely discouraged, as it is an outdated technology that offers unreliable service and slow connection speeds. Not to mention, phone service has some serious issues of its own. So if you're still using an alarm system with phone line connectivity, and you want more reliable and faster monitoring, it might time to make a change.

Honeywell lyric lte a at and t lte cellular communicator for the

3. You want easier daily access. Many older alarm systems are controlled through touch-button keypads that are wired in with the system. While this is fine for many users, it doesn't necessarily compare with the convenience of a touchscreen controller. This type of control will make it much easier to perform daily tasks like arming and disarming from the panel. And while there are certain touchscreen controllers for certain systems (e.g. the Honeywell Tuxedo Touch for VISTA Panels and the Interlogix Two-Way Talking TouchScreen for Interlogix Panels), they are often very expensive in their own right.

Many users often find that the best option is to simply ditch their hardwired system entirely and upgrade to a new wireless one with a touchscreen. And even if you have a large number of hardwired sensors, you can probably bring them over with a compatible wired to wireless converter. For example, the Honeywell 5800C2W will allow hardwired sensors to be used with a new wireless Honeywell System.

Honeywell 5800c2w hardwire to wireless system 9 zone conversion module4. You want more advanced sensors. Alarm sensors are continuing to become more and more advanced over time. And eventually, certain features that are added will simply be incompatible with an older system. An example of this involves the Honeywell SiX Series Sensors and the Qolsys S-Line Sensors. These sensors are both protected by 128-bit AES encryption, which makes them virtually impossible to takeover or hack into. However, this encryption limits their system compatibility. For the SiX Series Sensors, they can only work with Honeywell Lyric Panels. Meanwhile, the Qolsys S-Line Sensors will only work with the Qolsys IQ Panel 2.

It's not to say that older legacy sensors are bad or anything. They will work just fine with a security setup. But they aren't always going to offer the same advanced features and capabilities as newer sensors. So any users who want to incorporate more advanced system sensors into their setup may need to make an upgrade.

Honeywell sixpir lyric smart sensor motion

5. You want to obtain a smart home. Older alarm systems are often limited in how they can be controlled remotely. They are also sometimes restricted in their functionality with smart home applications, such as Google Home and Apple HomeKit. Most of this is done through an interactive service platform, like Honeywell's Total Connect 2.0 or Alarm.com. In fact, most security experts would agree that an alarm system is fairly outdate if it cannot connect with an interactive service platform.

An interactive service is usually accessed through a web browser or through a mobile app on a smartphone. There are some useful basic features that come with virtually any interactive service. These features include arming and disarming the system, checking the status of sensors, controlling Z-Wave home automation devices and viewing the live feed of programmed security sensors. So with access to an interactive service platform, these actions can be performed from nearly anywhere in the world.

Most smart home devices follow a certain protocol when interacting with an alarm system. In these cases, an interactive service platform typically acts as a "middleman" between the smart device and the security system. Any command that is is sent through the smart device (e.g. a Google Home device or an Amazon Alexa device) will first be sent to the interactive service server (e.g. Total Connect 2.0 or Alarm.com) and then to the system (e.g. the Honeywell Lyric Controller or the 2GIG GC3).

However, this type of access can be impossible for older alarm systems. So if you want to obtain a smarter home security setup, upgrading your system may be a good first step.

So, which system is right for me?

If you're in the market for a new system, we generally recommend choosing a wireless system. Most users find that wireless systems are easier to program, and they will provide all-in-one access for the user. These systems are also compatible with some of the most advanced sensors on the market, and they can all be used with an interactive service platform.

Our most favorite systems are the Honeywell Lyric Controller, the 2GIG GC3 and the Qolsys IQ Panel 2. These are all outstanding wireless systems that will provide tremendous functions and features for an end user. They are also each compatible with certain smart home applications. Make sure to check compatibility before making your decision if you want to achieve a smart home setup. But regardless, you can't go wrong with any of these outstanding systems.

Honeywell lyric controller encrypted wireless security system 2gig gc3 diy wireless security system w slash 7 screen Qolsys iq panel 2 at and t wireless security system with at and
Tags: , , , ,

Comments


Posted By

Hi DIYers! In today's product highlight, we are featuring the Honeywell SiXGB Glass Break Detector. This wireless glass break sensor is designed exclusively for use with Honeywell Lyric Systems, including the Honeywell Lyric Controller. The device is great for monitoring any glass windows or protective glass casings.

Honeywell sixgb wireless glass break detector

The SiXGB is the only glass break detector from the Honeywell SiX Series lineup. These are some of the most advanced pieces of security equipment available today. Like the other SiX Sensors, the SiXGB is fully protected with 128-bit AES encryption. This makes it nearly impossible for hackers or potential intruders to wirelessly take over or disable the device.

As a wireless sensor, the SiXGB communicates with the Lyric using a 2.4 GHz WIFI signal. The device boasts a maximum communication range of up to 300 feet. It is bi-directional, and it can receive automatic updates from the system itself. The sensor features a sleek and modern design that will fit in with almost any decor. Integrated LED lights assist with both device testing and enrollment.

The SiXGB functions best when it has a direct line of sight to the glass that it is monitoring. The device will need to hear both the "thud" of an object striking against the glass and the "shattering" sound of the glass itself in order to activate. The device can monitor plate, tempered, laminated, wired, coated and sealed insulating glass. However, the glass must be within the thickness requirements that are outlined below:


The SiXGB is available for purchase on the Alarm Grid site. Get a SiXGB for your Lyric System today!

Tags: , ,

Comments


Posted By

Door alarm sensors, or contacts, are some of the most important devices used with security systems. These devices alert a user whenever their door is opened. They can be used on virtually any type of door. These might include a front door, a back door, screen doors, a patio door, a shed, cabinets and any door inside the building. We typically find that door alarm sensors are some of the easiest to use devices with an alarm system. But still, it can be helpful to read through a comprehensive guide explaining the full ins and outs of these devices. So it here is - everything you've ever to know about door alarm sensors.

Qolsys iq dw mini s encrypted wireless sensors for iq panel 2 qsThe Basics of Door Alarm Sensors

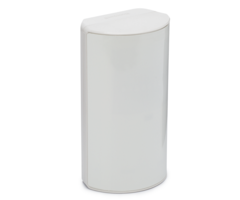
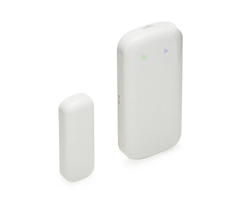
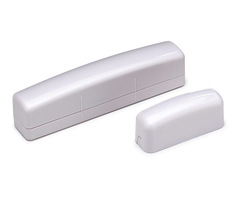
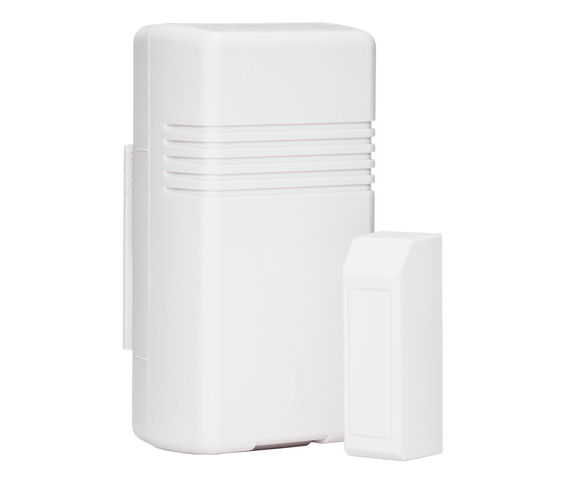
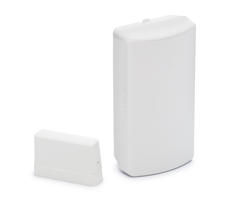
Most traditional door sensors feature a relatively simple design and premise. These devices usually consist of a sensor and a magnet. The sensor is placed on or inside the door frame, and the magnet is placed on or inside the door itself, within a half inch of the sensor. Opening the door will cause the magnet to pull away and separate from the sensor. When this happens, a reed switch inside the sensor will activate. This will cause the sensor to send a signal to the security system, letting it know that the door was opened. The system will then perform the appropriate response based on how the sensor's Response Type was programmed. At the surface, it's all very simple. Some examples of these traditional sensors include the Honeywell 5800MINI, the Honeywell SiXMINICT and the VERSA-2GIG Sensor. Traditional door sensors can be either surface-mounted or recessed.

Honeywell 5800mini interior wireless door and window sensor

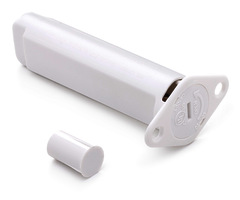
There's also a second variation of door sensors, known as mechanical door sensors. This type of sensor features a physical switch that is pressed down when the door is closed. When the door is opened, the switch will pop up, causing the sensor to activate. From there, the system will perform the Response Type assigned to the zone for that sensor. This type of door alarm sensor is far less common than the other type of sensor. However, the end result is still the same - the system will still perform the programmed Response Type when the sensor is activated. An example of this type of sensor is the Honeywell 5800RPS. While you are less likely to come across this type of door sensor, it's still worth mentioning just in case. Mechanical door sensors are only available in the recessed variety.

Honeywell 5800rps wireless recessed door and window plunger sensTypes of Door Sensors - The Two Distinctions

Now that you know the very basics of door sensors, you can start thinking about the different types. While almost every door sensors operates using one of the two mechanisms mentioned above, there are two other distinctions that are commonly made between door sensors. These are whether the door sensor is wireless or wired and whether the door sensor is surface-mounted or recessed. These considerations will play a big role in determining which door sensor you choose to purchase for your alarm system.

A wireless door sensor will communicate with an alarm system wirelessly. This will prevent the need for running a wire from the system to the door sensor. This can make wireless door sensors significantly easier to install. Another great aspect of wireless door sensors is that they can usually be auto-enrolled with the security system. That said, a wireless sensor will need to have its battery replaced every three to five years. On the other hand, a wired door sensor will need to be physically connected with the alarm system. This can make the installation considerably more difficult in certain cases. However, a wired sensor will never require any battery replacements.

If you are using a wireless door sensor with a wired alarm system, such as a Honeywell VISTA Panel, then you will need to use a wireless receiver. This will allow the wireless signal to be received by the system. When choosing a wireless door sensor, make sure that the wireless frequencies it uses are compatible with your alarm system. For example, Honeywell Panels look for wireless signals that operate at a frequency of 345 MHz, while Qolsys Panels use signals that operate at a frequency of 319.5 MHz. If you try to use a wireless door sensor that does not communicate at the correct wireless frequency, then it will not function with the alarm system.

Honeywell 5800rp wireless repeater
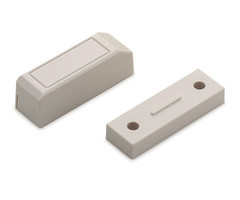
The other major distinction between door sensors is surface-mount sensors versus recessed sensors. Simply put, surface-mount sensors are installed on the outside of the door and its frame, while recessed sensors are installed in the inside. Surface-mount sensors require no drilling. In the easiest scenario, it is possible to mount them using a double-sided adhesive (foam tape). They can also be mounted using screws. With their easier installation, this is generally the preferred type of door sensor. Most users do not mind the fact that a small sensor will be visible on the outside of the door.

Honeywell 5820l super slim wireless door and window sensorHowever, for users who do want a more discrete installation, there are recessed door sensors. These sensors and their magnets need to be inserted into holes that are drilled into both the door and the frame. The exact size of the holes will depend on the specific model of the recessed door sensor that is being installed. Once the sensor and magnet have been installed, they will not be visible from the outside. That said, most users opt for surface-mount door sensors due to the easier installation.

Honeywell 5818mnl wireless recessed door sensor and window senso

Some Notes on Response Types

The primary function of any security sensor is determined by its Response Type. This refers to what action the system will take when the zone is faulted (e.g. the door is opened). Below are the Response Types that are most commonly used with door sensors:

  • Entry / Exit: If the door is opened while the system is armed stay or armed away, then the system will need to be disarmed within its entry delay period. If the system is not disarmed within this time period, then an alarm event will occur. Most alarms will feature two different Entry / Exit settings. This allows two different entry delay periods to be used on the same system for different zones.
  • Perimeter: If the door is opened while the system is armed stay or armed away, then an alarm event will occur immediately.
  • Interior Follower: If the system is set to armed away, an alarm event will immediately occur if the door is opened, assuming that an entry / exit zone is not faulted first. If an entry / exit zone is faulted first, then the system must be disarmed within its entry delay period, otherwise an alarm event will occur.
  • Interior With Delay: If the system is set to armed away and the door is opened, then the system must be disarmed within its entry delay period. If the system is not disarmed within this time period, then an alarm event will occur.
  • Day / Night: If the system is disarmed and the door is opened, a trouble event will occur on the system. If the system is armed away or armed stay and the door is opened, an alarm event will immediately occur on the system.
  • 24 Hour Audible: Opening the door will immediately cause a full system siren and an alarm to be set off, regardless of what state the system is currently in. This Response Type should not be used unless the door should never be opened for any reason.
  • 24 Hour Auxiliary: Same as 24 Hour Audible, but only the panel itself will produce a siren. Any external sirens or noisemakers will not activate. This zone type is ideal for emergency medical cabinets that would only be opened in a serious medical emergency.
  • 24 Hour Silent: Same as 24 Hour Audible, but no siren or sound will be produced.
  • Fire No Verification: Opening the door will immediately cause a fire alarm to be set off, regardless of what state the system is currently in. This is the ideal Response Type for fire doors.

Certain Response Types are only available for certain Device Types. Depending upon the panel you are using, not all of these Response Types will be made available for the Device Type of "Door". A way to work around this is to set the Device Type to "Other". This will allow you to set any possible Response Type for the door sensor.

2gig dw10 wireless slim door slash window contactOther Programming Settings

Programming a door sensor has to do with more than just the Response Type and the Device Type. Below are some of the other programming settings available for a door sensor. Please note that these settings are specific for a Honeywell Lyric Controller, and different settings may be available on another type of panel.

  • Serial Number: This is how the system will specifically identify the exact door sensor that is being used.
  • Loop Number: This tells the door sensor what function it should perform. Each door sensor usually has a specific loop number that should be set for the device to function as a door sensor. Some door sensors have multiple possible functions that can be used with the device. One example is the Honeywell 5816, which can be used as both a door sensor and as a wireless transmitter depending upon the loop number that is set.
  • Zone Descriptors: These serve as the name of the door sensor. The panel will announce the zone descriptors whenever the zone for that sensor is affected.
  • Alarm Report: This tells the system whether or not it should send an outbound signal to the central monitoring station. If you turn this off, then all the sounds and sirens will still be made, but a distress signal will never be sent to the central station. An example for turning this off might be if you are monitoring a liquor cabinet to make sure your teenage doesn't get into it. You might want a very loud siren to go off so that you know if this happens. However, you obviously wouldn't want the police to show up at your house in this situation!
  • Chime: This will have the panel produce a simple chime whenever the door is opened. Many panels will allow you to toggle between different chime options for the panel. Remember, you will still need to have the local chime for the system enabled from the main settings menu.
  • Supervision: This will have the system monitor the door sensor for low battery or loss of signal. Keep this enabled to make sure that the door sensor is always in proper working order. This setting is only used with wireless door sensors.

For any programming questions related to a specific panel, please consult the programming guide for that panel. This information is readily available on the Alarm Grid website in the form of FAQs.

Honeywell 5816 wireless door window sensor

Common Door Sensor Questions

Below are some questions that are commonly asked about door sensors:

1. How do I program my door sensor?

If it is a wireless door sensor, it can most likely be auto-enrolled.This is accomplished by accessing zone programming on the system and then faulting and restoring the door sensor three times to learn it in. You can fault and restore the door sensor by separating the sensor and the magnet and then clicking them back together. From there, make any necessary programming configurations on the panel. See the above information on Response Types and other programming settings.

If it is a wired door sensor with a hardwired VISTA Panel, then we recommend consulting this FAQ. You may also need to consult the VISTA 15P and 20P Programming Guide.

Honeywell vista 15p alarm control panel

2. How long do door sensor batteries last?

A wireless door sensor will typically require a battery replacement every three to five years. Wired door sensors do not use batteries, and they will never require a battery replacement.

Panasonic cr123a 3v battery

3. How close should the door sensor be to its magnet?

We usually recommend placing the door sensor magnet within a half inch of the sensor. Some sensors may allow for a greater separation distance than others before a faulted zone will occur. The closer the magnet is to the sensor, the less likely an unwanted fault or a false alarm is to occur.

Honeywell 5899 magnet for 5816 wireless door sensor and window s

4. Are there any encrypted wireless door sensors?

Yes, there are encrypted wireless door sensors. The Honeywell SiXCT, the Honeywell SiXMINICT, the Qolsys IQ DW MINI-S and the Qolsys IQ Recessed Door-S are all encrypted wireless door sensors.

Honeywell sixct wireless door slash window contact for lyric con

5. What is the best door sensor?

Please see the following FAQs:

Tags: , , , , , , , , , , , , , , , , , , , , , , , , ,

Comments


Posted By

Hi DIYers! Are you ready for the Alarm Grid weekly video recap? By pure coincidence, Joe was the star of every video this week. He certainly did a great job of making videos to help users learn the basics of their alarm systems. Let's check out the newest videos from our YouTube channel.

Registering a Lyric Alarm System SIM Card

Joe talks about how to register a SIM Card for a Honeywell Lyric Controller. All of the cellular communicators for the Lyric Controller provide the same function. The main difference between these communicators is that they connect to different cellular networks. The fastest communicator at this current time is the AT&T LTE Communicator. The cellular module is inserted into a port located on the side of the system. The communicator can be installed after choosing the "Install Cellular Module" option within the advanced settings menu.


Factory Defaulting a 2GIG GC3

Joe discusses how to reset a 2GIG GC3 to factory default settings. To do this, you will need to know the system's Installer Code to do this. Both a soft default and a hard default can be performed. The soft default will allow you to choose which settings to reset, while a hard default will reset everything. A soft default is performed by choosing the "Restore Defaults" option. A hard default is performed by pressing and holding the two main buttons after the system is powered on.


Honeywell VISTA 20P vs Honeywell VISTA 21iP

Joe talks about the differences between the Honeywell VISTA 20P and the VISTA 21iP. These systems feature mostly the same functions and features, but they differ in terms of their communication paths. The VISTA 21iP board provides support for a hardwired ethernet connection and cellular connectivity. The system will use ethernet as its primary connection and cellular service as a backup. Without any upgrades, the VISTA 20P will be forced to rely on a phone line connection. To utilize a cellular or IP connection on the VISTA 20P, some upgrades will be needed.


Adding User Code to a VISTA Security System

Joe goes over the process for adding a new user code to a VISTA Alarm System. The number of user codes supported by the system will depend on the type of VISTA System that is being used. The main way to add a new user code is by using an external keypad, like the Honeywell 6160RF. The command for adding a new user code is [Master Code] + [8] + [2-Digit User Number] + [Desired 4-Digit Code]. Only the Master Code can be used to add a new user code.


Add a Duress Code to a VISTA Alarm System

Joe discusses how to program a duress code for a VISTA Security System. Entering in a duress code will send a panic signal to the central monitoring station. A duress code is programmed by assigning the duress attribute to any valid user code. Any system code except for the Installer Code and the Master Code can be set up as a duress code. The command for setting a user code as a duress code is [Master Code] + [8] + [2-Digit User Number] + [#] + [1] + [3].


Tags:

Comments