March 2019 Archives

Posted By

Hi DIYers! We are taking a look at two very interesting products today. The DSC PG9934P and the DSC PG9944 are the ideal PowerG Image Sensors for use with the Qolsys IQ Panel 2 Plus Alarm System. They can both send quick and convenient images to Alarm.com upon activation for remote viewing.


When the original Qolsys IQ Panel 2 System was released, it required a Qolsys IQ CARD-IS to communicate with Qolsys Image Sensors. This is still the recommended image sensor option for those with a standardIQ Panel 2. However, the IQ CARD-IS actually uses the same antenna that is used by the PowerG daughtercard for the IQ Panel 2 Plus. As a result, it is not feasible to use both Qolsys Image Sensors and PowerG Wireless Sensors with an IQ Panel 2 System.

But with the DSC PG9934P and PG9944 PowerG Image Sensors, there now exist viable options for IQ Panel 2 Plus owners. Each device can auto-enroll with a Qolsys IQ Panel 2 Plus System much like any other PowerG Sensor. Remember, there is a special trick to auto-enroll PowerG Sensors with an IQ Panel 2 Plus. Knowing this technique can save you some frustration when you go to enroll the sensors!

After putting the panel into its wireless enrollment mode, press and hold the learn button on the PowerG Sensor. An LED light will appear after a brief moment, but you should not stop holding the button. Keep it held down, and the light will disappear. Then it will reappear after a brief moment. At that point, you should release the button to auto-enroll. As image sensors, you can add up to five of these devices on a single IQ Panel 2 Plus System. This can be any combination of up to five total PG9934P and PG9944 sensors.

Qolsys iq panel 2 at and t wireless security system with at and

Both motion sensors function like any standard PIR motion detecting sensor by looking for changes in infrared (IR) energy that occur with movement. But as image sensors, they will take pictures using their built-in cameras. These devices can also be configured to send images upon a panel disarm or during alarm events. Only one image will be sent out at a time with the PowerG Image Sensors.

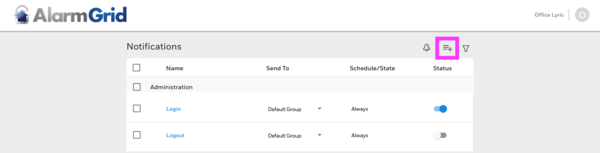
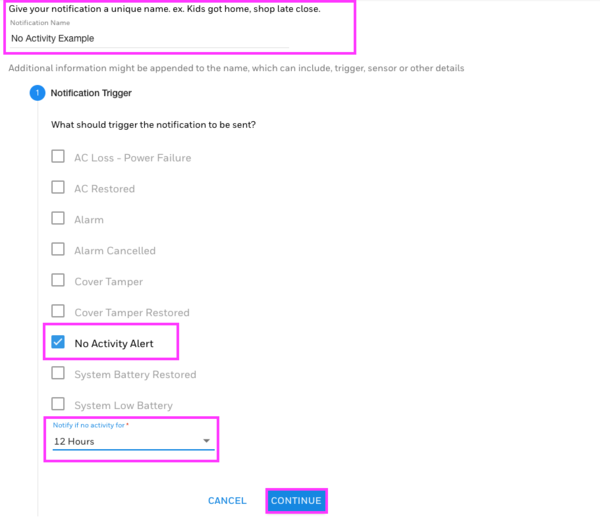
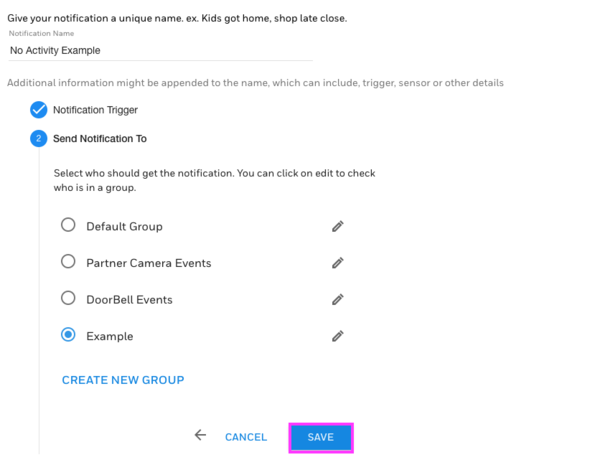
Any resulting image is first sent to the IQ Panel 2 Plus, and the system forwards the image to Alarm.com. From there, Alarm.com will pass the image to anyone included in the notifications group. The image can be sent through text and email. You just have to configure that notification settings on Alarm.com. More information about setting up this feature can be found in this FAQ.

In order to use the PG9934P or PG9944 with an IQ Panel 2 Plus, the system must be running firmware version 2.3.0 or higher. More information on this firmware update is available here. At this time, Alarm.com recognizes the photos produced by these sensors as "Panel Camera" images. This is the same category of images that the camera on the front of the panel uses when it takes Disarm photos.

We believe that Alarm.com may change this category name during a future IQ Panel 2 firmware update. After all, we expect that users would want a different category for images produced by the panel and images produced by their image sensors. But for now that is the category to look for if you are having trouble finding the resulting images. Also keep in mind that Panel Camera Images must be enabled on Alarm.com for the feature to work. Note that you can also view the images from the panel.

You can see image upload activity in the Events Log on the Alarm.com website, which looks like this:


And below is what the resulting images look like on the Alarm.com website. Note that the image is listed as "Panel Camera", but it is actually from a PowerG Image Sensor.


And if you get the image via text message:


The major difference between the PG9934P and the PG9944 is that the PG9944 is suitable for outdoor use. It is weather-resistant and capable of surviving harsh environments. But the PG9934P is designed for indoor use only, and it will become damaged if exposed to heavy rain, wind or dust. Additionally, the motion sensor for the PG9944 is slightly more advanced than the one used on the PG9934P.

But in principle, these devices function in largely the same manner. Both feature PowerG technology, which includes an extended communication range and 128-bit AES encryption for added security. They also both offer pet immunity options, with the PG9934P being suitable for small animals weighing up to 85 pounds, and the PG9944 being suitable for small animals weighing up to 40 pounds. Keep in mind that mounting location is very important for ensuring proper pet-immunity.

If you would like to learn more about the PG9934P or PG9944, please reach out to us! The best way to contact us is to send an email to support@alarmgrid.com. Our team will review the email and get back to you as soon as possible. You may also call us at (888) 818-7728 during our normal business hours of 9am to 8pm EST M-F. We look forward to hearing from you!

Tags: , , , , , , , , ,

Comments


Posted By

Hi DIYers! We have learned that Resideo put out a new feature for Total Connect 2.0 in the form of "No Activity Alerts". Users can now receive text and/or email alerts when no system activity occurs after a set period of time. This can be great for making sure that a loved one is active.


The No Activity Alert feature represents an ideal method for keeping tabs on a relative or loved one and ensuring that they are moving around and using their system like normal. The feature can be be set to send notifications after every hour, four hours, eight hours, 12 hours or 24 hours. If no system activity occurs after the set period of time, then a notification will be sent to out to any phone number or email address listed as a recipient.

Total Connect 2.0 previously made it possible to send out a notification if a specific event did not occur within a set period of time. Users had to create individual notifications for each activity that did not occur. This general No Activity Alert feature is more of a "catch-all" to eliminate the need for setting up a series of notifications.

Additionally, this new feature will continue to send out notifications every time the set period passes without activity occurring. For example, if you have the feature set to send alerts after four hours of no activity, you will receive a first notification after four hours of no activity, then a second notification after eight hours of no activity, and so on.

Users should keep in mind that No Activity Alerts will only be sent out when the system is in a Disarmed state. If the system is Armed, then No Activity Alerts will not be sent out. The list of activities that can prevent a No Activity Alert from being sent out is extremely extensive. No notification will be sent out as long as at least one of the following events occurs during the set time period:

  • Sensor Open
  • Sensor Closed
  • Sensor Trouble
  • Sensor Trouble Cleared
  • Sensor Alarm
  • Sensor Alarm Cleared
  • Sensor Bypass
  • Sensor Bypass Cleared
  • Sensor Tamper
  • Sensor Tamper Cleared
  • Sensor Supervision
  • Sensor Super. Cleared
  • Sensor Low Battery
  • Sensor Low Batt Cleared
  • Sensor Close Left Open
  • Sensor UnMask
  • Disarmed
  • Armed Away
  • Armed Away (Bypass)
  • Armed Stay
  • Armed Stay (Bypass)
  • Armed Away Instant
  • Armed Away Instant (Bypass)
  • Alarm
  • Alarm (Bypass)
  • Armed Stay Instant
  • Armed Stay Instant (Bypass)
  • Disarmed (Bypass)
  • Fire
  • Alarm Cancelled
  • Disarmed Not Ready
  • CO Alarm
  • Alarm Silenced
  • Exit Alarm
  • Night Stay
  • Night Stay (Bypass)
  • Night Stay Instant
  • Night Stay Instant (Bypass)
  • Armed Custom
  • Armed Custom (Bypass)
  • Armed Custom Instant
  • Armed Custom Instant (Bypass)
  • Comm Fail
  • Comm Fail – Resolved
  • AC Restored
  • System Battery Restored
  • Phone Line Restored
  • Program Exit (New Config)
  • Arming
  • Disarming
  • Cover Tamper
  • Cover Tamper Restored
  • Duress Alarm
  • Partition Removed

Overall, this feature is particularly useful for making sure that loved ones are using their system like they are supposed to. You can set it up for an elderly or disabled user to make sure they haven't fallen down or experienced an injury. It's also great for making sure that your kids or your spouse has returned home safely.

You can set up this feature from the Total Connect 2.0 website or mobile app. For this post, we're going to show the feature on the website. Start by logging into your Total Connect 2.0 account, and then choose the Notifications tab on the left, followed by List. Then choose the Add Notification button:


Choose Security > System. Then provide a Notification Name. In our example, we chose "No Activity Example". Then select No Activity Alert. Finally, choose the time interval for when a notification should be sent out. We chose 12 Hours in our example. Press Continue when you have finished:


Next you will choose who will receive the notification. You can use an existing group, or you can create a new one. In our case, we used a group called "Example", but you can set yours accordingly. Press Save when finished, and then press Yes to confirm:


Your new notification should then appear somewhere in your list under the Security section:


If you are an Alarm Grid monitored customer with questions about this new feature, please do not hesitate to reach out to us. You may email us at support@alarmgrid.com, or call us at (888) 818-7728 during our normal business hours of 9am to 8pm EST M-F. We look forward to hearing from you!

Tags: , , ,

Comments


Posted By

Hi DIYers! We are happy to announce that the Honeywell LYNX Touch Updater Tool is now available for purchase on our website. This easy-to-use module allows users to conveniently update the firmware for any Honeywell L5210 or L7000 and get it running on the latest software version.


As you may recall, LTE Communicators for the L5210 and L7000 were released last year. There is the LTE-L57A for the AT&T LTE Network and the LTE-57V for the Verizon LTE Network. But these systems require a minimum firmware version to support these modules. The LTE-L57A requires firmware version 9.00.209 or higher, while the LTE-L57V requires firmware version 9.00.201 or higher. Any newly manufactured L5210 or L7000 will already be running a high enough firmware version. However, older L5210 and L7000 Systems may require a firmware update.

It used to be possible to push down an over-the-air (OTA) firmware update to an L5210 or L7000. However, this is no longer the case. All firmware updates for these two systems must be applied using the Honeywell LYNX Touch Updater Tool, officially known as the Honeywell LYNXTOUCH-MSD. This tool allows users to update the firmware for their L5210 or L7000 System at their own leisure. It will also come in handy if Resideo decides to release any future firmware updates for these systems at some point.

Alarm Grid has already released an FAQ to help you use this new device to upgrade your L5210 or L7000 System. We also invite you to check out the Installation Guide for the module for even more information. Remember, you will want to get your LYNX Touch System connected with an LTE network sooner rather than later. The 3G sunset is rapidly approaching, and LTE connectivity will allow you to greatly extend your system's lifespan!

If you are an Alarm Grid monitored customer with any questions about the Honeywell LYNXTOUCH-MSD Updater Tool, or if you would like to know why upgrading to LTE is important, we encourage you to reach out to us. You may email us at support@alarmgrid.com or call us at (888) 818-7728 during our normal business hours of 9am to 8pm EST M-F. We look forward to hearing from you and answering any questions you might have!

Update: As of October 2019, the LYNXTOUCH-MSD Updater Tool can also be used with an L5200 Panel. See this blog post for more information.

Tags: , , , , , , ,

Comments


Posted By

Hi DIYers! Our video team was super productive over the past week, as they put up nine new videos for us all to enjoy. Jorge, Jarrett and Joe are all back and ready to help you get the most out of your system. Let's take a look at the latest content from the Alarm Grid video team.

Adding Additional User Codes to a Qolsys IQ Panel 2

Jarrett teaches users how to add additional codes to the IQ Panel 2. User codes can be assigned as a "Master", "User" or "Guest. A Master User can change system settings in addition to arming and disarming. Despite the name difference, there is actually no difference between "User" codes and "Guest" codes, as they have the same authority level. Any new system code that is added will be available on Alarm.com for further control and configuration.


Disabling Chime on a Qolsys IQ Panel 2

Jarret demonstrates how to disable the Chime function for the Qolsys IQ Panel 2 System. Normally if a zone has Chime enabled, then the panel will produce a brief Chime tone when the associated sensor is activated. However, you can disable Chimes for the entire system so that no faulted zones result in a Chime. You can also configure the Chime settings individually for each zone so that some sensors result in a chime, while others do not.


Muting the Honeywell 5828V Wireless Keypad

Jorge explains how users can mute the voice annunciation function for the Honeywell 5828V Keypad. By muting the keypad, no voice annunciations will be produced when zones are faulted. It will also not announce any changes in the current Arming state. However, this will not affect voice annunciation for the panel itself if it has the feature enabled. Additionally, muting the keypad will not stop the device from producing tones when buttons are pressed. It only affects spoken voice.


Controlling the Volume in a Honeywell 5828

Jorge demonstrates how users can adjust the volume on a Honeywell 5828. This will affect the tones produced when keypad buttons are pressed. Unlike the the Honeywell 5828V, the standard Honeywell 5828 is relatively basic it terms of volume control. The volume can only be adjusted one level at a time, and it cannot be muted entirely. The keypad can be used with any LYNX Touch Panel and any Honeywell VISTA Panel that has an added wireless transceiver.


Updating the Firmware on a Qolsys IQ Panel 2

Jarrett covers the process for updating the system firmware on a Qolsys IQ Panel 2. Performing a firmware update is often necessary for unlocking newly released system functions and capabilities. The IQ Panel 2 System will need to be connected with a local WIFI network and be running on transformer power for the update to go through. It also cannot have a low-battery condition. You can search the network for an update or apply a Patch Tag.


Basics of Alarm Keypad Operation

Jorge teaches users the basics of how to use an alarm system keypad. The main purpose of a keypad is to provide an on-site access point for controlling an alarm system. This includes Arming and Disarming. A keypad can be either a primary controller or a secondary access point depending on the system. A primary controller is used performing deep-level programming changes. If you use a keypad as a primary controller, you should make sure it is an Alphanumeric Keypad. A Fixed-English keypad cannot be used for deep-level programming.


Installing the Qolsys IQ Card-IS to the Qolsys IQ Panel 2

Joe shows users how to install the Qolsys IQ Card-IS inside the IQ Panel 2 System. The IQ Card-IS module allows you to use Qolsys Image Sensors with the system. These devices use PIR technology to detect motion. If motion is detected, the image sensor will take a photo and send it to Alarm.com. Since the IQ Card-IS uses the same antenna as the PowerG daughtercard used with the IQ Panel 2 Plus, it is only recommended to be used with the standard version of the system.


Resetting a Honeywell Tuxedo Keypad

Joe explains the different methods for resetting a Honeywell Tuxedo Touch Keypad. There are four reset options that can be performed. A Keypad Reboot Reset will simply power cycle the device. A Keypad Factory Reset will restore all settings and configurations to default, without clearing Z-Wave devices. But the Z-Wave devices will have their names reset. A Z-Wave Reboot Reset will power cycle the Z-Wave controller, without clearing devices. A Z-Wave Factory Reset will default all Z-Wave setting and clear all Z-Wave devices.


Qolsys Hardwire 16-F Overview

Joe goes through and explains how the Qolsys Hardwire 16-F functions. This is a wired to wireless converter that can support 2-wire smoke detectors on its 16th zone. It is primarily used for allowing wired sensors to communicate with wireless panels. The module works with nearly any system that accepts the 319.5 MHz frequency. Each zone terminal on the Hardwire 16-F must have a 4.7k end of line resistor, even if the zone is not used. Additionally, you must properly configure a zone as NC or NO before enrolling with the panel.

Tags: , , ,

Comments


Posted By

For a current, updated list of states that we charge sales tax in, check out our Sales Tax Policy, which is updated daily

Recently the Supreme Court decided South Dakota v. Wayfair, Inc. (Wayfair). The ruling allows states to require out-of-state retailers to collect sales tax. The decision changes the landscape of e-commerce significantly.

We appreciate the benefits of doing business in the United States. We were blessed with unprecedented advantage as an e-tailor. We are sad that one of e-commerce's biggest benefits is disappearing. But we also recognize the change was inevitable. We appreciate that most states have provided immense clarity. We also appreciate that technology allows small e-tailors to affordable compliance solutions.

We recognize that Alarm Grid is now required to pay our fair share in states all around the US. Unfortunately, that means that we are going to start charging sales tax in 32 new states. Those taxes will begin showing up on invoices as early as yesterday. All taxes will be active between now and early April. Most invoices will reflect sales tax as of April 1, 2019. While this would be a great April Fools prank, unfortunately, it’s not one. Alarm Grid is in Florida. Our Florida customers have always had to pay sales tax on both product sales and monitoring. If you're one of Alarm Grid's Florida residents, nothing is changing for you.

Unlike Florida, some states exempt services like monitoring. Others do not. Navigating the tax landscape of 50 states is extremely complicated. We've spent a long time unwinding which state does what. Regardless of the state, products are always taxed. Moreover, as Alarm Grid grows, we are going to become nexused in more and more places. As that happens, we will make announcements to keep you updated about how your charges will change.

Below is a table of locations and respective links to relevant regulations. Products will be taxed in all listed states. In the "Monitoring Taxed" column we list whether states require us to charge sales tax on monitoring. Some states do not charge taxes on alarm monitoring. Others do. If the cell is blank it’s because we are still awaiting answers from that state's Department of Revenue. As soon as we know, we will update the table.

For the wild west internet that we have come to know and love, this might feel like a big setback. But we are aware of the enormous advantage online businesses gain from regulations. We have never competed on price, and we won’t be starting today. Alarm Grid has the best service in the industry. We have changed the way the industry works with customers. And we will continue to do just that.

There is no innovation in profiting from the free margin provided by our ability or any company’s ability to avoid taxes. And while the lower prices have been nice, Alarm Grid doesn't grow by eking out an additional 3-8% from each sale. Rather we need to continue working to stand out from our competition. We will continue to provide the same great products, service, and support.

This is a bittersweet day for us. It’s a day that all e-commerce companies knew was coming. We apologize for those impacted by the change. And we hope you continue using Alarm Grid for all of your security system needs.

State

Monitoring Taxed?

Date Taxes Will Begin Appearing on Invoices

Arizona

No

3/22/2019

Arkansas

Yes

4/1/2019

California

No

3/22/2019

Colorado

No

3/26/2019

Connecticut

Yes

4/1/2019

District of Columbia

Yes

4/8/2019

Florida

Yes

7/20/2012

Georgia

No

3/24/2019

Hawaii

Yes

4/1/2019

Illinois

No

3/22/2019

Indiana

No

3/22/2019

Iowa

Yes

4/1/2019

Kansas

No

4/1/2019

Kentucky

No

3/26/2019

Louisiana

No

4/8/2019

Maine


Sometime in Early April

Maryland

Yes

4/1/2019

Michigan


Sometime in Early April

Minnesota

Yes

4/1/2019

Nebraska

Yes

4/1/2019

Nevada

No

3/22/2019

New Jersey

Yes

4/1/2019

North Carolina

No

4/26/2019

Ohio

Yes

3/21/2019

Oklahoma

No

3/22/2019

Pennsylvania

No

3/26/2019

South Carolina

No

3/26/2019

South Dakota

Yes

5/17/2019

Tennessee

No

3/26/2019

Texas

Yes

3/25/2019

Utah

No

4/1/2019

Virginia

No

3/22/2019

Washington

Yes

4/1/2019

West Virginia

Yes

Sometime in Early April

Wisconsin

Yes

5/17/2019

Tags:

Comments


Posted By

A couple of weeks ago, we learned that AlarmNet announced an end date for activating 3G and 4G cellular communicators. Now Alarm.com has followed suit by announcing that they will no longer allow 3G activations starting June 30, 2019. Future activations must use LTE communicators.


Both AT&T and Verizon have made it clear that LTE and eventually 5G communication is the way of the future. They are beginning the process of phasing out their older 3G networks in favor of faster and more advanced technology. AT&T has publicly stated that their 3G network will be shutdown in February 2022. The shutdown for the Verizon CDMA Network is expected to occur around this time as well. Users should start preparing for the long-term now by getting LTE communicators for their systems.

If you have an Alarm.com 3G Cellular Communicator, you must activate it by June 30, 2019, or else it will not work. If you deactivate your Alarm.com 3G Communicator after this date, you will not be able to reactive it. Reactivating a communicator is considered the same as a new activation. If you have a 3G communicator that is already activated, then it will continue to work as long as the associated cellular network is kept in service. But once the network is shutdown, the communicator will stop working.

Any customer who has an Alarm.com 3G Communicator should get it activated as soon as possible to avoid missing the cut-off date. Customers who want to prepare for the long-term should obtain an LTE communicator. This may mean upgrading to a new alarm panel. To activate a communicator or to learn about the options available to you, please email support@alarmgrid.com. You may also call us at (888) 818-7728 during our normal business hours of 9am to 8pm EST M-F.

Note: Verizon stopped allowing activations for all CDMA communicators starting on December 22, 2018. More information about this can be found here.

Tags: , , , , , , , , , , , , , , , , , , , , , , , , , , ,

Comments


Posted By

We have received news that San Jose, CA has recently repealed its Verified Response policy for emergency dispatch. The city will now respond normally to a dispatch request from a central monitoring station. This is great news for customers in San Jose who depend on reliable dispatch.

For anyone who does not know, Verified Response is a policy in which a dispatching center will not send out emergency police response unless a crime is confirmed visually or audibly. The purpose of these policies is to reduce false alarms and to save costs by not sending out potentially unnecessary dispatch.

As a monitoring service provider, Alarm Grid is opposed to Verified Response policies. We want all our customers to receive reliable emergency dispatch in the event of a potential crisis. We understand the need to limit false alarms and not waste the time and resources of our valued local law enforcement. That being said, we take several steps to eliminate false alarms with our central station partner, Criticom.

Some of the actions that Criticom takes to reduce false alarms include check-in calls, false alarm passwords, and allowing end users to place their systems on test mode. A Verified Response policy only makes it more difficult for an end user to get the help that they need in a timely manner, and it does not sufficiently reduce occurrences of false alarms.

The truth is that the vast majority of false alarms come from a very small percentage of overall alarm users. Putting burdensome requirements in place before allowing the authorities to properly respond and failing to work directly with the end users and alarm companies that create false alarms leads to a less safe environment for all.

We are sure that our San Jose customers will appreciate this action, and they will enjoy greater peace of mind in knowing that Criticom Monitoring Services will now be able to successfully request emergency police dispatch to their homes and businesses. Additionally, we have noticed a trend that many Southwestern US Cities have started reversing Verified Response policies that were all put into effect somewhat recently. Alarm Grid will provide updates as we receive more information.

If you receive alarm monitoring service in an area where a Verified Response policy is still in place, there are some actions you can take to ensure that emergency help is sent out during a crisis. The best option is to install security cameras or use image sensor modules to provide a visual look-in for any activity at your home or business. End users might also consider using panels with a built-in camera, such as a Honeywell Lyric Controller or a Qolsys IQ Panel 2.

Remember that when using cameras, you must be able to respond to calls from the central station and let them know that any given alarm is legitimate. If you cannot do this, then you will not receive the authority response you expect. For these users, the best option is often to use a local guard service that handles the dispatch and alerts the local police after they arrive on the scene and confirm that a crime is taking place. Alarm Grid customers in Verified Response areas can contact us about arranging for a local guard service to protect their homes and businesses.

We encourage every Alarm Grid customer to check with their local jurisdiction to find out if any Verified Response policies are in effect in their area. If you have any questions about Verified Response policies, you can always reach out to us. We are available via email at support@alarmgrid.com. You may also call us at (888) 818-7728 during our regular business hours of 9am to 8pm EST M-F. We look forward to hearing from you!

Alarm grid inside security stickers

Tags: , , ,

Comments


Posted By

Hi DIYers! We have received news from Honeywell that Lyric Firmware Update MR8 is now available! This is the latest firmware update for the Honeywell Lyric Controller, and it is currently available for free download. End users can expect a few minor system improvements with the update.

Honeywell lyric controller encrypted wireless security system

From an end user's perspective, the following changes can be expected with Firmware Update MR8:

  • The WIFI indicator in the upper-left corner will now display a red X if WIFI connectivity goes down.
  • The Honeywell SiX Series Sensors now have a shorter RF transmission supervision interval. It is now six hours for all burglary devices, four hours for the Honeywell LKP500 Keypad, and two hours for all life-safety devices. Previously, the RF transmission supervision interval was 12 hours on all devices.
  • In the SiX Programming Menu, the Zone Number will now be shown in Red if the zone is faulted. Additionally, a tamper message will be displayed in Red if the zone is tampered.
  • The SiX Programming Menu now shows every enrolled SiX Series device for quick access. Newly enrolled sensors will be labeled "Newly Enrolled", which will be displayed in place of the Zone Number.
  • The Honeywell LKP500 Keypad will no longer beep after performing an update.
  • The Honeywell LKP500 Keypad will no longer announce Night Stay when Voice is disabled.
  • Eaton Cooper Z-Wave Light Switches are now supported.

Additionally, the update includes various changes that will make it easier for your alarm company to monitor your system. That is why performing the update is crucial for all Lyric System owners.

Performing the update is very easy. First, you must make sure that your Lyric System is ready and has no trouble conditions, including any tamper cover and low-battery messages. It must be actively monitored with a working communication path. Start from the main screen of the system, and choose Security, followed by Tools. Then enter your system's Installer Code, which is 4112 by default. Then click on the Update Firmware button. The button should grey out to indicate that it has been selected.

You can then return to the home screen, and the update should be applied automatically. It will typically go through in a few minutes with a WIFI connection, but it may take up to an hour with cellular only. Once the update is ready, the system will reboot to complete the process.

You can check the system revision to confirm the update. Go to Security > Tools > Master Code (default 1234) > Advanced > System Information. Then check the revision to make sure it reads 01.08.


If you are an Alarm Grid monitored customer with any questions about the the MR8 Firmware Update, you can email support@alarmgrid.com for more information. You may also call us at (888) 818-7728 from 9am to 8pm EST M-F. We look forward to hearing from you!

Tags: , , , , ,

Comments


Posted By

Hi DIYers! Today, we're presenting another basic security tip. This tip is to never Arm or Disarm your system using your Installer Code. That system code should only be used for programming, and it should be kept at its default to prevent you from being locked out of programming later.

Honeywell lyric controller encrypted wireless security system

If you go to Arm your system, you will often be prompted to enter a system code. Normally, you will use your Master Code or a standard user code to complete the Arming process. However, you will notice that your can technically Arm using your system's Installer Code. By doing this, you will make it possible for you to Disarm using that same code later on. But if you use your Master Code or a user code to arm, then you will not be able to disarm using your Installer Code.

The problem with using your Installer Code to Arm and Disarm is that an intruder may know the code and use it to gain access to the system. Default Installer Codes are usually common knowledge, and an intruder will often try one of these codes in a quick attempt to disarm. While keeping the Installer Code at its default is good practice, you will never want to use this code on a regular basis. Instead, you should only use the Installer Code to enter programming when the system is already Disarmed.

The default Installer Codes for many popular security systems are as follows:

If you are using one of these codes to Arm and Disarm your system, then you should stop this practice immediately. Instead, you should use your system's Master Code to arm and disarm. Make sure you change the Master Code from its default before using it to control your system. Set it to a unique code that is difficult for others to guess, but easy for you to remember. Then use that unique and personalized code to Arm and Disarm when needed. If you need to create any additional system codes, make sure they are not obvious for an intruder to guess. You can Arm and Disarm using a standard user code just like you would a Master Code.

If you are an Alarm Grid customer with questions about system codes, please reach out to us. We want to make sure you are using a secure code to Arm and Disarm your system and that you are not putting yourself at-risk for a security breach. Please email us at support@alarmgrid.com, or call us at (888) 818-7728 during our normal business hours of 9am to 8pm EST M-F. We look forward to hearing from you.

Tags: , ,

Comments


Posted By

Hi DIYers! Our team is back with another video recap. We have six new videos this week, as it was a dead even split between Joe, Jarrett and Jorge. Each of our talented actors had two new videos apiece. Let's take a look at the latest videos from the Alarm Grid Video Production Team!

Factory Resetting the Honeywell Lynx Touch L7000

Jarrett puts on a smile as he shows users how to perform a factory reset on a Honeywell L7000 System. This is accomplished by loading one of the Default Configurations. By performing a factory reset, the entire L7000 System will need to be reprogrammed from scratch. All sensors will need to be relearned with the panel, and all system settings will be reset to their default. Additionally, the Master Code will be reset to its default of 1234, and the Installer Code will be reset to its default of 4112.


Bypassing a Sensor in Total Connect

Jarrett happily demonstrates how to bypass zones in Total Connect 2.0. When you bypass a zone, the associated sensor will remain inactive and be unable to cause a system alarm. For example, if you bypass a door sensor when arming your system, then people will be able to open and close that door without causing an alarm. However, all other system zones will still remain active as usual. Sensors must be bypassed individually for each Arming session.


Addressing a Honeywell Alarm Keypad

Joe explains how to address a Honeywell Alarm Keypad with a Honeywell VISTA Security System. Touch-button keypads use addresses 16 thru 23 on VISTA P-Series Panels. Address 16 is always enabled, while addresses 17 thru 23 must be specifically enabled within programming. Meanwhile, an Advanced User Interface (AUI) device will use address 1, 2, 5 or 6. Touchscreen keypads are considered AUI devices and will use one of these slots. Remember that the Total Connect 2.0 platform itself takes up an AUI slot.


Using the Lynx Touch with a 3rd Party Z-Wave Controller

Joe talks about how how you can use a Honeywell LYNX Touch System as a secondary Z-Wave controller. This is done by pairing the system itself with a different Z-Wave hub. All Z-Wave devices from the primary hub will be automatically pushed over the LYNX Touch System. They can then be controlled from both the primary controller and from the LYNX Touch. However, you will need to use the primary controller to learn-in new Z-Wave devices. You must install an L5100-ZWAVE Card in the LYNX Touch System to support any Z-Wave functionality.


IP Fault Time Setting on the Lyric Alarm Panel

Jorge with his colorful hair discusses the IP Fault Time Setting on the Honeywell Lyric Controller. This setting will have the system display a trouble condition whenever the WIFI goes down for a certain period of time. That way, the user will know later that the system was unable to communicate with the AlarmNet Servers. An IP Fault Time trouble will only appear on the panel if WiFI is set as the only communication path. If the system has a cellular backup, then only the central station will receive an E350 Communication Path Failure on Zone 951.


Programming a Honeywell 5800CO Into an All-in-One Panel

Jorge walks users through the process of programming a Honeywell 5800CO with a wireless alarm system. The Honeywell 5800CO is a carbon monoxide detector that operates at 345 MHz. It is primarily used with Honeywell Systems, but it will work with nearly any panel that accepts the 345 MHz frequency. The sensor will cause an instant system alarm when activated. All building occupants should vacate the premises immediately if a CO alarm occurs. When programmed as a 24-Hour Carbon Monoxide Zone, the 5800CO Sensor cannot be bypassed.

Tags: , , ,

Comments