Alarm Grid Tips: Mount Your Door Contacts Properly!
Posted By Michael GorisHi DIYers! We're here with another Alarm Grid Tip. We're going to cover the proper technique for mounting your door alarm sensors. Many people have trouble getting a faulted zone to disappear when their sensors are not aligned properly. Mounting your sensors correctly will fix this issue.
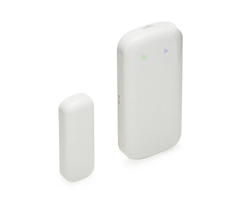
First, It's important to understand how door and window contacts work. There are two (2) parts. These are a sensor and a magnet. The sensor is the larger component and usually represents the listed product dimensions. The magnet is the smaller component. In a proper installation, the sensor (larger) should be mounted on the door frame. The magnet (smaller) should be mounted on the actual door. Ideally, the magnet and the sensor should be in direct contact when the door is closed. The magnet should also be aligned with the metal reed switch inside the sensor. The sensor will most likely have indentations to indicate the location of the reed switch.
The idea is that when the door is closed, the magnet will be in contact with the sensor. This is why these sensors are often called "contacts". When the door is opened, the magnet will become separated from the sensor. This will release its internal metal reed switch. When this happens, the sensor will transmit a signal to the alarm control panel. The system will respond based on the programming settings for the corresponding zone.
When you mount your door contacts, you should make sure that the magnet and the sensor are in proper alignment when the door is closed. If not, then the reed switch inside the sensor will stay open. As a result, the zone will still be shown as faulted on the panel. You want proper alignment so that the zone functions consistently. Whenever the door is opened, the zone should appear as faulted. If it's closed, then you should not see any faults.
Walk testing your contacts is extremely important! This is the best way to make sure that the sensor and magnet are in proper alignment. Sure, it might pass the eyeball test, but does it pass the system test? Always, always, always test your equipment! We don't care if you are a novice DIYer or a seasoned professional installer - your job is not finished until you have completed the walk test.
Again, the ideal door sensor and magnet will be IN DIRECT CONTACT when the door is closed. This will provide the best possible results. We have seen customers stack multiple pieces of double-sided foam tape to make this happen. This is pretty unusual, but it works! It might look funny if you have to do that, but it will get the job done! As long as the sensor and magnet are in correct alignment, then the sensor will work.
If you absolutely must leave the contact and magnet separated, do not do so from more than one-half (0.5) of an inch, unless the manual specifically says that the sensor-magnet gap can be further. And make sure to test extra thoroughly if you decide to try and get these sensors to work with a wider magnet spacing.
Also remember to check sensor for indentations that indicate which side to place the magnet. If you are unsure, then check the device manual. Many answers can be found in the installation instructions. Unfortunately, many end users choose to ignore them. Read the manual!
Keep in mind that some door sensors may be equipped with LED lights that help the installer make sure that the sensor and magnet are indeed in proper alignment. If your sensor has this feature, then definitely use it! This is an easy and convenient way to make sure they are aligned correctly. Check your device manual for more information. An example of a door sensor that is equipped with this feature is the Honeywell 5800MINI.
Below is an example of what a properly installed contact looks like. In this case, it is the 2GIG DW10. Note how the sensor and the magnet are in direct contact and properly aligned. Normally, the battery tab at the bottom of the sensor would be removed, but for this example, it's okay.

We hope this tip has been helpful for anyone setting up their first alarm system. Please email us at support@alarmgrid.com if you have any questions. We look forward to hearing from you!


