Getting Your New Alarm.com Camera Online and Integrated
Posted By Michael GorisIf you have a new Alarm.com Security Camera or you are thinking about getting one, then you may want to know just how easy it is to get a camera online and paired with your personal Alarm.com account. Today, we're looking at the setup process for the ADC-V515, ADC-V523, and ADC-V723.

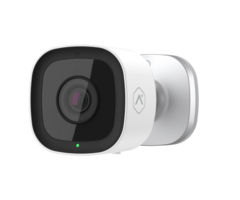
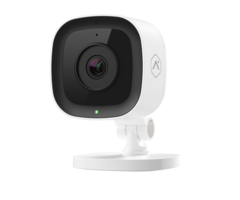
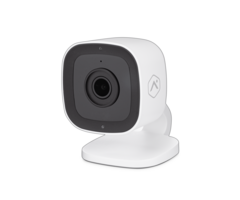
You may recall that the ADC-V515, ADC-V523, and ADC-V723 were our Top Alarm.com Camera Picks in a post we made a couple of months ago. These are indeed the cameras you will most likely be considering if you are a residential user. They're great because they can be powered with a simple plug-in adapter that comes included with each device, and they are also extremely easy to pair with the local WIFI in your home. Plus, the ADC-V515 and ADC-V523 Indoor Cameras can be rested on a desk, table, or countertop for a tools-free installation. The ADC-V723 Outdoor Camera needs to be hard-mounted, so you will have to break out the toolkit to install that one. But just drill a few holes and secure the camera's backplate using included screws, and that camera will also be ready to go.
The other popular Alarm.com Camera for residential use is the ADC-V622, which is also sometimes called the Alarm.com Wellcam. Unlike the other three (3) cameras, Alarm.com markets the ADC-V622 for more of an "independent living" solution so that you can monitor a loved one. It can make a good security camera as well, though its applications are usually a bit different. Alarm.com also has a great lineup of commercial security cameras, which you can usually identify by having a C in the name (e.g. ADC-VC826). But for today, our focus is strictly on the three (3) main residential security cameras, the ADC-V515, ADC-V523, and ADC-V723. We may cover the other cameras in a future post as well, so stay on the lookout for that. But for now, besides the camera, the other things you need to get started are a home WIFI network and an alarm monitoring plan with video surveillance that includes access to Alarm.com, such as an Alarm Grid Platinum Plan. You can learn all about our monitoring plans in this post. Remember that you will only use Alarm.com Cameras if your security system supports Alarm.com, or if you choose to use a stand-alone video-only Alarm.com plan. If you have a Resideo or Honeywell Alarm System, then your system will most likely use Total Connect 2.0 instead of Alarm.com. In that case, there is a nice selection of TC2 IP Cameras you can choose from. But today, we're only looking at Alarm.com Cameras.
When you have a new Alarm.com camera, the first thing you will want to do is power it on. For the three cameras we're checking out today, the power adapter comes included. Most users find the stock setup to be sufficient, but Alarm.com does offer a convenient 9-foot extension cable called the Alarm.com ADC-VPE-9FT-W if you need an extra-long wire run to the nearest outlet. Alarm.com recommends extending the power wire no more than 100 feet. Once you plug the camera in, you can verify that it is receiving power by seeing that the camera's LED light has turned on.

The next step is to get the camera online. These are WIFI cameras that don't support wired ethernet options. You must get the camera connected to wireless WIFI internet. The ADC-V523 and ADC-V723 support both 2.4 GHz and 5 GHz networks. But the ADC-V515 only supports 2.4 GHz networks, and it will not support 5 GHz networks. Keep that in mind if you are using the ADC-V515. Each camera can be paired using AP Mode pairing or WPS pairing. Of these two methods, AP Mode pairing is more secure, and it is the method recommended by Alarm Grid. Check out any of the FAQs below for instructions on AP Mode pairing:
WPS, stands for WIFI Protected Setup. You can use WPS pairing as an alternate method for getting your Alarm.com Camera online. Although WPS pairing is usually seen as easier than AP Mode pairing, it isn't as secure, and it opens up the door for various network vulnerabilities. If you accept the risks, then we have guides showing WPS pairing as well.
Once your camera is online and has a solid green LED, all you need to do is pair it with your Alarm.com account. You can do this using the website or mobile app. Both methods are very easy, so it really comes down to preference as to which one you use. If you decide to pair through the website, then make sure you are using a compatible web browser for Alarm.com.
- ADC-V515 Account Integration via Website
- ADC-V523 Account Integration via Website
- ADC-V723 Account Integration via Website
If you haven't tried out the Alarm.com Mobile App for controlling your system remotely, then setting up a camera through the mobile app can be an excellent way to show you how it works. Anyone with an Alarm.com account can use the mobile app at no extra charge, and you can conveniently download it for free from either the Google Play Store on Android or the Apple App Store on iOS. Then use one of these guides to pair your Alarm.com Camera:
- ADC-V515 Account Integration via Mobile App
- ADC-V523 Account Integration via Mobile App
- ADC-V723 Account Integration via Mobile App

We hope that you find these guides useful for setting up an Alarm.com Residential Camera. We will likely be covering the Alarm.com Wellcam ADC-V622 and the Alarm.com Commercial Security Cameras sometime in the near future, so stay on the lookout. Feel free to comment below to share your thoughts on Alarm.com Cameras. What do you like about them? Is there anything you'd love to see in future updates and releases? Leave a comment down below, and stay tuned for more content on security systems and cameras coming soon.