Joshua Unseth Posts

Posted By

Most of these best security systems lists are frustrating to navigate. Many of them include companies and their respective rating. ADT, Brinks, Vivint, or others will make the cut. We’re sad to never be included in these lists. But that reflects the state of the industry. Many people don’t know that other alarm monitoring companies exist. Still others only include the new DIY systems that are on the market like Simplisafe, Ring, Nest, or Scout. Consumer Reports, for example, only reviews Nest, Ring, Abode, Frontpoint, Simplisafe, and Samsung’s Smarthings integrated GC3 that they produced for ADT. This list is, in no way, a complete list of products. Moreover, it completely ignores legacy and current systems. And, while we like “new,” being in the industry, we are proud to say that the so-called “professional” systems that are out there are better than these systems for a few simple reasons.

Our list includes exclusively professional equipment. It is the same equipment that ADT or other installation companies might sell you. We’ve tested a lot of these DIY systems. They work well to varying degrees. But we have found that nothing surpasses the quality or features of a professional system. What’s more, we provide the help that you need to turn these professionally installed systems into the DIY systems that you may be looking for.

Yup! You heard that right. You don’t need a professional to install a professional home security system.

They are simple enough to install and operate that you can do it yourself. Additionally, you can have them monitored by anyone. We think that this feature is the feature that sets them apart from any of the new “DIY” systems. Simplisafe systems must be monitored by Simplisafe. Ring systems must be monitored by Amazon. Nest systems must be monitored by Google’s chosen provider: Monitronics (now Brinks).

But a professional system can be monitored by any alarm company. We certainly do monitor them. But if you’re interested in having a local installer at your beck and call, you can have Larry the alarm installer from down the road monitor it as well.

In all, these systems are not easy to rank. Each one comes with its own set of features and benefits. So we have organized the following list based on your own possible set of needs.

So without further ado, here are the 3 best alarm systems of 2020.

Best Interactive Service of 2020

Alarm.com

Interactive services are the apps that allow you to control your alarm system from your phone or computer. There are dozens of such services. Some companies, such as the ones we mentioned above have their own proprietary service. But then, there are a few universal services. These are sold by Interlogix, DSC, Alarmnet (Honeywell), Securenet and others. Our favorite of these interactive services is alarm.com. It is a great service that works with Qolsys products, DSC products, Interlogix products, 2GIG products, and more. Unfortunately, it does not work with most Honeywell products.

It provides a wide array of controls, including the ability to use SIRI to command your system and schedule Z-Wave scenes. The drawback is that Alarm.com requires users to sign up for cellular monitoring. This is the best, most robust kind of monitoring. But some users don’t want that level of connectivity. Some end users are satisfied with just IP monitoring. In the 90s, particularly, phone line monitoring was the norm. Modern monitoring has found other, better, more secure options. No one can cut the line of a cellular device, for example. IP monitoring suffers from many of the same problems as phone line monitoring. But it also allows users to get many of the advantages of cellular monitoring, including homeowner’s insurance discounts. Even still, despite this drawback of alarm.com, it is our preferred interactive service.

That said, its closest competition is Honeywell’s Total Connect. Total Connect only works with Honeywell. It does almost everything that Alarm.com does, with a few specific differences - no native SIRI control, for example. That said, Honeywell makes excellent equipment. The Lyric alarm, for example, works with HomeKit. This integration will allow individual control of the unit from SIRI. This is actually more robust than even alarm.com’s SIRI integration. And the only options that a HomeKit user has on the Alarm.com side is the DSC iotega, which is a system that works, but for many reasons, doesn’t make this list.

Ultimately, whether you use Alarm.com or Total Connect, it will depend on your system’s interactive service compatibility. If you are interested in system features, look at the systems below. If you are more concerned with the usability of the interactive service, you can certainly pick a system based on its qualities and compatibility with an interactive service.

Runner Up: Total Connect

Best Overall System of 2020

Qolsys IQ Panel 2+

This security system is an amazing piece of equipment. It is a great looking home automation controller as well as a security system. It’s Alarm.com compatibility is a great feature that makes the Qolsys IQ Panel 2+ a stratospherically better panel than almost anything on the market. The system is built on the Android operating system. Ultimately, the Qolsys is what you get when you beset a Silicon Valley company with the task of building a professional alarm system. It is feature filled, beautifully and competently built.

One of the frustrations with the Qolsys is its lack of modularity. It is an expensive system. Everything is built in to the panel. Whereas most security systems allow a user to install (and uninstall) a cellular communicator, the Qolsys builds the communicator right into the panel itself. This sounds like a great feature, and it is. But that’s until the system’s communicator becomes obsolete. It’s something that doesn’t happen very often, but every 10 or so years, the cellular companies deprecate one or more of their networks. At this very moment, Alarm Grid’s subscribers are preparing to replace thousands of communicators. As Verizon and AT&T deprecate their old CDMA and 3G networks, the systems that have included these communicators are coming due for an upgrade. The drawback of the Qolsys is that there is no upgrade per se. Rather, end users with an older Qolsys will have to replace the entire panel.

Despite this drawback, the Qolsys is a great unit. One of its best features is its ability to take over old systems. For those that are looking to replace an old system, the Qolsys is a great choice. The new Qolsys IQ Panel 2 Plus’s come in different varieties, each with a daughter card that allows them to grab the signals from other company’s wireless sensors.

Just awesome!

In our opinion the best feature of the new Qolsys IQ Panel 2 Plus, however, is not its amazing home automation features or its ability to take over other systems. It’s not even its slick Android interface. All those features can and are replicated by its competitors. Rather, our favorite feature of the Qolsys is its sensor’s ranges. The Qolsys is a panel whose PowerG sensors, which are encrypted, are capable of being monitored over HUGE ranges. We have seen the Qolsys detect sensors that are nearly a half mile away. This makes the PowerG line of sensors that are compatible with the Qolsys an amazing feature that no other all-in-one system has. These sensors basically remove the need for expensive repeaters. They are modern sensors that no other company has.

Eat your heart out Google, Amazon, and all ya’ll Silicon Valley companies trying to build better systems. None of these systems even touch the quality of the Qolsys in our opinion.

Runner-up: 2GIG GC3e

Best HomeKit Compatible System of 2020

Honeywell Lyric

The Lyric is in competition with DSC’s Iotega, which works as a HomeKit controller. If you’re looking for HomeKit control, and your home is filled with DSC sensors, the Iotega might be a better choice for you. But if you’re starting from scratch, nothing is better than the Lyric controller. This system is compatible with a wide range of sensors, including America’s most sold sensor, the 5816. It looks great on a wall. It’s fairly priced, and it does everything you’d want from a good looking system, including a photo album feature.

We sold more Lyric’s in 2019 than any other system on the market. This is largely due to Honeywell’s trusted name. The quality exemplified by the brand is epitomized in this sleek wall unit. Its versatility is buttressed by the hundreds of compatible sensors that Honeywell has released over the years.

We like Honeywell’s no-nonsense approach to monitoring. They put security over all. They were the first mainstream system on the market with both a panel and encrypted sensors. And the sensors work immensely well. We love Honeywell. We love the Lyric. At the moment, we believe that the Qolsys has surpassed the features of Honeywell’s alarm system. But the Lyric has one feature that Qolsys simply does not: the ability to be monitored by WiFi only. In fact, nearly all of Honeywell’s all-in-one systems can be monitored by WiFi only. For an end user, this means that they can be professionally monitored at a price that is significantly cheaper than that of a cellular system. For the budget conscience consumer, this presents an amazing opportunity to save money while getting all the benefits of a monitored system, including insurance discounts. We are a big fan of cellular monitoring. But the option is there for those who simply don’t think it’s as important as we do or for those who don’t want to pay the cost of cellular monitoring.

Runner Up: DSC iotega

Best Budget Alarm System

Honeywell L3000


We spent a lot of time debating whether the L3000 would be the best system for someone on a budget. We actually prefer the GC2e as a system. It’s a great looking system, it’s inexpensive, and it uses Alarm.com. But here’s the problem: it requires that anyone using it purchase a cellular communicator. Additionally, because its most minimal monitoring will include Alarm.com. This puts anyone purchasing it into a different category of spending. That said, if it’s not outside of your budget, the GC2e is a great system. It is our runner-up, because it is a good budget system, but it’s not great.

The low price of the L3000 is no indication of its quality. It is because it is a legacy system. It is often used by alarm companies that are putting systems into big apartment buildings. The system is amazing. It’s effective, will last for a very long time. Unfortunately, it’s ugly and can be a bear to program. Luckily for owners, programming is not something you do more than one time. And if you’re with Alarm Grid, there is a strong chance that we can program it for you.

Unlike the GC2e, the L3000 allows users to do IP-only monitoring. It also allows old-school phone line monitoring. That means, for the budget-conscious consumer, the L3000 is both cheaper to purchase than the GC2e, and will save an end user between $10 and $20 per month. In all, the L3000 will save anyone who installs it between $120 and $240 per year, while also being incredibly affordable at the outset. Huzzah! Oh, and for those concerned about sensors, the L3000 works great with any of the Honeywell’s 5800 sensors. You will have a ton of sensors to pick from, which also makes the system the most versatile budget system on the market.

We love the L3000 as a budget system.

Runner-Up: 2GIG GC2e

Best Wired Alarm System of 2020

Honeywell VISTA 20P

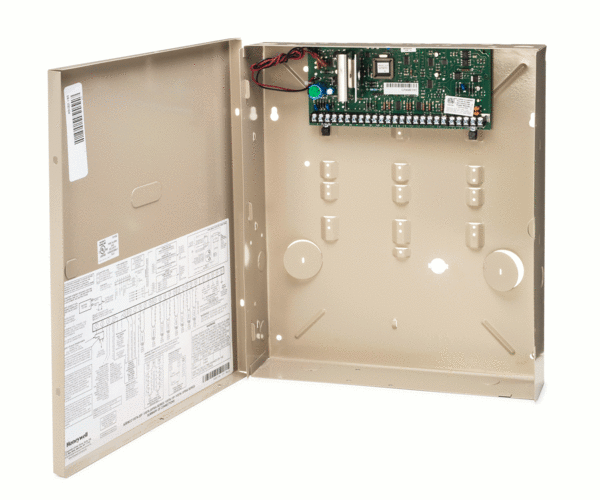
This is an oldie but a goodie. The VISTA 20P has been produced by Honeywell for many many years now. It's an excellent system with great, modern features. Honeywell produces update chips that they release every once in a while. These updates allow the system to take advantage of modern features like those available in the VAM or Tuxedo Touch. Home Automation? You can do it using the VISTA 20P. Manage both wired and wireless sensors? You can do that very easily with the VISTA 20P by adding a wireless receiver or a keypad with a wireless receiver built in. In all, this system has all the same great features of its all-in-one wireless contemporaries. 2 drawbacks to speak of, though: 1) it's big and bulky; 2) programming these systems sucks.

Runner-up: Honeywell VISTA 21iP

What Else is Coming in 2020?

Every year, professional systems get better and better. The systems that are coming soon are no different. In the coming months, we are expecting the release of Qolsys’s new Hub as well as Honeywell’s ProSeries panel. 2GIG hasn’t announced anything yet. But they just released the encrypted versions of their panels.

Unfortunately, 2019 saw the close of Interlogix’s security systems production division. While interlogix was not known for the incredible innovation of their systems, they made great budget models that gave users a simple, cheap entry point into security systems. They will be missed. But the three main producers--2GIG, Qolsys, and Resideo (formerly Honeywell)--are continuing to pioneer new and innovative features.

Tags: , , , , , , , , , , , , , , , , , , , , , , , , , , , , , , , , , , , , , , , , , , , , , , , , , , , , , , , , , , , , , , , , , , , , , ,

Comments


Posted By

The phone system played an integral role in early alarm systems. Each system was connected directly to a dial up phone system. If an alarm was tripped, the system would call the central station and give information. That is when high-fidelity copper lines ruled the day. In that world, analog calls were crystal clear. But the world has moved to digital, and while everything is cheaper, some things have changed, which we’ll cover in a little bit.

For those hyper-concerned with the safety of their family or possessions, skimping on security is the last thing you should do. At one time, landlines were the best thing you could use to send signals from your alarm system to the central station. Nowadays, there are simply better ways to get that signal out. And it’s time to stop skimping on the monitoring and update your system to get with the modern age. It doesn’t cost an arm and a leg, and the advantages to using new technology are out of this world.

Which is why you should...

Switch to Cellular & IP Alarm Monitoring

The advantages of switching are innumerable. In some ways it is how you breathe new life into a security system that has grown old. These new communication pathways will overtake your current system’s old, tired over-the-phone communication, and turn your system into the modern system that you want. And, most of the time, it will cost you very little.

In other words…

Save a ton of money. Most Systems Can be Retrofitted to Work with Cellular Alarms Easily

Most old systems can use a new communicator. These systems are simple units that tell you whether a zone is opened or closed. This simple function is no different in new systems. Generally the difference between an old system and a new system is in the slick design. But now, even old systems have gotten some great updates. For example, if you have an old VISTA-20P, you can bring your system up to date with a

  • PROM replacement (about $50)
  • a communicator (about $120)
  • and if you’re really concerned about the way the keypad looks on your wall, you can get one of the new Tuxedo Touch keypads to make your system look new, modern, and sleek.

Regardless of how easy it is, there is really only one great reason to switch from a landline security system to a wireless (cellular+IP) security system: IP Monitoring & Cellular Monitoring provide better security than old landlines.

Thieves Can No Longer Just Cut Your Phone Lines


When phone lines were analog, all a thief had to do was cut your phone line. This would prevent your system from calling the central station. No wire, no signal. No signal, no one will know you were robbed.

While the advantage of the analog phone lines was the crystal clear communication from the panel to the central, the disadvantage of having exposed wire is obvious. Fortunately, cutting the line doesn’t work when your system is able to communicate wirelessly.

This is why we don’t recommend IP systems exclusively. IP is great! It’s the fastest communication pathway alarms have. But, generally, IP is still connected via an exposed wire. The solution to the problem of the exposed wire is cellular monitoring. And the fact that most modern systems allow you to connect your system to both IP and cellular communication paths at the same time means that you can get all the advantages of IP monitoring (at no extra cost) with the connectivity of cellular.

The wireless, over-the-air cellular communication path means that this attack vector is something you will never have to worry about again!

Phone Lines are No Longer Analog


Phone lines don’t really work anymore like they used to. Old phone lines were made of copper. Their analog signal was extremely high fidelity. Nowadays, things are different.

First, a lot of our customers have switched to Voice Over IP (VOIP) phones. These phones are notoriously poor quality. They work pretty well, but the quality is nothing like analog. While this might not be terrible for calls to friends or family, it poses a problem in sending signals to a central station.

Second, most phone systems have digital switches. What that means is that even if you never got rid of your old copper line phone, your phone likely still uses digital signals at some point. This poses the same issue for alarm companies as VOIP.

For us, this means that wires get crossed a lot. The result is that central stations occasionally receive bad signals, these VOIP accounts are prone to false alarms, and occasionally, the bad signal will cause signals to get crossed in such a way that signals are dispatched to the wrong account. Phone lines just don’t work like they used to.

Since signals are being sent over wireless communication pathways, this is one of those instances where embracing modern technology will save you a lot of headaches. Where VOIP fails, cellular and IP monitoring pick up the slack.

Because of these issues, we think that

Cellular Monitoring Is Simply Better Than Landline Monitoring, and IP Monitoring Creates a Great Backup for When it’s Needed.

Cellular monitoring provides amazing connectivity. Because it is a wireless connection, a thief can not cut any wires to disable it. The cellular modules connect directly to the nearest cellular tower.

And most modern systems also include monitoring for any system whose signal is blocked by someone using a device that disrupts cellular signals.

Up time for these systems is as close to perfect as it can be. While an IP signal is a great way to make sure your system is able to quickly send signals, cellular monitoring enhances monitoring over the internet by making sure that your system can communicate signals even during those times that your IP provider is down (and we all know that happens occasionally).

That’s why…

Cellular Monitoring is the most reliable monitoring you can buy. And with our dual path IP + cellular monitoring options, it’s made even more reliable.

Comments


Posted By

l

Data Field Programming Guide This is a living document based on Honeywell's Vista 15P, 20P Programming Guide. It is meant to be the programming guide in its entirety, but is a work in progress. We will be continually adding new segments, new videos, and more. Hopefully this guide makes everything a little bit easier for those looking at the document for the first time. Please let us know what we can do to improve it.

Recommendations for Proper Protection

The following recommendations for the location of fire and burglary detection devices help provide proper coverage for the protected premises.

Recommendations for Smoke and Heat Detectors

With regard to the number and placement of smoke/heat detectors, we subscribe to the recommendations contained in the National Fire Protection Association's (NFPA) Standard #72 noted below.Early warning fire detection is best achieved by the installation of fire detection equipment in all rooms and areas of the household as follows: For minimum protection a smoke detector should be installed outside of each separate sleeping area, and on each additional floor of a multi-floor family living unit, including basements. The installation of smoke detectors in kitchens, attics (finished or unfinished), or in garages is not normally recommended. For additional protection the NFPA recommends that you install heat or smoke detectors in the living room, dining room, bedroom(s), kitchen, hallway(s), attic, furnace room, utility and storage rooms, basements and attached garages. In addition, we recommend the following:

  • Install a smoke detector inside every bedroom where a smoker sleeps.
  • Install a smoke detector inside every bedroom where someone sleeps with the door partly or completely closed. Smoke could be blocked by the closed door. Also, an alarm in the hallway outside may not wake up the sleeper if the door is closed.
  • Install a smoke detector inside bedrooms where electrical appliances (such as portable heaters, air conditioners or humidifiers) are used.
  • Install a smoke detector at both ends of a hallway if the hallway is more than 40 feet (12 meters) long.
  • Install smoke detectors in any room where an alarm control is located, or in any room where alarm control connections to an AC source or phone lines are made. If detectors are not so located, a fire within the room could prevent the control from reporting a fire or an intrusion.

This control complies with NFPA requirements for temporal pulse sounding of fire notification appliances.

Recommendations For Proper Intrusion Protection

For proper intrusion coverage, sensors should be located at every possible point of entry to a home or commercial premises. This would include any skylights that may be present, and the upper windows in a multi-level building. In addition, we recommend that radio backup be used in a security system so that alarm signals can still be sent to the alarm monitoring station in the event that the telephone lines are out of order (alarm signals are normally sent over the phone lines, if connected to an alarm monitoring station).

Contents

  • Programming Mode Commands
  • Data Field Programming Form
  • Configurable Zone Types Worksheet
  • *56 Zone Programming Menu Mode
  • *58 Expert Zone Program Mode
  • WIRELESS KEY PROGRAMMING TEMPLATES
  • *57 FUNCTION KEY PROGRAMMING MENU MODE
  • *79/*80 MENU MODE - OUTPUT DEVICE PROGRAMMING GENERAL INFORMATION
  • *79 RELAY/POWERLINE CARRRIER DEVICE (X-10) PROGRAMMING MENU MODE
  • *80 OUTPUT FUNCTION MENU MODE
  • *81 ZONE LIST MENU MODE
  • *82 ALPHA DESCRIPTOR MENU MODE
  • ALPHA VOCABULARY LIST (For Entering Zone Descriptors)
  • SETTING SCHEDULES
  • AVS SYSTEM ENABLE and QUICK PROGRAMMING COMMANDS
  • SETTING THE REAL-TIME CLOCK
  • *29 COMMUNICATION DEVICE MENU MODE (Pass-Through Programming)
  • UPLOADING/DOWNLOADING VIA the INTERNET
  • ZONE TYPE DEFINITIONS
  • REPORT CODE FORMATS
  • SYSTEM SECURITY CODES
  • KEYPAD FUNCTIONS
  • VARIOUS SYSTEM TROUBLE DISPLAYS
  • UL NOTICES
  • SIA QUICK REFERENCE GUIDE
  • ULC S304 REQUIREMENTS (for VISTA-15PCN and VISTA-20PCN)
  • FCC STATEMENTS
  • LIMITATIONS STATEMENT
  • CONTACTING TECHNICAL SUPPORT
  • WORKSHEET for *56 ZONE PROGRAMMING
  • WORKSHEET for *57 FUNCTION KEY PROGRAMMING
  • WORKSHEET for *79 OUTPUT RELAY/POWERLINE CARRIER DEVICE PROGRAMMING
  • WORKSHEET for *81 ZONE LIST PROGRAMMING
  • WORKSHEET for *80 OUTPUT FUNCTION PROGRAMMING
  • WORKSHEET for SCHEDULES
  • TABLE OF DEVICE ADDRESSES
  • 5800 SERIES TRANSMITTER INPUT LOOP IDENTIFICATION

Programming Mode Commands

To enter programming mode (using an alpha keypad connected to the control):

  • POWER UP, then press [*] and [#] at the same time, within 50 seconds of powering up (this method must be used if *98 was used to exit program mode). OR
  • Enter Installer Code (Default: 4112) then 800
Task Command/Explanation
Go to a Data Field Press [∗] + [Field Number], followed by the required entry.
Entering Data When the desired field number appears, simply make the required entry. When the last entry for a field is entered, the keypad beeps three times and automatically displays the next data field in sequence. If the number of digits that you need to enter in a data field is less than the maximum digits available (for example, the phone number fields *41, *42), enter the desired data, then press [∗] to end the entry. The next data field number is displayed.
Review a Data Field Press [#] + [Field Number]. Data will be displayed for that field number. No changes will be accepted in this mode
Deleting an Entry Press [*] + [Field Number] + [*]. (Applies only to fields ∗40 thru *46, *94, and pager fields) Press *96.
Initialize Download ID Press *96. Initializes download ID and subscriber account number.
Reset Factory Defaults Press *97. Sets all data fields to original factory default values.
Zone Programming Press *56. Zone characteristics, report codes, alpha descriptors, and serial numbers for 5800 RF transmitters.
Function Key Programming Press *57. Unlabeled keypad keys (known as ABCD keys) can be programmed for special functions
Zone Programming (Expert Mode) Press *58. Same options as *56 mode, but with fewer prompts. Intended for those familiar with this type of programming, otherwise *56 mode is recommended.
Output Device Mapping Press *79. Assign module addresses and map individual relays/powerline carrier devices.
Output Programming Press *80. Program 4229 or 4204 Relay modules, Powerline Carrier devices, or on-board triggers.
Zone List Programming Press *81. Zone Lists for relay/powerline carrier activation, chime zones, pager zones, etc.
Alpha Programming Press *82. Zone alpha descriptorsIP/GSM ProgrammingPress *29. For programming the IP/GSM options.
Exit Program Mode with installer code lockout Press *98. Exits programming mode and prevents re-entry by: Installer Code + 8 0 0. To reenter programming mode, the system must be powered down, then powered up. Then use method A above. See field *88 for other *98 Program mode lockout options.
Exit Program Mode Press *99. Exits program mode and allows re-entry by: Installer Code + 8 0 0 or method A above.
Scheduling Mode Enter code + [#] + 64. Create schedules to automate various system functions.
Site-Initiated Download Enter Installer code + [#] + 1. (perform while system is disarmed and in normal mode)

AVS Quick Programming Guide (for AAV sessions using the AVS system)

For controls with the following firmware revision levels, these commands automatically configure the control for AVS operation:

  • VISTA-15P = version 6.0 or higher
  • VISTA-20P = version 7.0 or higher

Programming Instructions

  • installer code + [#] + [0] + 3. Enable AVS operation.
  • installer code + [#] + [0] + 4. Enable AVS operation and enable panels sounds on the AVST speaker.
  • installer code + [#] + [0] + 5. Remove all programming options set by [#] + [0] + 3 quick command.
  • installer code + [#] + [0] + 6. Remove all programming options set by [#] + [0] + 4 quick command.

Refer to the AVS System Enable and Quick Programming Commands section for details on the specific options that are set with each command, depending on the control used. To select the AAV session communication path (phone line/communication device), see field ∗55 Dynamic Signaling Priority. To enable AAV operation, use ∗91 Options field (option 4).

Special Programming Messages

  • OC = Open Circuit (no communication between Keypad and Control).
  • EE or ENTRY ERROR = ERROR (invalid field number entered; re-enter valid field number).
  • After powering up, AC, dI (disabled) or “Busy Standby vx.x (firmware revision) Dl will be displayed after approximately 4 seconds. This will revert to a “Ready” message in approximately 1 minute, which allows PIRS, etc. to stabilize. You can bypass this delay by pressing [#] + [0].
    NOTE for CANADIAN PANELS: Power up time is 2 minutes, and Contact ID report code 305 System Reset is sent if the [#] + [0]command is not performed before the 2 minutes expires.
  • If E4 or E8 appears, more zones than the expansion units can handle have been programmed. The display will clear after you correct the programming

IMPORTANT: The Real-time clock must be set before the end of the installation. See procedure in the Setting the Real-Time Clock section of this manual.

Data Field Programming Guide

Input Command Explanation Video
*20 Installer Code.
Enter 4 digits between 0000 and 9999.
The Installer Code (default 4-1-1-2) is used to assign the 4-digit Master Security Code (default 1-2-3-4). The Installer Code can perform all system functions except it cannot disarm the system unless it was used to arm the system. For security purposes, the factory default installer code should be changed.
*21 Quick Arm Enable
  • 0 = no
  • 1 = yes
If enabled, users can press the [#] followed by an arming key to arm the system instead of using a security code. The security code is always needed to disarm the system.
*22 RF Jam Option
  • 0 = no RF Jam detection
  • 1 = send RF Jam report
If enabled, a report is sent if the system detects an RF jamming signal.

UL Note: Must be 1 if Wireless sensors are used.
*23 Quick (Forced) Bypass
  • 0 = no quick bypass
  • 1 = allow quick bypass (code + [6] + [#] )

Zones bypassed by this function will be displayed after the bypass is initiated.

*24 RF House ID Code
  • 00 = disable all wireless keypad use
  • 01–31 = using 5827, 5827BD or
  • 5804BD keypad

The House ID identifies receivers and wireless keypads. If a 5827 or 5827BD Wireless Keypad or 5804BD Transmitter is being used, a House ID code must be entered and the keypad set to the same House ID. You can assign RF house ID for each partition.
*26 Chime By Zone / KP Sound Enables Entry 1
  • 0 = no “entry 1” keypad trouble sounds, AND no chime by zone (keypad chimes on fault of any entry/exit or perimeter zone when chime mode is on)
  • 1 = Chime by Zone enabled
  • 2 = Communication Device (LRR) trouble sounding enabled (for communication devices such as 7845GSM, 7845i-GSM, GSMV)
  • 4 = System Low Battery sounding enabled
  • 7 = select all entry 1 options
Entry 2
  • 0 = no “entry 2” keypad trouble sounds
  • 1 = RF Supervision sounding enabled
  • 2 = RF Low Battery sounding enabled
  • 4 = RF Jam sounding enabled
  • 7 = select all entry 2 options

Chime by Zone

If Chime by Zone is enabled (entry 1 – option 1), you can define the specific zones intended to chime when faulted while the system is in Chime mode. List chime zones on zone list 3 using *81 Menu mode.

Keypad (KP) Trouble Sounding

Keypad trouble sounding can be enabled/disabled for the conditions listed for each entry.

For each entry, enter the sum of the desired options. Example Entry 1: for Chime by Zone and System Low Battery sounding, enter 5. To enable all options, enter 7.

*27 Powerline Carrier Device (X–10) House Code
  • 0 = A
  • 1 = B
  • 2 = C
  • 3 = D
  • 4 = E
  • 5 = F
  • 6 = G
  • 7 = H
  • 8 = I
  • 9 = J
  • #10 = K
  • #11 = L
  • #12 = M
  • #13 = N
  • #14 = O
  • #15 = P
Powerline Carrier devices require a House ID, identified in this field.

Program Powerline Carrier devices in interactive modes *79, *80 and *81.

UL Note: UL: not for fire or UL installations
*28
  • Access Code For Phone Module
  • 00 = disable
  • 1st digit: enter 1–9
  • 2nd digit: enter # + 11 for "∗", or # + 12 for "#".

[00] partion 1 only

You must assign a 2-digit access code for the 4286 Phone Module, if used. Example: If desired access code is 7∗, then 7 is the first entry, and [#] + 11 (for ∗) is the second entry.

NOTE: A 0 in either digit disables the phone module.

UL Note: UL: must be 00 for UL Commercial Burglary installations.

*29 Enable IP/GSM? – Communication Device Menu Mode (pass-through programming)

This is a Menu Mode command, not a data field, for programming IP/GSM communication device options. See *29 Menu Mode section later in this document.

*31 Single Alarm Sounding Per Zone
  • 0 = unlimited sounding
  • 1 = one alarm sounding per zone

V20PSIA/V15PSIA. If “0” selected, “alarm sounding per zone” will be the same as the “number of reports in armed period” set in field *93 (1 if one report, 2 if 2 reports, unlimited for zones in zone list 7).

▢ [0]

If enabled, limits alarm sounding on the bell output to once per zone per armed period.

*32 Fire Alarm Sounder Timeout
  • 0 = sound stops at timeout selected in field *33
  • 1 = no timeout; sounds until manually turned off

▢[0]

This control complies with NFPA requirements for temporal pulse sounding of fire notification appliances. Temporal pulse sounding for a fire alarm consists of the following: 3 pulses – pause – 3 pulses – pause – 3 pulses.

UL: must be 1 for fire installation

*33 Alarm Sounder (Bell) Timeout
  • 0 = none
  • 3 =12 min
  • 1 = 4 min
  • 4 = 16 min
  • 2 = 8 min

▢[1]

This field determines whether the external sounder will shut off after time allotted, or continue until manually turned off

  • UL: For residential fire alarm installation, must be set for a minimum of 4 min (option 1)
  • For Commercial Burglary installations, must be minimum 16 min (option 4)
*34 Exit Delay
  • 00 - 96 = 0 - 96 secs
  • 97 = 120 secs

V20PSIA/V15PSIA:

  • 45 - 96 = 45 - 96 secs
  • 97 = 120 secs
  • NOTE: Entries less than 45 will result in a 45-second delay.
The system waits the time entered before arming entry/exit zones. If the entry/exit door is left open after this time expires, an alarm will occur. Common zones use same delay as partition 1.

SIA Guidelines: minimum exit delay is 45 seconds Common zones use partition 1 delay.

*35 Entry Delay #1

00 - 96 = 0 - 96 seconds

97 = 120 secs

98 = 180 secs

99 = 240 secs

V20PSIA/V15PSIA:

30-96 = 30 - 96 secs; 97 = 120 secs;

98 = 180 secs; 99 = 240 secs

NOTE: Entries less than 30 will result

in a 30-second delay

Upon entering, the system must be disarmed before the time entered

expires, otherwise it sounds an alarm.

Common zones use same delay as part 1.

SIA Guidelines: minimum entry delay is 30 seconds

*36 Entry Delay #2

See *35 Entry Delay 1 for entries

*37 Audible Exit Warning

0 = no; 1 = yes

Warning sound consists of slow continuous beeps until the last 10

seconds, and then it changes to fast beeps. Sound ends when exit time

expires.

SIA Guidelines: must be enabled

*38 Confirmation Of Arming Ding

0 = no

1 = yes (wired keypads and RF)

2 = yes, RF only (except 5827,

5827BD)

Confirmation of arming is 1/2-sec external sounder “ding.”

If 1 selected, ding occurs when closing report is sent if open/close

reporting is enabled, or at the end of Exit Delay. If 2 selected, ding

occurs upon reception of the wireless arming command.

*39 Power Up In Previous State

0 = no, always power up disarmed;

1 = yes, power up in previous state

When the system powers up armed, an alarm will occur 1 minute after

arming if a zone is faulted. Note that if the previous state was armed

Away or Stay, the system ignores sensor changes for 1 minute, which

allows sensors such as PIRs to stabilize.

UL: must be 1

SIA Guidelines: must be 1
*40 PABX Access Code or Call

Waiting Disable

Enter up to 6 digits.

To clear entries, press

*

40

!

.

If call waiting is used, enter call waiting

disable digits “


(#+11) 70” plus “# +

13” (pause).

Call Waiting:

If the subscriber’s phone service has “call waiting” (and

is not using PABX), enter “*70” (“# + 11”) plus “# + 13” (pause) as the

PABX entry to disable “call waiting” during control panel calls. If the

subscriber does not have “call waiting” and is not using PABX, make

no entry in this field.

NOTES:

1. The call waiting disable feature cannot be used on a PABX line.

2. Using Call Waiting Disable on a non-call waiting line will prevent

successful communication to the central station.
*41, *42 Primary Phone No.

Secondary Phone No.

Enter up to 20 digits. To clear entries, press

!

41

!

or

!

42

!

respectively

.

Enter the respective phone numbers.

*43 Partition 1 Primary Acct. No.
[FFFFFFFFFF]
*44 Part. 1 Secondary Acct. No.


*45 Partition 2 Primary Acct. No.


*46 Partition 2 Secondary Acct. No.

Enter 4 or 10 digits, as chosen in *48

Report Format. Enter digits 0–9; #+11

for B; #+12 for C; #+13 for D; #+14 for

E; #+15 for F.
Enter [


] as the fourth digit if a 3-digit account number (for 3+1 dialer

reporting format) is used. Enter 0 as the first digit of a 4-digit account

no. for 0000-0999. E.g., For Acct.

B234

, enter: #+11 + 2 + 3 + 4

To clear entries in a given field, press *43*, *44*, *45*, or *46* based

on the field being programmed

*47 Phone System Select

If Cent. Sta.

is not

on a WATS line:

0=Pulse Dial; 1=Tone Dial

If Cent. Sta.

is

on

a WATS line:

2 = Pulse Dial; 3 = Tone Dial.
Select the type of phone service for the installation.
*48 Report Format
  • 0 = 3+1, 4+1 ADEMCO L/S STANDARD.
  • 1 = 3+1, 4+1 RADIONICS STANDARD.
  • 2 = 4+2 ADEMCO L/S STAND.
  • 3 = 4+2 RADIONICS STANDARD.
  • 5 = 10-digit ADEMCO CONTACT ID REPORTING.
  • 6 = 4+2 ADEMCO EXPRESS.
  • 7 = 4-digit ADEMCO CONTACT ID REPORTING.
  • 8 = 3+1, 4+1 ADEMCO L/S EXP.
  • 9 = 3+1, 4+1 RADIONICS EXP.
Select the format for primary/secondar phone numbers
*49 Split/Dual Reporting

0 = Standard/backup reporting only (all

to primary)

1-5 = see table at right

Backup Reporting:

All reports are sent only to the primary number

unless unsuccessful after 8 attempts. If unsuccessful, the system will

make up to 8 attempts to send all reports to the secondary number. If

still unsuccessful after the 16 attempts, the system displays the

“COMM. FAILURE” message (FC for fixed-word displays).

*50 Burglary Dialer Delay

Delay Time:

0 = no delay

1 = 15 seconds

2 = 30 seconds

3 = 45 seconds

V20PSIA/V15PSIA:

Delay Time:

1 = 15 seconds

2 = 30 seconds

3 = 45 seconds

Delay Disable:

0 = use delay set in entry 1

1 = dial delay disabled for zones

listed in zone list 6 (use zone list 6

to enter those zones that require

dial delay to be disabled; these

zones ignore the setting in entry 1)

UL: Dial delay plus entry delay must not

exceed one minute; use zone list 6 to

disable dial delay from appropriate zones,

if necessary.

Provides delay of “BURGLARY ALARM” report to the central station,

which allows time for the subscriber to avoid a false alarm transmission.

This delay does not apply to zone type 24 alarms (silent burglary) or to

24-hour zone types 6, 7, and 8 (silent panic, audible alarm, auxiliary

alarm), which are always sent as soon as they occur.

UL: Delay Time must be 0

SIA Guidelines: delay must be minimum of 15 seconds

*53 SESCOA/Radionics Select

0 = Radionics (0-9, B-F)

1 = SESCOA (0-9 only reporting)

Enter 0 for all non-SESCOA formats.
*54 Dynamic Signaling Delay

0 = no delay (both signals sent)

1 = 15 secs

2 = 30 secs, etc.

Select delay from 0 to 225 secs, in 15-sec increments.

Intended for reporting via a communication device on the ECP bus

(LRR). This field lets you select the time the panel should wait for

acknowledgment from the first reporting destination (see


55) before it

attempts to send a message to the second destination. Delays can be

selected from 0 to 225 seconds, in 15-second increments. This delay is

per message. If 0 is entered in this field, the control panel will send

redundant reports to both Primary Dialer and communication device.

*55 Dynamic Signaling Priority /

AAV Path Select

0 = Primary Dialer first / AAV via phone

line

1 = Communication Device (LRR) first /

AAV via communication device

path (see AAV Path Select

paragraph at right)

This field selects the primary communication path for reporting (dialer

or communication device) of

primary phone number

events


(see


49

Split/Dual Reporting)

and

selects the communication path used for

AAV sessions (phone line or communication device path). Use


29

IP/GSM menu mode to enable the communication device being used.


Reports intended for the secondary phone number are not sent via

the communication device.

For Dynamic Signaling Priority:

Select the initial reporting destination

for messages as follows:

Primary Dialer First selected (

0

):


If acknowledged before delay expires (see


54), then message will

not be sent via LRR.


If not acknowledged before delay expires, message is sent to both

the Primary Phone No. and via LRR.

Communication Device (LRR) First selected (

1

):


If acknowledged before delay expires, then message will not be sent

to the primary dialer.


If not acknowledged before delay expires, message is sent to both

the Primary Phone No. and via LRR.

*56, *57, *58 Menu Modes. These are Menu Mode commands, not data fields, for Zone Programming, Function Key Programming, and Expert Mode Zone Programming respectively. Alarm Grid provides worksheets for the *56 and the *57 menu

System Status Report Codes (*59–*68)

Input Command Explanation Video
*59
*60
*61
*62
*63
*64
*65
*66
*67
*68
*69
*70
*71
*72
*73
*74
*75
*76
*77
*78
*79, *80, *81, *82 Menu Modes. These are Menu Mode commands, not data fields, for Output Device Mapping, Output Programming, Zone List Programming, and Alpha Programming respectively. Click on the zone numbers above to be taken to the appropriate section of this guide. Additionally, we provide a pdf version of the *79, the *80, and the *81 programming worksheets.
*84
*85
*86
*87
*88
*89
*90
*91
*92
*93
*94
*95
*96, *97 Initialize/Reset Defaults. These are commands, not data fields.
*98, *99 Exit commands. These are commands, not data fields.
*160
*161
*162
*163
*164
*165
*166
*167
*168
*169
*170
*171
*172
*174
*177
*181 50/60 Hertz AC Operation
0 = 60 Hz; 1 = 50 Hz
[0]
Select the type of AC power applied to the control (option is used for Real-Time Clock synchronization)
CONFIGURABLE ZONE TYPE OPTIONS (*182-*185)
(see Configurable Zone Type Worksheet following data field *199)
  • The system allows you to define custom zone types (VISTA-20P supports 4 [types 90-93]; VISTA-15P supports 2 [types 90, 91]) based on the options selected.
  • All configurable zone types can be programmed via the downloader. Zone types 90-91 can also be programmed from a keypad using data fields *182-*185.
  • IMPORTANT: Be careful when selecting combinations of options for configurable zone types. Contradictory options can cause unpredictable results.
Configurable Zone Type Options >
Auto Restore (entry 2): Faults on zones set for this option are cleared; restore messages sent upon restoral of faults.
Vent Zone (entry 2): Zones set for this option are ignored if faulted when arming the system, but are protected if the zone is later restored (e.g., an open window can be ignored when arming, but if the window is later closed, it will be protected; opening the window again causes an alarm.)
Bypass Disarmed (entry 4): Zones set for this option can be bypassed only while the system is disarmed.
Bypass Armed (entry 4): Zones set for this option can be bypassed when the system is armed.
Dial Delay (entry 6): Alarms on zones set for this option participate in dial delay central station reporting, if system dial delay enabled in field *50.
Fault Delay (entry 6): Faults on zones set for this option are delayed by the time set in field *87. Do not use this option if using entry/exit delay for this zone type.
Faults Display (entry 7): Selects how faults on zones set for this zone type are displayed.
Power Reset/Verification (entry 7): Selects whether the system resets power (when user enters code + OFF), and whether the system performs alarm verification (see description for zone type 16 in Zone Type Definitions section) when a fault occurs on these zones.
Use Entry Delay (entry 8): Selects whether to use the system’s entry delay times.
Use Exit Delay (entry 8): Selects whether to use the system’s exit delay time.
Interior Type (entry 8): Zones set for this option are treated same as standard zone type 4 (bypasses when armed STAY, faults displayed). Alarm Sounds (entry 9): Selects the type of alarms sound for zones set for this zone type.
Bell Timeout (entry 9): Alarm sounding on zones set for this option remain for the duration set in fields *32 / *33.
Fire Zone (entry 9): Zones set for this option respond in the same manner as if programmed for zone type 9. Do not set fire zones to respond as a “fault” in entries 1-6.
Trouble Sounds (entry 10): Selects the type of trouble sounds for zones set for this zone type (periodic beeps = once every 30 seconds; trouble beeps = rapid beeping).
Chime Enable (entry 10): Zones set for this option cause a chime when Chime mode is on.
*182
*183
*184
*185
*189
*190
*191
*192
*193
*194
*195
*196
*197
*198
*199

*56 Zone Programming Menu Mode

(press *56 while in Program mode) Use the provided *56 Zone Programming Worksheet.

Zones and Partitions Each protection zone needs to be programmed with various attributes using *56 Zone Programming mode or *58 Expert Programming Mode. Using this mode, enter the zone number to be programmed and make appropriate entries at the prompts. Finally, Confirm the serial number of wireless transmitter zones. The VISTA-20P system can control two independent areas of protection (known as partitions) for use by independent users, if desired, by simply assigning zones to one or the other partition during zone programming. The VISTA-20P, by default, automatically distributes users between the two partitions. The master user can change the user number distributions. Zones can also be assigned to a common partition, which is an area shared by users of both partitions (such as a lobby in a building). This allows either partition to arm, while leaving the common partition disarmed for access into the other partition. The following describes the functioning of the VISTA-20P common partition:

  • The common zone sounds and reports alarms only when both partitions are armed. If only one partition is armed, the system ignores faults on the common zone.
  • Either partition may arm its system if the common zone is faulted, but once armed, the other partition will not be able to arm unless the common zone is first bypassed or the fault is corrected.
  • Faults on the common zone are displayed on common zone keypads, and will also appear on another partition’s keypad when that partition is armed.
  • Either partition can clear and restore the common zone after an alarm.

*56 Menu Mode

Wireless Key Predefined Default Templates

Templates Loop Function Zone Type
Template 1
1
2
3
4

No response
Disarm
Arm Away
No Response

23
22
21
23
Template 2
1
2
3
4

No Response
Disarm
Arm Away
Arm Stay

23
22
21
20
Template 3
1
2
3
4

24-hour audible
Disarm
Arm Away
Arm Stay

7
22
21
20
Template 4
1
2
3
4

No Response
No Response
Arm Away
Disarm

23
23
21
22
Template 5
1
2
3
4

No Response
Arm Stay
Arm Away
Disarm

23
20
21
22
Template 6
1
2
3
4

24-hour audible
Arm Stay
Arm Away
Disarm

7
20
21
22
Prompt Valid Entries Explanation Video

Alpha Descriptor Vocabulary List (For Entering Zone Descriptors)

Descriptor Number Word
A
000 (Word Space)
  • 001
AIR
  • 002
ALARM *
004 ALLEY
005 AMBUSH
  • 006
AREA
  • 007
APARTMENT
  • 009
ATTIC *
010 AUDIO
B
  • 012
BABY *
  • 013
BACK *
  • 014
BAR
  • 016
BASEMENT *
  • 017
BATHROOM *
  • 018
BED
  • 019
BEDROOM *
020 BELL
  • 021
BLOWER
  • 022
BOILER
023 BOTTOM
025 BREAK
  • 026
BUILDING
C
028 CABINET
  • 029
CALL
030 CAMERA
031 CAR
033 CASH
034 CCTV
035 CEILING
036 CELLAR
  • 037
CENTRAL
038 CIRCUIT
  • 040
CLOSED *
  • 046
COMPUTER
047 CONTACT
D
  • 048
DAUGHTERS
049 DELAYED
  • 050
DEN *
051 DESK
  • 052
DETECTOR *
  • 053
DINING *
054 DISCRIMINATOR
055 DISPLAY
  • 057
DOOR *
  • 059
DOWN
  • 060
DOWNSTAIRS
061 DRAWER
  • 062
DRIVEWAY
  • 064
DUCT
E
  • 065
EAST
066 ELECTRIC
067 EMERGENCY *
068 ENTRY
  • 069
EQUIPMENT
  • 071
EXIT *
072 EXTERIOR
F
  • 073
FACTORY
075 FAMILY
  • 076
FATHERS
  • 077
FENCE
  • 079
FIRE *
  • 080
FLOOR *
081 FLOW
082 FOIL
  • 083
FOYER
084 FREEZER
  • 085
FRONT *
G
  • 089
GARAGE *
  • 090
GAS
091 GATE
  • 092
GLASS
093 GUEST
094 GUN
H
  • 095
HALL *
  • 096
HEAT
098 HOLDUP
099 HOUSE *
100 INFRARED
  • 101
INSIDE *
102 INTERIOR
103 INTRUSION
J
104 JEWELRY
K
  • 105
KITCHEN *
L
  • 106
LAUNDRY *
  • 107
LEFT
108 LEVEL
  • 109
LIBRARY *
  • 110
LIGHT
111 LINE
  • 113
LIVING *
  • 114
LOADING
115 LOCK
116 LOOP
117 LOW
  • 118
LOWER
M
  • 119
MACHINE
121 MAIDS
122 MAIN *
  • 123
MASTER *
  • 125
MEDICAL *
126 MEDICINE
128 MONEY
129 MONITOR
  • 130
MOTHERS
  • 131
MOTION *
132 MOTOR
N
  • 134
NORTH
135 NURSERY
O
  • 136
OFFICE *
  • 138
OPEN *
139 OPENING
  • 140
OUTSIDE
142 OVERHEAD
P
143 PAINTING
  • 144
PANIC *
145 PASSIVE
  • 146
PATIO *
147 PERIMETER
  • 148
PHONE
150 POINT
151 POLICE *
152 POOL *
  • 153
POWER
R
155 RADIO
  • 156
REAR
157 RECREATION
159 REFRIGERATION
160 RF
  • 161
RIGHT
  • 162
ROOM *
163 ROOF
S
164 SAFE
165 SCREEN
166 SENSOR
  • 167
SERVICE
  • 168
SHED *
169 SHOCK
  • 170
SHOP *
171 SHORT
  • 173
SIDE *
174 SKYLIGHT
175 SLIDING *
  • 176
SMOKE *
  • 178
SONS
  • 179
SOUTH
180 SPRINKLER
  • 182
STATION
184 STORE
  • 185
STORAGE *
186 STORY
190 SUPERVISED *
191 SUPERVISION
192 SWIMMING
193 SWITCH
T
194 TAMPER
196 TELCO
197 TELEPHONE
  • 199
TEMPERATURE
200 THERMOSTAT
  • 201
TOOL
202 TRANSMITTER
U
  • 205
UP
  • 206
UPPER
  • 207
UPSTAIRS *
  • 208
UTILITY *
V
209 VALVE
210 VAULT
212 VOLTAGE
W
213 WALL
214 WAREHOUSE
  • 216
WEST
  • 217
WINDOW *
  • 219
WING
220 WIRELESS
X
222 XMITTER
Y
223 YARD
Z
224 ZONE (No.)
  • 225
ZONE *
  • 226
0
  • 227
1
  • 228
1ST *
  • 229
2
  • 230
2ND *
  • 231
3
  • 232
3RD *
  • 233
4
  • 234
4TH
  • 235
5
  • 236
5TH
  • 237
6
  • 238
6TH
  • 239
7
  • 240
7TH
  • 241
8
  • 242
8TH
  • 243
9
  • 244
9TH
245 Custom Word #1
246 Custom Word #2
247 Custom Word #3
248 Custom Word #4
249 Custom Word #5
250 Custom Word #6
251 Custom Word #7
252 Custom Word #8
253 Custom Word #9
254 Custom Word #10

*Note: Bulleted (•) words in boldface type are those that are also available for use by the 4286 Phone Module. If using a Phone module, and words other than these are selected for Alpha descriptors, the module will not provide annunciation of those words.
Italicized words followed by an asterisk indicates those words supported by the 6160V/6150V Voice Keypads.

CHARACTER (ASCII) CHART (For Adding Custom Words)
32 (space)
33 !
34 "
35 #
36 $
37 %
38 &
39 '
40 (
41 )
42 *
43 +
44 ,
45
46 .
47 /
48 0
49 1
50 2
51 3
52 4
53 5
54 6
55 7
56 8
57 9
58 :
59 ;
60 <
61 =
62 >
63 ?
64 @
65 A
66 B
67 C
68 D
69 E
70 F
71 G
72 H
73 I
74 J
75 K
76 L
77 M
78 N
79 O
80 P
81 Q
82 R
83 S
84 T
85 U
86 V
87 W
88 X
89 Y
90 Z

UL NOTICES
  1. Entry Delay No. 1 and No. 2 (fields ∗35, ∗36) cannot be greater than 30 seconds for UL Residential Burglar Alarm installations, and entry delay plus dial delay should not exceed 1 minute. For UL Commercial Burglar Alarm installations, total entry delay may not exceed 45 seconds.
  2. For UL Commercial Burglar Alarm and UL Residential Burglar Alarm installations with line security, total exit delay time must not exceed 60 seconds.
  3. The maximum number of reports per armed period (field ∗93) must be set to “0” (unlimited) for UL installations.
  4. Periodic testing (see scheduling mode) must be at least every 24 hours.
  5. Alarm Sounder plus Auxiliary Power currents must not exceed 600mA total for UL installations (Aux power 500mA max.).
  6. All partitions must be owned and managed by the same person(s).
  7. All partitions must be part of one building at one street address.
  8. If used, the audible alarm device(s) must be placed where it/they can be heard by all partitions.
  9. For UL commercial burglar alarm installations the control unit must be protected from unauthorized access. The tamper switchinstalled to protect the control unit enclosure door is suitable for this purpose.
  10. Remote downloading without an alarm company technician on-site (unattended downloading) is not permissible for UL installations.
  11. Auto-disarming is not a UL Listed feature.
  12. As SIA limits for delay of alarm reporting and sounding can exceed UL limits for commercial and residential applications, the following UL requirements per UL681 are provided: The maximum time that a control unit shall be programmed to delay the transmission of a signal to a remote monitoring location, or to delay the energizing of a local alarm sounding device to permit the alarm system user to enter and disarm the system, or to arm the system and exit shall not exceed:
    1. 60 seconds for a system with standard line security or encrypted line security,
    2. 120 seconds for a system without standard line security or encrypted line security, or
    3. 120 seconds for a system that does not transmit an alarm signal to a remote monitoring location.
  13. This control is not intended for bank safe and vault applications.

SIA Quick Reference Guide
  1. *31 Single Alarm Sounding per Zone: If “0” selected, “alarm sounding per zone” will be the same as the “number of reports in armed period” set in field ∗93 (1 if one report, 2 if 2 reports, unlimited for zones in zone list 7).
  2. *34 Exit Delay. Minimum exit delay is 45 seconds.
  3. *35/*36 Entry Delay 1 and 2. Minimum entry delay is 30 seconds.
  4. *37 Audible Exit Warning: Feature always enabled; field does not exist.
  5. *39 Power Up in Previous State: Must be “1,” power up in previous state.
  6. *40 PABX Access Code or Call Waiting Disable: If call waiting is used, call waiting disable option in field *91 must be set.
  7. *50 Burglary Dial Delay: Delay must be minimum of 30 seconds.
  8. *59 Exit Error Alarm Report Code: Always enabled. 9 ∗68 Cancel Report Code: Default is “code enabled.”
  9. *68 Cancel Report Code: Default is "code enabled."
  10. *69 Recent Closing Report Code: Always enabled.
  11. *91 Option Selection: Exit Delay option should be enabled. If call waiting is used, Call Waiting Disable must be set to “1” (enabled).
  12. *93 No. reports in Armed Period: Must be set for 1 or 2 report pairs.
  13. Cross zone timer programming is set in field ∗85; cross zone pairs are assigned in zone list 4 using ∗81 Zone List mode.
  14. Duress code is assigned by using the “add a user code” procedure found in the User Guide. Enable Duress code reporting by programming zone 92 using ∗56 Zone Programming mode.
  15. Fire alarm verification is a built-in system feature when a zone is programmed for zone type 16.

ULC S304 REQUIREMENTS (for VISTA-15PCN and VISTA-20PCN)

Refer to the following notes for systems intended for Low Risk Level (low extent of protection) and Medium Risk Level (medium extent of protection) installations.

Low Risk Level

If the panel is used for Low Risk Level installations, the system msut include the following:

  • Subscriber control unit may use one telephone number, but it msut be programmed that
    1. it transmits over the single channel to the receiver once every 24 hour;
    2. it detects a loss of communication and initiates the local trouble signal within 180 seconds;
    3. in event of failure in the communication channel, all alarm and trouble signals must be annunciated locally.
  • Protection circuit conductors shall form one fully supervised circuit so arranged that an alarm signal will be initiated at the central station from teh effect of loss data, an open circuit or other change in normal status.
  • Trouble response time must be in compliance with CAN/ULC-S301, Central and Monitoring Station Burglar Alarm Systems

Medium Risk Level

If the panel is used for Medium Risk Level installations, the system must include the following:

  • Subscriber control unit may use at least two communication levels, one being the telephone number and the other being a radio frequency communication channel - the GSM communicator may be used. The Subscriber control unit must be programmed that
    1. it transmits over the both channels to the receiver once every 24 hours;
    2. failure of communication of either channel is reported to the Central Station on the other channel within 240 sec;
    3. the first attempt to send a status change signal shall utilize the Telephone line. Where it is known to have failed, transmission attempts over the alternate communication channel shall occur.
  • Protection circuit conductors shall form double fully supervised circuits so arranged that an alarm signal will be initiated at the central station from the effect of loss data, an open circuit or other change in normal status.
  • Trouble response time must be in compliance with CAM/ULC-S301, Central and Monitoring Station Burglar Alarm Systems

Perimeter, Space, Safe, and Vaults Protection

Protection for perimeter, space, safe, and vaults need to be provided during the installation.

  • For the Low Risk Security Level - Accessible openings should be contacted whether fixed or moveable;
  • For the Medium Risk Security Level - All moveable and fixed accessible openings should be contacted.

5800 Series Transmitter Input Loop Identification

All of the transmitters illustrated have one or more unique factory assigned input (loop) ID numbers. Each of the inputs requires its own programming zone (e.g., a 5804's four inputs require four programming zones). For information on any transmitter not shown, refer to the instructions accompanying that transmitter for details regarding loop numbers, etc.

UL NOTE: The following transmitters are not intended for use in UL installations:

  • 5802MN
  • 5802MN2
  • 5804
  • 5804BD
  • 5814
  • 5816TEMP
  • 5819
  • 5819WHS & BRS
  • 5850.

The 5827BD and 5800TM can be used in UL Listed Residential Burglar installations.


Comments


Posted By

For a current, updated list of states that we charge sales tax in, check out our Sales Tax Policy, which is updated daily

Recently the Supreme Court decided South Dakota v. Wayfair, Inc. (Wayfair). The ruling allows states to require out-of-state retailers to collect sales tax. The decision changes the landscape of e-commerce significantly.

We appreciate the benefits of doing business in the United States. We were blessed with unprecedented advantage as an e-tailor. We are sad that one of e-commerce's biggest benefits is disappearing. But we also recognize the change was inevitable. We appreciate that most states have provided immense clarity. We also appreciate that technology allows small e-tailors to affordable compliance solutions.

We recognize that Alarm Grid is now required to pay our fair share in states all around the US. Unfortunately, that means that we are going to start charging sales tax in 32 new states. Those taxes will begin showing up on invoices as early as yesterday. All taxes will be active between now and early April. Most invoices will reflect sales tax as of April 1, 2019. While this would be a great April Fools prank, unfortunately, it’s not one. Alarm Grid is in Florida. Our Florida customers have always had to pay sales tax on both product sales and monitoring. If you're one of Alarm Grid's Florida residents, nothing is changing for you.

Unlike Florida, some states exempt services like monitoring. Others do not. Navigating the tax landscape of 50 states is extremely complicated. We've spent a long time unwinding which state does what. Regardless of the state, products are always taxed. Moreover, as Alarm Grid grows, we are going to become nexused in more and more places. As that happens, we will make announcements to keep you updated about how your charges will change.

Below is a table of locations and respective links to relevant regulations. Products will be taxed in all listed states. In the "Monitoring Taxed" column we list whether states require us to charge sales tax on monitoring. Some states do not charge taxes on alarm monitoring. Others do. If the cell is blank it’s because we are still awaiting answers from that state's Department of Revenue. As soon as we know, we will update the table.

For the wild west internet that we have come to know and love, this might feel like a big setback. But we are aware of the enormous advantage online businesses gain from regulations. We have never competed on price, and we won’t be starting today. Alarm Grid has the best service in the industry. We have changed the way the industry works with customers. And we will continue to do just that.

There is no innovation in profiting from the free margin provided by our ability or any company’s ability to avoid taxes. And while the lower prices have been nice, Alarm Grid doesn't grow by eking out an additional 3-8% from each sale. Rather we need to continue working to stand out from our competition. We will continue to provide the same great products, service, and support.

This is a bittersweet day for us. It’s a day that all e-commerce companies knew was coming. We apologize for those impacted by the change. And we hope you continue using Alarm Grid for all of your security system needs.

State

Monitoring Taxed?

Date Taxes Will Begin Appearing on Invoices

Arizona

No

3/22/2019

Arkansas

Yes

4/1/2019

California

No

3/22/2019

Colorado

No

3/26/2019

Connecticut

Yes

4/1/2019

District of Columbia

Yes

4/8/2019

Florida

Yes

7/20/2012

Georgia

No

3/24/2019

Hawaii

Yes

4/1/2019

Illinois

No

3/22/2019

Indiana

No

3/22/2019

Iowa

Yes

4/1/2019

Kansas

No

4/1/2019

Kentucky

No

3/26/2019

Louisiana

No

4/8/2019

Maine


Sometime in Early April

Maryland

Yes

4/1/2019

Michigan


Sometime in Early April

Minnesota

Yes

4/1/2019

Nebraska

Yes

4/1/2019

Nevada

No

3/22/2019

New Jersey

Yes

4/1/2019

North Carolina

No

4/26/2019

Ohio

Yes

3/21/2019

Oklahoma

No

3/22/2019

Pennsylvania

No

3/26/2019

South Carolina

No

3/26/2019

South Dakota

Yes

5/17/2019

Tennessee

No

3/26/2019

Texas

Yes

3/25/2019

Utah

No

4/1/2019

Virginia

No

3/22/2019

Washington

Yes

4/1/2019

West Virginia

Yes

Sometime in Early April

Wisconsin

Yes

5/17/2019

Tags:

Comments


Posted By

There have been a lot of changes in the industry over the last few years. Alarm Grid has always tried to be at the forefront of the industry both in terms of our quality of support as well as our providing of resources to customers. One of the big changes the last year is the introduction of smart home systems that integrate with the security system. These include products like Alexa, Apple HomeKit, Google Home, Samsung's Smart Things and lesser known, open source protocols like Home Assistant.

For a lot of alarm companies, this is scary. Disruption is amazingly difficult to respond to. For Alarm Grid, it's more of the same. We're here to help you take care of your security needs. These protocols are enhancements to our service of dispatching the police when you need us to do that.

In order to help customers better navigate this changing world, today we introduced the protocol compatibility pages. These pages will let customers navigate the simple question, "will this panel or sensor or device work with [insert awesome protocol or home automation device here]?"

You will see badges on each product page. These badges will give you an indication of which protocols each product is compatible with. So far, we are showing Alarm.com, Alexa, HomeKit, Google Home, Home Assistant, Total Connect, and Z-Wave and Z-Wave Plus compatibility icons.

If you have any questions about compatibilities, please feel free to email us at support@alarmgrid.com. But in the meantime, we hope this change is helpful. We try to give you the best, easiest to navigate site in the entire industry, and we think this goes a long way to helping achieve that goal. Happy shopping!

Comments


Posted By

If you've ever wanted a glimpse into the world of Alarm Grid training, we have it! Alarm Grid's team occasionally takes an hour or two off and learns a little bit about the products that we recommend to you. These trainings are in-depth explanations of the functions of items attached to your system. If you wonder how it is that our wonderful staff know so much, well, I think you're going to be astounded by the quality of training they receive.

Below, Julia, an industry veteran and our most senior tech, steps the rest of the staff through a great tutorial on glass breaks and motions.


Tags: , , , , , , ,

Comments


Posted By

We are getting a lot of callers asking us whether we as a company support the NRA. It began a couple weeks ago after our competitor, Simplisafe, pulled their discount for NRA members. Whatever the motivation, we don't envy their position. This is a hot-button debate right now, and being accidentally caught up in the fray of a political discussion as a company is unenviable. We do not make guns, we have nothing to do with guns, and we as a company do not wish to alienate anyone on either side of the debate.

We are a diverse company with a lot of people who hold a lot of different opinions on the subject matter of guns. We have not probed or asked what people’s positions are. But discussions have happened around the office. We are sure that some at Alarm Grid are vehemently opposed to gun rights. Others may be members of the NRA. We haven't asked. What we have appreciated is that the conversation internally has always been very respectful.

As a company, our position is that we want to make sure your home is as secure as possible so that no matter what gun laws are, you have a layer of protection that will make it unnecessary to ever have to use them.

Alarm Grid attempts to remain above the fray when it comes to political topics. As a company, our expertise is in dispatching the police when someone is breaking into your home. We would be remiss, however, if we did not give due credit to the country we are founded in and due respect to the laws of that country for the success of our growth.

We hold in high regard the rights endowed to us. As to the administration of those rights, the debate about guns themselves, their lethality, background checks, mental illness issues, etc, we will leave up to the people of this great country and the courts.

Our only hope is that the debate, is respectful, open, and fact-based.

Our headquarters is just down the road from Marjory Stoneman Douglas. We are deeply connected to the area. Many of us know students who go or went there. Our connections to the tragedy are numerous and direct. Everyone at Alarm Grid harbors deep sadness at the events that unfolded there.

It’s our prayer that this never happens again.

As a company, we have encourage our staff to get involved however they see fit. This is literally something that happened in our community and strong emotions directed at solving the problem are to be expected. But we do our best to respect one another’s views.

We have never given NRA members any kind of discount. We don’t plan on doing it. But that’s not because we dislike the NRA. It’s because we do our best to offer great prices to every customer. And most discount programs require us to pay to be involved.

That’s not how we do business.

We’re not venture backed, we don’t have giant amounts of investment. We’re just a good ole American business started by some entrepreneurs in South Florida. We really do try to remove politics from our business because taking political positions would alienate many of our customers, and, more importantly, our employees. #respect

Tags:

Comments


Posted By

Remember the old days of alarms? 3 and 5 year contracts in exchange for large amounts off the monthly bill. Sometimes, companies would offer free equipment on signing.

In the last 5 years everything has changed. Alarm Grid pioneered the no-contract model. At the same time, other companies began pushing no-contracts. They also required homeowners purchase a proprietary system - made by them.

This should raise a consumer's hackles. Save for a couple companies, the alarm industry has always used open systems. Traditional alarm companies buy systems from Honeywell, DSC, GE, or another manufacturer.

The company will usually install these systems in the home of a consumer. The system is connected to a central station. If an intruder comes into the home, a signal is sent. The central station dispatches the police.

Alarm Grid's puzzle place in that old model is to remove the need for an installer. We do not go to a consumer's home to install the system. Instead, we make amazing content that helps you operate your security system. We help you install the security by using our resources, videos, and available tech support. Once you do, you sign up for monitoring, and we get you on your way. We never send anyone out. We don't have to gouge you on prices for "rolling a truck" because we don't have trucks.

In the end, you get a great, professional security system at an affordable price.

Additionally, Alarm Grid basically invented the month-to-month model in alarms. Before Alarm Grid, companies would require long-term contracts. Now, a lot of companies are moving to the month-to-month, no-contract model.

This is great for consumers! But only if they own an open system.

Companies that sell cheap, closed equipment are no different than companies that get you to sign a long-term contract. Your stuck on their system. No one else can "take it over" and monitor it.

Alarm Grid is perfect for people who want to leave their current company!

Getting a new system can be a big burden. We try our hardest to use what you have. If we can't, we try to get you the best system for your situation. WE DO NOT MUCH MAKE MONEY WHEN YOU BUY A SYSTEM.

Also, Alarm Grid doesn't sell proprietary systems. If you hate us, you can leave us. We do not lock you into a contract, and we do not lock you into a system that can't be taken over. Alarm Grid's incentive is to make your experience amazing every day all the time.

If we ever do anything to frustrate you, there are literally thousands of other companies that you can select to monitor your system instead. If Alarm Grid fails at serving you adequately, you can leave, no matter what, no questions asked.

Join the family...

If you're coming from a company that sold you proprietary equipment, we'd love to have you. Sign up for monitoring using the link at the top of this page. Then, give us a call (888-818-7728) or email (support@alarmgrid.com). Let us know which company you're coming from. Let us know about the equipment you have installed. We'll do what we can to help you use what you have or to replace all your equipment as frugally as possible.

For anyone switching companies, we'll give you your first month free. If you need new equipment (this month only), we'll give you 10% off whatever you buy here. Simply send us an email after you purchase, ro let us know which company you came from. We'll apply the 10% coupon after checkout.

Comments


Posted By

Today is the final day of our super low Qolsys pricing. We want to get the Qolsys panel into the hands of as many of our new customers as we can. For that reason, we have lowered the price of the panels as low as we possibly can. Today is the last day. Tomorrow, Qolsys panels are going to go to their normal price.

If you're looking to get a great, cellular panel, with some amazing Z-Wave features, this is the panel for you. The Qolsys IQ Panel 2 is the latest in security technology. The big screen looks great on the walls, and the profile of the panel is thinner than any on the market. The sensors are encrypted like they are on the Lyric, and the panel has an easy-to-use Android interface. We LOVE this panel!

If you need an extra keypad, make sure to get the IQ Remote. This keypad will blow your mind. It looks great, it has a thin profile, and it does pretty much everything the bigger, main panel can do. It will be a welcome edition to anyone's home.


Adding peripherals is easy too. Need more door and window sensors than the number that are included int eh IQ Kit 2 Classic? Add some more door/window s-line sensors. These encrypted sensors will protect your system from being spoofed by clever thieves and their thin profile means that they will protect you discretely.


Unlike the other kits, the Qolsys doesn't come with a key fob. If you love the key fob, you can easily add one. Consider that with this system, you will be able to arm and disarm from your phone. Key fobs aren't absolutely necessary. But if you love it we have it.


No system is complete without a motion sensor. These encrypted motions will make give your home a redundant layer of protection. You can't go wrong with motions. And the encrypted motion by Qolsys will round out your security system for incredible peace of mind.


Finally, to complete your system, consider a glass break detector. Like the motion, this adds a redundant layer of protection in homes. If an intruder breaks glass to get in, they will be stopped short as your system blares and warns them that the police are on their way.


Tags: , , , , , , , ,

Comments


Posted By

Alarm Grid has been working tirelessly to launch the full line of Qolsys's panels. These panels are state of the art, built on Google Android, and they look great. They are built to work on Alarm.com, and have already come out with a line of encrypted sensors. This distinguishes the line from the GC3, which has the capability of communicating with encrypted sensors, but 2GIG has not yet release the compatible encrypted sensors.

Just like the 2GIG GC3 or the Honeywell Lyric, the Qolsys is simple to use. We have tested it extensively and we are comfortable offering this line to our customers. Like our other panels, we will be putting together a full set of FAQs on the Qolsys panels so that our DIY folks can do most of their own installation and programming.

Qolsys has two panels, despite having only been around a little while. Their first one, the IQ Panel, made a big splash. Built on Android, the system function astoundingly well, standing up to the major players in the space. The IQ Panel 2, however, is on a different level. It's clean, thin, made of glass. The system joins the pantheon of modern systems as a great looking item to have on the wall of any home.

Armed with all the basic features of a security system, the Qolsys IQ Panel 2 comes with it some amazing little extra touches that neither Honeywell nor 2GIG have added to the Lyric or Go!Control lines as of yet. The ease of updating this system is unparalleled, and its got some great diagnostic features to help setup Z-Wave sensors. In-all, it is the perfect panel for the avid DIYer, and it won't disappoint anyone who is used to the Honeywell and 2GIG quality,

For those who don't like the look of the Qolsys's sensors, Alarm Grid is making available a new sensor. The Alarm Grid 319.5 MHz sensor which is reliable, cheap, and looks great. We are selling them as single units, in packs of 5, and in packs of 10.

Tags: , , , , , , , , , , , , , , , , , , , , , , , , , , , , , , , , , , , , , , , , , , , , , ,

Comments