Honeywell VISTA-21iP Posts

Posted By

You might be checking your calendar because it's Friday, and this is a video recap, and we usually save those for Mondays. Well we had four (4) videos from earlier this month that we never managed to recap, so we figured why not now? The topics today are VISTA Panels and the Tuxedo Keypad.

Honeywell VISTA System: Factory Defaulting

I show you how to Factory Default a Honeywell VISTA Security System. This process is very simple. You just get into programming with the command [Installer Code] + [8] + [00], with the default Installer Code being 4112. You can press [*97] to perform the default. The panel will beep three (3) times to confirm. You should also press [*96] to default the panel account and Computer Station ID (CSID). You can then press [*99] to exit programming. You can perform the default on an Alphanumeric Keypad, a Fixed English Keypad, or a Tuxedo Touchscreen Keypad in its Console Mode.


Honeywell Home Tuxedo: Local Scenes Using Sunrise & Sunset

I explain how you can create local smart scenes on a Honeywell Home Tuxedo Keypad to be set with time-based triggers for the local sunrise or sunset time. In the upper-right corner of the main Tuxedo screen, there is a weather display. If you click on this, then you can set the ZIP Code for the keypad. The Tuxedo will use this ZIP Code and its WIFI connection to get the daily sunrise and sunset time for any scenes set to trigger that way. If the Tuxedo loses its internet connection, it will just use the last recorded sunrise time and sunset time.


Honeywell Home Tuxedo: Setting Up Web Server & Remote Access

I show you how to set up web server access so that you can control the Tuxedo Keypad from a web browser. After setting up the feature by entering a username and password into the designated section of the Tuxedo, you can enter the Tuxedo IP Address into the web browser of an IP-connected device to access a login screen. The device used must be on the same network as the Tuxedo Keypad. Provide the username and password that you set up at the Tuxedo. This will open an interface resembling the old style Tuxedo Touch, and you can use that you control the Tuxedo and the connected VISTA.


Honeywell Home Tuxedo: Web Interface Cannot Include/Exclude Z Wave Devices

I explain that you cannot include or exclude Z-Wave devices when accessing the Tuxedo Keypad from a web browser, also known as the Tuxedo Web Interface or Tuxedo Virtual Interface. Although you can perform almost all of the same commands from the virtual Tuxedo Web Interface as you can from the Tuxedo Keypad itself, you cannot add or remove Z-Wave devices. This is because the necessary menu option for adding and removing Z-Wave devices is not present inside the Tuxedo Virtual Interface. You can only add and remove Z-Wave devices by interacting with the actual Tuxedo Keypad itself.

Tags: , , , , , , , , , , , , , , ,

Comments


Posted By

Most of these best security systems lists are frustrating to navigate. Many of them include companies and their respective rating. ADT, Brinks, Vivint, or others will make the cut. We’re sad to never be included in these lists. But that reflects the state of the industry. Many people don’t know that other alarm monitoring companies exist. Still others only include the new DIY systems that are on the market like Simplisafe, Ring, Nest, or Scout. Consumer Reports, for example, only reviews Nest, Ring, Abode, Frontpoint, Simplisafe, and Samsung’s Smarthings integrated GC3 that they produced for ADT. This list is, in no way, a complete list of products. Moreover, it completely ignores legacy and current systems. And, while we like “new,” being in the industry, we are proud to say that the so-called “professional” systems that are out there are better than these systems for a few simple reasons.

Our list includes exclusively professional equipment. It is the same equipment that ADT or other installation companies might sell you. We’ve tested a lot of these DIY systems. They work well to varying degrees. But we have found that nothing surpasses the quality or features of a professional system. What’s more, we provide the help that you need to turn these professionally installed systems into the DIY systems that you may be looking for.

Yup! You heard that right. You don’t need a professional to install a professional home security system.

They are simple enough to install and operate that you can do it yourself. Additionally, you can have them monitored by anyone. We think that this feature is the feature that sets them apart from any of the new “DIY” systems. Simplisafe systems must be monitored by Simplisafe. Ring systems must be monitored by Amazon. Nest systems must be monitored by Google’s chosen provider: Monitronics (now Brinks).

But a professional system can be monitored by any alarm company. We certainly do monitor them. But if you’re interested in having a local installer at your beck and call, you can have Larry the alarm installer from down the road monitor it as well.

In all, these systems are not easy to rank. Each one comes with its own set of features and benefits. So we have organized the following list based on your own possible set of needs.

So without further ado, here are the 3 best alarm systems of 2020.

Best Interactive Service of 2020

Alarm.com

Interactive services are the apps that allow you to control your alarm system from your phone or computer. There are dozens of such services. Some companies, such as the ones we mentioned above have their own proprietary service. But then, there are a few universal services. These are sold by Interlogix, DSC, Alarmnet (Honeywell), Securenet and others. Our favorite of these interactive services is alarm.com. It is a great service that works with Qolsys products, DSC products, Interlogix products, 2GIG products, and more. Unfortunately, it does not work with most Honeywell products.

It provides a wide array of controls, including the ability to use SIRI to command your system and schedule Z-Wave scenes. The drawback is that Alarm.com requires users to sign up for cellular monitoring. This is the best, most robust kind of monitoring. But some users don’t want that level of connectivity. Some end users are satisfied with just IP monitoring. In the 90s, particularly, phone line monitoring was the norm. Modern monitoring has found other, better, more secure options. No one can cut the line of a cellular device, for example. IP monitoring suffers from many of the same problems as phone line monitoring. But it also allows users to get many of the advantages of cellular monitoring, including homeowner’s insurance discounts. Even still, despite this drawback of alarm.com, it is our preferred interactive service.

That said, its closest competition is Honeywell’s Total Connect. Total Connect only works with Honeywell. It does almost everything that Alarm.com does, with a few specific differences - no native SIRI control, for example. That said, Honeywell makes excellent equipment. The Lyric alarm, for example, works with HomeKit. This integration will allow individual control of the unit from SIRI. This is actually more robust than even alarm.com’s SIRI integration. And the only options that a HomeKit user has on the Alarm.com side is the DSC iotega, which is a system that works, but for many reasons, doesn’t make this list.

Ultimately, whether you use Alarm.com or Total Connect, it will depend on your system’s interactive service compatibility. If you are interested in system features, look at the systems below. If you are more concerned with the usability of the interactive service, you can certainly pick a system based on its qualities and compatibility with an interactive service.

Runner Up: Total Connect

Best Overall System of 2020

Qolsys IQ Panel 2+

This security system is an amazing piece of equipment. It is a great looking home automation controller as well as a security system. It’s Alarm.com compatibility is a great feature that makes the Qolsys IQ Panel 2+ a stratospherically better panel than almost anything on the market. The system is built on the Android operating system. Ultimately, the Qolsys is what you get when you beset a Silicon Valley company with the task of building a professional alarm system. It is feature filled, beautifully and competently built.

One of the frustrations with the Qolsys is its lack of modularity. It is an expensive system. Everything is built in to the panel. Whereas most security systems allow a user to install (and uninstall) a cellular communicator, the Qolsys builds the communicator right into the panel itself. This sounds like a great feature, and it is. But that’s until the system’s communicator becomes obsolete. It’s something that doesn’t happen very often, but every 10 or so years, the cellular companies deprecate one or more of their networks. At this very moment, Alarm Grid’s subscribers are preparing to replace thousands of communicators. As Verizon and AT&T deprecate their old CDMA and 3G networks, the systems that have included these communicators are coming due for an upgrade. The drawback of the Qolsys is that there is no upgrade per se. Rather, end users with an older Qolsys will have to replace the entire panel.

Despite this drawback, the Qolsys is a great unit. One of its best features is its ability to take over old systems. For those that are looking to replace an old system, the Qolsys is a great choice. The new Qolsys IQ Panel 2 Plus’s come in different varieties, each with a daughter card that allows them to grab the signals from other company’s wireless sensors.

Just awesome!

In our opinion the best feature of the new Qolsys IQ Panel 2 Plus, however, is not its amazing home automation features or its ability to take over other systems. It’s not even its slick Android interface. All those features can and are replicated by its competitors. Rather, our favorite feature of the Qolsys is its sensor’s ranges. The Qolsys is a panel whose PowerG sensors, which are encrypted, are capable of being monitored over HUGE ranges. We have seen the Qolsys detect sensors that are nearly a half mile away. This makes the PowerG line of sensors that are compatible with the Qolsys an amazing feature that no other all-in-one system has. These sensors basically remove the need for expensive repeaters. They are modern sensors that no other company has.

Eat your heart out Google, Amazon, and all ya’ll Silicon Valley companies trying to build better systems. None of these systems even touch the quality of the Qolsys in our opinion.

Runner-up: 2GIG GC3e

Best HomeKit Compatible System of 2020

Honeywell Lyric

The Lyric is in competition with DSC’s Iotega, which works as a HomeKit controller. If you’re looking for HomeKit control, and your home is filled with DSC sensors, the Iotega might be a better choice for you. But if you’re starting from scratch, nothing is better than the Lyric controller. This system is compatible with a wide range of sensors, including America’s most sold sensor, the 5816. It looks great on a wall. It’s fairly priced, and it does everything you’d want from a good looking system, including a photo album feature.

We sold more Lyric’s in 2019 than any other system on the market. This is largely due to Honeywell’s trusted name. The quality exemplified by the brand is epitomized in this sleek wall unit. Its versatility is buttressed by the hundreds of compatible sensors that Honeywell has released over the years.

We like Honeywell’s no-nonsense approach to monitoring. They put security over all. They were the first mainstream system on the market with both a panel and encrypted sensors. And the sensors work immensely well. We love Honeywell. We love the Lyric. At the moment, we believe that the Qolsys has surpassed the features of Honeywell’s alarm system. But the Lyric has one feature that Qolsys simply does not: the ability to be monitored by WiFi only. In fact, nearly all of Honeywell’s all-in-one systems can be monitored by WiFi only. For an end user, this means that they can be professionally monitored at a price that is significantly cheaper than that of a cellular system. For the budget conscience consumer, this presents an amazing opportunity to save money while getting all the benefits of a monitored system, including insurance discounts. We are a big fan of cellular monitoring. But the option is there for those who simply don’t think it’s as important as we do or for those who don’t want to pay the cost of cellular monitoring.

Runner Up: DSC iotega

Best Budget Alarm System

Honeywell L3000


We spent a lot of time debating whether the L3000 would be the best system for someone on a budget. We actually prefer the GC2e as a system. It’s a great looking system, it’s inexpensive, and it uses Alarm.com. But here’s the problem: it requires that anyone using it purchase a cellular communicator. Additionally, because its most minimal monitoring will include Alarm.com. This puts anyone purchasing it into a different category of spending. That said, if it’s not outside of your budget, the GC2e is a great system. It is our runner-up, because it is a good budget system, but it’s not great.

The low price of the L3000 is no indication of its quality. It is because it is a legacy system. It is often used by alarm companies that are putting systems into big apartment buildings. The system is amazing. It’s effective, will last for a very long time. Unfortunately, it’s ugly and can be a bear to program. Luckily for owners, programming is not something you do more than one time. And if you’re with Alarm Grid, there is a strong chance that we can program it for you.

Unlike the GC2e, the L3000 allows users to do IP-only monitoring. It also allows old-school phone line monitoring. That means, for the budget-conscious consumer, the L3000 is both cheaper to purchase than the GC2e, and will save an end user between $10 and $20 per month. In all, the L3000 will save anyone who installs it between $120 and $240 per year, while also being incredibly affordable at the outset. Huzzah! Oh, and for those concerned about sensors, the L3000 works great with any of the Honeywell’s 5800 sensors. You will have a ton of sensors to pick from, which also makes the system the most versatile budget system on the market.

We love the L3000 as a budget system.

Runner-Up: 2GIG GC2e

Best Wired Alarm System of 2020

Honeywell VISTA 20P

This is an oldie but a goodie. The VISTA 20P has been produced by Honeywell for many many years now. It's an excellent system with great, modern features. Honeywell produces update chips that they release every once in a while. These updates allow the system to take advantage of modern features like those available in the VAM or Tuxedo Touch. Home Automation? You can do it using the VISTA 20P. Manage both wired and wireless sensors? You can do that very easily with the VISTA 20P by adding a wireless receiver or a keypad with a wireless receiver built in. In all, this system has all the same great features of its all-in-one wireless contemporaries. 2 drawbacks to speak of, though: 1) it's big and bulky; 2) programming these systems sucks.

Runner-up: Honeywell VISTA 21iP

What Else is Coming in 2020?

Every year, professional systems get better and better. The systems that are coming soon are no different. In the coming months, we are expecting the release of Qolsys’s new Hub as well as Honeywell’s ProSeries panel. 2GIG hasn’t announced anything yet. But they just released the encrypted versions of their panels.

Unfortunately, 2019 saw the close of Interlogix’s security systems production division. While interlogix was not known for the incredible innovation of their systems, they made great budget models that gave users a simple, cheap entry point into security systems. They will be missed. But the three main producers--2GIG, Qolsys, and Resideo (formerly Honeywell)--are continuing to pioneer new and innovative features.

Tags: , , , , , , , , , , , , , , , , , , , , , , , , , , , , , , , , , , , , , , , , , , , , , , , , , , , , , , , , , , , , , , , , , , , , , ,

Comments


Posted By

Another part of the Resideo booth at ISC West 2019 that we missed yesterday featured the new and upcoming LTE communicators for Resideo Alarm Panels. These cellular communicators will provide fast and reliable communication and allow users to control their systems through Total Connect 2.0.


As you may know, the 3G sunset is quickly approaching. If you want to keep your alarm system connected to the network into the distant future, you will need an LTE communicator. Cellular service providers like AT&T and Verizon have stated that they plan to support their LTE networks for many years to come. Getting an LTE communicator represents possibly the most important upgrade you can make for your security panel.

The Resideo Alarm Communicators will connect compatible systems with the company's AlarmNet Servers. This allows the end user to access and control their system through Total Connect 2.0. This is an excellent platform that allows users to arm and disarm their system, check current system status and control Z-Wave smart home devices.

Resideo showcased many AlarmNet LTE Communications. Most have a variety of different carrier options, which are AT&T, Verizon and Bell Canada. Many wireless Honeywell Panels were represented. The display featured communicators for the Lyric Controller:

The Lynx Touch L5210 and L7000:


The VISTA Systems:


And even the L3000 got some love:


If you didn't know, Alarm Grid already sells many of these communicators. The ones offered on our site include:

We are sure that Resideo users will achieve great results with these LTE communicators. Stay tuned to our blog for more content from ISC West!

Tags: , , , , , , , , , , , ,

Comments


Posted By

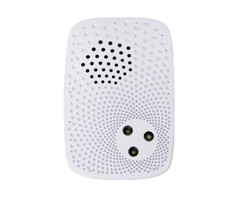
Hi DIYers! Today, we're taking a closer look at the Qolsys IQ Siren. Specifically, we want to go into the details of how it is used when paired with a Honeywell Alarm System. As you may know, the IQ Siren is a Z-Wave device that pairs with most Z-Wave controllers, including Honeywell Panels.

Qolsys iq siren z wave siren for qolsys iq and iq panel 2 qz2300

What's interesting is that the Qolsys IQ Siren learns-in with Honeywell Alarm Systems not as a Z-Wave siren, but as a Z-Wave light switch. This is not the case with the Qolsys IQ Panel 2, which immediately recognizes the IQ Siren for what it is - a siren. This way, the siren automatically activates during audible alarm events, with no special automation functions required. The 2GIG GC2 and 2GIG GC3 Alarm Systems also properly recognize the IQ Siren as a siren. We even wrote an FAQ and shot a video about this.

But since Honeywell Systems view the Qolsys IQ Siren as a light switch and not a siren, things become a little bit tricky. After all, you want the siren to operate like a siren, not a light switch! Fortunately, there's a way around this problem. That is using Total Connect 2.0 to create smart scenes. These scenes will tell the siren to activate when the Honeywell System experiences an audible alarm event, and also to stop sounding when the system is disarmed and the alarm is cleared. How's that for a creative solution?

It might take a little bit of extra work to get the Qolsys IQ Siren working on a Honeywell Security Panel, but it really is worth it. This is a 105 dB siren with a built-in strobe light to provide a visual indication of an alarm. For a sound comparison, 105 dB is about as loud as a table saw. It blows the 85 dB sounder built into the Lyric and LYNX Touch Systems out of the water. It's much easier to install than a hardwired siren, and it is extremely versatile overall. This makes the IQ Siren a winning option for many DIY users.

The Qolsys IQ Siren is great for any Honeywell System with a Z-Wave controller. Remember, the Lyric already includes a built-in Z-Wave controller, while the other panels need to have one added separately. The LYNX Touch Systems need a Honeywell L5100-ZWAVE Card, while the VISTA Panels need either a Honeywell VAM or a Honeywell Tuxedo Touch Keypad. It is also helpful to have access to Total Connect 2.0. If your monitoring plan does not include TC2, now is a great time to get started!

Please note that while you can create the necessary scenes from the panel and not from TC2 (with the exception of the Lyric system) we find that using TC2 is the easiest option. You can use the TC2 website or the mobile app on Android and iOS devices. We like using the website to create scenes. But if you prefer the mobile app, that's okay too!


Once you have paired the IQ Siren and logged into your TC2 account, it's time to create the scenes! Most users will want three scenes. These are:

  • A scene to activate the siren during a burglary alarm
  • A scene to activate the siren during a fire alarm
  • A scene to deactivate the siren during a panel disarm

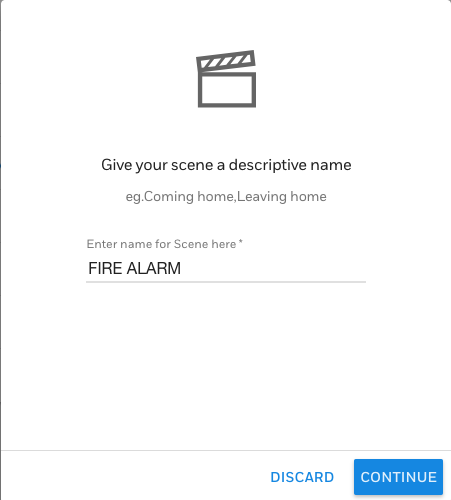
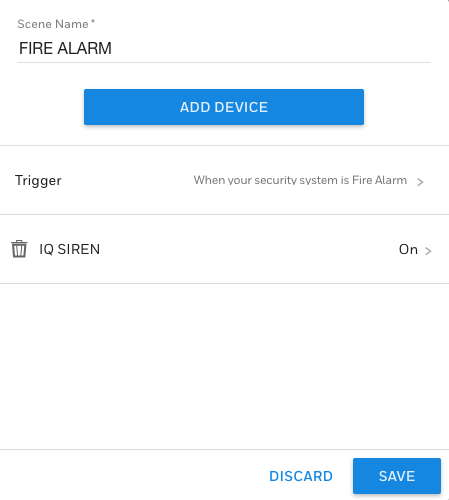
For our example, we will be creating a scene for the fire alarm. The other scenes will follow a similar process. Start by navigating to the Scenes Menu. Then choose Add Scene. You will then name your scene:


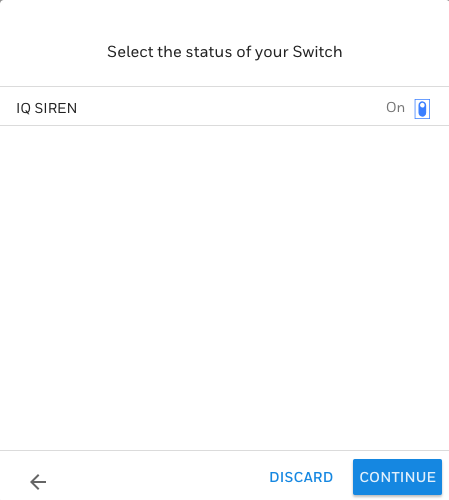
Then you will include the IQ Siren into the scene. It will be listed under "Others". Since we are setting it to activate during an alarm, we will set the device to On for this scene. But if you wanted to have the siren stop sounding when an alarm is cleared, then it would be set to Off.


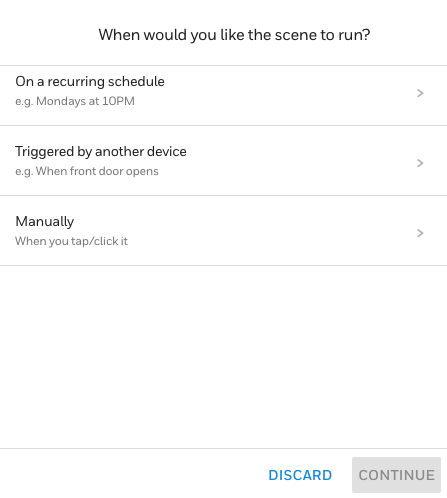
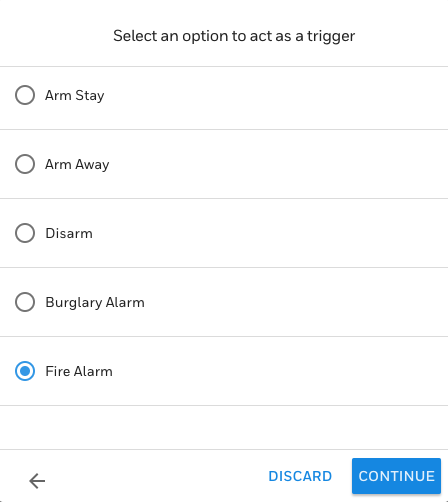
Next, you will set when the scene should run. Since it is being controlled by either a system alarm or a system disarm, you will choose "Triggered by another device". Then choose the appropriate function.


Finally, save your scene!


And that's it! Remember, you must do this for each individual scenario (burglary alarm, fire alarm, and to turn off upon disarm) if you want the IQ Siren to provide complete functionality. Alarm Grid monitored customers can always get further assistance by emailing support@alarmgrid.com. You can also call us at (888) 818-7728 during our normal business hours of 9am to 8pm EST M-F. If you aren't already monitored with Alarm Grid, make sure to press the orange Alarm Monitoring button at the top of this page. We look forward to working with you!

Tags: , , , , , , , , ,

Comments


Posted By

Hi DIYers! We know that many users take on the task of setting up their own hardwired security system. We think this is great, as it really lets a DIY user get to know their alarm panel. But there are some extra tools we recommend for setting up a wired system. One of which is a voltmeter.

Honeywell vista 20p wired alarm control panel

All alarm systems require electricity for basic operation. But this electricity is used for more than just powering the panel. Various equipment like sensors and keypads will also require power. With hardwired systems, the peripheral equipment will actually draw power from the panel. Not only is the system's plug-in transformer powering the panel, it is also keeping its many devices running as well. If the electricity goes out, the panel should also have a backup battery to ensure that everything remains powered.

The important thing to understand is that plugging in a transformer does not suddenly supply an infinite amount of electricity for an alarm system. There's a limit to how much power a system can provide. Each transformer can only provide a limited amount of current. There are also current limiting devices like fuses and breakers that are built into each of the output circuits on a system. These are used to prevent things like the bell circuit, the battery charging circuit and the auxiliary power circuit from allowing enough current through to damage the system. If you try to add too many devices to a system, you may find that they will not work properly. Worse yet, if you don't use the specified transformer and other manufacturer-specified peripheral devices, you could cause serious damage to the system.

For smaller applications, this is not usually a major concern. But as you add more powered devices to an alarm system, the chance for overload becomes greater. You may need to add a second power supply, along with an additional transformer and battery. However, you shouldn't be working blindly. Using a voltmeter with the ability to read current (technically a multi-meter) is very important for knowing the current load and making sure that the current power supply is adequate.

A voltmeter works by applying a known amount of current and resistance to a circuit. Ohm's Law tells us that if you know any two of three values (voltage, current or resistance), you can then calculate the third value. A hardwired zone on an alarm panel works largely in the same way. Voltage, along with a small amount of current, is fed through a zone circuit. Based on the Ohm's Law principle, if you know the amount of voltage being applied, and you know the amount of current being applied, you can then calculate the amount of resistance that is present on the circuit. This is how a zone with an end-of-line resistor works. When you make a zone Normally Open or Normally Closed, you simplify things even further. If current is flowing, the zone is open. If current is not flowing, the zone is shorted or closed. Without a voltmeter, troubleshooting wired zones becomes much more difficult. The voltmeter doesn't even have to be a big expensive model. It just needs to provide basic function.

Also keep in mind that many system problems occur due to electrical issues. Having a voltmeter on hand can save a user a lot of hassle in troubleshooting. We hear of users all the time who don't know why their system isn't working, only to find that it is because they aren't supplying enough power. Performing a simple check with a voltmeter can help you discover an issue that would otherwise have gone unnoticed. For that reason, everyone with a wired panel really should invest in an inexpensive voltmeter or multi-meter.

If you're just beginning to consider purchasing a panel, and you don't want the hassle of worrying about wired zones, then a wireless system may be a better option. Wireless sensors operate strictly on battery power, and a user won't have to worry about overloading circuits. We generally recommend wireless systems for DIY users in general, as they are much easier to use and install. But if you do decide to go the hardwired route, or you already have a working wired system, we certainly recommend you keep a voltmeter on hand!

If you're an Alarm Grid customer, and you need help using a voltmeter to check your system, don't hesitate to reach out to us! We are happy to help monitored customers get their systems up and running and perform any necessary troubleshooting. We invite you to check out our monitoring page for more information. If you ever need help, you can send an email to support@alarmgrid.com. You may also call us at (888) 818-7728 during our normal business hours of 9am to 8pm EST M-F. We look forward to working with you!

Tags: , , , , , , , , , , , ,

Comments


Posted By

Anyone who has a Honeywell Security System knows that using and managing codes is very important for getting the most out of the system. This handy guide will show you everything you need to know about Honeywell System Codes, including how they are are used and how they are created.

Basic Information about System Codes

Note that the default Installer and Master Codes for almost any Honeywell System are 4112 and 1234 respectively. Let's start by reviewing basic concepts and information about system codes.

What is a system code?

A system code on a Honeywell Panel is a numeric password that is used to gain access to certain menus of the system and to perform various functions. The main reason that alarm systems have codes is to make sure that the person who is using the system is supposed to have access. Only the end user and any other individuals they have authorized to use their security system should know any of the system codes.

Depending on the type of code, a master user can restrict access to only specific parts of the system for other users. This makes some system codes more powerful than others. For Honeywell Systems, most codes are four-digits in length and use the digits 0-9. This allows for up to 10,000 possible combinations for any given code!

How should I choose a system code?

Any code you use on a Honeywell System should be a code that is easy for the user to remember, but difficult for others to guess. Remember, the purpose of a code is to prevent access to unauthorized users. If an unauthorized user, like an intruder, is able to provide a valid system code, it could result in a serious security breach. Likewise, if an authorized user forgets a code, it can be inconvenient or even impossible to get back in.

Most Honeywell Systems operate using delay periods. In other words, upon entering the premises, a valid code must be provided within a very limited time period to disarm the system. If a valid code is not provided within this specified time, then an alarm will occur. This will give an end user who knows a valid code enough time to disarm the system. But it will not give an intruder nearly enough time to brute force their way into the system by guessing codes.

What types of codes are used on Honeywell Systems?

There are many types of codes used with Honeywell Panels. The most common are outlined below:

  • Master Code: Each system has one Master Code. This is the main code a user will normally use for arming and disarming. It can perform all security functions, add and delete users, change the current Master Code and perform many additional system functions. This code cannot be deleted from the system entirely. Only the main user and operator of the security system should know the Master Code.
  • User Codes: Most Honeywell Systems can have multiple user codes set up. These codes can arm and disarm the system just like the Master Code. However, they cannot perform other system functions. A user code should be provided to a user who needs regular access to the building, but should not be able to adjust important settings and configurations for the alarm system.
  • Installer Code: Each system has one Installer Code. This is the main code that is used for making programming changes to the system. It is needed for adding, deleting and configuring sensors, adjusting entry and exit delay periods and more. Basically any major system setting will require the use of the Installer Code. An important note is that the Installer Code can only disarm the system if it was used to arm the system in the first place. This means that keeping the Installer Code at its default is not a security risk, as long as the code isn't used to arm the system. This code cannot be deleted from the system.
  • Guest Code: Also called a "babysitter code", a guest code is a restricted-access code that can be established on most Honeywell Systems. The important thing to remember about this code is that it can only disarm the system if it was the code used to arm in the first place. This code is best provided to users who need temporary access to the system, such as a house guest, a babysitter or a maintenance person. The main user can arm their system with the guest code so that they can access the premises. But if nobody else should be using the system, then the Master Code or a regular user code can be used to arm so that the guest code cannot gain access.
  • Duress Code: The duress code is a special code that is used to send a secret signal to a central monitoring station, letting them know that help is needed immediately. When this code is entered, it will appear to disarm the system like normal. But in reality, a distress signal will be sent out to the central monitoring station to request immediate help. This code is very rarely used, as its only purpose it to protect the user in hostage situations. Otherwise, this code should never be used. However, it is still important to remember this code, as it can save lives when used properly.
  • Arm Only: On select panels only. This code can arm the system, but it cannot disarm.
  • Partition Master: Only for systems with multiple partitions. This code is the same as a Master Code, but its authority only applies to a specific partition. This type of code is optional on a system, but it can be useful if multiple partitions have been established.

What are default codes?

When a Honeywell System is used for the first time, its Master Code and its Installer Code will be set to default values. For most Honeywell Panels, the default Master Code is 1234, and the default Installer Code is 4112. It is normally recommended that you change the Master Code for security purposes. However, the Installer Code can be left at its default so that the user can get back into programming. Keeping the Installer Code at the default does not present any type of security risk.

Now that we have covered some basic information for system codes, let's look into some specific panels to learn how codes are used.

Honeywell Lyric Controller

Honeywell lyric controller encrypted wireless security system

For the Lyric, codes are managed through the Users Menu. To access this menu, start from the main screen of the system. Choose Security > Tools > Master Code > Users. This menu will allow you to change any system code, with the exception of the Installer code.

Up to 48 unique codes can be added with the system. The code in slot 01 is the Installer Code. The code in slot 02 is the Master Code. The code in slot 47 is the Guest Code. The code in slot 48 is the duress code. All of the other 44 system codes are optional user codes.

Add New Codes

Press the "Add New" button. You can the provide a name for the code, enter in a valid four-digit code, and set whether or not the code can be used to control any Z-Wave door locks. The user number will be automatically assigned. Remember to press the "Save" button in the lower-right corner when you have finished.

Edit Existing Codes

Click on the code you want to edit to highlight it. Then press the Edit button in the lower-left corner of the screen. You can then edit the Name, the 4-digit numeric code and the Z-Wave lock settings for the code. Make sure to press "Save" when finished.

Delete Codes

Click on the code you want to delete to highlight it. Then press the Delete button in the lower-right corner of the screen. Press "Yes" when asked if you are sure. The code will be deleted.

Changing the Installer Code

The default Installer Code for the Honeywell Lyric Alarm System is 4112. We recommend keeping this code at the default to prevent the user from being locked out of programming. However, this code can be changed through programming if desired. You will need the current Installer Code to do this. You cannot do this using the Master Code.

Start from the main screen of the system. Choose Security > Tools > Installer Code (default is 4112) > Program > Installer Code. You can then change the Installer Code for the system. Press the "Done" button in the lower-right corner when finished.

Honeywell LYNX Touch Panels

Honeywell l5210 lynx touch wireless security system with 4 1 sla

Managing user codes for a Honeywell LYNX Touch System is very similar to the process for the Honeywell Lyric Controller. Most codes can be managed through the User Codes menu. To access this menu, start from the main screen, and choose Security > More > Tools > Master Code > Users. This menu will allow you to edit any system code, except for the Installer Code.

Please note that the number of user codes that can be added depends on the type of LYNX Touch Panel that is being used. On each system, the Installer Code will be user 01, the Master Code will be user 02, the Guest Code will be the second-to-last available code, and the Duress Code will be the last.

For reference, the L7000 will support up to 48 codes, the L5210 and L5200 will support up to 32, and the L5100 and L5000 will support up to 16.

Add New Codes

Click the "Add New" button at the bottom of the screen. The following menu will let you change the Name, the four-digit code and the Z-Wave lock settings for the code. The user number for the new code will be automatically assigned. Press "Save" in the lower-right corner to finish.

Edit Codes

Click on the code you want to edit to highlight it. Then press the Edit button in the lower-left corner. From there, you can change the name, the four-digit code, and the Z-Wave lock settings. Press "Save" in the lower-right corner when finished.

Delete Codes

Click on the code you want to delete to highlight it. Then press the Delete button in the lower-right corner. The panel will ask you if you are sure. Choose "Yes". The code will be deleted.

Changing the Installer Code

All of the LYNX Touch Panels use 4112 as their default Installer Code. This code is normally left at its default to prevent the user from being locked out of programming later. But it can be changed using the current Installer Code for the system if desired. Remember, keeping the Installer Code at the default does not present any type of security risk.

To change the code, start from the main screen of the system. Choose Security > More > Tools > Installer Code (default is 4112) > Program > Installer Code. You will then be able to change the Installer Code. Please note that when exiting programming, always choose "Yes" when asked you want to allow the installer to get back into programming. Choosing "No" will lock the user out of programming, and the user will need to use the backdoor method to get back in.

Backdoor Method for Accessing Programming

If you ever get locked out of programming, either due to choosing "No" when asked if you want to allow the Installer to get back into programming, or because you lost an Installer Code that wasn't set to the default of 4112, you can use the backdoor method to get back in.

First, reboot the panel by going to Security > More > Tools > Master Code > Test > Reboot. Alternatively, if you don't know the Master Code, you can power the system down by unplugging the transformer and disconnecting the backup battery. Then power it back on by plugging the transformer in. Once the white screen on the reboot appears, immediately press and hold the Home Button (the picture of the house) on the front of the panel. Release the button once the green bar with "Ready to Arm" appears across the top. Then choose Security, followed by Arm Stay. In the number pad that appears, press Clear, followed by 00. Choose "Program" to enter the Programming Menu.

Once you are inside, you can then set the Installer Code for the system to reenter programming later. You can also restore the system to factory default settings through "Default Config" to restore the system to its factory default settings. This will reset the Master Code to its default of 1234. Please note, this will also delete all programming settings for the system.

Honeywell VISTA P-Series

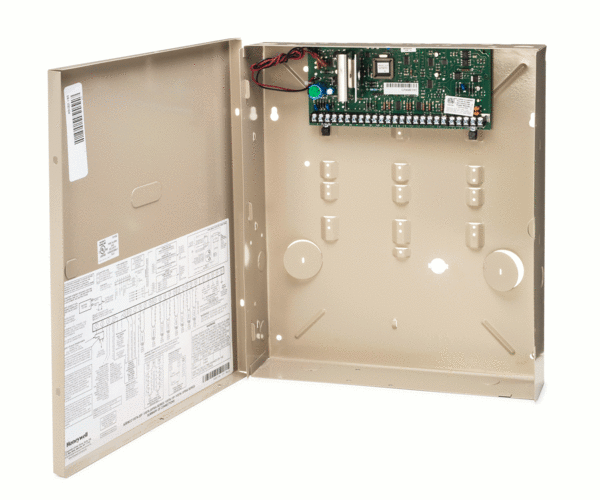
Honeywell vista 21ip internet alarm control panel open

The VISTA P-Series Panels use hardwired keypads for virtually all system operations and overall access. This includes adding, editing and deleting codes. Since codes do not require deep level programming, alphanumeric keypads and fixed English keypads can be used for this purpose. The VISTA 21iP and VISTA 20P can support up to 48 system codes. The VISTA 15P can support up to 32 system codes. The VISTA 10P can support up to 16 system codes. Remember, two of these slots will go to the Installer Code (slot 01) and the Master Code (slot 02).

For these systems, each Code Type is associated with a particular Authority Level. This Authority Level is assigned when assigning attributes. Please note that since the Installer Code and Master Code are hardcoded to slots 01 and 02 respectively, they are not associated with any particular Authority Level. The table below outlines the the Authority Levels that can be assigned to system codes.

Code Type
Authority Level
Notes
User 0 Can arm and disarm the system.
Arm Only 1 Can only arm the system.
Guest 2 Can disarm if it was the code used to arm.
Duress 3 Sends secret distress signal to station.
Partition Master 4 Partitioned systems only. One per partition.

Also note the various attributes for VISTA System codes:

Attribute
Attribute Number
Assigned Value and Notes
Authority Level 1 See previous table.
Access Group 2 0-8. An entry of [0] means no group.
Active Partitions 3 Enter the partition numbers, then [#].
RF Zone Number 4 2-digit key fob number.
Open/Close Paging 5 0 for No. 1 for Yes.

Add New Codes

Enter the following command on the keypad:

[Master Code] + [8] + [2-digit User Number] + [desired 4-digit code]

The panel will beep to confirm the new code has been added. However, a long tone indicates that the process was unsuccessful, likely because the code was already taken.

Edit Codes

This is basically the same as adding a new code, only you will be working with a code that has already been programmed.

[Master Code] + [8] + [2-digit User Number] + [desired 4-digit code]

The panel will beep to confirm that the code has been changed. But if a long tone is produced, it indicates that the process was unsuccessful. This could be because the code was already taken.

Deleting Codes

Note that you cannot delete the Installer Code or the Master Code. Enter the following command:

[Master Code] + [8] + [2-digit User Number] + [#] + [0]

Assigning Attributes

Enter the following command:

[Master Code] + [8] + [2-digit User Number] + [#] + [Attribute Number] + [Attribute Value]

Backdoor Into Programming

If you don't have your Installer Code or if you have locked yourself out of programming., you can get back into programming using the backdoor method. To do this, power down the panel by unplugging the transformer and disconnecting the backup battery. Press and hold the the [*] and [#] buttons on the keypad simultaneously. With these buttons held down, power the system back on by plugging the transformer back in. The message "20" or "Installer Code 20" should appear on the keypad to indicate that programming has been accessed. Then press [*] + [20] + [4112] to set the Installer Code back to 4112. Then press [*] + [99] to exit programming. Never use [*] + [98] to exit programming, as this will lock you out!
Honeywell LYNX Plus L3000

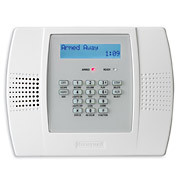
Honeywell l3000 wireless alarm control panelThe Honeywell LYNX Plus L3000 is relatively outdated by today's standards, but it is still used in some cases. The panel can only support up to 8 different codes. Much like the other panels, slot 01 goes to the Installer Code, and slot 02 goes to the Master Code. These codes cannot be deleted from the panel. Also, slot 07 goes to the Guest Code, and slot 08 goes to the Duress Code. Only codes 03 thru 06 can be assigned to regular user codes.

Adding a Code

Enter the following command:

[Master Code] + [8] + [Code Number] + [Desired Code]

The panel will beep to confirm success. Remember that [03] thru [08] can be entered for the Code Number.

Deleting a Code

Only codes [03] thru [08] can be deleted. Codes 01 and 02 are for the Installer Code and the Master Code respectively, and they cannot be deleted from the system. Enter the following command:

[Master Code] + [8] + [Code Number]

The panel will beep to confirm that the code has been deleted.

Editing a Code

Codes cannot be truly edited. Instead, a code must be deleted, and then re-added with a new entry. Start by deleting the code:

[Master Code] + [8] + [Code Number]

Then add the new code:

[Master Code] + [8] + [Code Number] + [Desired Code]

The panel will beep to confirm the code has been added.

Change the Master Code

This process is the mostly same as adding a new code. Note that the Master Code is assigned slot 02. Enter the following command:

[Master Code] + [8] + [02] + [Desired Master Code] + [Desired Master Code Again]

The panel will beep three times after a Master Code change.

Conclusion

We hope that this guide has been informative for you in learning all about codes of Honeywell Systems. In future, we hope to expand this guide to include the commercial polling loop VISTA Systems as well. If you have any questions, please reach out to us at support@alarmgrid.com, or call us at (888) 818-7728 from 9am to 8pm EST M-F.

Tags: , , , , , , , , , , , , , ,

Comments


Posted By

After much anticipation, partition support for Total Connect 2.0 will soon be available for compatible VISTA Systems! With this update, users will gain full access to each live system partition. This includes controlling, checking the status and receiving updates for individual partitions.

The TC2 partition update applies to the following panels:

  • VISTA-20P
  • VISTA-20PSIA
  • VISTA-21IP
  • VISTA-21IPSIA
  • VISTA-128BPT
  • VISTA-128BPTSIA
  • VISTA-250BPT
  • VISTA-128FBPT
  • VISTA-250FBPT
  • VISTA-32FBPT

By using TC2, users can control up to eight different partitions on their alarm system. However, if their VISTA System supports fewer partitions, the user will only be able to control the number of partitions that are supported by their respective system (e.g. VISTA-20P can only support three partitions, with one being a common partition). With this update, users with compatible systems will be able to perform the following functions from Total Connect 2.0:

  • Name partitions
  • Arm and disarm individual partitions
  • Bypass sensors
  • Assign partition control to different users
  • Enable or disable event notifications
  • Set remote disarming capabilities for individual partitions
  • Choose which user codes can activate and edit partition settings
  • View activity of fire partitions remotely (cannot control a fire partition remotely)
  • Additional features to be announced

To ensure a successful rollout, Honeywell is making partition support available for a small percentage of customers each day. The process already started on Monday, June 11th, and it is expected to continue until the week of June 25th. By the week of June 25th, all compatible VISTA Systems should have TC2 partition support. Also note that any new Honeywell Total Connect VISTA partition account programmed during the rollout will be enabled for partition support the next regular business day.

Sometime during this rollout period, you should notice an update on your Total Connect 2.0 account. The message will state that partitions for your location have been made available. You will then be able to configure the partitions for your VISTA System through both the Total Connect 2.0 web browser and the TC2 Mobile App.

Please note that you will not be required to set up multiple partition configurations for your system right away. You can also choose to save the set up process for a later time. To configure partitions for your system immediately, select "Configure Now". To save the process for another time, choose "Later". You will be able to access partition support by clicking the "Partitions" tab on Total Connect 2.0.

To learn more about this feature, please review this helpful guide from Honeywell.

If you have any questions about Total Connect 2.0 partition control, please do not hesitate to contact us at support@alarmgrid.com or call us at 888-818-7728 from 9am to 8pm M-F.

Tags: , , , , , , , , , , , ,

Comments


Posted By

With the recent release of the LTE-L57V for the L5210 and L7000 Systems, there is now a viable LTE cellular communication module available for all of the most popular Honeywell Alarm Control Panels. Whether you own a Lyric, LYNX Touch or VISTA panel, there is an LTE communicator for you!

The current LTE options are as follows:

Please note that for the Honeywell VISTA 21iP, there is currently no "snap-on" LTE module like that of the AT&T 3G/4G based VISTA-GSM4G. In order to use the Honeywell LTE-XV communicator with the VISTA 21iP, the "internal communications" jumper on the board must be set to the bottom two pins. Make sure to power the system completely down before making this adjustment. The communicator must then be installed as an external radio-like wiring on a VISTA-20P. By adjusting the jumper in this way, the integrated ethernet port for the VISTA 21iP will be disabled. However, this is not a huge concern. LTE cellular connectivity is extremely reliable, and it provides communication speeds that are comparable to that of IP. So even though IP connectivity will no longer be accessible, it is a worthwhile sacrifice to obtain LTE service over older cellular technologies like 3G and CDMA. Remember, LTE service is widely recognized as being the single best communication path available for modern alarm systems.

By releasing these new communicators, Honeywell has made it very clear that LTE cellular communication is the way of the future. This news is also important for users of the Verizon CDMA Network. AlarmNet (Honeywell's cloud server) has stated that new CDMA activations will no longer be permitted after June 1, 2018. This includes cancelling an existing CDMA account and then trying to reactivate it later. Anyone hoping to use CDMA with their Honeywell System must get the communicator active before it's too late. Verizon has promised that CDMA support for existing equipment will remain active until their CDMA network is shutdown. After that, the communicator will need to be upgraded.

All of the current LTE communicators for Honeywell Systems are available for purchase on the Alarm Grid website. We'll be sure to keep you updated with any news regarding additional Honeywell LTE communicators that are released in the future. We do not have any exact timelines for the release of a Verizon LTE module for the Lyric, nor AT&T LTE for the Lynx Touch and VISTA panels. If you have any other questions, feel free to reach out to our support team at support@alarmgrid.com.

Tags: , , , , , , , , , , ,

Comments


Posted By

Alarm Grid is happy to announce that the Total Connect 2.0 Alexa Skill has finally been released. This makes it possible to use an Amazon Alexa device to control a Honeywell Alarm System. Users can check the status of their alarm system and arm their panel using simple voice commands.


The TC2 Skill is compatible with any Honeywell Lyric Controller, Lynx Touch or VISTA Panel that uses the Total Connect 2.0 service. This service is included with all of our no-contract monitoring plans, other than our basic bronze plan.

At this time, the following voice commands are compatible with the Total Connect 2.0 Alexa Skill:

“Alexa, ask Honeywell, What is the status of my security system?”
“Alexa, ask Honeywell, Is my security system armed?”
“Alexa, tell Honeywell to Arm”
“Alexa, tell Honeywell to Arm Away”
“Alexa, tell Honeywell to Arm Stay”

After providing the command, a message will be sent from your Alexa device to your Total Connect account. Your Total Connect account will then forward the command to your Honeywell System so that the action can be performed. This is a quick and easy way to control your system without having to get up or log-in to your Total Connect account.

Please note that you will not be able to use Alexa to disarm your system. This must still be done directly at the panel or through the Total Connect 2.0 Mobile App. Another important consideration is that the TC2 Alexa Skill cannot be used to control home automation devices at this time. However, we expect this to change in the future.

To get started using the Total Connect 2.0 Alexa Skill, simply find the Total Connect 2.0 Skill using the Alexa App on your Android or iOS device. Enable the skill, and follow the prompts on the screen to get started. After completing the setup process, your Honeywell Alarm System will be integrated with your Alexa device.


If you have any questions about the Total Connect 2.0 Alexa Skill, please contact us online via chat or over the phone at 888-818-7728 during normal business hours (9am to 8pm EST).

Tags: , , , , , ,

Comments


Posted By

This is an important message for anyone with a Honeywell VISTA System that uses an LTE-XV Verizon Cellular Communicator. Honeywell will be sending out an automatic firmware update to these communicators. This firmware update will install version 4.0.30 on the communicator. With this automatic update, users can expect a performance upgrade and an enhancement of the module's auto-detect recovery mode.


During this update process, the following messages will generate::

Action

Code
Start FW E903
Power on Reset E339
Complete FW R903

These messages are completely normal, and they are nothing to worry about. The update will take place automatically sometime in the next few days. The update will not affect the usability of your security system. You will also not need to make any changes to your panel's settings. However, we recommend keeping your system powered on and connected to the cellular network during this time. This will allow the firmware update to go through as normal.

If you have any questions about this update and what it means for your panel, please contact support@alarmgrid.com.

Tags: , , , , ,

Comments