Holiday Buying Guide 2019 - Honeywell Lyric
PostedIf you own a Lyric system and have not already done so, please read this important update regarding AlarmNet360 changes that affect your panel. It may be time for an update!
With the holiday season quickly approaching us, we thought it was a good time to present some holiday buying guides for various security systems. Today, we are focusing on the Honeywell Lyric. This guide will help whether you are considering a new Lyric or adding upon an existing one.

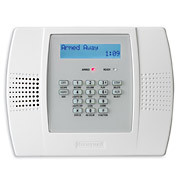
The Honeywell Lyric is currently the flagship all-in-one wireless security system from Resideo. It has been one of the most highly regarded alarm systems for the past few years for several reasons. The system supports up to 128 wireless zones, making it suitable for applications big and small. It has a built-in Z-Wave controller, and you can pair up to 72 Z-Wave devices for home automation purposes. The Lyric is also one of the very few alarm panels that can support Apple HomeKit, making it perfect for iOS users looking to expand upon their HomeKit Network. In fact, we believe that the Lyric is the top HomeKit Security System on the market at this time.
The other major appeal of the Lyric is the fact that it can technically be monitored using an IP only communication path. This is because it connects with AlarmNet360 and the Total Connect 2.0 platform. Unlike most other monitoring platforms like Alarm.com which require cellular connectivity, Resideo allows IP only monitoring for panels connected with TC2. The Lyric has a built-in WIFI card, so you can connect with a local network right out of the box. Although we always recommend cellular communication for optimal reliability, we do understand that many users will want to use IP only service as a cost-cutting measure. Additionally, you can always add a cellular communicator to the Lyric System if you decide that you want to go cellular later on. Both the Honeywell LYRICLTE-A (AT&T LTE) and the Honeywell LYRICLTE-V (Verizon LTE) are great options.
Building a Lyric System from Scratch
 For new users starting from scratch, the best option is typically to buy a complete Honeywell Lyric Security System Kit. This will include everything you need to get started with alarm monitoring. Whether you plan to use IP only monitoring service, or you intend on setting up cellular service, there is a perfect kit for you. For those planning to go IP only, no cellular communicator is needed, and you should choose a kit labeled "WIFI Only". If you intend to use the system for cellular monitoring, then both AT&T and Verizon system kits are available. Whether you go with a 3-1 kit (3 contacts and 1 motion) or a 10-1 kit (10 contacts and 1 motion) should depend on the size of the building you are monitoring. You will need more contacts to cover more doors and windows.
We recommend going through the Lyric System Kit Page linked above and finding the perfect Lyric Kit for your needs. In addition to the system, sensors, and optional communicator, you will also get a Honeywell LT-Cable with every kit. This makes it super easy to get the system up and running without having to prepare any standard alarm wiring.
Sensors for New and Existing Lyric Systems

One of the best aspects of the Lyric is that it has one of the most diverse and complete lineup of supported sensors in the entire security industry. Resideo created a sensor lineup designed exclusively for their Lyric System in the Honeywell SiX Series Sensors. These powerful sensors offer an impressive communication range of up to 300 feet indoors and 128-bit AES encryption for enhanced wireless protection. The lineup includes the following products:
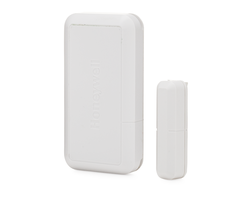
- SiXCT Door/Window Contact
- SiXMINICT Mini Door/Window Contact
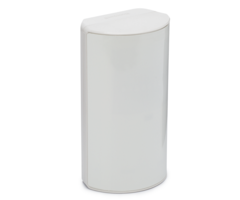
- SiXPIR Motion Sensor
- SiXGB Glass Break Detector
- SiXSMOKE Smoke Detector
- SiXCOMBO Combination Smoke/CO Detector
- SiXSIREN Wireless Siren
- SiXFOB Wireless Key Fob
With this great lineup, you can achieve a total and complete Lyric Security System by only using SiX Series devices. And for most Lyric users, that is the best option. But these are not the only sensors you can use with the Lyric System. The Lyric is also compatible with nearly any uni-directional 345 MHz sensor, which includes most devices from the Honeywell 5800 Series and the 2GIG 345 MHz lineup. Additionally, these lineups are both a little more fleshed out than the SiX lineup. There are certain sensor types (e.g. outdoor sensors) where you will need to turn to one of these product lineups.
Many users will also supplement their SiX Series devices with Honeywell 5800 Sensors and 2GIG 345 MHz Sensors as a cost-saving measure. These 345 MHz sensors will work just as well as the SiX Series devices on the Lyric. The only difference is that the 345 MHz sensors will not utilize any encryption, making them more susceptible to wireless attacks. The Lyric does have protection against 345 MHz RF jamming, but it can offer some users better peace of mind to know that their wireless sensors are encrypted. But if you are comfortable using non-encrypted wireless devices, then 345 MHz sensors can save you a lot of money when designing your Lyric System.
Some of our favorite Honeywell and 2GIG 345 MHz Sensors for use with the Lyric include:
- VERSA-2GIG Door/Window Contact
- 2GIG DW20R Recessed Door/Window Contact
- Honeywell 5816OD Outdoor Door/Window Contact
- Honeywell 5800PIR-OD Outdoor Motion Sensor
- Optex FTN-RRHW Outdoor Motion Sensor
- Honeywell 5822T Garage Tilt Sensor
Other Accessories for Your Lyric
We have already covered the sensors you will use with your Lyric System. However, there are still other devices you may want to add to your setup. The biggest attraction are Z-Wave devices like lights, door locks, and smart thermostats. One admitted weakness of the Lyric is that its automation controller is only a standard Z-Wave controller. The Lyric does not offer a Z-Wave Plus controller, and Lyric users cannot take advantage of the extended range and increased battery life of Z-Wave Plus. You can still use Z-Wave Plus devices with the Lyric System, but they will only offer the functionality of classic Z-Wave peripherals.
With that limitation in mind, you can still use the Lyric as a perfectly capable smart home automation hub. You can even pair the system as a secondary controller to other automation hubs (e.g. Samsung SmartThings) for added flexibility in your smart home. Nearly any Z-Wave automation device can be used with the system, so feel free to explore your options. We have plenty of devices on our website. Just remember that the Lyric System cannot support Z-Wave security devices. The Lyric Z-Wave controller is for automation purposes only. Alarm Grid does not sell Z-Wave security sensors on its website.
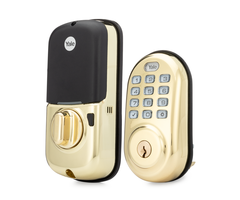
If you want to use your Lyric to control your garage door, then you will want to invest in a Honeywell 5877GDPK. This kit includes everything you need to get started with garage door operation for your Lyric System. Inside the kit there is a Honeywell 5877 Z-Wave Garage Door Relay, a Honeywell 5822T Garage Door Tilt Sensor, and a FortrezZ Z-Wave Siren/Strobe. You can purchase these items separately, but this convenient kit makes things easier.
The Lyric has only one compatible wireless keypad option, which is the Honeywell LKP500. This is a fairly standard push-button keypad with an LCD screen. You might also consider getting a cheap tablet and mounting it to the wall and using that as a keypad. You can download the Honeywell My Home Controller App to the tablet and essentially make the device a permanently mounted touchscreen keypad for your Lyric.
Lastly, you might want to get a desk mount for your Lyric System. This will eliminate the need for mounting the panel to the wall. Desk mounts are great for people living in apartments or rental homes, as well as users who simply do not want to drill holes. Using a desk mount sure beats laying the system flat on a counter! The Lyric Desk Mount is called the Honeywell LCP500-DK. There is also a desk mount for the Honeywell LKP500 Lyric Keypad called the Honeywell LKP500-DK.
Ask Us Questions!
![]()
Don't be afraid to reach out to us at Alarm Grid if you have any questions about the Lyric, or if you need any help choosing a system and accessories. The best way to reach us is to email support@alarmgrid.com. You may also reach us over the phone at (888) 818-7728. Remember that our support hours run from 9am to 8pm ET M-F. We look forward to hearing from you!


 The Honeywell LYNX Plus L3000 is relatively outdated by today's standards, but it is still used in some cases. The panel can only support up to 8 different codes. Much like the other panels, slot 01 goes to the Installer Code, and slot 02 goes to the Master Code. These codes cannot be deleted from the panel. Also, slot 07 goes to the Guest Code, and slot 08 goes to the Duress Code. Only codes 03 thru 06 can be assigned to regular user codes.