Touchscreen Keypads Posts

Posted By

The DSC HS2TCHP(N) touchscreen keypad can work with a Qolsys IQ Pro, but only after a software update. Keypads running version 1.39 or lower need new interface files first, and you can get them from our HS2TCHP firmware updates page.

The update is a quick job. It takes an SD card, a few minutes, and no new hardware.

Why the HS2TCHP(N) Needs an Update

The HS2TCHP(N) was made for DSC PowerSeries NEO systems. Its touchscreen software, called the user interface or UI, is written for a NEO panel. The IQ Pro needs a different UI. Until the keypad gets the new firmware files, it is not ready to be used with an IQ Pro.

Check the part number on your keypad before you start. If it says HS2TCHPRO and runs version 1.40 or higher, the touchscreen will not work on an IQ Pro. The update is only for the HS2TCHP(N) at version 1.39 or lower.

When Does This Comes Up?

The most likely reason is a panel swap. Say a home has a NEO system with HS2TCHP(N) keypads already mounted on the walls. The owner decides to switch to an IQ Pro. The wiring is already in place, so reusing those keypads saves money and a lot of work. The update is what makes that possible.

There is one catch. Once a keypad has been updated for the IQ Pro, it cannot go back to a NEO control panel. Do not update a keypad that still needs to work on a NEO system. If you are still running a NEO panel, we show you how to add an HS2TCHP to a PowerSeries NEO panel in a separate guide.

How to Update the Keypad

The update uses an SD card. Download the files from the firmware page linked above and unzip them. There are three files, and all three go in the root directory of a blank SD card. Format the card as FAT32 first, and use a card with a capacity of 32 GB or less.

Next, slide the card into the bottom of the keypad. On the touchscreen, tap the Options icon, then Installer Menu. Enter the IQ Pro Installer or Dealer Code (defaults 1111 or 2222 respectively). Tap Keypad Programming, tap Firmware Upgrade, and follow the prompts to finish. When it is done, the keypad shows the "IQPanel" logo in the top right corner instead of the "DSC" logo.

Do not pull the keypad off its backplate while the SD card is inside. That can damage the card slot. For the manufacturer’s full notice, see the HS2TCHP(N) touchscreen keypad update instructions.

Connecting the Keypad to the IQ Pro

An IQ Pro can support up to 16 keypads. They connect to the panel over the Corbus, which is a four-wire connection. Here are the basics:

  • Match the colors. Connect the keypad’s red, black, yellow, and green terminals to the corresponding Corbus terminals on the IQ Pro board.
  • Use the right wire size. Use 18 - 22 gauge 4-conductor wire. Two twisted pairs are recommended. Do not use shielded wire.
  • Watch the distance. Keypads can sit up to 1,000 feet from the panel. They can be home run, wired in series, or T-tapped.
  • Power comes last. Keep the panel’s battery and power adapter disconnected until all the wiring is done.
  • Enable keypad. Once the keypad is connected, you'll need the IQ Installer App, available for free from the Apple and Google stores, to enable the keypad, assign partitions if necessary, and set any other keypad options.

Each keypad also has a zone input, so you can hook up a wired sensor, like a door contact, right at the keypad. It works with normally closed loops, single end of line resistors, and double end of line resistors. To turn the input on or off, go to Installation, then Devices, then Security Sensors. Pick the enrolled keypad, tap Edit, and choose Keypad Input. Then select Enable or Disable. For all the details, check the IQ Pro install guide.

Need Keypads or Monitoring?

If you're updating your panel and you're interested in a new monitoring plan to go with it, check out our no-contract monitoring options. We don't charge activation fees, and you can cancel at any time. Need another keypad for your project? Browse our PowerG keypads and the IQ Remote PowerG touchscreen keypad.

Need Help?

Stuck on the update or the wiring? Our support team is happy to help. Phone and email support are open from 9:00 AM - 8:00 PM Eastern. Call us at 888-818-7728 or email support@alarmgrid.com. Live chat on our website is also available until 6:00 PM Eastern.
Tags: , , , , , , , , , , , , , , , , , , , , , , , , , ,

Comments


Posted By

The DSC HS2TCHP(N) touchscreen keypad can work with a Qolsys IQ Pro, but only after a software update. Keypads running version 1.39 or lower need new interface files first, and you can get them from our HS2TCHP firmware updates page.

The update is a quick job. It takes an SD card, a few minutes, and no new hardware.

Why the HS2TCHP(N) Needs an Update

The HS2TCHP(N) was made for DSC PowerSeries NEO systems. Its touchscreen software, called the user interface or UI, is written for a NEO panel. The IQ Pro needs a different UI. Until the keypad gets the new firmware files, it is not ready to be used with an IQ Pro.

Check the part number on your keypad before you start. If it says HS2TCHPRO and runs version 1.40 or higher, the touchscreen will not work on an IQ Pro. The update is only for the HS2TCHP(N) at version 1.39 or lower.

When Does This Comes Up?

The most likely reason is a panel swap. Say a home has a NEO system with HS2TCHP(N) keypads already mounted on the walls. The owner decides to switch to an IQ Pro. The wiring is already in place, so reusing those keypads saves money and a lot of work. The update is what makes that possible.

There is one catch. Once a keypad has been updated for the IQ Pro, it cannot go back to a NEO control panel. Do not update a keypad that still needs to work on a NEO system. If you are still running a NEO panel, we show you how to add an HS2TCHP to a PowerSeries NEO panel in a separate guide.

How to Update the Keypad

The update uses an SD card. Download the files from the firmware page linked above and unzip them. There are three files, and all three go in the root directory of a blank SD card. Format the card as FAT32 first, and use a card with a capacity of 32 GB or less.

Next, slide the card into the bottom of the keypad. On the touchscreen, tap the Options icon, then Installer Menu. Enter the IQ Pro Installer or Dealer Code (defaults 1111 or 2222 respectively). Tap Keypad Programming, tap Firmware Upgrade, and follow the prompts to finish. When it is done, the keypad shows the "IQPanel" logo in the top right corner instead of the "DSC" logo.

Do not pull the keypad off its backplate while the SD card is inside. That can damage the card slot. For the manufacturer’s full notice, see the HS2TCHP(N) touchscreen keypad update instructions.

Connecting the Keypad to the IQ Pro

An IQ Pro can support up to 16 keypads. They connect to the panel over the Corbus, which is a four-wire connection. Here are the basics:

  • Match the colors. Connect the keypad’s red, black, yellow, and green terminals to the corresponding Corbus terminals on the IQ Pro board.
  • Use the right wire size. Use 18 - 22 gauge 4-conductor wire. Two twisted pairs are recommended. Do not use shielded wire.
  • Watch the distance. Keypads can sit up to 1,000 feet from the panel. They can be home run, wired in series, or T-tapped.
  • Power comes last. Keep the panel’s battery and power adapter disconnected until all the wiring is done.
  • Enable keypad. Once the keypad is connected, you'll need the IQ Installer App, available for free from the Apple and Google stores, to enable the keypad, assign partitions if necessary, and set any other keypad options.

Each keypad also has a zone input, so you can hook up a wired sensor, like a door contact, right at the keypad. It works with normally closed loops, single end of line resistors, and double end of line resistors. To turn the input on or off, go to Installation, then Devices, then Security Sensors. Pick the enrolled keypad, tap Edit, and choose Keypad Input. Then select Enable or Disable. For all the details, check the IQ Pro install guide.

Need Keypads or Monitoring?

If you're updating your panel and you're interested in a new monitoring plan to go with it, check out our no-contract monitoring options. We don't charge activation fees, and you can cancel at any time. Need another keypad for your project? Browse our PowerG keypads and the IQ Remote PowerG touchscreen keypad.

Need Help?

Stuck on the update or the wiring? Our support team is happy to help. Phone and email support are open from 9:00 AM - 8:00 PM Eastern. Call us at 888-818-7728 or email support@alarmgrid.com. Live chat on our website is also available until 6:00 PM Eastern.

Tags: , , , , , , , , , , , , , , , , , , , , , , , , , ,

Comments


Posted By

The problem outlined in this notice arises if you attempt to pair an older firmware ProSeries touchscreen keypad to a newer or recently updated ProSeries panel. If the keypad is on version 3.324.46 or lower, and the panel is on 03.3206.57+, then the keypad won't pair and ceases functioning.


ProSeries keypads, specifically the PROWLTOUCH and PROWLTOUCHC, may require a special upgrade process to install the latest firmware in certain cases. Normally, these keypads receive updates from the ProSeries panel. However, if the keypad can’t pair with the panel, or loses connection, it won’t be able to receive the update.

If you have a ProSeries panel and touchscreen keypad that stay paired, connected to WIFI, and in regular communication most of the time, you shouldn’t have any issues. When the panel updates its firmware via WIFI, it will pass along any available update to the keypad automatically. If your keypad has trouble staying connected, you may want to set it up using Access Point (AP) Mode. This helpful FAQ can show you how.

As we mentioned earlier, most users won’t run into this issue. However, certain situations make it more likely. For example, if you buy a used ProSeries touchscreen keypad, or if you purchase one from stock that has been sitting on the shelf for a long time, you may encounter the problem.

If your panel hasn’t been updated regularly, jumping from an older firmware straight to the latest release can cause the issue described above. It can also occur with panels that have been installed for a long time and communicate with AlarmNet360 only over cellular.

If your system has a PROWIFI or PROWIFIZW module, the panel and keypad may have been paired using AP Mode. Since the panel can’t update firmware over cellular, suddenly connecting it to WIFI could trigger an upgrade to the latest version, potentially leaving the keypad behind on older firmware.

If you purchase a new keypad that has been sitting in stock, and you discover it suffers from this issue, you should be able to return it to the dealer or distributor for a refund or replacement. However, if you buy a used keypad, inherit one with a home purchase, or receive a second-hand keypad as a gift, you may need to follow specific steps to update it. The first step is to check the firmware version.

Our Advice: If you’re considering buying a used touchscreen keypad, ask the seller to verify its firmware before you commit. Request a picture of the firmware screen as proof. Even if the keypad isn’t paired to a panel, you can still see its firmware version.

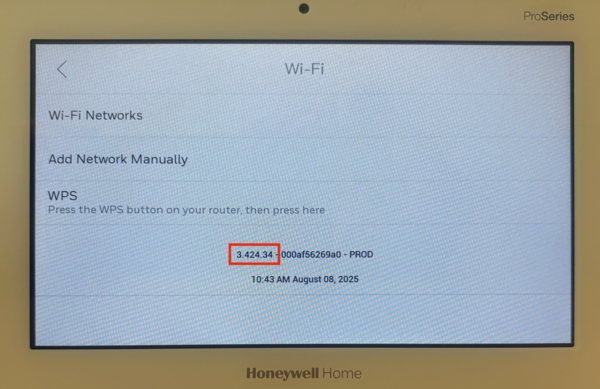
To check the firmware, power on the keypad and let it attempt to connect to a panel. Press "Pair to Panel". On the next screen, you’ll see options for connecting the keypad to WIFI. At the bottom of that screen, the current firmware version is displayed.


Once you know the keypad firmware, verify your ProSeries panel version. On the panel begin by tapping the Menu icon (≡) at the bottom center of the panel screen. Scroll down and tap Tools > Enter the Installer or Master Code (4112 or 1234, by default) > tap System Information > General. The panel firmware version will be displayed in a XX.XXXX.XX format.

If the keypad is on version 3.324.46 or lower and the ProSeries panel is on firmware version 03.2306.57 or higher, the touchscreen keypad will not pair with the panel. There is no way to make the keypad in this example pair with a panel at that firmware version. However, the keypad will still function if it is used with a panel on a lower firmware version that is then upgraded properly.

Important Note: You cannot downgrade the firmware on a ProSeries panel, per Resideo support.

Another drawback to this situation is that an end-user can't control when their panel updates, or to what version. The only control you have as an end-user is that if you remove your ProSeries panel from WIFI, it will not receive firmware updates. These panels don't update using cellular data.

Important Notes At A Glance:

  • Keypads on v3.324.46 or lower can’t pair with panels on v03.2306.57 or higher.
  • ProSeries panel firmware can’t be downgraded.
  • Panels update only over WIFI, not cellular.
  • Disconnecting WIFI stops panel updates.
  • Check firmware before buying a used keypad.
  • Contact your alarm dealer for upgrade help.

If you're a customer with concerns about this potential issue, contact your alarm dealer. They will be able to push the necessary upgrades to your ProSeries panel in the correct order. Alarm Grid has a list of customers with touchscreen keypads that may be susceptible and we are proactively reaching out via email or phone to those customers. If you are not an Alarm Grid customer your alarm dealer should have a similar list.


Tags: , , , , , , , , , , , , , , , , , , ,

Comments


Posted By

Update 12/02/21:

We have confirmed with Resideo and at least one customer that the issues regarding the syncing of Automation between all versions of the Tuxedo Keypads, and the VAM have been resolved and that remote control of Z-Wave devices has returned to normal. Users should now be able to remotely control Z-Wave Automation Devices during any Total Connect 2.0 session. Any Alarm Grid customer that notices issues like this in the future, please report it to support@alarmgrid.com.

Update 11/26/21:

On Tuesday of this week, Resideo announced an update meant to fix this issue. Apparently, it fixed the portion of the issue where all Automation Syncs were failing, but did not address the issue with being unable to control Z-Wave Devices remotely.

There is something of a workaround for this portion of the issue at this time. During the TC2 session where a successful Automation Sync occurs, you can control Z-Wave devices remotely. Once you end that TC2 session and begin another one, you will lose that ability. So, for now, if you need to control a Z-Wave device remotely, perform a sync, and once you see in the Activity Log that the Automation Sync was successful, you will be able to control Z-Wave devices until the current TC2 session ends. Stay tuned and we will provide further updates as this issue is resolved.

Original Post:

In the last couple of weeks, Alarm Grid has noticed several customers with VAM and Tuxedo Keypads (all versions) having trouble syncing Z-Wave devices with Total Connect 2.0. This prevents newly added Z-Wave devices from showing up in TC2, though local control at the device is still available.

This issue doesn't seem to affect Total Connect 2.0 accounts associated with AiO (All-in-One) panels such as the Lyric Controller and the Honeywell Home PROA7PLUS. Accounts with these panel types should be working fine. It is unknown exactly what the problem is, and there is currently no workaround available. We've been in touch with Resideo and Honeywell Home and they are aware of the problem, but there is no Estimated Time of Resolution (ETR) for a fix.

You can continue to add and remove Z-Wave devices locally at the VAM or Tuxedo. But any changes that are made locally at the Z-Wave controller will not be synced to Total Connect 2.0. This means that any device deleted locally will continue to show up in TC2, and any device added locally will not show up in Total Connect 2.0 until this issue is resolved and a successful automation sync occurs.

Any device that currently shows up in Total Connect 2.0, and still exists in the Tuxedo or VAM CANNOT be controlled remotely through TC2. When an attempt to perform an Automation Sync occurs, there is no Automation Sync Failed, or Automation Sync Successful message displayed in TC2 Activity. Status changes from the Z-Wave device to TC2 seem to be coming through fine. It's only the sync process and remote control that seem to be having issues.

Alarm Grid is working with Resideo and Honeywell Home, and as soon as this issue is resolved, we'll post about it here. We posted information earlier this year about the Tuxedo Keypads and VAM Automation Controllers not updating the weather properly. We don't know if this current issue is related to the previous one, but we hope that it will be resolved soon. Stay tuned to our blog for updates.

Tags: , , , , , , , , , , , , , , , , , ,

Comments


Posted By

Here at Alarm Grid, we recently learned that the Qolsys IQ Panel 4 supports the Qolsys IQ Remote, but only the most recent iteration. Older Qolsys IQ Remotes are not compatible. If you plan to replace a Qolsys IQ Panel 2 with an IQ Panel 4, read on to see how you can tell the keypads apart.

As of now, only the Qolsys IQ Panel 4 AT&T LTE, Interlogix/GE Compatible version, and the Qolsys IQ Panel 4 Verizon LTE, Interlogix/GE Compatible version are available. The other iterations of the panel will become available in the next couple of months. The only touchscreen keypad that is currently compatible with these panels is the Qolsys IQ Remote, and only the latest version with P/N QW9104-840, at that. Keypads with a P/N of QW9103-840 or below are not compatible. The sticker showing the part number should be on the back of the keypad.

Below, you can see the back of an IQ Remote with the P/N: QW9103-840. This keypad is not compatible with a Qolsys IQ Panel 4:


Looking at the sticker on the back of the keypad is the first way to easily determine whether the IQ Remote will work with the IQ Panel 4 or not. But, what if the sticker has been removed, or the touchscreen keypad has been mounted to the wall and the back side is difficult to access? There is another easy way to tell whether the IQ Remote you have is the older or newer version.

When the IQ Remote was re-designed, the front-facing camera was moved from the upper right corner to the center of the keypad. This was done, in part to better match the look of the Qolsys IQ Panel 2/2 Plus. Checking the location of the camera is the easiest way to determine whether it is a newer or an older Qolsys IQ Remote.

Below you can see one of the original Qolsys IQ Remotes. You can see that the camera is located in the upper right corner of the keypad.

Below is an image of the newer Qolsys IQ Remote, P/N QW9104-840. You can see the camera has been moved to the front center, and in the upper right corner you can see that a microphone has been added:


Checking the camera location is by far the easiest and quickest way to determine if the IQ Remote you have is compatible with the Qolsys IQ Panel 4. It's rumored that a PowerG Touchscreen Keypad is in the works, which, if true will likely make the IQ Remote obsolete given the superior wireless range of the PowerG protocol.

The Qolsys IQ Panel 4 can support up to three (3) IQ Remotes, but it also supports the use of up to five (5) Wireless PowerG Keypads (WS9LCDWF9, HS2LCDWF9, and HS2LCDWF9ENG) and up to two (2) Hardwired DSC Keypads (HS2LCD, HS2ICN) per DSC PG9WLSHW8 PowerG Wired to Wireless translator module. Up to two (2) modules are currently supported per panel, so up to four (4) of the wired keypads can be used. This gives a total of up to 12 remote keypads.

Have comments, questions, suggestions? Leave a comment below and we'll be happy to respond. Our support hours are from 9:00 am - 8:00 pm Eastern Time, Monday - Friday, and our support email is support@alarmgrid.com. We always look forward to hearing from you.

Tags: , , , , , , , , , , , , ,

Comments


Posted By

The leading keypad option for the Qolsys IQ Panel 2 Plus is unquestionably the Qolsys IQ Remote. This innovative touchscreen keypad mimics the screen of an IQ2 or IQ2+, and it allows for security and automation control from a second on-site location. But sadly, it lacks a replaceable battery!

To be clear, the Qolsys IQ Remote does have a backup battery. When AC power for the IQ Remote is lost (either due to the transformer being unplugged or an electrical outage), the backup battery will keep it running for several hours. But like any rechargeable battery, the one inside the Qolsys IQ Remote has a limited useful life. And once that useful life is up, the battery cannot be replaced with a new one. This means that the IQ Remote Keypad will need to be plugged in at all times in order to be used. If AC power becomes lost for any reason once this happens, then the IQ Remote will immediately power down. Also, the keypad will then always show a low-battery warning that can never be cleared. While not completely debilitating, it is an unfortunate aspect of the Qolsys IQ Remote device.

When we spoke with Qolsys about this issue, they assured us that the IQ Remote battery is "very long lasting", and a user shouldn't encounter this issue for at least ten (10) years from the initial manufacture date, assuming that the battery is cared for properly. Additionally, the company has stated that they have not received any excessive reports of IQ Remote battery failures since its release more than five (5) years ago. But it's fair to expect that Qolsys might be hearing about this issue more frequently in about five year's time when a large number of Qolsys IQ Remote batteries begin failing! At least most IQ Remote Keypads are not carried or transported around, and most users just leave them mounted in a single location. If a user gets a backup generator for the device, then the issue might not cause serious problems.

Still, this is definitely a disappointing limitation of the Qolsys IQ Remote Keypad. We hope that Qolsys will see this message and consider updating the IQ Remote to support an end-user replaceable battery. A well-constructed device can certainly be used for more than 10 years, but it needs a replaceable battery option so that it can truly go the maximum distance. Also, for anyone considering the IQ Remote for use with an IQ Panel 2 or IQ Panel 2 Plus, we still think it's a great keypad option, and we still recommend using it. Just be aware that after ten (10) years or so, the battery will probably stop holding a charge and will begin not working as intended. The keypad will need to be plugged in and receiving power at all times once this happens, or else it will power down immediately. Our hope is that Qolsys redesigns the IQ Remote Keypad to put an end to this issue. Then a user can buy a new battery once the original reaches its end-of-life, install the new one, and keep using this great keypad!

For now, we would love to hear what you have to say about the Qolsys IQ Remote lacking a replaceable battery. Does this issue influence your decision in buying this keypad? Or do you think that it's not a major concern? Please let us know your thoughts in a comment down below. We're sure that many users who buy this keypad, and also those who have bought it in the past, may be surprised to learn that the device's backup battery cannot be replaced. And if we ever learn of Qolsys updating the IQ Remote to fix this issue, or releasing a successor keypad with a replaceable battery, then we will be sure to let you know in the Alarm Grid Blog so that you can make an informed buying decision. Please stay tuned for more security news and updates coming real soon!

And before we forget, we wish everyone in the United States a Happy Independence Day (4th of July) over this upcoming weekend! We are open today, Friday, July 2nd, and we will also be open for business as usual on Monday, July 5th. We look forward to serving you!

Tags: , , , , , , , , ,

Comments