1080P Security Cameras Posts

Posted By

Welcome back from 4th of July! We have had a busy past couple of weeks at Alarm Grid since our last video recap. This time, we have seven (7) new videos to show you, including five (5) with Jorge and two with myself. We cover the PROA7PLUS, 2GIG Edge Cameras, and 2GIG GC2 Firmware Updates!

2GIG Edge: Alarm.com Cameras that Support Live Streaming

Jorge explains which Alarm.com Security Cameras can be streamed directly to a 2GIG Edge Alarm Panel. Most of the newer Alarm.com Cameras can be used in this way. In order for this to work, a camera must be paired with the same Alarm.com account used with the 2GIG Edge, and it must be enabled for panel streaming from the Alarm.com website or mobile app. Cameras can be streamed from the Smart Home Menu on the 2GIG Edge.

2GIG Edge: Alarm.com Cameras that Support 2-Way Audio via Live-Streaming

Jorge teaches users about two-way audio playback when live-streaming security cameras on the 2GIG Edge. While nearly all Alarm.com Cameras can be used for video streaming on the 2GIG Edge, only a smaller selection of cameras can be used for live audio streaming. Really, it's mostly the indoor residential cameras that do audio streaming. Most of the Alarm.com Commercial Cameras that support Power over Ethernet (PoE) and all Alarm.com Outdoor Cameras do not support two-way audio, as they typically do not have built-in microphones.


2GIG Easy Updater Tool: Updating

Jorge explains how to update the 2GIG UPDV Easy Updater Tool that is used to update the firmware on a 2GIG Go!Control GC2 Security System. The Easy Updater Tool contains the firmware update for the GC2 System. If the firmware on the Updater Tool is outdated, then you must update the Updater Tool by following the process outlined in this video. The current downloaded firmware on the Updater Tool will be displayed across the device screen when power is applied. This will let you know if you need to updater the Updater Tool.


2GIG GC2: Updating Using the Easy Updater Tool

Jorge teaches you how to use the 2GIG UPDV Easy Updater Tool to update the firmware on a 2GIG Go!Control GC2 Alarm Panel. After you have updated the firmware on the Updater Tool itself, you can then use the device to update the firmware on the GC2 Panel. Updating to the latest firmware version will ensure that you can use all of the released features for the system and that all of the latest hardware is supported. The LTE communicators for activating with Alarm.com and alarm monitoring will require a certain firmware version.


Honeywell Home PROA7PLUS: Delete a Zone

Jorge shows you how to delete a zone on a Honeywell Home PROA7PLUS or other ProSeries Alarm System. When you delete a zone, the associated sensor will no longer be programmed with the system. You would need to re-enroll it in order to continue using it. For the encrypted PROSIX Sensors and SiX Sensors, after deleting the sensor, you will then be able to enroll it with a new ProSeries Panel, provided that the sensor received the deletion signal from the panel. When deleting PROSIX and SiX Sensors, be sure the sensor is powered on and within range of the ProSeries Panel at the time of deletion.


Honeywell Home PROA7PLUS: Add a User Code

I show you how to add a new user code to a Honeywell Home PROA7PLUS Alarm System or other ProSeries Panel. All of the ProSeries Systems support up to (96) total user codes, so you should have no trouble giving everyone in your household or office their very own code to use when controlling the system. After you have added a user code, you can then go back into user settings to configure automatic Bluetooth disarming and Z-Wave lock functionality for the user.


Honeywell Home PROA7PLUS: Clear a Tamper Error

I show you how to clear a tamper error on a Honeywell Home PROA7PLUS or other ProSeries Security Controller. A tamper error occurs when the red tamper button on the back of the ProSeries Controller isn't held down properly. This is usually because the system has been taken off its backplate, or it isn't mounted on its backplate properly. Once you get the panel back on the backplate, you can then acknowledge the tamper condition by entering the system's Master Code when prompted.

Tags: , , , , , , , , , , , , , ,

Comments


Posted By

There is an important key change coming to the way that Alarm.com Video Analytics are handled. Notifications for Alarm.com Video Analytics are now being as soon as a person, vehicle, or animal is detect. A notification will link to the live camera feed so that you can view the action.

This new change will apply to all new and existing Alarm.com Video Analytics recording rules. Previously, Alarm.com Video Analytics notifications were sent out once the associated video clip was fully uploaded. The one exception to the change is for email and SMS text message Video Analytics notifications that are specifically configured to "Attach a Video Clip" are still going to be sent after the video clip has been uploaded.

According to Alarm.com, the new method with the notification linking to the associated camera video feed will make it easier for users to quickly access the associated camera so that they can gain knowledge of the situation at-hand in a faster time period than they were able to previously. While this might seem like a relatively small change here, it will actually have a pretty big impact on Alarm.com Video Analytics and how they are used.

Remember that Alarm.com Video Analytics are based around Video Analytics Rules. If you want to add a new Video Analytics Recording Rule through the Alarm.com Website, then start by logging into your Alarm.com account through a compatible web browser. Choose Video on the left-hand side, then Recording Rules, followed by Add New Rule, and then Video Analytics. Remember that your alarm monitoring provider must have enabled both video monitoring and Video Analytics on your account before you will be able to do this. Alarm Grid customers must have a Platinum Plan (Self or Full) or an Alarm Grid Video-Only Plan to use any form of Alarm.com Video Analytics.

Do you have any thoughts on this seeming small, yet major change to Alarm.com Video Analytics notifications? Share your viewpoint in a comment down below. Maybe you like this change, because it will allow you to access your cameras more quickly? Or maybe you think that Alarm.com should have just left things alone. In any case, we would love to see some discussion. And don't forget to to stay tuned to our blog for more security news coming soon.

Tags: , , , , , , , , , , ,

Comments


Posted By

We have a quick bit of news today. Certain commercial-grade Alarm.com Security Cameras will receive an automatic firmware update in the coming weeks. Models receiving the update include the ADC-VC726, ADC-VC736, ADC-VC826, and ADC-VC836. No special action is needed to receive the update.

At this time, Alarm.com has not provided much information regarding the update. All we know is that the update is for Firmware Version V5.5.82.210318 and that it includes multiple stability enhancements. Only the aforementioned commercial-grade security cameras from Alarm.com are set to receive the update. These are all Power over Ethernet (PoE) cameras that only use hardwired ethernet for network connectivity, and they do not support WIFI connectivity. Although these are commercial-grade cameras designed for commercial or industrial use, they can certainly be used in residential settings as well.

Alarm.com has stated that these cameras will be automatically updated in the coming weeks. The update will occur as part of an automated overnight firmware upgrade process. Again, no special action is required to receive the update. Just make sure that your camera is powered on and connected to the network, and Alarm.com should take care of the reset.

Since this update is only for stability enhancements, it is very likely that you will not receive any direct notification that the update has been performed. However, you can easily check the installed firmware for your camera by accessing Alarm.com through a compatible web browser, logging into your account, clicking Video on the left-hand side, choosing Settings at the top, then choosing the first option of Video Device Info. From there, select the camera (Video Device) you want to view from the dropdown menu and note the Current Firmware Version. This can be seen in the following picture.


As we said, we don't know much about the firmware update that will be coming, and we only have "within the coming weeks" as a general timeframe. But still, feel free to leave your thoughts or start a discussion in the comments down below. We would love to hear what you think, And remember to stay tuned to the Alarm Grid Blog for more news coming soon!

Tags: , , , , , , , , , , , , , , , ,

Comments


Posted By

If you have Alarm.com Video Surveillance service, then you likely know that the lineup of compatible security cameras is quite deep. It can be a bit daunting to decide which camera is best for you. Today, we're going to present our list of our Top 5 Best Alarm.com Cameras for use at home.


Keep in mind that we're not presenting any "commercial" cameras on the list. Only residential cameras will be considered. You can usually tell the difference based on the name. The Alarm.com Commercial Cameras will have a "VC" somewhere in the title, whereas the Alarm.com Residential Cameras only have a "V" in the title. We also considered Alarm.com Doorbell Cameras for this list, and those can be identified by having "VDB" for "Video Door Bell", in the name. Other than that, there's really not much else to think about. These are just the residential cameras that we think are most useful. We also want to mention that every camera on this list is compatible with Alarm.com Video Analytics, to at least some degree. If you aren't familiar with Alarm.com Video Analytics, we recommend checking out this FAQ to learn more. With that out of the way, let's get started!

5. Alarm.com ADC-V515 Budget Indoor Camera

The ADC-V515 is often seen as the "budget version" for another camera higher on this list. But despite being a low-cost option, the ADC-V515 still packs some impressive features. It offers 1080p recording capabilities, IR night vision of up to 15 feet, a 110° viewing angle, a nice 3.19mm F2.2 lens, and WIFI connectivity (2.4 GHz networks only). If that weren't enough, the ADC-V515 even offers High Dynamic Range (HDR) to make recordings appear deeper and more luminous. The camera might feel a bit more "flimsy" compared with the other models on this list, but still, it has the strong quality to keep your home safe for a very long time. This is a great starter camera for those who want to get into video surveillance, without breaking the bank.

Best For: Anyone needing a great indoor-only camera on a budget.

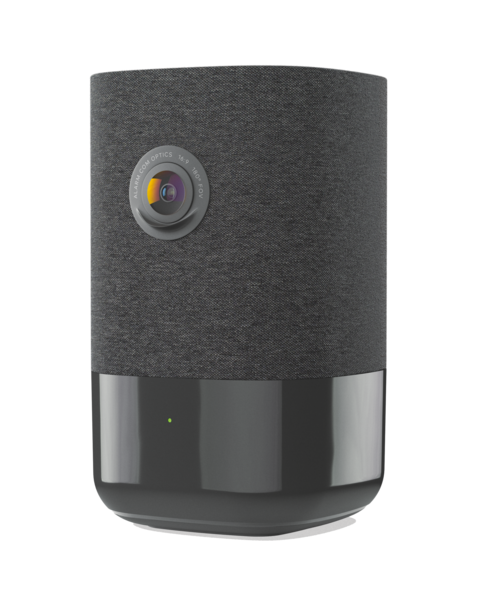
4. Alarm.com ADC-V622-WELL Wellness Camera

While it's specifically designed for monitoring an elderly or mobility challenged loved one and helping them live independently, the ADC-V622-WELL, also called the Alarm.com Wellcam, actually boasts some excellent security capabilities as well. This is a camera tower that can be easily mounted to a wall or conveniently placed on a table or desk. In addition to its 1080p recording quality, 1.62mm F2.3 lens, and IR night vision of up to 15 feet, the Wellcam is perhaps best known for its "press to call" feature and its two-way audio capability. This is also the only camera on this list that supports Power over Ethernet (PoE), which is usually reserved for commercial cameras. However, you might feel a bit silly buying this camera for strictly security purposes, as the packaging really emphasizes the "wellness" aspect.

Best For: Anyone needing to monitor a family member to help them live independently.

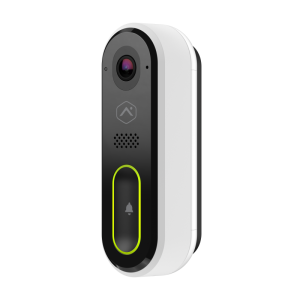
3. Alarm.com ADC-VDB770 Doorbell Camera

When it comes to doorbell cameras, Alarm.com has no shortage of options. But few would argue that the ADC-VDB770 isn't the single best doorbell camera offering from Alarm.com. In fact, many would say that it's the single best video doorbell on the market, period. This incredible device offers resolution of up to 1440x1920 Full HD, a Field of View of 150° Vertical and 115° Horizontal, IR night vision of up to 15 feet, and two-way voice for communicating with whomever is at your door. If that weren't enough, the doorbell camera even offers HDR recording, a feature normally reserved for traditional HD cameras. It is worth mentioning that unlike the other cameras on this list that support the full range of Alarm.com Video Analytics, the ADC-VDB770 only supports limited range of Video Analytics, in which only one (1) Ground Zone rule can be configured. But for a video doorbell, that's usually all you will need. Best of all, while this camera still counts towards your total ADC camera limit, you can actually use a single video doorbell device like the ADC-VDB770, on your Alarm.com account, even if you don't have a traditional video monitoring plan. This makes the device fantastic for monitoring your home's primary entrance, without needing to upgrade to a higher-cost monitoring plan.

Best For: Those wanting a top-of-the-line doorbell camera to integrate with Alarm.com.

2. Alarm.com ADC-V523 Premium Indoor Camera

When we said earlier that the ADC-V515 was the "budget" version of another camera on this list, the ADC-V523 is that camera. This is considered the standard "go-to" camera for use with Alarm.com. Any residential user who is just looking for a great, all-around camera for general use should absolutely consider the ADC-V523. It is basically everything that the ADC-V515 offers, but better. The lens is boosted to 3.0mm F2.0, the viewing angle has been increased to 117°, and you can connect with both 2.4 GHz and 5 GHz WIFI networks. Even the build quality is improved, as the ADC-V523 has a heavier feel to it, and you can quickly identify that this is the premium offering from Alarm.com. Also returning to the ADC-V523 is the 1080p Full HD recording quality and HDR recording for deeper-looking footage. The only weakness with regard to this camera is that it cannot be used outside. It's for indoor use only.

Best For: Anyone needing the very best residential Alarm.com Camera for strictly indoor use.

1. Alarm.com ADC-V723 Premium Outdoor Camera

The ADC-V723 eliminates the most glaring drawback of the ADC-V523, as our top Alarm.com Camera pick can be used both indoors and outdoors. For the most part, the ADC-V723 offers the same specifications as the ADC-V523, but there are a few improvements. Returning to the ADC-V723 from the ADC-V523 is the 3.0mm F2.0 Lens, the 117° Viewing Angle, Full HD recording with HDR for more luminous footage, and the full suite of Alarm.com Video Analytics. But the ADC-V723 offers a few unique upgrades in its own right. This camera introduces ingress protection (IP66) for keeping out the harsh outside elements. It also offers further IR night vision of up to 40 feet, so that individuals standing even further away can still be properly identified in nighttime recordings. It's safe to say that the ADC-V723 is basically the same as the ADC-V523, only better. But the "upgrades" really only come in handy if you need an outdoor camera. If you intend on keeping the ADC-V723 tucked inside, then you may as well just get the ADC-V523. When used indoors though, the two cameras have to be considered equal. In this case, we have to give the ADC-V723 the edge for its ability to function as an outdoor camera.

Best For: Anyone needing the very best outdoor camera for use with Alarm.com.

Do you agree with our list? Do you have any of these cameras at your house? Maybe some of these cameras are on your wish list? Let us know in a comment down below. Remember that you need an alarm monitoring plan with video surveillance, such as an Alarm Grid Platinum Plan or Video-Only Plan, to get started with most of these cameras. The only exception is the ADC-VDB770, as you can add a single compatible video doorbell device to an existing Alarm.com account, without a true video surveillance plan. If you need help getting started with any of these cameras, please email our team at suppor@alarmgrid.com. We're here to check incoming emails from 9am to 8pm ET M-F. Also don't forget to comment down below, and stay tuned to the Alarm Grid Blog for more content coming real soon!

Tags: , , , , , , , , , , , , , ,

Comments


Posted By

We have a quick post for you today, as we just wanted to tell you about the new "Restrict Camera Access by Login" feature for Alarm.com. With this feature, you can prevent certain users from accessing security camera footage. The feature is available to all ADC users with added cameras.

As you likely know by now, the deep lineup of Alarm.com Security Cameras is quite impressive. But what if you want to make it so that certain users are unable to view security camera footage through Alarm.com, while still being able to access the Alarm.com platform for other tasks, such as arming/disarming and controlling automation devices? That is now possible thanks to the "Restrict Camera Access by Login" feature! You can easily set up the feature through the Alarm.com website using a compatible web browser.

Once the feature has been set up, access to live and recorded camera footage will be restricted for any designated users. It is also possible to restrict access on a camera by camera basis, so that a user can view one or more cameras, while access for one or more other cameras is restricted. The feature can really come in handy in a number of different situations. For example, if you have children or teens in your household, and you want them to be able to arm/disarm from the Alarm.com Mobile App, but you don't want them to view the feed for the camera in the master bedroom, then this is a great option. Another scenario could be that you have employees with access to the Alarm.com account for your business, and you don't want them to view the camera in your private office.

To get started, visit the Alarm.com website, and log in to your customer account. Make sure you are using login credentials with Admin access for the Alarm.com account. Once you are logged in, select Users on the left-hand side. Then choose Manage Logins on the upper bar. Then press the blue "Add A Login" button in the bottom-right corner. You will then follow the steps to create a new login. This will include providing a valid email address, a login name, and setting the language preference. Then press the blue Save button in the bottom-right.

From there, you will be taken to the Manage Login Permissions page. Under "Permission", click the box for Limited Device Access. Make sure to check any boxes for functions that you want the new login to have access to. For example, by checking the box for Remote Arming and choosing the name of the system from the selectable box, you are giving the login the ability to arm/disarm the system from the Alarm.com Mobile App or website. To restrict camera access, do not check the box next to Video Cameras. Alternatively, if you only want to restrict access to certain cameras, then you can check the box next to Video Cameras, and only choose cameras from the dropdown menu that you want to allow the user to view.

Additionally, if you ever want to change the restrictions (i.e. add/remove camera access), then you can simply access the Manage Logins page on the Alarm.com website, click on the underlined login name for the user whose permissions you want to adjust, make the appropriate changes, and press Save in the bottom-right corner. Please note that this feature can only be applied to a single-system login. Group logins cannot be given access to video devices on a per-device basis.

It's nice to see Alarm.com adding a new feature like this. Sure, it's something relatively small, but it's a nice touch that can really come in handy. It's also cool how you can customize access so that certain cameras remain visible, but other cameras, perhaps ones in more private areas (e.g. Master Bedroom, personal offices, etc.), are restricted for access.

If you have any interest in the feature, then we encourage you to test it out. Then after trying it out, leave a comment down below sharing your experience. We would love to hear what you have to say about this new feature. The comments section down below is also a good place to ask any questions you might have.

Or if you have yet to get started with video surveillance from Alarm.com, then we would love to help you out. We offer Alarm.com Video Surveillance on our Platinum Level Plans (Self or Full) and our Video-Only Plan. Don't forget to check out our monitoring page for information on all our available plans. You can also send an email to support@alarmgrid.com to get the ball rolling on new monitoring service a bit more quickly. We check emails during our usual business hours of 9am to 8pm ET M-F. As always, we look forward to hearing from you soon!

Tags: , , , , , , , , , , , , , , , , , , , , , , , , , , , , , , , , , , , , , , , ,

Comments


Posted By

If you have one or more Alarm.com Cameras set up for onboard recording using an installed SD card, then there is a new Alarm.com webpage you may want to check out when accessing ADC from a web browser. The new SD Card Information Page will show details about the SD card inside your camera.

For those unfamiliar with Alarm.com Onboard Recording, it basically allows a compatible Alarm.com Security Camera to store its captured video footage to a Micro SD card that is on-board the camera device. You can then access the footage remotely from the Alarm.com website or mobile app. The feature really became popular after the Alarm.com ADC-SVR122 Streaming Video Recorder was discontinued. At this time, the cameras that support the feature include the ADC-V515, the ADC-V523, and the ADC-V723.

The new SD Card Information Page can be very useful for anyone using the Alarm.com Onboard Recording feature. The page shows all of the critical details for the SD card that is installed inside one of the compatible Alarm.com Cameras. This may include how much storage space is available for footage. You can also use the page to reformat an SD card, which you might need to do if the SD card was previously used inside a different device.

You can only access the SD Card Information Page if you have the Onboard Recording Feature enabled for your Alarm.com account and you have at least one compatible camera set up to use the feature, with a Micro SD card installed. Also note that you can only access the page from the Alarm.com website. It is not found within the Alarm.com Mobile App. To access the page, login to the Alarm.com website, and choose Video, followed by Settings, and then SD Card Information.

Have you tried out the Alarm.com Onboard Recording Feature yet? If you have, please leave a comment down below to let us know what you think of the feature. Also, do you think the SD Card Information Page will come in handy? Let us know in a comment down below. We will be back with more security system news soon, so keep checking the Alarm Grid Blog!

Tags: , , , , , , ,

Comments


Posted By

If you have a new Alarm.com Security Camera or you are thinking about getting one, then you may want to know just how easy it is to get a camera online and paired with your personal Alarm.com account. Today, we're looking at the setup process for the ADC-V515, ADC-V523, and ADC-V723.


You may recall that the ADC-V515, ADC-V523, and ADC-V723 were our Top Alarm.com Camera Picks in a post we made a couple of months ago. These are indeed the cameras you will most likely be considering if you are a residential user. They're great because they can be powered with a simple plug-in adapter that comes included with each device, and they are also extremely easy to pair with the local WIFI in your home. Plus, the ADC-V515 and ADC-V523 Indoor Cameras can be rested on a desk, table, or countertop for a tools-free installation. The ADC-V723 Outdoor Camera needs to be hard-mounted, so you will have to break out the toolkit to install that one. But just drill a few holes and secure the camera's backplate using included screws, and that camera will also be ready to go.

The other popular Alarm.com Camera for residential use is the ADC-V622, which is also sometimes called the Alarm.com Wellcam. Unlike the other three (3) cameras, Alarm.com markets the ADC-V622 for more of an "independent living" solution so that you can monitor a loved one. It can make a good security camera as well, though its applications are usually a bit different. Alarm.com also has a great lineup of commercial security cameras, which you can usually identify by having a C in the name (e.g. ADC-VC826). But for today, our focus is strictly on the three (3) main residential security cameras, the ADC-V515, ADC-V523, and ADC-V723. We may cover the other cameras in a future post as well, so stay on the lookout for that. But for now, besides the camera, the other things you need to get started are a home WIFI network and an alarm monitoring plan with video surveillance that includes access to Alarm.com, such as an Alarm Grid Platinum Plan. You can learn all about our monitoring plans in this post. Remember that you will only use Alarm.com Cameras if your security system supports Alarm.com, or if you choose to use a stand-alone video-only Alarm.com plan. If you have a Resideo or Honeywell Alarm System, then your system will most likely use Total Connect 2.0 instead of Alarm.com. In that case, there is a nice selection of TC2 IP Cameras you can choose from. But today, we're only looking at Alarm.com Cameras.

When you have a new Alarm.com camera, the first thing you will want to do is power it on. For the three cameras we're checking out today, the power adapter comes included. Most users find the stock setup to be sufficient, but Alarm.com does offer a convenient 9-foot extension cable called the Alarm.com ADC-VPE-9FT-W if you need an extra-long wire run to the nearest outlet. Alarm.com recommends extending the power wire no more than 100 feet. Once you plug the camera in, you can verify that it is receiving power by seeing that the camera's LED light has turned on.


The next step is to get the camera online. These are WIFI cameras that don't support wired ethernet options. You must get the camera connected to wireless WIFI internet. The ADC-V523 and ADC-V723 support both 2.4 GHz and 5 GHz networks. But the ADC-V515 only supports 2.4 GHz networks, and it will not support 5 GHz networks. Keep that in mind if you are using the ADC-V515. Each camera can be paired using AP Mode pairing or WPS pairing. Of these two methods, AP Mode pairing is more secure, and it is the method recommended by Alarm Grid. Check out any of the FAQs below for instructions on AP Mode pairing:

WPS, stands for WIFI Protected Setup. You can use WPS pairing as an alternate method for getting your Alarm.com Camera online. Although WPS pairing is usually seen as easier than AP Mode pairing, it isn't as secure, and it opens up the door for various network vulnerabilities. If you accept the risks, then we have guides showing WPS pairing as well.

Once your camera is online and has a solid green LED, all you need to do is pair it with your Alarm.com account. You can do this using the website or mobile app. Both methods are very easy, so it really comes down to preference as to which one you use. If you decide to pair through the website, then make sure you are using a compatible web browser for Alarm.com.

If you haven't tried out the Alarm.com Mobile App for controlling your system remotely, then setting up a camera through the mobile app can be an excellent way to show you how it works. Anyone with an Alarm.com account can use the mobile app at no extra charge, and you can conveniently download it for free from either the Google Play Store on Android or the Apple App Store on iOS. Then use one of these guides to pair your Alarm.com Camera:


We hope that you find these guides useful for setting up an Alarm.com Residential Camera. We will likely be covering the Alarm.com Wellcam ADC-V622 and the Alarm.com Commercial Security Cameras sometime in the near future, so stay on the lookout. Feel free to comment below to share your thoughts on Alarm.com Cameras. What do you like about them? Is there anything you'd love to see in future updates and releases? Leave a comment down below, and stay tuned for more content on security systems and cameras coming soon.

Tags: , , , , , , , ,

Comments


Posted

You may recall us briefly discussing the Alarm.com Camera Onboard Recording feature when it was announced that the ADC-SVR122 was being discontinued. Today, we're taking a closer look at the feature, what it entails, and how you can get started. Let's check out Alarm.com Onboard Recording!


Simply put, Alarm.com Onboard Recording allows a compatible Alarm.com Camera to record captured footage locally to a micro SD card that is on board the camera. As the camera is connected with the Alarm.com servers, the user can access the footage on the Micro SD card remotely using the Alarm.com website or mobile app. Only footage that is still on the Micro SD card can be accessed. As the camera continues to record and store video, older footage on the card is deleted to make space. You must access and save any important footage on the Micro SD card before it is deleted and lost forever. Many Alarm.com users have found that onboard recording is a nice alternative to using a streaming video recorder (SVR) device.

There are many things to keep in mind when thinking about Alarm.com Onboard Recording. The first thing you should consider is which Alarm.com Cameras support the feature. At this time, there are only three (3). These are the ADC-V515, the ADC-V523, and the ADC-V723. It's likely no coincidence that these cameras also happen to be the premier residential video surveillance options offered by Alarm.com. You may also recall that Alarm Grid took an in-depth look at these same cameras not too long ago. Check out that post here. Remember that you will need a monitoring plan that includes both video surveillance and access to Alarm.com to use any of these cameras. Examples of compatible plans include an Alarm Grid Platinum Level Plan (Self or Full) or an Alarm Grid Video Only Plan. Learn about monitoring plans here.

Once you have a compatible camera, you can then start thinking about which Micro SD card you want to use. The Micro SD card you select cannot have a capacity smaller than 32GB and cannot be larger than 512GB in size, and it should be a high-quality card that has been specifically built for video surveillance. Alarm.com lists the following Micro SD cards as compatible:

  • Micron Industrial Memory Cards (Available in 128GB and 256GB)
  • SanDisk High Endurance
  • WD Purple Micro SD Cards

Additionally, you should check out the following FAQs from Alarm Grid that show you how to install the Micro SD card for each of the compatible ADC Cameras:

After selecting the proper plan, a compatible camera, and a recommended Micro SD card, make sure your monitoring company enables the "Onboard Recording with Smart View" feature on your account. You will not be able to set up the feature on your account until this option has been enabled. Once you have the Onboard Recording feature set up and running, accessing the recorded footage is very simple. You can use the Alarm.com website or mobile app for this task. We recommend checking out our FAQ on Viewing Alarm.com Onboard Recorded Video from an SD Card for more information.

What do you think of the Alarm.com Camera Onboard Recording feature? Would you like to see it become available for more Alarm.com Cameras? Leave a comment down below, and share your thoughts. And stay tuned to the Alarm Grid Blog for more security system news coming soon!

Tags: , , , , , , , , ,

Comments


Posted By

We recently came across an article from Bonka Bird Toys expressing their satisfaction with Alarm Grid and their new security system and security camera setup. Bonka Bird Toys is a local business, located right down the road from Alarm Grid. Thank you Bonka for your continued support!


Bonka Bird Toys has quite an intricate setup, centered around a Qolsys IQ Panel 2 Plus Security System. It is a dual-path system, complete with encrypted PowerG Sensors, and four (4) IQ Remote Keypads. Bonka says that they opted to not mount their IQ Remote Keypads, and instead carry them around loose like small tablets, and keep them at their desks. They particularly love being able to check their security cameras right from their IQ Remote devices. Having an IQ Remote at each workstation is really convenient!


According to Bonka Bird Toys, their favorite part of their setup is their security cameras. They used two (2) types of commercial grade Alarm.com Security Cameras, including the Alarm.com ADC-VC736 and the Alarm.com ADC-VC836. They even added the Alarm.com ADC-CSVR126 Commercial Streaming Video Recorder to facilitate a continuous 24-hour recording schedule. In addition to their IQ Panel 2 Plus and their IQ Remote Keypads, Bonka also set up a dedicated monitor that shows their camera feeds. They placed it up in a prominent spot where they can check it any time. We think this is a fantastic example of what kind of setup you can achieve with a security system and Alarm.com Cameras!


Bonka Bird Toys also set up a complete automation network of Z-Wave Plus devices, including lights, door locks, and thermostats. They love being able to control these devices locally from their alarm panel and keypads, and remotely from the Alarm.com platform on their phones and computers. Bonka Bird Toys also states that it was really easy to install their equipment. It took them just a single afternoon to get everything ready and going, and they saved thousands of dollars by doing it themselves rather than hiring a professional installer. This is the same type of robust setup that you can achieve for your home or business. And you can easily install everything yourself to save money,

If you are looking for the best bird toys, birdcages, aviaries, and accessories, then be sure to check out the Bonka Bird Toys website. And if you have any questions about how you can get started with Alarm Grid monitoring service, then reach out to us by emailing our support team and security system planners at support@alarmgrid.com. We're here to check your emails from 9am to 8pm ET M-F. We look forward to hearing from you!

Tags: , , , , , , , , , , , , ,

Comments