Smart Home Posts

Posted By

Qolsys is rebranding as IQ, taking a cue from its product line. IQ's parent company, JCI, announced the change on July 1, 2025. The end-user-facing site has already been updated with new branding. It will likely take a little longer for product packaging to follow suit. But, what does this mean?

Honestly, for customers not a lot. I don't know what precipitated the change, but it could be the result of market research showing that IQ is a more recognizable name than Qolsys. Or, perhaps, just a name that is more positively viewed. Whatever the reason, the product line we've all come to know and love will remain unchanged.

Speaking of changes, IQ has a new panel lineup on the horizon. The IQ Panel 5 debuted at ISC West this year. This panel lineup will follow the format of the IQ4 systems. Meaning there will be a good version in the IQ5 NS. A better version in the IQ5 Hub, and a best option in the IQ Panel 5. The differences that exist in the similar IQ Panel 4 lineup will be mirrored in the IQ5 series.

IQ Panel 5

Let’s start with the highlight of the new IQ Panel lineup, the upcoming IQ Panel 5. This next-generation panel will build on the foundation of the IQ Panel 4, launching with base firmware equivalent to version 4.6.1 — likely renamed as 5.0 for the new release.

The IQ Panel 5 will feature a Qualcomm Dragonwing™ chipset and run on Android 14, a big upgrade from the IQ Panel 4’s Qualcomm Snapdragon™ chipset and Android 9 base. This major update paves the way for new and enhanced features and a refreshed user experience, with future refinements driven by customer feedback once the system is in use.

With its base firmware, the IQ Panel 5 will support PowerG+ devices right out of the box. Another key improvement is how the panels will be configured and offered. Every IQ Panel 5 model will include a built-in PowerG transceiver rather than a PowerG daughter card. This includes the IQ5 Hub and IQ5 NS. If support for a legacy SRF frequency is needed, it can easily be added with a simple daughter card. This makes selecting the right panel variant much more straightforward.

The panel’s front-facing camera has also been improved. Instead of being adjustable up and down, the camera is now fixed in place, but rotated 90 degrees to provide a portrait view rather than a landscape one. This means the camera can capture clear disarm images whether the user is a child or an adult. The camera resolution has also been improved, increasing from 9MP to 13MP for better image clarity.

The following improvements have also been made:

  • LEDs: Smaller, less glaring.
  • Power Supply: Now uses a 12VDC power supply, allowing for longer power wire runs and better overall operation.
  • Mounting Plate: Improvements have been made to the smart mount layout so that it better lines up with single, double, and triple gang boxes.
  • Power Terminals: A new terminal block design uses pins rather than blades to connect the panel with power (when the barrel connector is not being used). This prevents power fluctuations during touchscreen use, when the panel may flex against the mounting plate.
  • Panel Tamper: The panel tamper has been moved slightly toward the center of the unit and is now a solid plastic piece, rather than a foam-tipped one.

IQ5 Hub

The IQ5 Hub, assuming it will follow in the footsteps of the IQ4 Hub will still be a powerhouse system, but will be slightly less feature-rich than the IQ Panel 5. The table below shows a comparison between the IQ Panel 4 and the IQ4 Hub. This will give an idea of the differences we can expect between the IQ Panel 5 and the IQ5 Hub.

Feature Comparison between the IQ Panel 4 and the IQ4 Hub:

(Features that differ are highlighted in yellow)

Feature IQ Panel 4 IQ4 Hub
Processor Qualcomm Snapdragon 8 core SOM Qualcomm Snapdragon 8 core SOM
Memory 16GB of NAND Flash 16GB of NAND Flash
User Codes Up to 242 (Role-based) Up to 242 (Role-based)
WIFI Support 802.11 a/b/g/n/ac dual-band 2.4/5Ghz - includes built-in Access Point Capability 802.11 a/b/g/n/ac dual-band 2.4/5Ghz - includes built-in Access Point Capability
Cellular Technology LTE Category 4 LTE Category 4
Automation Support Z-Wave Plus (800): Up to 137 Devices) Z-Wave Plus (800): Up to 137 Devices)
Bluetooth Support Bluetooth Low Energy (BLE) 4.2: For Disarming and Audio Streaming Bluetooth Low Energy (BLE) 4.2: For Disarming and Audio Streaming
LCD Display 7" LCD, 1280 x 800 pixels, 300 cd/㎡, RGB 24 bit, 16.9 Million Colors 7" LCD, 1024 x 600 pixels, 300 cd/㎡, RGB 24 bit, 16.9 Million Colors
Touchscreen Type Capacitive Glass Multi-touch Capacitive Glass
LED Indicator (Status LED) Triple, Full-color RGB LED Single, Full-color RGB LED
Speaker 4W x 4, QuadSound, 4x 4W Front-facing speakers w/85 dB siren 4W x 1, Front-facing speaker + 85 dB Piezo Siren
Microphone MEMS x 3, (Micro-Electro-Mechanical System) with Echo Cancellation MEMS x 1 (Front-facing)
Camera Front-facing Camera, 8MP, Wide-Angle 120° Field-of-View, Fixed-Focus Camera, with Flex-Tilt Adjustment No Camera
Two-Way Voice Support Yes No
Supports IQ Base Yes No

IQ5 NS

The IQ5 NS is a screenless version of the IQ Panel 5. While full specifications have not yet been released, the differences between these two systems will likely mirror those between the IQ4 NS and the IQ Panel 4. For the DIY installer, the most significant change will be the programming, which is handled through an app or web portal rather than an integrated touchscreen.
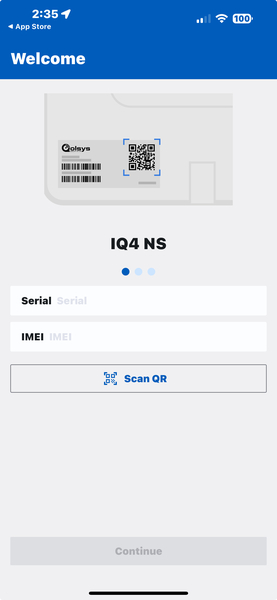
For local programming, the IQ Installer Interface app must be used. This is a free app available from the iOS App Store and Google Play Store. This allows you to connect to the panel via its built in wireless access point and program using the phone or tablet's touchscreen. The programming interface is very similar to programming through the panel's touchscreen. Below, you can see an example of the screen used to connect to an IQ4 NS.

The IQ5 NS is an excellent choice for those on a budget who still want many of the great features associated with IQ panels. These features include Z-Wave Plus with Z-Wave Long Range support, support for PowerG, and an updated Qualcomm Dragonwing™ processor. The chart below shows a comparison between all three versions of the IQ4 panel line. It's safe to assume that the differences between the panels in the IQ5 lineup will be similar.

Feature IQ4 NS IQ4 Hub IQ Panel 4
HARDWARE
7" Touchscreen NO YES YES
8-Core CPU YES YES YES
Built-in LTE & WIFI Comms YES YES YES
Dual SRF (PowerG + 1) NO NO YES
Single SRF YES YES NO
Z-Wave Plus (800-Series) YES YES YES
Bluetooth Disarming NO YES YES
Music Streaming NO YES YES
Microphones 0 1 3, with echo cancellation
8MP Panel Camera (w/Flextilt) NO NO YES
Built-in Panel Glass Break NO NO YES
Built-in Panel Motion Detector NO NO YES
24-Hour LiPo Backup Battery YES YES YES
Smart Mount Installation YES YES YES
Compatible with IQ Base NO NO YES
Available in Black Housing NO NO YES
SOFTWARE
Live View, Live Answer Doorbell & Cameras NO YES YES
Weather on Home Screen NO YES YES
Photo Frame Screensaver NO YES YES
Full Alarm.com Integration YES YES YES
SECURITY
4-Watt Speakers YES, 1 YES, 1 YES, 4
85dB Siren YES YES YES
Support for 128 Zones YES YES YES
Support for Partitioning YES, 4 YES, 4 YES, 4
242 User Codes YES YES YES
Encrypted Sensor Support YES (with PowerG or 319.5 MHz SRF) YES (with PowerG or 319.5 MHz SRF) YES
Support for Hardwired Zones YES (SRF will determine how) YES (SRF will determine how) YES (via PG9WLSHW8 or other SRF)
2-Way Voice NO NO YES
Residential Certification YES, (UL1023, UL985) YES, (UL1023, UL985) YES, (UL1023, UL985)
Commercial Certification YES, (UL2610) YES, (UL2610) YES, (UL2610)

So, the brand name change from Qolsys to IQ won't affect any existing customers or their products, and it won't change the product lineup, or the roadmap for future products. It's just less of a mouthful when discussing the brand and its products, and that's a good thing!

Tags: , , , , , , , , ,

Comments


Posted By

No more hunting through your Alarm.com app activity screen, trying to piece together the reason for an alarm on your system. Alarm Recap, a new feature from Alarm.com, summarizes all events occurring just before, during, and after an alarm. Giving you a complete recap with a single glance.

To see this new feature, you must have an Alarm.com account and iOS app version 5.9.7+ or Android app 5.7.6+. This feature has been slowly rolling out over the past couple of weeks, so if you're on the latest version and don't see it yet, don't worry, it's coming. The alarm recap becomes available on the app Home screen ten (10) minutes after the alarm's conclusion (i.e. post disarm).

Each recap covers activity and video from five (5) minutes before the alarm, events that occur during the alarm, and events up to three (3) minutes after the alarm. While most alarm types trigger a recap, in-app property panic alarms and water monitoring events are not included.

Alarm Recap: What You'll See

  • The Sensor/Event that triggered the alarm.
  • Relevant video footage (i.e., People, Vehicle, Animal, etc.)
  • Recent activity leading up to, and during, the alarm.
  • The user that disarmed after the alarm.
  • Monitoring station events.
  • Tamper or Malfunction Events.

Alarm Recap: Who Can View

All logins with the ability to view Activity have access to the alarm recap. This includes users with Master, Full Control, Read-Only, and Custom logins with the attribute for Activity enabled. Additionally, Master, Full Control, and Custom logins that can arm/disarm remotely can also provide feedback on Alarm Recap. This feedback is used to make improvements to Alarm.com features.

Alarm Recap: How To View

When you log into the app, the alarm recap is available from the Home Dashboard screen. You can also reach it by choosing Activity from the menu options at the bottom of the screen. From the activity screen tap the alarm event row, then tap Alarm Recap.

Alarm Recap: Other Details

If you have a partitioned system, the alarm recap will include each partition that reported an alarm. For commercial accounts with multiple locations, the alarm recap can be viewed from the individual business system's location rather than from the Enterprise Group level.

If multiple alarms occur in a 24 hour period, only the most recent alarm will be shown in the alarm recap. Information for prior alarms can be viewed from the Activity screen. The alarm recap is only available after the alarm has been cleared (the system disarmed). You won't see it during an active alarm.

The Alarm Recap feature is a game-changer when it comes to understanding what's happening with your security system. No more guessing or scrolling endlessly through activity logs!

This new feature gives you a clear, concise summary of alarm events, delivering crucial information like triggering sensors, relevant video, and who disarmed the system, all in one easy-to-digest view. It’s designed to save you time and give you peace of mind by providing immediate clarity when an alarm occurs.

Get the Full Picture with Video

To truly unlock the power of Alarm Recap and see exactly what triggered an alarm, we highly recommend adding Alarm.com's video monitoring to your system. Without video, you'll still get a great summary of events, but with it, you'll literally see the complete picture, allowing you to quickly verify incidents and take appropriate action.

Alarm.com has a tremendous suite of video cameras and peripherals. If you have a scenario, they likely have a camera that will work perfectly in it. Alarm Grid offers video monitoring with security in our Platinum Plans (Self or Full). We also offer stand-alone video monitoring, though you won't get an Alarm Recap with a video-only plan.

Tags: , , , , , , , , , , , , ,

Comments


Posted By

Up to now, Alarm Grid has never enabled Pro Video with Analytics on Alarm.com video accounts unless specifically requested by the customer. This feature comes with additional costs that we have always covered. Now that Video Motion Detection is no longer an option, we've changed our policy.

Although Alarm.com ended support for enabling Video Motion Detection on new accounts in February 2023, its effect on our video customers only became clear to us recently. One of our customers alerted us to an issue that highlighted the impact of this change, prompting us to institute this new policy.

Please note that this policy change does not affect the monthly monitoring price for Platinum (Self or Full) Monitoring or Standalone Video Monitoring. This adjustment is simply to ensure our customers receive the full monitoring experience they expect. Below, we'll discuss the differences between Video Motion Detection and Video Analytics.

Video Motion Detection (VMD)

Method of Detection: VMD detects motion by analyzing brightness and color changes in user-defined pixel areas within camera images, eliminating the need for a separate motion detector.

Configuration: VMD settings are configured using VMD windows, which are drawn by the user on a live video preview. Users can adjust the sensitivity (how much change is needed to trigger an event) and target size (the percentage of the VMD window that needs to be filled by movement) for each window.

Recording Rules: VMD recording rules can be created to trigger recordings when motion is detected in specified VMD windows. However, for some camera series, the option to choose specific VMD windows to trigger a recording is not available; any motion in any window will trigger a recording.

Best Practices: For effective detection, it's recommended to draw longer and narrower boxes, similar to tripwires, in areas where motion should trigger a recording. Avoid placing windows in areas with constant or insignificant motion like moving trees or reflective surfaces. VMD windows should not overlap, as this can lead to false activations. For outdoor cameras, creating lines or barriers with the available windows is suggested instead of one large box.

Limitations:

  • VMD may not always function properly due to environmental factors like flying insects, falling leaves, or precipitation.
  • Certain older camera models do not show the VMD window turning orange upon motion detection during configuration.
  • The VMD windows for certain cameras are not visible to your alarm dealer (for troubleshooting purposes) in the Partner Portal, even after they've been configured.
  • Sensitivity settings may affect all VMD windows for some camera models.

New accounts created after February 2023 will no longer have the option to create VMD recording rules, as Alarm.com is moving forward with Video Analytics as their primary motion-activated recording solution. However, accounts created before this date, and older cameras that only support VMD will continue to be able to use VMD, and support for it will continue.

Video Analytics

Method of Detection: Video Analytics continuously scans a property and identifies and classifies objects such as people, vehicles, or animals. It can understand traffic patterns and detect specific behaviors like loitering, or objects crossing virtual lines.

Configuration: Video Analytics rules are configured using virtual tripwires (to capture movement through an area) or ground zones (to capture objects lingering in an area). Users can define the area of interest and specify the duration an object needs to be in a ground zone to trigger a recording.

Recording Rules: Video Analytics rules offer more advanced options, including the ability to trigger recordings based on the type of object (person, vehicle, animal) detected. Existing VMD recording rules must be deleted before setting up a Video Analytics rule. Users can create up to three Video Analytics rules per camera, and ground zones and tripwires can overlap.

Best Practices:

  • For accuracy, avoid drawing tripwires or ground zones over objects that move on their own (like trees or shrubs) and only draw the rule where the feet or wheels of the object should cross.
  • It's recommended to observe the rule's detections and then adjust the Minimum Object Detection Size or recalibrate the camera if needed.
  • Proper camera placement (height, angle, distance) is crucial for Video Analytics to function effectively.

Additional Features: Video Analytics enables enhanced notifications with thumbnail images of the detected objects. It can also be used to control lights based on detected events. Features like Perimeter Guard™ (alert sounds and flashing LED) and Package Alerts for specific doorbells rely on Video Analytics.

Additional Content on Video Analytics:

Summary of Key Differences:

Detection Method: VMD detects motion based on pixel changes within a specified area of the camera's field of view, while Video Analytics constantly scans the camera's view, identifying and classifying objects using cutting-edge technology and machine learning.

Precision: Video Analytics offers more precise detection and reduces false triggers by accurately identifying specific types of objects.

Rule Capabilities: Video Analytics allows for more sophisticated rules based on object type and behavior (e.g., loitering, crossing a line), unlike VMD which primarily reacts to general motion within a defined area.

Notifications: Video Analytics provides more comprehensive notifications with thumbnail images and object classification.

Summary:

In essence, Video Analytics is a more advanced and intelligent method of motion detection when compared to VMD. While VMD can be effective for basic motion detection on older systems, Video Analytics offers greater accuracy, more options, and better control over what triggers recordings and notifications.

Compatible Cameras:

Cameras That Support VMD Only:

If you are moving into a home or business with existing cameras and plan to activate new Alarm.com service after February 2023, please note that the following cameras support only Video Motion Detection (VMD), not Video Analytics. With these specific models and possibly other older cameras not shown here, you will only be able to view live video remotely; creating recording rules is not possible.

Camera Name Image
ADC-VS1
Analog to IP Converter
1-Channel
ADC-VS420
Analog to IP Converter
4-Channel
ADC-V510
Fixed Lens
Indoor Camera
ADC-VS520IR
Fixed Lens
Indoor Camera w/IR
ADC-V610PT
Indoor Pan/Tilt Camera
ADC-V620PT
Indoor Pan-Tilt
Camera
ADC-V700X
Weatherproof
Day/Night IP Camera
ADC-V720
Outdoor PoE
Night Vision
Bullet Camera


ADC-V820
Indoor PoE
Dome Camera
ADC-V521IR
Indoor Fixed
IR Camera
ADC-V721W
Wireless Outdoor
IP Night Vision Camera
ADC-V821
Outdoor PoE
Night Vision
Dome Camera
2GIG HD100
Indoor 720P
Camera w/ Night Vision

Cameras That Support Video Analytics:

See the table below for cameras compatible with Alarm.com's advanced Video Analytics. Given its superior accuracy for detecting threats and gathering information about your property compared to Video Motion Detection, we strongly recommend upgrading if your cameras currently only support VMD. Start planning your upgrade today, you'll be glad you did!

Camera Name Image
ADC-V515
Indoor 1080P
Camera
ADC-V522IR
Indoor 1080P
Night Vision Camera
ADC-V523/ADC-V523X
Indoor 1080P Camera
with IR Night Vision
ADC-V622
Indoor 1080P Camera
with IR Night Vision and
2-Way Audio
ADC-V722W
Outdoor 1080P
WIFI Camera with
Night Vision
ADC-V723/ADC-V723X
Outdoor 1080P Camera
with IR Night Vision and
High Dynamic Range (HDR)
ADC-V724/ADC-V724X
Outdoor 1080P WIFI Camera
with 2-Way Audio
ADC-VC726
Outdoor 1080P
PoE-Capable
Mini Bullet Camera
with Night Vision
ADC-VC727P
Indoor/Outdoor 1080P
PoE-Capable Mini Bullet
Camera
ADC-VC728PF
Indoor/Outdoor 1080P
Varifocal Bullet Camera
ADC-V729 / ADC-V729AC / ADC-VC729P
Outdoor 4MP Floodlight Camera
ADC-V729 - Powered by 24V DC
ADC-V729AC - Powered by 100V - 240V AC
ADC-VC729P - PoE-Capable or 24V DC Powered
ADC-VC736
Outdoor 1080P Large Bullet
PoE-Capable Camera
with Night Vision
ADC-VC826
ADC-VC827P
Indoor/Outdoor 1080P
Dome Camera
ADC-VC836
Outdoor 1080P
Turret Camera with
Night Vision
ADC-VC838PF
Indoor/Outdoor 1080P
Varifocal PoE-Capable
Turret Camera
ADC-VC847PF
Indoor/Outdoor 1080P
Varifocal PoE-Capable
Dome Camera
ADC-VDB750
Full HD Wired
Video Doorbell Camera
ADC-VDB755P
Full HD PoE-Capable
Video Doorbell Camera
ADC-VDB770
Full HD Wired
Video Doorbell Camera
with High Dynamic Range (HDR)
ADC-VDB780B
Full HD 2MP Battery-Powered
(Rechargeable)
Video Doorbell Camera
Also available in a bundle with the
ADC-W115C Wireless Chime Module.
Some installations will require
the ADC-W115C to use this
video doorbell camera.
If a cameras in the above list has no link it's because it is discontinued and no longer offered by Alarm Grid.
Tags: , , , , , , , , , , , , , , , , , , , , , , , , , , , , , , , ,

Comments


Posted By

Time for the CellBounce to, well, bounce. This device, which served as a temporary bridge for AT&T customers clinging to their 3G communicators, is now being discontinued. For those who rely on CellBounce to convert 3G signals for use on the LTE network, it's time to consider the next steps.


Mark your calendars: as of May 1, 2025, AT&T will officially cease support for CellBounce devices on its network. This means if you're currently relying on a CellBounce to bridge the gap between your old AT&T 3G/4G communicator and the AT&T LTE network, it's time to upgrade.

Failure to upgrade to a new LTE communicator, or a new system before the deadline will likely result in a complete loss of communication, compromising alarm signals. This includes critical life-safety signals like fire and carbon monoxide alerts.

You may be wondering which communicator to choose. Below, we'll give you some suggestions for how best to move past the Resideo CellBounce and that old 3G/4G communicator:

Alarm Panel LTE Communicator Recommended
Replacement
Panel
New Panel
LTE Communicator
L3000 LTE-L3A (AT&T)
LTE-L3V (Verizon)
PROA7PLUSC PROLTE-A (AT&T)
PROLTE-V2 (Verizon)
Lynx Touch
(L7000
L5210
L5000
Panel Firmware
9.00.209+
required)
LTE-L57A (AT&T)
LTE-L57V (Verizon)
PROA7PLUSC PROLTE-A (AT&T)
PROLTE-V2 (Verizon)
VISTA-20P
VISTA-15P
VISTA-10P
LTEM-XA (AT&T)
LTEM-XV (Verizon)
LTEM-PA (IP & AT&T)
LTEM-PV (IP & Verizon)
LTEM-PXA (IP* & AT&T)
LTEM-PXV (IP & Verizon)
LTEM-PIA
(IP & AT&T UL Residential Fire Rated)
LTEM-PIV
(IP & Verizon UL Residential Fire Rated)
VISTAH3 PROLTE-A (AT&T)
PROLTE-V2 (Verizon)
VISTA-21iP LTEM-XA (AT&T)
LTEM-XV (Verizon)
LTEM-PA (IP & AT&T)
LTEM-PV (IP & Verizon)
LTEM-PXA (IP & AT&T)
LTEM-PXV (IP & Verizon)
LTEM-PIA
(IP & AT&T UL Residential Fire Rated)
LTEM-PIV
(IP & Verizon UL Residential Fire Rated)
Must Disable Internal Comm.
VISTAH3

VISTA-21IPLTE
PROLTE-A (AT&T)
PROLTE-V2 (Verizon)

LTE-21V (Verizon)
No AT&T Option Available
for the VISTA-21IPLTE


*The LTEM-PXA and LTEM-PXV are unique in that they can support either a wired Ethernet connection or WIFI. To use WIFI, either the PROWIFI (WIFI Only) or the PROWIFIZW (WIFI and Z-Wave) module must be added.

We realize upgrading to a new panel may be a big undertaking for a DIYer. We've got content on upgrading from a VISTA-20P to a VISTAH3 and on upgrading from several older panels to the PROA7PLUS:

If you fail to replace the Resideo CellBounce before the deadline, here's what you may experience:

  • Communication Failures: "Comm fail," or communication failure, means your alarm system's regular check-in with AlarmNet didn't happen and they sent a message to the monitoring station. These supervision check-ins usually occur daily or monthly. If a comm fail happens, the monitoring station will normally contact the alarm dealer, who will then contact you, though exact procedures may vary. For Alarm Grid customers with cellular communicators, these check-ins are typically set for every day. It is possible that your system is set as "unsupervised". If that is the case, your system might be incapable of communicating and neither you nor the monitoring station would know.
  • Trouble message on display. This issue can vary widely, depending on your panel type and supervision settings. When a cellular communicator is in use, there is a "cell fault time" setting within communicator programming. By default, this is usually set to 60 minutes. With this setting, if the communicator loses contact with the cellular network for 60 consecutive minutes, a trouble message is displayed by the panel. This means you'll likely see that there is a problem before your alarm dealer. This may be displayed as a bF or Check 103 depending on the panel and keypad used. If a CellBounce is the issue, the most effective way to clear this message permanently is to disable the cellular communicator in panel programming. This will effectively disable cellular reporting. A better option is to upgrade the communicator or the system.

If you happen to have an IP and GSM communicator, it is usually possible, depending on your communicator version, to disable only the cellular path for the communicator. This will leave the IP communicator working. This might be a temporary solution, until you can upgrade to a new LTE communicator, or a new system.

The CellBounce was always intended as a short-term fix for a long-term problem. Let's face it, some people just don't like being told they have to upgrade their stuff. I remember when the old 2G network shut down, I had family members who clung to their old phones right up until the bitter end! But eventually, we all have to move with the times. Funny thing is, those same family members wouldn't give up their smartphones without a fight today.

Tags: , , , , , , , , , , , , , , ,

Comments


Posted By

Give Back/Get Back is a program sponsored by electric utility companies in the US. During the summer, when electricity usage is at its peak, these companies offer an incentive for customers with smart thermostats to allow the adjustment of their thermostats during peak usage, lowering demand.

Our first blog about Give Back/Get Back (Demand Response) was in May of 2020. Now, over twenty electric utility providers participate in the program, with thousands of customers taking advantage of these incentives.

Here's how the Give Back/Get Back program typically works: On extremely hot or cold days, when energy demand surges, your utility company partners with Alarm.com to make small, temporary temperature adjustments in participating homes. These adjustments, usually no more than four (4) degrees Fahrenheit, may last up to four (4) hours.

The adjustment lowers the demand on the power grid and also saves you money by causing your electric air conditioning or heating usage to be reduced. Those who heat their homes using gas, wood burning stoves, or other non-electric means can still participate if they cool their homes using electricity and have a qualified, internet-connected thermostat.

The two newest areas participating in Give Back/Get Back are PJM Utility and the Tennessee Valley Authority (TVA). PJM Utility calls its program "Power Savers MidAtlantic" and the TVA calls its program "EnergyRight Smart Thermostat Rewards".

PJM Utility:

To participate under the PJM Utility program you must:

  • Be a resident of Ohio or Illinois and a customer of ComEd, Duke Energy Ohio, or AEP Ohio.
  • Have a qualifying, internet-connected smart thermostat.
  • Agree to allow the utility to adjust your thermostat setting during peak energy usage times.
  • Connect your utility account through the PJM Utility partners Voltus or Arcadia.

In exchange for their participation in the program, PJM Utility customers who sign up will receive an entry in a sweepstakes for $10,000. Each event that you participate in will give you another entry into the sweepstakes. You always have the option to choose not to participate in a temperature offset event in either program. For full details on the PJM Utility Power Savers Mid-Atlantic program, click here.

Tennessee Valley Authority:

  • If you live in the seven-state Tennessee Valley region you can check whether your utility is participating here. If it is, enroll your qualifying thermostat here.
  • Have an internet-connected, qualifying smart thermostat.
  • If your primary heat source uses electricity and you have electric cooling, you're eligible for the year-round program.
  • If you use natural gas, wood-burning, or any other non-electric powered heat, and electricity for cooling you can still participate in the summer-only program.

In exchange for your participation, you will receive a $65 enrollment rebate for both the year-round and the summer-only program. Year-round participants will then receive a yearly $65 rebate as long as they continue to participate or until the program ends. Summer-only participants will receive a $20 rebate per participation year for the life of the program. You can read the full details of the TVA program here.

Alarm.com calls this Give Back/Get Back, but each utility company has their own program name. If you haven't seen us write about your utility provider, you can check to see if they participate in partnership with Alarm.com by going to thermostatrewards.com and looking for your electric utility's name. If it is listed, click the link and find out about your potential rewards for participation and what's required to sign up.

If you don't have a smart thermostat yet, your utility's program page likely lists compatible models, and often provides discounted purchase links. Once you install and connect your thermostat through Alarm.com, you can easily enroll in the program. Remember, incentives vary by utility, so review your company's specific program details. Investing in a smart thermostat is a wise choice, often paying for itself quickly through energy savings and program incentives.

Supported Alarm.com Thermostats:

The list of supported thermostats can vary by utility company, but in this case, both PJM and TVA support the same list of Alarm.com compatible thermostats.

Tags: , , , , , , , , , , , , , , , ,

Comments


Posted By

If you own a Lyric system and have not already done so, please read this important update regarding AlarmNet360 changes that affect your panel. It may be time for an update!

Unlike Resideo, Alarm.com doesn't manufacture alarm panels. Instead, they work with various panel manufacturers to provide alarm signal transport and remote control capabilities for their panels. Many users prefer the Alarm.com platform for its clean look and intuitive user interface (UI).

There are a couple of panel manufacturers who offer all-in-one systems that can easily replace a Lyric. The exception is for those users who have embraced Apple HomeKit. There is currently no Alarm.com capable panel that also supports HomeKit. There may never be. So, if you're firmly in the HomeKit camp, this option is probably not for you.

This post focuses on two Alarm.com-compatible panels: the 2GIG Edge and the Qolsys IQ Panel 4. Alarm.com requires cellular communication, and these panels cannot be registered without it. Therefore, each panel includes a built-in LTE cellular communicator, available in either AT&T or Verizon versions. Be sure to choose the cellular carrier who will have the best signal inside the protected premises.

While many Alarm.com systems support older Honeywell/Resideo wireless sensors, SiX Series sensors from a Lyric panel are incompatible and require replacement. Both Qolsys and 2GIG offer their own encrypted sensor options.

As mentioned above, users often find the Alarm.com user interface (UI) more intuitive than Total Connect 2.0. Additionally, Alarm.com consistently innovates, updates, and adds features that enhance the usability of their platform. Resideo also does this with Total Connect 2.0, but not as regularly. Alarm.com is also highly responsive to customer feedback, demonstrating a commitment to improving the Alarm.com user experience.

Another advantage is that the Alarm.com camera lineup is miles ahead of Resideo's. They offer a dizzying array of both residential and commercial grade cameras. If you're particular about your video options or you're just now looking to add video to your home or business for the first time, then Alarm.com is sure to have the right combination of cameras for you.

Replacing the Lyric with a 2GIG Edge:

2GIG was founded by two former Honeywell employees, so it stands to reason that all 2GIG panels can support legacy Honeywell sensors. Since its founding, 2GIG has expanded on its sensor compatibility and now offers encrypted sensors in their eSeries 345 MHz frequency, as well as long-range encrypted 900 Mhz sensors via the E+ Series.

Panel Hardware Options:

Both the 2GIG Edge With AT&T LTE communicator and the 2GIG Edge With Verizon LTE Communicator feature an LTE cellular communicator, 2.4 GHz WIFI capability, Z-Wave Plus V2 (700 Series), and a vertically adjustable front-facing camera. It is a very solidly built panel with a 7" LCD touchscreen interface. For a complete list of specifications, see the full data sheet.

The 2GIG Edge offers exceptional sensor versatility, supporting legacy Honeywell 5800 Series sensors, legacy 2GIG sensors, and the new encrypted 2GIG eSeries and E+ Series sensors. This comprehensive compatibility allows users to protect virtually any part of their property.

The E+ Series sensors boast a remarkable range of up to 2km, depending on environmental conditions. This impressive range extends protection to previously unreachable areas like barns or outbuildings.

One of the 2GIG Edge's most compelling features is its facial recognition disarming, a capability currently unavailable on the other panels we've discussed. Unlike cloud-based biometrics, the Edge stores all facial recognition data locally, ensuring your personal information remains exclusively on your system.

2GIG Edge Vs. Resideo PROA7PLUS - Feature Comparison

Replacing the Lyric with a Qolsys IQ Panel 4

Similar to the 2GIG Edge, Qolsys offers the IQ Panel 4 which is compatible with legacy Honeywell 5800 Series 345 MHz and 2GIG 345 MHz* sensors. In addition, it supports PowerG 915 MHz sensors. These sensors offer encryption, two-way communication and an impressive transmitting range to rival the 2GIG E+ Series.

*The Qolsys IQ Panel 4 cannot support the 2GIG eSeries 345 MHz sensors.

Panel Hardware Options:

Being an Alarm.com panel, the IQ Panel 4 includes a built-in AT&T or Verizon LTE cellular communicator. Additionally, IQ4 versions support various legacy sensors: Honeywell/2GIG (345 MHz), DSC (433 MHz), or Interlogix/Qolsys (319.5 MHz). Therefore, when selecting an IQ Panel 4, be sure you choose the correct communicator and legacy receiver to replace your Lyric. You can choose either the Qolsys IQ Panel 4, 345 MHz with AT&T & PowerG or the Qolsys IQ Panel 4, 345 MHz with Verizon & PowerG.

In addition to supporting 345 MHz legacy sensors and PowerG long-range wireless sensors, each IQ Panel 4 offers dual-band, 2.4 GHz or 5 GHz WIFI capability, Z-Wave Plus V2 (700 Series), Bluetooth disarm and audio streaming, front-facing camera for optional disarm photos, and a 7" touchscreen interface. Check out the specification sheet for a full list of features.

Using Alarm.com:

Curious about the Alarm.com experience? Alarm Grid provides a demo account for you to explore its user interface. Use the following login credentials to get started at:
www.alarm.com/login:

  • USERNAME: ADCDemo@alarmgrid.com
  • PASSWORD: DemoP@ssw0rd

This demo account is fully loaded, providing a glimpse into features like motorized shades, locks, and water valves with water usage monitoring. The specific features available to you with an activated Alarm.com account will depend on the hardware installed in your unique system.

Be sure to check out the rest of this series on Preparing For the Eventual Lyric End-of-Life. In Part 1, we discuss the considerations when continuing to use the Lyric. In Part 2 we discuss replacing the Lyric with another all-in-one panel, in particular with one of the PRO Series systems. In Part 3 we discuss replacing the Lyric with one of the new Resideo First Alert hybrid panels, the VISTAH3.

Preparing for the Eventual Lyric End-of-Life - Part 3

Tags: , , , , , , , , , , , , ,

Comments


Posted By

If you own a Lyric system and have not already done so, please read this important update regarding AlarmNet360 changes that affect your panel. It may be time for an update!

Although users accustomed to the Lyric's all-in-one style and convenience are unlikely to switch to a hybrid panel, it is still possible. Therefore, in this installment of "Preparing for the Eventual Lyric End-of-Life," we will discuss replacing the Lyric with the new First Alert VISTAH3.

Replacing The Lyric With A Hybrid Panel:

The First Alert VISTAH3 may be a good choice to replace an aging Lyric. Much like the PRO Series panels, the VISTAH3 supports SiX and PROSIX sensors right out of the box. It can also support a variety of wired and wireless devices.

The VISTAH3 is more of a traditional system, like the VISTA-20P. The main control panel is installed in a remote location, away from entry points. Then, either wired or wireless keypads are used to control the system. This is the first panel Resideo has produced that can support wired zones, wireless devices, legacy wireless, ECP zone expansion, and V-PLEX zone expansion. That's every type of expansion the company has ever made.

While the VISTAH3 might seem complex, its programming closely resembles that of the PRO Series panels. When replacing a Lyric system, you may not immediately utilize the new panel's more advanced features. However, it's nice knowing these capabilities are available for future expansion.

Recommended Keypads:

DIY installers of the VISTAH3 should be aware that local programming requires a touchscreen WIFI keypad. This means adding either a PROWIFI (WIFI-only) or a PROWIFIZW (WIFI and Z-Wave Plus) module before connecting a programming keypad.

There are three (3) touchscreen keypads to choose from when using the VISTAH3. The Honeywell Home PROWLTOUCH, the Resideo PROWLTOUCHC, and the First Alert VISTAHTCHWLC. If you'll be purchasing a new touchscreen keypad for use with this panel, we recommend the First Alert model. It is compatible with all versions of the VISTAH3 panel without having to undergo a firmware update.

Before using either the PROWLTOUCH or PROWLTOUCHC with the VISTAH3, a firmware update is required. This update can take up to 30 minutes to download and install. The VISTAH3 panel must be registered and updated first; then, it will automatically push the necessary firmware to the keypad. If you intend to set up and program your system before registration, the First Alert VISTAHTCHWLC is the best keypad for you.

Although touchscreen keypads offer the best functionality and control of both the system and automation devices, it is recommended that you have at least one wired keypad to provide control of the alarm system in the event of a wireless failure.

The First Alert VISTAHLKP and First Alert VISTAHPKP both connect to the panel through the iBus. This new bus technology leverages RS-485 and provides robust flexibility for long wire runs.

RS-485 is not a protocol. Instead, it's a standard that defines the electrical characteristics of drivers and receivers in a serial network. It's been commonly used in manufacturing automation for years due to its relative immunity to electrical noise. It supports long wire runs in noisy environments and multiple devices connected to a single bus.

Support for Legacy Wireless:

The VISTAH3 is compatible with the First Alert VISTAHTKVRWL for legacy wireless zone support. This legacy wireless takeover module works exactly like the PROTAKEOVER module used with the PROA7C and PROA7PLUSC. The biggest difference between the two modules is in their antennas.

The PROTAKEOVER includes a new PRO Series panel backplate with integrated antennas. The original backplate must be replaced for proper module function. Similarly, the VISTAHTKVRWL utilizes two external antennas, installed within the VISTAH3 panel's enclosure, to ensure effective wireless signal reception.

Similar to the PROTAKEOVER, the VISTAHTKVRWL cannot support multiple legacy wireless frequencies simultaneously. That means it cannot support both 5800 Series 345 MHz sensors and 2GIG 345 MHz sensors. If your Lyric panel incorporates both sensor types, a decision will have to be made as to which wireless series to keep and which to replace.

Communicators:

The VISTAH3 features an integrated Ethernet communicator. If a wired Ethernet connection is unavailable, or if you plan to use a WIFI keypad, you'll need to add either the PROWIFI (WIFI-only) or PROWIFIZW (WIFI and Z-Wave Plus) module. For enhanced reliability, consider installing either the PROLTE-A or PROLTE-V2 LTE cellular communicator. However, similar to the PRO Series, the VISTAH3 requires an Ethernet or WIFI connection for firmware updates. Over-the-air updates are not allowed via cellular connection.

Total Connect 2.0:

As with choosing a PRO Series panel as a replacement for the Lyric the First Alert VISTAH3 also comes with the added convenience of supporting Total Connect 2.0 (TC2). Whether you've already been using TC2 with the Lyric, or you want to begin using it with the replacement panel, the VISTAH3 provides you with that opportunity.

TC2 is the remote accessibility platform offered by AlarmNet. AlarmNet is a subsidiary of Resideo. It started life as a means of providing backup communication for alarm systems that relied on telephone lines for a communication path. A savvy burglar could cut the phone lines from outside the building, then make entry, secure in the knowledge that the alarm system was unable to communicate.

AlarmNet changed all that by providing cellular communication capabilities for alarm systems. Those old analog cellular communicators were used only in instances where the primary means of communication, namely the copper phone line, was compromised.

Now, cellular communication is often the primary or the only communication path used. With the addition of IP communication, in the form of an Ethernet or WIFI path alarm users can have the best of both worlds. The speed of IP communication with the reliability of cellular. Total Connect 2.0 leverages these paths to provide remote control, along with real-time remote monitoring and notification capability.

Be sure to check out the rest of this series on Preparing For the Eventual Lyric End-of-Life. In Part 1, we discuss the considerations when continuing to use the Lyric. In Part 2 we discuss replacing the Lyric with another all-in-one panel, in particular with one of the PRO Series systems. In Part 4 we discuss using an Alarm.com compatible system as a replacement.

Preparing for the Eventual Lyric End-of-Life - Part 2

Preparing for the Eventual Lyric End-of-Life - Part 4

Tags: , , , , , , , , , , , , , , , , ,

Comments


Posted By

If you own a Lyric system and have not already done so, please read this important update regarding AlarmNet360 changes that affect your panel. It may be time for an update!

I began with the intention of making a single post about possible replacement options for the Lyric. But the post grew out of control and took on a life of its own! So instead, I'm making a series of posts, one for each suggestion. In Part 2, we'll concentrate on the Resideo PRO Series panels.

The Lyric was discontinued in 2021 and production of all SiX Series sensors has now ended. With that in mind, I've been looking at the various ways forward for current Lyric users. In Part 1 we explored the option of simply continuing to use the Lyric Alarm. In Part 2, we'll discuss replacing the Lyric with a like-panel. In this case, the Resideo PROA7C or PROA7PLUSC.

Feature Comparison FAQs:

Replace the Lyric With Another All-In-One System:

If you choose to replace the Lyric panel, using another all-in-one system is a great idea. The Honeywell Home PROA7, Resideo PROA7C and PROA7PLUSC panels are a natural choice. The PROA7, PROA7C and PROA7PLUSC can support nearly all the same sensors as the Lyric, though there are some exceptions as we discuss in this FAQ.

NOTE: The Honeywell Home PROA7 and the Resideo PROA7C are virtually the same panel with a different manufacturer's badge on the front. The Honeywell Home PROA7PLUS and the Resideo PROA7PLUSC are also virtually the same. In early 2025, Resideo announced they would discontinue the PROA7PLUS and begin only manufacturing the PROA7PLUSC.

Between the two panels, the PROA7PLUSC is the most like the Lyric in terms of features. For example, the Lyric has a front-facing camera as does the PROA7PLUSC. The PROA7C has no camera. The PROA7PLUSC comes with both WIFI and Z-Wave support included, the PROA7C doesn't, though you can add those features. You can see a full feature comparison between the PROA7C and the PROA7PLUSC here.

The PROA7C and PROA7PLUSC both support PROSIX and SiX Series sensors right out of the box. When a SiX Series sensor is added to either of the PRO Series panels the sensor is updated, effectively becoming a PROSIX sensor. Once this upgrade occurs, the SiX Series device cannot be downgraded again. That means it can never work with a Lyric panel after the upgrade takes place.

Another important thing to remember is that every SiX and PROSIX sensor can only be paired to one panel at a time. When replacing a Lyric system with a PRO Series panel, a specific set of steps should be completed, and in the proper order. You can read the steps for replacing a Lyric with a PRO Series panel here.

You'll need to work closely with your alarm dealer to complete a replacement steps linked above as only your alarm dealer can perform certain steps in the list. There is no direct replacement option through AlarmNet360 currently, as there is when going from one Lyric panel to another Lyric panel. You will be reprogramming all your zones when performing this replacement.

As previously mentioned, SiX Series devices are paired with the Lyric panel during programming. To disassociate a sensor for use with another panel, either the individual zone must be deleted while the sensor is powered on and can receive the delete command, or the entire panel must be defaulted with all SiX sensors powered and receptive to the default signal.

In the event of a Lyric panel failure with multiple paired SiX Series devices, sending the delete or default command may become impossible. Consequently, not only would the Lyric panel require replacement, but all paired SiX Sensors would also need to be replaced, as they would be unresponsive to pairing with a new panel. For this reason, it is better to replace the Lyric panel before a failure occurs.

Honeywell 5800 Series Support:

The PROA7C and PROA7PLUSC don't offer native 5800 Series support. To support 5800 Series devices a Honeywell Home PROTAKEOVER module must be added. With a PROTAKEOVER the system can support any one (1) legacy RF frequency from the following:

  • Honeywell 5800 Series - 345 MHz
  • 2GIG Unencrypted Sensors - 345 MHz
  • Qolsys/Interlogix Unencrypted - 319.5 MHz
  • DSC Legacy (not PowerG) - 433 MHz
  • Bosch - 433 MHz

In spite of the fact that several of the above mentioned manufacturers use the same basic frequency for legacy wireless, none of these are interchangeable. That means you can only support 2GIG or Honeywell 5800 Series, not both. We have tested this and this is a definite limitation. Incidentally, the FF345 behaves as a Honeywell 5800 Series device rather than a 2GIG one. The same rule holds true for DSC and Bosch 433 MHz sensors.

Communicators:

A key advantage of Resideo and First Alert panels is their versatile communication options, offering IP, LTE cellular (AT&T or Verizon), or dual-path connectivity. However, it's important to point out that IP-only communication leaves the system vulnerable to network outages. LTE cellular communication is much more reliable, though it is slightly more expensive when choosing a monthly monitoring plan.

Despite the reliability of LTE cellular communication, Alarm Grid still recommends a connection to WIFI. This is due in part to the fact that PRO Series panels can only receive over-the-air firmware updates via WIFI. Updates will not be sent using cellular data. If you have a panel in a location with no WIFI available, you can use your cell phone as a wireless hotspot. The panel will see this as a WIFI connection and should be able to download any available update.

Apple HomeKit Support:

If your Lyric is using Apple HomeKit you will be able to continue using it with the Resideo PROA7PLUSC. Unfortunately, the Resideo PROA7C does not support HomeKit. Also, once you have the PROA7PLUSC configured, you'll need to go through the process of setting up HomeKit with the new PROA7PLUSC from scratch. There is a bit of difference in using the PROA7PLUSC with HomeKit, you can read about that here.

HomeKit is a great way to automate you lifestyle-enhancement devices and integrate them with your alarm system, or vise versa. However, there are limitations to the security and life-safety devices you can monitor with it. For example, Apple HomeKit doesn't provide detailed notifications for fire or carbon monoxide alarms. You can read a comparison between HomeKit and Total Connect 2.0 here. Because of these differences, we still recommend that HomeKit users also use TC2.

Total Connect 2.0:

Switching from the Lyric to a PRO Series panel enables continued or new access to Total Connect 2.0. This remote platform mirrors panel functionality, allowing you to monitor status, arm/disarm, control automation, and program scene-based automation schedules and system event triggers.

Be sure to check out Part 1 and Part 3 in this series on Preparing For the Eventual Lyric End-of-Life. In Part 1, we discuss the considerations when continuing to use the Lyric. In Part 3 we discuss replacing the Lyric with a new VISTAH3 Hybrid panel.

Preparing for the Eventual Lyric End-of-Life - Part 1

Preparing for the Eventual Lyric End-of-Life - Part 3

Tags: , , , , , , , , , , , , , ,

Comments


Posted By

If you must replace a PROA7 or PROA7PLUS* panel, it is important to perform not only the proper steps but in the proper order. Failure to do so may cause some PROSIX sensors to become unresponsive, forcing a replacement of those sensors. In this blog, we'll outline the proper procedure.

As we've often noted, Resideo's SiX Series and PROSIX sensors are uniquely paired to the alarm panel during initial panel and sensor configuration. Once paired, they cannot be used with any other panel until they are properly unpaired from the original. Without this unpairing, a failed original panel can potentially render a sensor unusable.

AlarmNet360 (AN360) acts as an important safeguard. When a PRO Series panel is registered with AN360, it begins near-constant two-way communication. Any programming change at the panel triggers an upload of the panel's configuration to AN360. This creates a backup of the panel's current programming, including the essential configuration information for all PROSIX sensors.

In the event of a PRO Series panel failure, a replacement panel can be configured with the exact same zone and system programming parameters as the original. The sensor information, including wireless channel data and encryption keys, is transferred to the new panel, ensuring it matches the existing sensor programming. By following the proper replacement process, the existing PROSIX sensors function seamlessly, unaware of the panel change.

However, a significant problem arises when DIY users add new PROSIX sensors to the replacement panel before a proper AN360-based panel replacement is performed. We've observed this issue on several occasions. Customers, awaiting a scheduled panel replacement, decide to add new PROSIX sensors in the interim.

Because the panel replacement requires dealer involvement, and in the case of Alarm Grid customers, a scheduled appointment with an Alarm Grid activator, customers often utilize their wait time by tinkering with their system. This can include adding new PROSIX devices.

When the scheduled replacement occurs, customers often overlook the newly added sensors, failing to mention them to the activator. This oversight, due to the unique way PROSIX sensors function, can create a serious conflict.

PROSIX sensors communicate using 2.4 GHz, similar to some WIFI networks. Like WIFI, PROSIX sensors utilize channels within the 2.4 GHz band. If a PRO Series panel detects interference on its current channel, it can instruct all PROSIX sensors to switch to a less congested one. This ensures the most consistent ongoing communication.

During pairing, encryption keys and the designated communication channel are established. All PROSIX devices on a PROA7 or PROA7PLUS panel operate on the same channel. This channel information is regularly backed up to AN360 and transferred to the replacement panel during the swap.

Consequently, AN360 holds a complete backup of the original panel's configuration. However, the new panel now contains configuration information for the recently added sensors, including new encryption keys and a potentially different 2.4 GHz channel.

During the replacement process, the new panel's configuration is overwritten with the backup from the original panel. The information for the newly added PROSIX sensors is lost. Effectively, the new panel becomes the original panel. Unfortunately, the new sensors were paired with the actual new panel, not the restored version.

Consequently, from this point there is no mechanism to instruct the newly added sensors to release or unpair, allowing them to be paired with the restored panel. There is a narrow 24 hour window from the time of enrollment where most PROSIX sensors can be defaulted. If the window for default is missed, and the replacement through AlarmNet360 is completed, the newly added PROSIX sensors become unusable. For that reason, we recommend anyone replacing a PRO Series panel follow these steps.

Recommended Steps, In Order, For Replacing a PROA7 or PROA7PLUS:

  1. Make sure the replacement panel is the same revision, or higher, as the original panel. Work with your alarm dealer to verify the panel versions. It is possible to replace a PROA7 with a PROA7PLUS. It is NOT possible to replace a PROA7PLUS with a PROA7.
    NOTE: Firmware updates require WIFI. If your location doesn't have WIFI you can use a phone as a hotspot. This will be seen as a WIFI connection by the panel and AN360, and should allow you to perform the update. Obviously, this means the panel will need a PROWIFI or PROWIFIZW.
  2. Make sure both panels are powered down.
  3. Your alarm dealer will begin the replacement process in AN360. They will instruct you when to move to the next step.
  4. With both panels still powered down, remove any modules such as PROLTE-A/PROLTE-V2, PROTAKEOVER, PROWIFI/PROWIFIZW from the original panel and install them into the new panel. If you have a PROTAKEOVER, be sure you move the backplate from the old panel to the new panel as well. It contains the antennas for the PROTAKEOVER.
  5. Power up the NEW panel. You can immediately join the WIFI network when prompted, if applicable, or wait for the cellular module to initialize then press NEXT.
  6. Press REGISTER, when prompted. The panel will register then pull all available programming from AN360. When this process is finished, the panel will display the Home screen.
  7. If any PROWLTOUCH or PROWLTOUCHC WIFI keypads are associated with the panel, each will prompt you to "Pair to Panel". Do this at each keypad.
  8. If the original panel was a Version 01 or 02 and there were PROINDMV Motion Viewers associated with it, these will have to be repaired with the new system. Your alarm dealer will give you specific instructions on what to do. The alarm dealer will need to go to each PROINDMV zone within AN360, select EDIT, then select LEARN. At that point they will tell you to activate the Motion Viewer. You can either remove the cover, or remove and replace the batteries. The PROINDMV will then be repaired.
  9. Thoroughly test each component including zones, keypads, keyfobs, communicators, etc. Use the system test mode.
  10. It is now safe to add new PROSIX devices to the panel.
  11. If you're using BlueTooth Disarming, all cell phones will have to be manually paired with the new panel.
  12. If you used Alexa with the original panel, you'll need to set that up manually with the new panel.
  13. All Z-Wave devices that were paired with the original panel will need to be excluded then included with the new panel.
  14. All Total Connect 2.0 scenes will need to be recreated.

Resideo recently announced they would discontinue the Honeywell Home PROA7PLUS and would continue to produce the Resideo PROA7PLUSC. We now use PROA7PLUS and PROA7PLUSC interchangeably.

Tags: , , , , , , , , , , , , , , , ,

Comments


Posted By

If you own a Lyric system and have not already done so, please read this important update regarding AlarmNet360 changes that affect your panel. It may be time for an update!

With the introduction of the PRO Series and VISTAH3 panels, and with SiX Sensors discontinued, the official end-of-life of the Lyric panel will likely soon follow, leaving its users to seek viable upgrade paths. Here, we explore your upgrade options once the inevitable announcement is made.

If you have a Honeywell Lyric Alarm System don't worry. Even though production was discontinued in 2021, you can still use your working system. It will also continue to work with Total Connect 2.0. Discontinuation just means that you can no longer purchase a new Lyric panel. Also, it is likely there will be few, if any firmware updates going forward.

Upon discontinuing an alarm system, Resideo provides five (5) years of over-the-phone support to alarm dealers. Then the system enters the 'Limited Support' phase. During limited support, Resideo only offers documentation to dealers; direct, one-on-one support is no longer available. For the Lyric panel, limited support begins on December 31, 2026. After this date, a Lyric that displays anomalous behavior should be replaced.

Continue To Use The Lyric:

While SiX Sensors are still available for purchase from Alarm Grid, that's only because we still have inventory. As these sensors are no longer in production, they will be discontinued upon stock exhaustion. So, if you rely on a Lyric panel to protect your belongings or your loved ones, getting any necessary replacement sensors is recommended while supplies last.

Fortunately, the Lyric Controller also supports most Honeywell 5800 Series wireless sensors and 2GIG uni-directional, unencrypted 345 MHz sensors. So, these devices can be used to replace existing SiX Series devices that malfunction. Unfortunately, none of these devices support encrypted signaling between the sensor and the panel.

The Lyric cannot support the 2GIG eSeries encrypted sensors, nor can it support Honeywell bi-directional devices like the 5800WAVE, 5828, or the 5800RL. Any Honeywell 5800 Series device that requires a House ID to communicate with the system is not supported by the Lyric.

There is also the option of using a wired to wireless converter module. For users accustomed to the ease associated with using wireless sensors, the thought of using wired sensors may seem daunting. But depending on the layout, installing a Honeywell 5800C2W or a 2GIG TAKE-345 wired to wireless converter may be a good solution. Particularly if you need to install several closely grouped sensors.

A wired to wireless converter module functions by converting signals from traditional wired sensors into wireless transmissions. This enables the alarm panel to receive status updates from wired sensors, such as door openings or motion detection. The Honeywell 5800C2W supports up to nine (9) wired inputs, while the 2GIG TAKE-345 accommodates up to eight (8).

Consider a scenario involving a room addition or patio to sun room conversion. In such cases, wiring sensors in the new area to a wired to wireless converter module offers a simple method for integrating these zones into your existing Lyric system. This option simplifies the expansion of your security system without the need for a complete overhaul.

Another major consideration when thinking about replacing a Lyric System is the use of Apple HomeKit. The Lyric was the first, and for a long time the only, professionally installed system to support HomeKit. If you're using HomeKit, or if you plan to begin using it, then sticking with the Lyric may be your best bet.

There are now other panels that support Apple HomeKit, including the PROA7PLUSC from Resideo. The functionality between the Lyric and the PRO Series panels is a little different as outlined in this blog post. You can see how to configure HomeKit on a PROA7PLUS or PROA7PLUSC in this FAQ.

Be sure to check out the rest of our series on Preparing For the Eventual Lyric End-of-Life. In Part 2 of the series, we discuss the considerations when replacing a Lyric with another Resideo all-in-one panel the Resideo PROA7C, Honeywell Home PROA7, or Resideo PROA7PLUSC. In Part 3 we cover replacing the Lyric with a new First Alert VISTAH3 hybrid panel, and in Part 4, we consider moving from Resideo to an Alarm.com capable panel.

Preparing For the Eventual Lyric End-of-Life - Part 2

Tags: , , , , , , , , , , , , , , , , ,

Comments