A Nationwide AT&T Outage Is Affecting Alarm Communication
Posted By Julia RossUPDATE 3:00 PM EST 02/22/24:
The nationwide AT&T outage has been resolved and all affected users, including alarm communicators, have been restored to normal operation. AT&T is still investigating the cause of the outage, and no concrete information is yet available. If a forensic analysis is made public, we will comment on it in a separate post.
Both AlarmNet and Alarm.com show that service for customers with AT&T communicators has been fully restored. If you have an AT&T communicator that still seems to be offline, attempt to power cycle the device.
Always put a monitored system on test with the monitoring station before performing any kind of maintenance.
For most stand-alone communicators, you can do this by unplugging the battery and the primary power supply, waiting about 30 seconds, and then powering back on by plugging the battery, and then the power supply back in. If your communicator gets its power from a VISTA alarm panel, like the LTEM-XA, then power cycle the entire system. Power down by unplugging the panel's battery and transformer. Power up by plugging in the transformer first, and then the battery.
For older All-in-One systems, like the LynxTouch panels, you'll need to power cycle the entire system. Do this by opening the panel and unplugging the battery, then unplugging the transformer. When powering back up, plug the battery in first, then the transformer.
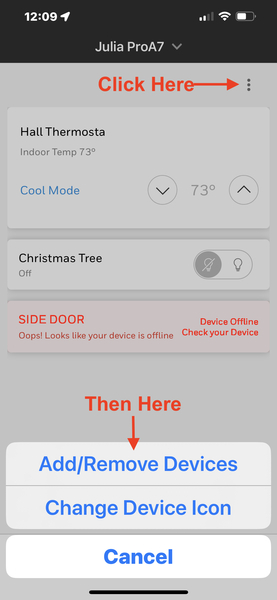
The PROA7 and PROA7PLUS panels have a reboot option through the Tools Menu. From the Home Screen, tap Menu (≡) > scroll down, tap Tools > Enter Installer Code (4112 by default) > scroll down and tap Reboot.
If you have a Qolsys touchscreen system, be sure to go through the panel's menu to reboot, rather than removing the battery and DC power. Not following the proper power-down or reboot procedure can damage the panel. Tap the gray bar at the top of the screen, then tap Settings > Advanced Settings > Enter Installer or Dealer Code (1111 or 2222 respectively, by default) > Panel Reboot (↻).
ORIGINAL POST:
A nationwide outage, beginning this morning at approximately 3:30 AM, is affecting both mobile phones and alarm communicators. The outage seems to be limited to AT&T, though there were early reports of issues with T-Mobile also. According to T-Mobile, their service is working normally now.
AlarmNet has posted this notice on the AlarmNet360 page:

Alarm.com has posted this notice:

It is important to note that this is a carrier outage, not an AlarmNet, Total Connect 2.0, or Alarm.com outage, meaning this is not something Resideo or Alarm.com can resolve. As new information becomes available, we will update it here. As an AT&T Subscriber in the Louisville, KY area, I can report that I have no cellular service at this time. AT&T recommends that their wireless users take advantage of WIFI calling wherever possible, until this issue is resolved.
This outage does potentially affect your ability to remotely control your system, to receive notifications from your system, and your system's ability to report alarm and other signals to a central station, but only if you have an AT&T communicator tied to the system or have an AT&T Mobile Device and no access to WIFI. To our knowledge, Verizon communicators are unaffected.
If your system reports a trouble condition related to the cellular outage, you can silence any audible alert by acknowledging the trouble condition. For users with touchscreen panels, this will usually involve touching the notification message and then acknowledging it on the next screen.
For VISTA users, a disarm command should be entered. This is accomplished by entering a valid 4-digit user code, and then pressing the 1 or OFF key. Once the outage has been restored, you will need to perform a disarm command again to clear the trouble condition from the display.
Most wired DSC panels indicate a trouble condition by displaying a triangle with an exclamation point inside. Pressing [*] [2] and then viewing the number or numbers displayed will explain what the condition is. A four usually (4) indicates a Comm Failure. You can see information about how to view DSC trouble conditions here. DSC Impassa users can see the Install Guide here. Information about trouble codes is on page 72. You can see a DSC PowerSeries troubleshooting guide here.


 Resideo completed the purchase of First Alert in 2022 and is now beginning to roll out products using the First Alert name. So far, we've seen the