At first glance, setting up your own alarm system might seem like a task best left to a professional. But in reality, it's actually something you can do on your own with a small bit of guidance. Putting a home alarm system together is actually very easy with some basic knowledge. You will only need to know the basic components of the system. Then follow some simple steps to get everything ready. If you are adept at using tools, then you can choose to make the process more hands-on. Likewise, you don't know your way around a toolbox, there's a simple setup for you too. The possibilities are completely open when you're starting from scratch. Or you might already have some components and you want to integrate them into your setup. Either way, this guide will help you get your alarm system up and running.

Understanding an Alarm System
An alarm system consists of many components. Each component serves a different purpose. You should first understand component before you rush out and start buying equipment. This will help you to better understand the workings of an alarm system. A simple way to think about this is to break every component into one of four categories. These are:
We'll go through each component and tell you what you should (and shouldn't) get for your alarm system.
The Panel
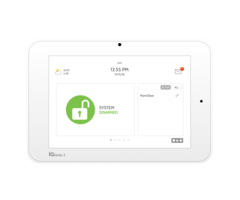
The panel serves as the central hub for a home alarm system. It goes by many names (control panel, security system, controller, etc.) But we'll refer to it as the panel. The panel represents the brains of the an alarm system. It is the device that receives signals from the other components of the setup. The panel can also tell other devices how to act or respond. But most importantly, the panel is what sends any outbound messages. If the system needs to alert you or the central station, the panel will send the signal. With that in mind, a good panel makes for a good alarm setup.
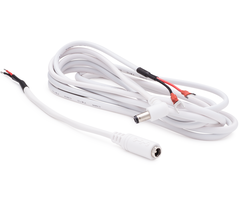
All panels are not built equal. Some come with more functions and features than others. A panel with more features will need fewer add-ons and save you money (more on that later). Also, some panels are easier for end users to set up and configure. As a general rule, wireless panels are easier to work with than wired panels. A wireless panel is an all-in-one panel that includes its own touchscreen display. These panels come with many built-in add-ons, preventing the need for users to buy more later. They are often easier to set up, and using a simple desk mount is an option. You may also need to buy a separate cable for a wireless panel, such as the Honeywell LT-Cable.
That said, some users choose to go with a wired panel. This might be because they inherited the panel or they want more control over the setup. Wired panels can make for a great foundation to a home alarm system. But they are usually more difficult to work with, and they are not as forgiving as wireless panels. You will need various tools to install a wired panel, and the panel will need a greater number of add-ons. But don't let that deter you. A great alarm system is possible with a hardwired panel. But if you're looking for the easiest route possible, choose a wireless panel instead.
 Assuming that you choose a wireless panel, there are a few things to look for. You should choose a modern, new panel that will receive support and updates well into the future. It's wise to select a panel with many built-in add-ons so that you don't have to add more later. Also make sure you choose a panel with an appearance that you like. After all, the panel will be a mainstay in your home for many years to come. It doesn't make sense to buy a panel with a design that you aren't fond of! Some great panels for new users to choose from include:
Sensors
If panel is the brains of the alarm system, then the sensors are what it controls. These are the security and life-safety devices that are vital to any proper home alarm system. A sensor is what the panel uses to recognize that something is wrong. When choosing a sensor, you must always make sure that it is compatible with your panel. Our support team is happy to help you answer any questions for sensor compatibility.

There are two main categories of sensors for security systems. These are wireless sensors and wired sensors. As the name implies, wireless sensors communicate with a panel wirelessly. This prevents the need for running a wire from the sensor to the panel or to a converter. The wireless sensors today are both reliable and easy to use. Some modern wireless sensors even use built-in encryption. This prevents others from hacking over or spoofing the sensor. Generally, wireless sensors are the preferred option. for anyone wants an easier time setting up their alarm system. But remember, wireless sensors will need battery replacements. The typical battery life for a wireless sensor is three to five years.
But there are cases when choosing wired sensors makes sense. Some users might already have some wired sensors that they want to use with their system. Other users might have a wired panel for easy integration with wired sensors. And some users might not want to deal with battery replacements for sensors. Wired sensors can work great in these situations. But the downside with wired sensors is that they are more difficult to install. Each sensor will need to have a wire run to the panel. Also, wireless panels will need a wired to wireless converter to work with wired sensors.
The other major way to divide sensors is by type. Of course, you most likely won't need every type of sensor for your alarm setup. Instead, you can pick and choose which sensors are most important for your system. The following are some of the types of sensors that you will come across:
-
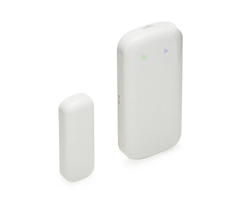
Door and Window Contacts: These devices let the system know about an opened door or window. They are some of the most important sensors in a security system. The two types of these devices are surface-mount contacts and recessed contacts. Surface-mount contacts are easier to install, but they are visible on the door or window. Recessed contacts will mandate some drilling, but they are not visible once installed.
-
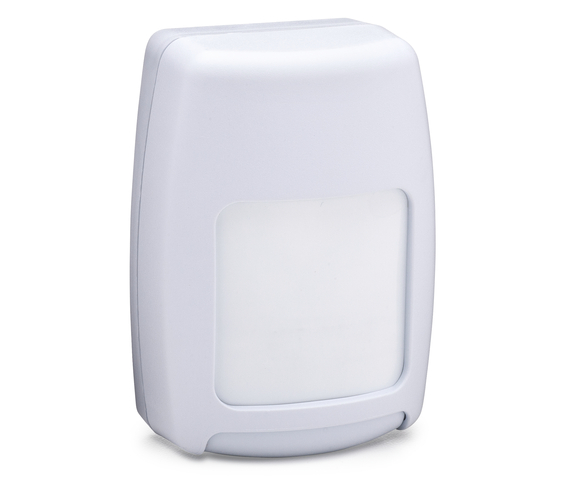
Motion Sensors: These sensors respond to the presence of motion. They are great for detecting intruders inside your home or on your property. Most motion sensors use one of two detection methods. These are passive infrared (PIR) and both PIR and microwave detection (dual-tec). Motion sensors are either designed for indoor use or outdoor use. The scope and range of motion sensors also varies between different devices. There even motion sensors that are pet-immune, making them great for homes with pets.
-
Glass Break Sensors: Glass break sensors respond to the sound of breaking glass. These devices will only activate if two distinct sounds occur at the same time. These are the "thud" of an object striking glass and the actual shattering of glass. Glass break sensors are great for monitoring windows. They can also oversee glass casings inside the home.
-
Shock Sensors: Shock sensors rest on the surface of a glass window or casing. These sensors will activate if they detect the shockwaves of breaking glass. These devices are great alternatives to sound-based glass break sensors.
-
Panic Buttons: A panic button is a button to press in the event of an emergency. Once activated, a panic button tells the system to perform a predetermined response. For example, some panic buttons will request medical dispatch. But others will request police dispatch. The type of response depends on the system programming settings of the device.
-
KeyFobs: A keyfob is a wireless device that allows a user to control their alarm system with ease. With the press of a button, a keyfob can arm or disarm the system, send a distress signal and more.
-
Sirens and Strobes: Sirens and strobes are devices used to alert others in case of an alarm. They produce loud alarms and/or flashing lights. They are great for warning others about present danger. These devices can also scare intruders off your property.
-
Smoke and Heat Sensors: A type of life-safety device, these sensors detect the presence of fire. If a fire is present, these devices will alert everyone in the building so they can evacuate. Some of these sensors only include standalone smoke or heat detection. But other devices include both smoke and heat sensing for extra protection.
-
Carbon Monoxide Sensors: These devices respond to the presence of carbon monoxide. This is an odorless and tasteless gas that is lethal if breathed in. These devices will alert everyone in the building so that they can escape in time. These life-saving devices are essential for any building.
-
Flood Sensors: Flood sensors are a type of environmental sensor. They alert a system about possible flooding. Upon detecting water, a flood sensor will send a signal to the panel to alert the system of the situation.
-
Temperature Sensors: Temperature sensors are a type of environmental sensor. They alert a system about the presence of extreme temperatures. These sensors are great for alerting a user to very low temperatures that may cause the pipes to freeze. They can also notify the user about very high temperatures caused by a broken AC unit.
Add-Ons
Add-ons are devices used to increase the functionality of an alarm system. In most cases, wired panels will warrant a greater number of add-ons than wireless panels. This is because wireless often come pre-included with more capabilities than wired panels. For wired panels, it isn't uncommon for a user to apply every type of add-on to their system. Meanwhile, wireless panels usually have many add-ons already built-in and included. But to get the most out of your system, you may need to first buy one or more add-ons.
Here are some of the add-ons you may encounter when setting up your security system:
-
Communicators: Communicators allow a system to send outbound signals. This is necessary for communicating with a central monitoring station. It also allows for connection to an interactive service, such as Total Connect or Alarm.com. The two main types of communicators are IP communicators and cellular communicators. Dual-path communicators also exist. Almost every wired panel will need some type of communicator installed. Most wireless panels come pre-included with an IP communicator. But many users also add a cellular communicator to their wireless panel. This will provide them with a dual-path communication setup.
-
Wired to Wireless Converters: Wired to wireless converters are very useful. They allow wired sensors to function with wireless panels. This works by connecting a wired sensor to the converter. The converter will then send a wireless signal to the panel. This will allow the wired sensor to communicate with the wireless panel. These converters are great for upgrading from a wired panel, without replacing sensors.
-
Wireless Repeaters: Wireless repeaters can extend the range of wireless sensors. When a wireless sensor sends off a signal, the wireless repeater will pick it up. The repeater will then send out the signal a second time, thus "repeating" this signal. This doubles the range of the sensor. By using a repeater, you will have greater freedom in deciding sensor location. Some examples of wireless repeaters include the Honeywell 5800RP and the 2GIG RPTR1-345.
-
Keypads: A keypad enables a user to control their security panel. Most wireless panels are "all-in-one" and include a built-in touchscreen keypad. But for wired panels, an external keypad is mandatory. Still, many users will add a keypad to their wireless panel anyway. This provides them with a second point of access to their panel. In some cases, a keypad will offer the complete functionality of the actual panel. That said, other keypads offer limited usability, such as arming and disarming only.
-
Wireless Receivers: Wireless receivers allow panels to communicate with wireless sensors. Most wireless panels come with a built-in wireless receiver. But wired panels will need a separate device. A wireless receiver can come in the form of a standalone device, such as the Honeywell 5881ENH. A wireless receiver can also double as a keypad, like the Honeywell 6160RF.
-
Hardwired Zone Expanders: Hardwired zone expanders are only used by wired panels. These devices increase the number of hardwired zones on the panel. This is necessary for using a large number of wired sensors with a security system. Please note that each panel is still limited by the total number of zones it can support. An example of a hardwired zone expander is the Honeywell 4219.
-
Z-Wave Controllers &Devices: Z-Wave control is a great addition to any system. With a Z-Wave controller added, a panel can operate Z-Wave devices. A user can control Z-Wave devices in one of two ways. These include using the panel itself or with an interactive service like Alarm.com. It is also possible to operate these devices remotely using a mobile app on your smartphone. Some common Z-Wave devices include Z-Wave lights, Z-Wave door locks, Z-Wave thermostats and garage door openers. A monitoring plan that includes Z-Wave control is necessary for doing this.
-
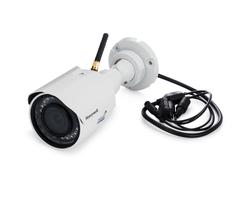
Security Cameras: Security cameras are a great addition to any home security system. These devices provide video monitoring for your property. In the event of a burglary, a security camera can make all the difference in catching the culprits later. Security cameras also provide peace of mind for end users. Recording all activity on one's property can help make a person feel more comfortable. A user can view the live feed for a security camera from an interactive service, such as Total Connect or Alarm.com. Remember, the alarm monitoring plan must include video surveillance to use security cameras.

The Monitoring Plan
Okay, this isn't an actual physical component of an alarm system. But the monitoring plan is still very important. This plan determines what type of protection your home will receive. It also determines how much your will pay in alarm monitoring costs. Of course, extra services will cost more money. At the very least, a monitoring plan should have some way of alerting you or a central station about an alarm event. Every other feature is an add-on to the monitoring plan. We recommend checking out various monitoring plans before making a decision. This way, you will know if the plan you've selected is a good deal. You should only sign-up for a plan that includes what you need. There is no use in signing-up for a plan that includes bonus features that you will never even use.
It is common to divide alarm monitoring plans into one of two types. These are central station plans and self-monitored plans. Central station plans have the alarm system connect with a monitoring station. If an alarm event occurs, a central station will receive a signal from the panel. The station can then dispatch the appropriate authorities or personnel on their own. A self-plan does not connect the system to a central station. Instead, all alarm events will pass through an interactive service, like Total Connect. The interactive service will then send an alert to the user via text and/or email. It is then up to the end user to contact any needed authorities. It is also possible to have a central station plan where the end user also receives text and/or email alerts.
Some common add-ons for a monitoring plan include:
-
Central Station: This will allow the system to connect with a central station. A central station can contact the authorities in case of an alarm event. A central station plan is often needed for receiving any sort of discount in one's home insurance. If a user does not receive central station monitoring, then they have a self-plan. In that case, the user must contact the authorities on their own.
-
Cellular Monitoring: This allows for a cellular communicator to control an alarm system. Cellular communication is the most reliable communication path available for a security system. This is because cellular signals are readily available and rarely down. Even a power outage will not disrupt cellular service. If a cell communicator is not used, then the system must use a less reliable communication path. The monitoring company will cover any applicable cellular service fees. That is why cellular monitoring costs extra.
-
Interactive Service: This allows a user to access an interactive service. Some interactive services for alarm systems include Total Connect and Alarm.com. These services allow a user to remotely arm and disarm their system. They also allow users to check the current status of their security sensors at any time. These services are necessary for getting the most out of an alarm system.
-
Remote Z-Wave Control: This is necessary for using Z-Wave devices with your system. Remote Z-Wave control allows you to operate Z-Wave devices using an interactive service. Both Total Connect and Alarm.com offer their own mobile apps. These apps allow users to operate their Z-Wave devices from almost anywhere. That way, you can operate your Z-Wave devices from across the house or across the world.
-
Video Surveillance: This is what allows users to add security cameras to their system. A user can view their security cameras through their interactive service. This way, they can get a live look at their property from anywhere in the world.
It's also worth mentioning that it is possible to use an alarm system without a monitoring plan. But this will make its functionality almost non-existent. In this case, the alarm system will only serve as a local sounder, and nothing more. The system will have no way of contacting you or a central monitoring station. Remote Z-Wave control will be impossible. Finally, you will have no way of viewing any security cameras. This is not recommended, because it will leave your home unprotected in every sense.

Get What You Need
Now that you know the ins and outs of a security system, you can get everything that you need. We understand that it can be tricky to remember everything. That is why we prepared a list of questions and recommendations to help you along the way:
- What kind of panel will you use? Do you want a wireless panel or a wired panel? Most users find that wireless panels are easier to get started with. Is there a security package that has everything you need? Do you need a desk mount for your panel? Do you need a cable, such as a Honeywell LT-Cable?
- What kind of sensors do you need? Do you want wireless sensors or hardwired sensors? Remember, wireless sensors are easier to program.
-
Do you only want a basic setup? Or do you want a more advanced security setup? Every setup should at least have door and window contacts and life-safety devices. A more complex setup might have with motion sensors, glass break sensors, keyfobs and more. Consider the type of protection you need and plan accordingly. Make sure to only choose sensors that are compatible with your security system.
- What extra features do you want? Do you want Z-Wave devices? What about security cameras? Do you want a secondary keypad for controlling your system?
- What add-ons will you need to make all this possible? Do you need a separate cellular communicator? Do you need a Z-Wave controller? If you have a wired system, you will most likely need a keypad and a wireless receiver. Make sure to get every needed add-on so that your system works as it should.
- What type of monitoring plan will you need? Do you want access to an interactive service? Do you need cellular monitoring, or is IP monitoring okay? Do you need video surveillance?
- Is everything within budget? Can you afford your home security setup?
Set it All Up
Once you have all your equipment, it's time to get your system set up. Start by getting your panel up an running. Many wireless panels can rest on a table with simple desk mount. This prevents the need for any drilling or difficult installations. If you do decide to wall-mount your panel, there are tutorials available online to help you. Install any necessary add-ons before powering your panel on. These include any communicators, Z-Wave controllers and hardwired zone expanders. We offer many videos and FAQs to assist you with installing these add-ons. Make sure to write down the MAC and CRC codes if you are installing a communicator. When powering your panel on, plug-in the transformer before connecting the backup battery.
After you have powered on your panel, you can then start preparing your sensors. Again, this is much easier if you are using wireless sensors. You can install most wireless sensors with double-sided sticky tape. This makes the installation process tool-free and very easy. We also offer several videos and FAQs to help you install your sensors. Make sure that the is within the range of the panel or the wireless receiver before mounting. You will also need to program every sensor to your panel. You can learn in most wireless sensors with the panel automatically. Again, we have a multitude of videos and FAQs to assist you. Try and make sure that every sensor is set up and programmed with your panel. This will make the activation process easier for your alarm technician. You can test these sensors even if your monitoring service is not yet active.
At this point, you can proceed forward with the activation. Your monitoring company will usually have you scheduled in an activation slot beforehand. This is the official activation of your monitoring service. Your alarm company will also register any communicators set up with your panel. We recommend having as much as possible ready with your alarm system. This will make the activation process as easy as possible. If you have any questions, you alarm technician can answer them for you during this time. Your alarm technician may run some tests to make sure that your system is working as it should. You must also set up the interactive service for your system, if applicable. You will receive an email with instructions to help you set up this service. You will need this service to test any Z-Wave devices and security cameras.
There's one last thing if your plan includes central station monitoring. This is setting a false alarm passcode and a duress code. If you receive a call from the central station, you may have to provide one of these codes. The false alarm code is a password for you to tell the central station that everything is alright. If you say this passcode, the central station will know not to send out any authorities to your home. The duress code is a way for you to tell the central station that you need help right away. If you say your duress code at anytime, the operate will hang up. They will then immediately send out the authorities to your home. This is very useful in certain emergency situations. Remember, only say your duress code if it is a real serious emergency.
Enjoy Your System!
And that's it! You have set up your very own home alarm system. If you ever have any questions, you can check out our videos and FAQs for more information. Alarm Grid also offers further help for monitored customers. Our customers can contact our expert technicians online or over the phone at any time. Whether you need to change your monitoring plan or adjust a sensor, we're happy to help. Enjoy your new alarm system and the peace of mind that comes with it!