Holiday Buying Guide 2019 - Qolsys IQ Panel 2 Plus
Posted By Michael GorisIt's less than two weeks until Christmas, and time is running out to get presents! If you're looking for a new alarm system, then you might strongly consider the Qolsys IQ Panel 2 Plus. This guide will help whether you are looking at a new IQ Panel 2 Plus or adding upon an existing system.

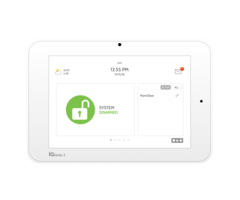
The Qolsys IQ Panel 2 Plus is undoubtedly one of the top security systems available as of now. In fact, we recently rated it as our top security system of 2019. The IQ Panel 2 Plus is the masterpiece creation of Qolsys, a company that will celebrate their 10th year anniversary in 2020. Despite being relatively new to the game, the company still managed to put out a beautiful, state-of-the-art alarm panel that is perfect for everyone from DIYers to large businesses.
The laundry list of features offered from the Qolsys IQ Panel 2 Plus is mind-boggling. This sleek and modern security panel offers 128 wireless zones, integrated WIFI, a built-in LTE cellular communicator (AT&T or Verizon), an integrated Z-Wave Plus controller, automatic Bluetooth disarming, a built-in 5 MP camera for automatic disarm photos when enabled, partitioning support for up to four (4) partitions, live-streaming for compatible Alarm.com Cameras, an integrated glass break sensor, touchscreen controls, one-touch panic buttons, and so much more.
Building a Qolsys IQ Panel 2 Plus from Scratch
 If you are considering a new Qolsys IQ Panel 2 Plus System, then the one big thing you will want to keep in mind is that there are three (3) different versions of the system. This refers to which legacy daughtercard is installed inside the panel. The legacy daughtercard determines which wireless frequency is supported by the system for using wireless sensors. Each of these three legacy frequencies supports a large wireless sensor lineup. If you are just starting out, then you can consider them equal on all counts. We recommend going with the 319.5 MHz version for the sole reason that it is the least expensive. The only real reason to choose the 345 MHz version or the 433 MHz version is if you have existing wireless sensors that you are hoping to use with the IQ2.
One other important thing to note is that you are not restricted to only using the legacy frequency of wireless sensors with your system. Every version of the Qolsys IQ Panel 2 Plus can also support wireless PowerG Sensors. This is true whether you are using the 319.5 MHz version, the 345 MHz version, or the 433 MHz version. PowerG Sensors are known for their incredible wireless range and extremely secure communication. The sensors can communicate from up to 2,000 feet away from the IQ Panel 2 Plus when used with a direct line of sight. Every signal is sent using military grade 128-bit AES encryption for maximum security. We believe that the PowerG Sensors are the best security sensors for the Qolsys IQ Panel 2 Plus, even with the legacy frequency support.
Once you have determined whether you want the 319.5 MHz version, the 345 MHz version, or the 433 MHz version, you must also determine which cellular service provider you will use with the system. Every version of the Qolsys IQ Panel 2 Plus includes a built-in cellular communicator. You can choose between AT&T LTE and Verizon LTE service. We recommend going with whichever service works best in your area. Please note that any monitoring expenses will be the same whether you use the AT&T version or the Verizon version. This is because cellular service expenses are covered by your alarm monitoring company as part of your alarm monitoring plan. Because of requirements mandated by Alarm.com you must activate the cellular communicator inside your Qolsys IQ Panel 2 Plus System for monitoring service. This means that you will need an alarm monitoring plan that includes cellular service, such as an Alarm Grid Gold Plan. You can learn all about the monitoring plans offered from Alarm Grid on our alarm monitoring page.
When buying a new Qolsys IQ Panel 2 Plus System, it is recommended that you get one of the pre-configured system kits from Alarm Grid. These kits include everything you need to get started with a new Qolsys IQ Panel 2 Plus. Assuming you go with the 319.5 MHz version (the least expensive), you can choose from a total of eight (8) kits. You will need to decide whether you want a system with AT&T LTE or Verizon LTE, and you will need to decide whether you want the kit to include encrypted PowerG Sensors or non-encrypted 319.5 MHz sensors. You must also choose whether you want a 3-1 kit or a 10-1 kit. A 3-1 kit will have three (3) door/window contacts and one (1) motion sensor, while a 10-1 kit will have ten (10) door/window contacts and one (1) motion sensor.
These eight (8) kits are listed below:
- Qolsys IQ Panel 2 Plus AT&T 3-1 Kit w/ 319.5 MHz Sensors
- Qolsys IQ Panel 2 Plus AT&T 10-1 Kit w/ 319.5 MHz Sensors
- Qolsys IQ Panel 2 Plus Verizon 3-1 Kit w/ 319.5 MHz Sensors
- Qolsys IQ Panel 2 Plus Verizon 10-1 Kit w/ 319.5 MHz Sensors
- Qolsys IQ Panel 2 Plus AT&T 3-1 Kit w/ PowerG Sensors
- Qolsys IQ Panel 2 Plus AT&T 10-1 Kit w/ PowerG Sensors
- Qolsys IQ Panel 2 Plus Verizon 3-1 Kit w/ PowerG Sensors
- Qolsys IQ Panel 2 Plus Verizon 10-1 Kit w/ PowerG Sensors
Additionally, you are welcome to check out our entire list of Qolsys Security System Kits if you are looking for a kit with a 345 MHz or 433 MHz IQ Panel 2 Plus System.
Sensors for New and Existing IQ Panel 2 Plus Systems

When shopping for sensors for an IQ Panel 2 Plus, you must consider two factors. The first is which version of the system is it (319.5 MHz, 345 MHz, and 433 MHz). The second is whether or not the system is an actual IQ Panel 2 Plus, or if it is an original IQ Panel 2 System. By answering that first question, you can determine which type of legacy sensor frequency you can use with the system. Of course, this is a non-issue if you are using exclusively PowerG Sensors.
Having to consider whether or not an IQ Panel 2 Plus System is actually an IQ Panel 2 Plus might seem silly at first. But the thing is that the IQ Panel 2 Plus looks exactly the same as an original IQ Panel 2 System. If you are buying sensors for someone else, then you might not know whether or not the system is a Plus model or an original Non-Plus model. This is important to determine, as only the IQ Panel 2 Plus can support PowerG Sensors. There is no way to use PowerG Sensors with an original IQ Panel 2 System. If you are wanting to surprise a friend or family member with some new sensors, then it may be important to ask whether the system they are using is a Qolsys IQ Panel 2 Plus or an original Qolsys IQ Panel 2. If the system is an original Non-Plus IQ Panel 2, then the only sensors it can support are the 319.5 MHz sensors from Qolsys and Interlogix. This includes the Qolsys S-Line Sensors, which use rolling code encryption.
 For the purpose of this blog post, we will assume that the system is a Qolsys IQ Panel 2 Plus, and that you are looking for PowerG Sensors. Remember, PowerG Sensors will offer the best range and the strongest wireless security. If you are considering other wireless sensors for a Qolsys IQ Panel 2 or IQ Panel 2 Plus, then we recommend emailing support@alarmgrid.com for further help. We have 319.5 MHz, 345 MHz, and 433 MHz sensors on our website, and we are happy to help you find them. As a reference, 319.5 MHz generally refers to legacy Qolsys and Interlogix Sensors, 345 MHz generally refers to legacy Honeywell and 2GIG Sensors, and 433 MHz generally refers to legacy DSC Sensors.
The PowerG Sensor lineup is quite robust, and there are plenty of sensor types to choose from. We will not cover every PowerG Sensor here. But we will cover some of the basic ones, as well as some of the more interesting ones that can really open up new possibilities for using your Qolsys IQ Panel 2 Plus System. Keep in mind this list is not exhaustive, and there are plenty of other PowerG Sensors out there beyond what we have listed here.
- DSC PG9303 - Door/Window Contact
- DSC PG9312 - Outdoor Door/Window Contact
- DSC PG9914 - Motion Sensor
- DSC PG9920 - PowerG Repeater
- DSC PG9934P - Image Sensor
- DSC PG9944 - Outdoor Image Sensor
- DSC PG9994 - Outdoor Motion Sensor
Accessories for Your Qolsys IQ Panel 2 Plus

Now that we have covered sensors you might use with your Qolsys IQ Panel 2 Plus System, you might also want to look into some accessories. Alarm.com Security Cameras are an excellent option if you are willing to get an alarm monitoring plan that includes video surveillance, such as an Alarm Grid Platinum Level Plan. The Qolsys is unique in that it can actually live-stream certain Alarm.com Security Cameras right from the panel itself. You will also be able to view the live feed for these camera from pretty much anywhere using the Alarm.com Mobile App on an Android or iOS device. There are a bunch of Alarm.com Cameras to choose from, but right now we really like the Alarm.com ADC-V523 for indoor use, and the Alarm.com ADC-V723 for outdoor use.
You will also likely want to take advantage of the system's built-in Z-Wave Plus controller. This will allow you to use a variety of Z-Wave Plus devices, including smart lights, door locks, and thermostats. You can also use classic Z-Wave devices with the system, but you should use Z-Wave Plus devices to maximize the range and battery life. And keep in mind that you can create special smart scenes using Alarm.com to have your Z-Wave devices activate automatically based on a schedule or with certain system events. There are so many Z-Wave devices to choose from, but here are some of our favorites for use with an IQ Panel 2 Plus:
- GE 14318 In-Wall Switch
- GE 14294 In-Wall Dimmer
- GE 12723 In-Wall 3-Way Switch
- GE 28170 Plug-In Smart Dimmer
- August Smart Lock Pro Deadbolt
- Kwikset Obsidian Deadbolt
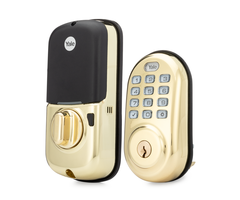
- Yale YRD226 Deadbolt
- Alarm.com ADC-T3000 Thermostat
- Alarm.com ADC-SWV100 Water Valve
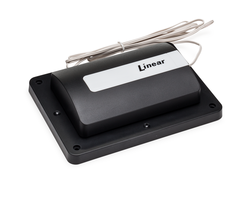
We are also sure that many IQ Panel 2 Plus users will want to set their system up for garage door control. Luckily, there is a great Z-Wave device for the job. The Linear GD00Z speaks Z-Wave, and it can easily enroll with your Qolsys IQ Panel 2 Plus System. The module also comes with its own tilt sensor for identifying when the garage door is opened or closed. And as a Z-Wave device, you will be able to include it into your smart scenes as well!
 There are other miscellaneous accessories you might also want to use with the Qolsys IQ Panel 2 Plus. If you want an external keypad, then the Qolsys IQ Remote is far and away the best option. This is a powerful touchscreen keypad that can do pretty much everything that the panel itself is capable of accomplishing. This is fantastic if you want to have an additional designated location for controlling your system in your home or business. The remote conveniently pairs across WIFI or an Access Point (AP), making it super easy to complete the integration. It even features a built-in camera for disarm photos, just like the main panel!
We also want to mention that while the IQ Panel 2 does come included with a desk stand for resting the system on a desk or table, you also have the option of getting the sturdier Qolsys IQ Stand, which will certainly keep your system upright. This is perfect if you have no intention of mounting your panel to the wall.
 That concludes our Qolsys IQ Panel 2 Plus buying guide! If you have any questions about the system or our monitoring service, please reach out to us. We listed our email earlier in this post, but if you need it again, it's support@alarmgrid.com. You are also welcome to call us at (888) 818-7728 during our normal business hours. We are here from 9am to 8pm ET M-F. Our team is looking forward to working with you and helping you find the perfect security system for your needs.

 If you want to start from the beginning, you can find Part 1 of this series

 For new users starting from scratch, the best option is typically to buy a complete
 Whether you love it or hate it, you likely know what winter brings for most of the country. There will likely be some cold weather and snow. The holiday season will also be happening soon, and presents will be sent out. Although Alarm Grid doesn't have anything to help you shovel your driveway or defrost your car windshield, we do have some important accessories that will help ensure that your winter season is a good one.

 Amazon is going to be busier than ever this holiday season delivering packages across the country. With packages being delivered faster than ever, package thieves are becoming a serious concern. Stolen presents won't lead to a merry holiday season, especially if you don't have any evidence of the crime. This is why you should definitely install a doorbell camera.

