Honeywell Lyric Alarm System Posts

Posted By

If you have a Honeywell System with access to Total Connect 2.0, then you will probably want to set up some TC2 notifications. These are used for sending you text and email alerts regarding activity on your alarm system. You will have no trouble setting them up once you know how they work.


Before fully diving into the process of setting up notifications, it's important to understand exactly how TC2 notifications are organized. Notifications are sent out when predetermined system activity events occur, such as arming, disarming, AC power loss, a system alarm, or even just a faulted zone. The recipients of any given notification are determined based on the assigned notification group. Each notification group will have at least one assigned user, and each user can have multiple email addresses and phone numbers set up on their profile.

To break it down, a user must be assigned to a notification group, and that notification group must be associated with the particular event or events that they want to be notified about. Once the event occurs, every user within the assigned notification group will receive the alert. Each user can assign email addresses for email alerts and/or phone numbers for text alerts. Every assigned email and phone number will ultimately be used for notifications, provided that everything has been set up correctly.

Where some people can have trouble with TC2 notifications is when trying to set them up for multiple users. This is usually the case for families, where multiple people in the household want to each receive their own set of notifications. The solution is often to set up a unique user profile for every person who will be using the system and receiving notifications. Each user will need to choose a user code for controlling the system locally. If you want to limit the number of codes on your system, then the other option is to assign multiple email addresses and/or phone numbers to a single user profile. But the downside to doing that is that you won't have any real way of setting who receives what. The point here is that there are multiple ways to ensure that everyone using the system can receive notifications.

Total Connect 2.0 notification can be set up and configured from both the Total Connect 2.0 website and the Total Connect 2.0 mobile app. For our examples, we will mostly be focusing on the website, but understand that these menus are mostly the same on the app. They just might be organized slightly differently to better fit the smaller dimensions of a mobile phone. Really, both the website and mobile app are laid out very similarly, so if you can use one, then you should have very little trouble switching over to the other if needed. The important thing is to understand what all of the various terms mean and how they are all related.

First, let's take a look at the Users Menu of Total Connect 2.0. Like we said earlier, the most common practice is to set up an individual user account for each person who will be regularly using the system and receiving notifications. But if you are trying to limit the number of codes on your panel, then assigning multiple email addresses and/or phone numbers to a single user profile is also an option. On the TC2 website, you can easily locate the Users drop-down menu on the left-hand side.
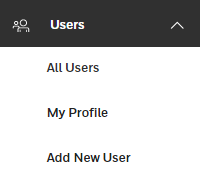
As you can see, the available options within Users are All Users, My Profile, and Add New User. The All Users option is useful if you are logged into a Total Connect 2.0 account with admin access. It will show all the users you have set up. My Profile is used for adjusting the settings for the user who is currently logged into TC2. This includes setting the user's name, preferred language, TC2 login password, assigned email addresses, assigned phone numbers, and even the security code they use with the panel. And the Add New User option is used for adding a new user to the Panel and if desired, to the Total Connect 2.0 account.
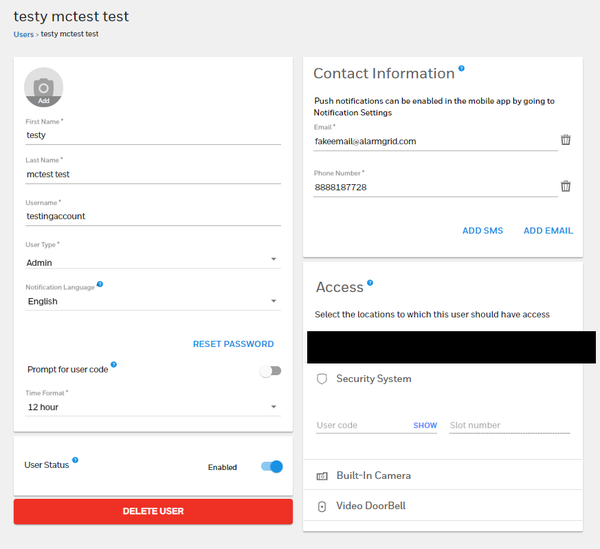

In the picture above, note the "Add SMS" and "Add Email" buttons. These are used for adding additional phone numbers and email addresses to a profile. Each assigned email and phone number will be used for notifications. If you don't want to create multiple users, then that is a method for ensuring that multiple people receive notifications. Just keep in mind that you will have no way of distinguishing which emails and phone numbers will receive which notifications. All emails and phone numbers assigned to the profile will be getting all the alerts.

Alternatively, if you create multiple user profiles, then you can pick and choose which profiles will be assigned to which notification groups. This is how you can set certain users to receive notifications regarding specific system events, while other users won't necessarily have to receive the same alerts for the same events. Whichever option you choose will work fine, and it's totally up to you. But you will have greater flexibility by creating multiple users.

Next, we would like to turn our attention to the Notifications Menu. This is where you will set up notification groups. Recall that different users can be assigned to different notification groups. Each notification group can correspondingly be assigned to different system events that will trigger notifications being sent out.
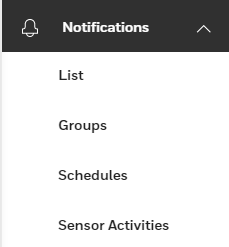

From the top, List shows the list of the specific system event triggers that will cause notifications to be sent out. Groups are the famous notification groups that we have been talking about throughout this post. Schedules are used for establishing set schedules for predetermined security and automation events to occur. Sensor Activities allows you to select specific sensors so that you can see if the sensor is faulted right from the main page of TC2, rather than having to access the complete system sensors list. For our purposes here, only List and Groups are really important.

After you have created the necessary user profiles and assigned email addresses and phone numbers to said profiles as needed, the next logical step is to create notification groups using the Groups option under the Notifications drop-down menu. If you click on the button with the two people and the + sign, then you can create a new notification group. This will involve providing a name for the notification group and choosing which users are included.


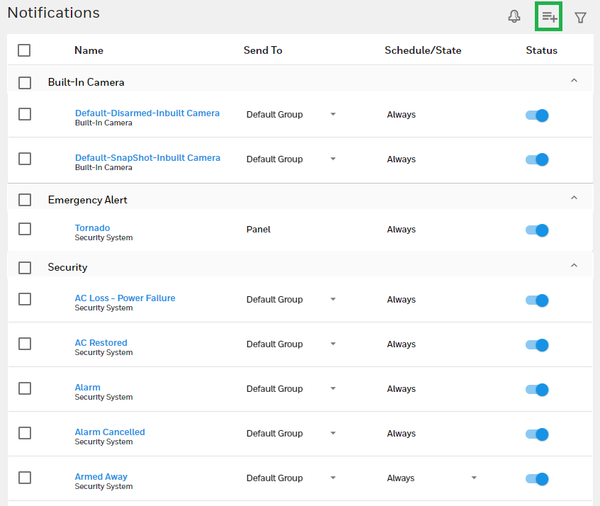
Upon building notification groups, you now get to the juicy step of actually building the triggers that will cause notifications to be sent out. These notification triggers are the actual system events that you want to be alerted about. To access this section, select List under the Notifications drop-down menu. You will likely find a bunch of notifications pre-assigned to the Default Group if you have never configured these settings before. To build new notifications, click the icon with three horizontal bars and the + sign. This will involve choosing the specific event that will trigger the notification to be sent out, as well as selecting the notification group that will receive the notification.

We know we've covered a lot of information here, so let us give a quick recap of the steps involved:

  1. Make user profiles. Each user profile will be able to control the system locally using their own user code. And Standard and Admin profiles will be able to access Total Connect 2.0 to control the system remotely. In most cases, each user profile will represent a different individual who uses the security system.
  2. Assign phone numbers and/or email addresses to user profiles. These are the contact points for sending notifications. Every added phone number and email will be contacted when a notification is triggered to be sent to the associated user. Note that phone number contacts are for text message alerts, NOT phone calls.
  3. Build notification groups. Each notification group consists of one or more user profiles. Every user in the notification group will receive notifications based on their assigned phone number(s) and/or email address(es) when a notification is triggered to be sent out. If you only want some users to receive a certain type of notification, then build a notification group that includes the relevant users, while leaving out users who do not need to be notified or who may receive the intended notification based on their inclusion in a different group.
  4. Create notifications. These are the actual system triggers that will cause a notification to be sent out. When creating a notification, you must select what system event will trigger the notification, and you must also choose which notification group will receive the alert.

Lastly, we briefly want to touch on push notifications that you can set up on your Android or iOS device. A push notification is sort of like a text message notification, in the aspect that it will appear on your phone. But the big difference is that the alert will not appear through your text messaging app, but rather from the TC2 app itself. These push notifications can only be configured by using the Total Connect 2.0 mobile app on a mobile device or tablet. You cannot set up push notifications using a web browser. After enabling Push Notifications from within the TC2 app on your device, you will be prompted by your phone or tablet to allow the App to perform Push Notifications.

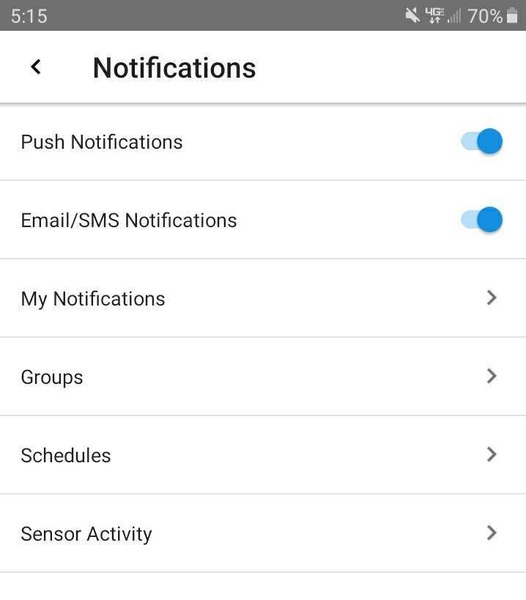
First, we will discuss enabling Push Notifications from within an Android device. Upon opening up the TC2 app and logging into your TC2 account, click the three horizontal bars in the upper-left corner. Then choose Settings, followed by Notifications. You can then toggle the Push Notifications option ON or OFF. To set which system events will trigger push notifications, use the My Notifications option.
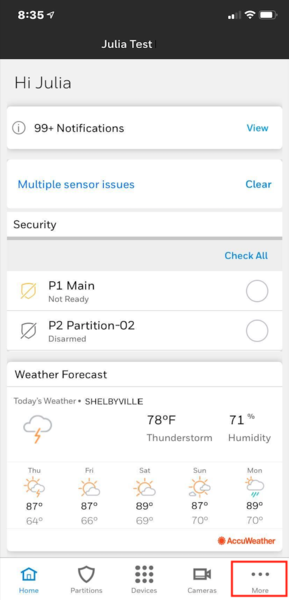
When using an iOS device, you will reach the option for Push Notifications by clicking the "More" option in the lower right corner of the main screen. From there, go to Settings > Notifications > Push Notifications, making sure that the option is enabled. Once you enable this option through the app, you will be prompted by the phone or tablet to allow the TC2 App to send you Push Notifications.

We really hope that this helps some users overcome their struggles with receiving TC2 notifications. If you are monitored by Alarm Grid, and you are still struggling with Total Connect 2.0 notifications, please feel free to email us at support@alarmgrid.com for extra assistance. We are certainly happy to help you out so that you can get notifications set up exactly how you want them. Our hours for checking emails run from 9am to 8pm ET M-F, so keep that in mind. We look forward to hearing from you!
Tags: , , , , , ,

Comments


Posted By

Today marks the first day for many of us at Alarm Grid in returning to our headquarters! After working from home for the past couple of months, we are eager to come back. We are returning in waves, so not everyone will be back at once. This is due to new health and safety requirements.

Alarm grid inside security stickers

Unfortunately, our support technicians and our planners won't be returning to the office for a few more weeks. This will allow us to better-conform with CDC guidelines. And as per new occupational safety requirements, we have already outfitted our headquarters with some upgrades to encourage social distancing. We intend on being completely safe and cautious with our transition back.

With our technicians and planners continuing to work from home, nothing will change in terms of your end user experience. Any orders will continue to be sent out by our shipping team like normal. Just keep in mind that some products may be backordered. If you want to make sure that an item is in stock, just contact us, and we'll be happy to check.

We can say that since our content team is returning, we will have some long-awaited videos being uploaded soon! Our usual video stars won't be returning right away, so you'll have to settle for a few of myself. We think our regular guys will be back soon though!

The COVID-19 pandemic has been tough on everyone, us included. But we are proud to say that we have made an excellent transition to working from home. And now, we're excited to get back to our usual spot!

If you would like to learn more about Alarm Grid or sign-up for monitoring, the best way to contact us is by email at support@alarmgrid.com. If you want to reach us by phone it's (888) 818-7728. We operate business hours from 9am to 8pm ET M-F. We look forward to hearing from you!

Tags: , , , , , , , , ,

Comments


Posted By

Are you moving into a new home? Alarm Grid will do its part to help make your relocation as easy as possible! You can usually bring your existing security system and activate it for monitoring service at your new house. We can help you every step of the way, from planning to testing!

2gig gc3e at and t lte 3 1 kit wireless encrypted alarm system 3

Before you cancel your existing service, you should remember that Alarm Grid charges you month to month. When you pay your monthly bill, you are essentially paying in advanced for your next month of monitoring service. If you plan to move then you should try and cancel your service before your next billing cycle. That way, you won't get charged an extra month. We are happy to cancel your plan at the last minute if it means preventing an extra bill. But we can't refund you once you have already been charged, so make sure to plan accordingly. Keep in mind that there are no fees to cancel service, or to start new service. You will not pay anything extra to bring your service from your old location to your new one. To us, this is the same as us cancelling an old account and opening a new one.

When making move, you are often left to decide whether you should bring your existing system or start fresh with a new one. And really, it depends. If you have a wired system that would be difficult to bring, or if you have an older wireless system, then it might worth getting a new system. This could also be a good time to get a new LTE cellular communicator if you have been using an older 3G or CDMA module. On the other hand if you have one of the newer wireless systems that we often talk about, like the Honeywell Lyric, the Qolsys IQ Panel 2 Plus, or the 2GIG GC3e, then you should totally bring it! You can also bring your wireless sensors and set them up around your new home.

Whether you brought your existing system or found a new one, you will follow the same general process for setting it up. If you don't want to mount the panel to the wall, then a desk mount might be a great option. And if you are using double-sided foam tape to mount your wireless sensors, then you will probably want to pick some up. Double-sided foam tape isn't too expensive, and you can find it in pretty much any major retail outlet or a hardware store. You can always drill some holes and hard-mount your panel and sensors if you prefer. It's completely up to you.

Once you have your system set up, you can go through the same easy activation process as one of our new customers. Remember that you or a designated individual will need to be on-site and able to work with the system at the time of activation. Check these tips for making your activation as easy as possible. You should visit our monitoring page or email us at support@alarmgrid.com to choose an activation slot. The activation is a great time to get an updated Certificate of Alarm for an insurance discount at your new home. Just make sure to have all of the applicable sensors powered on and enrolled with your system before the activation. And please feel free to email us beforehand if you have any questions. We have activation slots available from 9am to 8pm ET M-F. We look forward to helping you during your move

Tags: , , , , , , , , , , , , , ,

Comments


Posted By

With Father's Day right around the corner (Sunday, June 21st), we thought it'd be a good time to suggest some security and automation gifts to surprise the dad in your life. You don't need to get your dad another neck-tie this year. We've got some neat gifts that dad is sure to love!


The Gift of Security!

If dad doesn't have a security system yet, then he's really missing out. You can have peace of mind in knowing that his home is safe while he's out doing dad stuff like golfing, fishing, or going to a bbq. Maybe your dad thinks he doesn't need security? Well, you could remind him of a big fat insurance discount that he could get by getting his home monitored. That will excite him even more than a weekend trip to the hardware store.

We have lots of great panels available, though the most popular right now are the Honeywell Lyric and the Qolsys IQ Panel 2 Plus. These are both wireless panels that are very easy to set up, even for the dad who doesn't know his way around a tool-kit. You won't hear any swear words coming out of the work shed when dad goes to set up his new system. And he'll probably want to show it off to all the neighbors.

Honeywell lyric controller encrypted wireless security system


Shopping on a Budget?

Okay, totally understand if you're strapped for cash and can't drop a few hundred dollars on a brand-new security system. But just because you're looking to spend $30 rather than $300 doesn't mean you can't make dad smile. If your dad already has a system, then why not get him a new sensor or two? Door and window contacts are always affordable. Just get a model that works with dad's security system. The VERSA-2GIG and the VERSA-GE are both extremely popular, and they won't break the bank!

Maybe you've already surprised dad with a contact sensor before? You could always check out some motion sensors. These are great for knowing if someone is snooping around the basement or the garage. Again, you want to make sure you get a model compatible with dad's system. Popular options include the Honeywell SiXPIR, the 2GIG PIR1-345, and the DSC PG9914. And if you aren't sure which models will work with your dad's system, just reach out to us, and we'll be happy to help!

2gig pir1 345

Automation Excitement!

If dad already has a wireless system, then chances are that it doubles as an automation controller. You can surprise dad with some new Z-Wave automation devices for him to pair with his system. Lighting devices are always a great choice. Your dad will be able to turn the lights ON and OFF without getting up, and he can create smart scenes for automatic control. And a great thing about smart lights - they don't break the bank!

Your dad might like an in-wall switch as a nice weekend installation project. Some of our favorite in-wall switches include the GE 14318 and the Resideo Z5SWITCH. Or if your dad is not into wiring, you can get him a plug-in lamp module like the GE 28170 or the Resideo Z5DIMPID. And the great thing about these Z-Wave devices is that they are universally compatible and will work with any system that operates as a Z-Wave controller!

Maybe the smart lighting game has already been introduced to dad's house? In that case, you could make his day with a different automation device like a Z-Wave thermostat. Our favorites right now are the Honeywell T6 PRO and the Alarm.com ADC-T3000. Or if you really want to get your dad something a little more unique, then you could try a smart water valve like the Alarm.com ADC-SWV100. This can be very useful in preventing dad from experiencing the headache of a flooded basement or laundry room.

Ge 28170 side of z wave plug in smart dimmer

Help Dad Keep an Eye on the Neighbors

We all know that dads like to know what's going on outside. That is why we'd be foolish not to recommend some outdoor security cameras. These devices are actually easy to install, and they can give your dad a good look at the front lawn while he's tucked away in his man cave. You'll want to consider whether his system supports Alarm.com or Total Connect 2.0. For ADC, we like the Alarm.com ADC-V723. If dad has TC2, then go with the Honeywell IPCAM-WOC1.

Maybe dad isn't ready to upgrade to video monitoring quite yet? Don't worry! He can still make sure the neighbor kids stay off the lawn with a different type of camera. One popular option is to use a SkyBell Video Doorbell. These can be used without needing to upgrade to a full-on video monitoring plan. There are models for Total Connect 2.0, and others for Alarm.com. Another possibility is to look into the Arlo Cameras that do not use monitoring service through ADC or TC2.

Honeywell lyric oc1 standalone wifi outdoor 1080p hd total conne

The Best Gift of All!

We've saved the best gift idea for last. It isn't something you can hold in your hand, but it's something that every dad will love, even if they have all the security gadgets under the sun. That is the gift of alarm monitoring service! Why not offer to cover dad's monitoring bill for the next year? That is truly the gift that keeps on giving. Talk it over with dad, and when you're ready, the two of you can contact us to make the arrangements. We'll charge your card every month, with no added fees or sudden surprises. Meanwhile, your dad will be able to spend his money on other important things like new golf clubs or something. Oh dads....

If you haven't already, make sure to check out our monitoring page. This will teach you about the different plans offered from Alarm Grid so that you can choose the perfect one for your dad's needs. Once you're ready, shoot us an email at support@alarmgrid.com or call us at (888) 818-7728 to set things up. Remember that our business hours run from 9am to 8pm ET M-F. Our team will be thrilled to help you give your dad the gift of home security! We look forward to hearing from you!

Alarm grid inside security stickers

Tags: , , , , , , , , , , , , , , , , , , , , , , , , , , , , , , , , ,

Comments


Posted By

New Resideo CEO Jay Geldmacher officially began his duties as of today. Geldmacher is stepping into this role during a difficult, yet exciting time. The ongoing COVID-19 pandemic and the impending release of the upcoming Resideo PROA7PLUS Panel will make for an interesting transition.


Geldmacher was appointed as new Resideo CEO on May 19th. Today marks his first official day in this position. Prior to joining Resideo, Geldmacher previously served as president and CEO of Electro Rent Corp. Resideo has also recently added two new independent directors to their board as part of this change.

Resideo board chairman Roger Fradin said of Geldmacher, "Jay joins Resideo at an important inflection point, as we transform the business to better serve our attractive markets. With the support of the board, we are confident Jay will leverage his expertise to further transform the business, position the company to deliver enhanced operational and financial performance, and create substantial shareholder value. We look forward to embarking on this exciting new chapter together."

Fradin also expressed gratitude to previous CEO Mike Nefkens, who played a big role in leading the company through the global pandemic. Nefkens had served in his position since the company's spin-off from Honeywell in 2018. He unexpectedly announced his departure last December.

Jay Geldmacher has worked in the industry for more than 30 years. Resideo states that the company will look to his experience to lead them during these unprecedented times. With the release of the new Resideo PROA7PLUS Security System expected to occur in the coming months, and the world still reeling from the pandemic, the company will be counting on Geldmacher to keep them ahead of the ever-changing industry.

Alarm Grid offers monitoring services for many Resideo Systems, including the popular Honeywell Lyric Controller. If you are interested in learning more about our products and services, please email us at support@alarmgrid.com. We check email from 9am to 8pm ET M-F. We look forward to hearing from you!

Tags: , , , , , , , , , , , , ,

Comments


Posted By

We have recently noticed a major shift in the security industry due to the COVID-19 health pandemic and the resulting "new normal". Many companies that were traditionally opposed to the DIY model are now following our lead and implementing their own DIY practices to meet consumer needs.

Honeywell lyricpk lte enc encrypted at and t lte alarm system w There are many names for this rising practice. Some companies will call it "Do-It-Together" or "Do-It-With-Me" as an alternative to "Do-It-Yourself". But it's all the same principle. And it isn't anything new, even if other companies want you to believe that they are being innovative. Alarm Grid has been proudly offering DIY monitoring solutions since 2012. And only a very small handful of other companies have been providing similar solutions for the past several years. It wasn't until this "new normal" that DIY security even became the standard model.

Whether a security company calls their model DIY, DIT, or DIWM, it's all the same thing. They all refer to a company guiding an end user through the setup or installation process remotely through a phone call, text chat, or video call. The main principle behind this concept is that a modern security system is not difficult to install, and end users shouldn't have to pay hundreds or even thousands of dollars for an installation that they can easily complete on their own. The end user is empowered in being in full control of their security system, and the alarm company saves money by not having to send out a professional installer. Everybody wins.

For a long time, traditional security companies and equipment manufacturers stubbornly stood their ground and refused to adopt this new model. They continued hiding Installer Codes and making their systems difficult and frustrating for end users to work with. This allowed them to keep rolling trucks and charging their customers service fees. We have seen some improvements in this regard. For example, the Qolsys IQ Panel 2 Plus is arguably the most DIY-friendly alarm panel we have ever seen. But for the most part, this industry has been slow to take action. It's somewhat shocking that it took something like a serious global health pandemic to implement these changes.

But Alarm Grid has been doing this before it became the norm. We have never sent out an in-house technician to anyone's home or business. Why? Because we never needed to. These systems can be self-installed, and our trained and knowledgeable technicians provide all the support you need, both online and over the phone. Being ahead of the curve has allowed Alarm Grid to establish a successful and thriving business in the highly competitive security industry. And we intend on keeping it that way, even during these trying times.

While most other security companies were left scrambling for solution that has been right under their noses for quite some time, Alarm Grid was already adapted for the global pandemic. The only change we made was mandating that the vast majority of employees work from home. And even that is only temporary, as we plan on returning to the Alarm Grid headquarters once we feel that it is safe. But other than that, it has been business as usual for Alarm Grid. We have continued to keep our customers informed, and we have continued providing simple and effective security solutions.

Other companies that are just now implementing DIY practices during this historic event are not being innovative. They are fighting for survival. We have been doing this for nearly eight years. And each year, more and more people jump ship to Alarm Grid. Customers love us for our top-notch support, our contract-free structure and our no nonsense attitude, where our only goal is to provide you with excellent monitoring service at a price that you can afford. We have been right about this industry this entire time, and other companies are only just now realizing it as a means of survival.

Remember that customers stick with Alarm Grid because they love our support and our efficient business model. Any customer that is not satisfied for whatever reason is free to take their system with them to a new company. All of the security systems we support are non-proprietary, and they can be readily used with virtually any alarm company. But we rarely have customers leave us, as we are always there to help them overcome any problems that they may encounter.

If you are interested in learning more about Alarm Grid, the original DIY security company, we invite you to send an email to support@alarmgrid.com. We would love to help you explore your options so that you can make an informed buying decision for your home or business. Also, make sure to check out our monitoring page so that you can learn all about our monitoring plans. If you'd prefer to call us, we can be reached at (888) 818-7728. Our team is available and ready to talk from 9am to 8pm ET M-F. We look forward to hearing from you soon!

Tags: , , , , , , , , , , , , , , , , , , , , ,

Comments


Posted

Update 01/13/22: This feature has now been expanded upon, but only for the ProSeries panels. You can read all about it here!

The Total Connect 2.0 Mobile App for Android now allows users to arm, disarm, and check current system status using Google spoken voice commands. This handy new feature can be very useful for quickly and conveniently controlling your Honeywell Security System from almost anywhere.


In order to use Google voice commands with TC2, you must have the feature set up for your phone. To enable, go to Settings > Apps > Total Connect 2.0 > Enable Microphone. Once configured, you should see a blue microphone button in the bottom-right corner of the TC2 App. You can click on this button to have your phone begin listening for voice commands. At this time, only arming/disarming and status commands are available. We are hopeful that more commands will be arriving in the future.

Also keep in mind that you will need to give Total Connect 2.0 permission to use the microphone for your phone. Make sure to adjust the appropriate app permissions if you have not already done this. Remember that you can only make TC2 voice commands while you have the app opened. Google will not be able to understand any commands intended for TC2 unless they are performed through the app.

Please note that some commands may require a valid code entry. The following voice commands are available within the TC2 Android App:

  • Arm Stay: Puts the system in Arm Stay mode.
  • Arm Away: Puts the system in Arm Away mode.
  • Disarm: Disarms the system.
  • Home: Returns you to TC2 App home screen.
  • Sensors: Displays list of programmed sensors.
  • Keypad: Displays on-screen virtual keypad.
  • Events: Displays Events list.
  • Settings: Opens the TC2 Settings Menu.
  • Profile: Opens your TC2 Profile.
  • Location Settings: Opens the TC2 Locations Menu.
  • Manage Locations: Opens the Manage Locations tab within the Locations Menu.
  • Change Password: Opens the Change Password tab within your TC2 Profile.
  • Help: Opens the Help Menu.
  • Sign Out: Logs you out of TC2 and closes the app.

If you have any questions about this feature, or if you are interested in starting monitoring service for use with Total Connect 2.0, please email us at support@alarmgrid.com. We check our email from 9am to 8pm ET M-F. We look forward to hearing from you and helping you get the most out of Total Connect 2.0.

Tags: , , , , , , , , ,

Comments


Posted By

According to reports, Ubiquiti has corrected an issue affecting their UniFi Access Points (APs). Alarm Grid previously reported the issue back in February. The issue prevented various security systems from connecting. Users had to disable the Auto Optimize Network feature to connect.


It is our understanding that Ubiquiti pushed a firmware update to their UniFi Access Point devices. This firmware update made it so that a security system will not be booted from the network when the Auto Optimize Network feature is enabled for the AP. Users can now expect their systems to work while the AP is in this mode.

Before the issue was fixed, we were only aware of Honeywell Lyric Alarm Systems being affected. We later learned that other systems connecting with Ubiquity UniFi Access Points were believed to be affected as well. Regardless, there should no longer be any issues when using a UniFi AP with your system, as long as the AP received the firmware update.

If you are still experiencing issues, we recommend emailing us at support@alarmgrid.com. While we cannot push the update to an Ubiquiti AP, we can walk you through steps for making sure that your alarm system is doing its part. We check our email from 9am to 8pm ET M-F. Also make sure to check out our monitoring page if you are interested in learning more about our services. We look forward to hearing from you!

Update: The Honeywell ProSeries Panels (PROA7PLUS, PROA7PLUSC, PROA7, and PROA7C), when used with Ubiquiti Access Points, require that an Ubiquiti device has its Auto-Optimize feature turned OFF. This is needed for maintaining a stable WIFI connection. Please keep this in mind if you use an Ubiquiti Access Point with a ProSeries System.

Tags: , , , ,

Comments


Posted By

A security system is either monitored or unmonitored. While you can use an unmonitored system, we're here to tell you why having your system monitored is so important. Alarm monitoring service is the best way to ensure that responders arrive as soon as possible during an emergency.

Honeywell lyricpk10 lte a new dual path security system w slash

When a monitored system goes into alarm, it will activate a siren to alert those on-site, and it will send alerts to a central monitoring station and/or the end user directly via text and/or email, depending on the user's monitoring plan. If a system is not monitored, then the siren will still activate, but no remote alerts or notifications will be sent out.

The only way an unmonitored system is useful is if you are always on-site with the system. Then you will hear the siren and know to take action regarding the alarm. But what if you are away from your home or business and a fire or break-in occurs? That is when you count on your security system alarm monitoring service to ensure that the appropriate party is notified.

Alarm grid inside security stickers

There are two (2) types of alarm monitoring service. Central station monitoring involves having your system send an emergency alert to a central monitoring station where a highly trained operator will take immediate action. They can see the type of alarm that occurred (e.g. security, fire, carbon monoxide gas, medical, etc.) and contact the authorities in your area for help.

Some users prefer self-monitoring service. This involves having an alert sent to you via text, email, and/or push notification. The alert will tell you what type of alarm has occurred and which sensor or zone on your system caused the alarm. This way, you can take your own action regarding the alarm event. Just know that in order for help to arrive, you must be able to reliably respond to the alert.

It is also possible to get a central station monitoring plan that includes self-monitoring service. This way, you can still have emergency help sent out automatically by a central station operator, while also receiving a personal alert so that you immediately know what's going on. This is a "best of both worlds" option, and it is what most new users ultimately select when setting up their monitoring service.

Whether you go with central station monitoring, self monitoring, or a hybrid of both, having your system monitored is the best way to ensure that your home or business is protected while you are away. Alarm Grid offers monitoring plans for all types of homes and businesses, and we have a wide selection of security systems available. Our team is happy to help you every step of the way.

If you want to learn more about choosing and installing your own DIY security system and saving hundreds by not hiring a professional installer, please email us at support@alarmgrid.com. Our system planners are available from 9am to 8pm ET to help you choose the best security system for your needs. You might also want to check out our monitoring page to learn more about what we offer. We look forward to helping you get started with your new security system!

Tags: , , , , , , , , , , , , , , , , ,

Comments


Posted By

One of the best perks of owning a home security system is that it can also serve as an automation hub for controlling compatible smart devices. Apple HomeKit is an excellent platform to build around if you are a frequent iOS or Apple user. And a new Lyric System can make a great addition!

Honeywell lyric controller encrypted wireless security system

If you aren't familiar with Apple HomeKit, it is an app for iOS devices that allows you to control and automate compatible devices around your home. What's really cool is that you can perform various actions from virtually anywhere in the world using spoken Siri voice commands. Possible actions include arming or disarming your security system, controlling Lutron Smart Lights, or performing a complete HomeKit scene in which multiple devices are controlled at once.

In order to get started using a Lyric with Apple HomeKit, you must have a Lyric System that is set up for alarm monitoring service automation control. For Alarm Grid monitored customers, this means that you will need a Silver Plan or higher. More information is available on our monitoring page. Your alarm monitoring company can then activate the HomeKit feature for your Lyric System. Then just follow this simple FAQ to get it set up.

Remember that having a dedicated HomeKit Hub as part of your automation network is strongly recommended. This can be an iPad, an Apple HomePod, or an AppleTV Gen 4 or higher. You might also want to check out this FAQ on creating HomeKit Automations. That is how you will have your HomeKit compatible devices activate automatically with certain system events or based upon a set schedule.

When expanding upon your HomeKit network, make sure to look for devices that feature the Apple Home logo or other marking identifying them as HomeKit-compatible.

The only way to get your Honeywell Lyric set up for use with Apple HomeKit is to get it monitored. Please email us at support@alarmgrid.com for more information. We check our email Monday thru Friday from 9am to 8pm ET. Our team will be happy to help you find new HomeKit devices and build a robust and powerful HomeKit network that you can control from anywhere using your voice. Getting started is super easy, and we will be there every step of the way!

Tags: , , , , ,

Comments