Santa Claus Will Soon Return to Alarm.com Video Feeds!
Posted By Julia RossIt's that time of year again! The time when you might spot Santa Claus on your Alarm.com video feed as he prepares to deliver Christmas gifts. Of course, the true magic occurs on Christmas Eve, but Santa could drop by at any time between December 4 and December 31. So, be on the lookout!

Alarm.com is always enhancing and expanding its video offerings. For the past few years, its technology has become so advanced that it can capture Santa Clause as he goes about his pre and post-holiday preparation.
Any time between December 4 and December 31, 2023, you may catch a glimpse of the jolly old elf as he scurries about, scoping out the surroundings and getting all of the logistics prepared for the big night. Delivering toys to all the children of the world in a single night requires meticulous preparation!
The only way you can see Santa is if you capture a still image from your video feed. Santa is much too quick to be seen on the video feed itself. Just log into your Alarm.com account, pull up the feed of one of your Alarm.com cameras, and click the Santa icon. You'll see the various Santa poses captured within the feed. Click the one you like best, and then share the image with your family and friends.
In dark settings, Santa will appear in black and white, in lighted areas you'll see him in color. Just be sure you have the latest version of the Alarm.com app installed on your iOS or Android device so that you can take advantage of this rare opportunity. For iOS users, the latest version is 5.2.1. For Android users, the version you see will vary depending on your device. Just check the Google Play store and be sure there are no available updates. Your phone must be on Android 7.0 or higher to support the Alarm.com app.Of course, only those with a video subscription, and cameras installed will be able to capture Santa Clause in action. For Alarm Grid customers, this will be those on one of our Platinum Plans (Self or Full) or a Video Monitoring Account. If you've been considering adding an Alarm.com video camera to your system now may be the perfect time!
If you don't happen to have Alarm.com video service, but you do use Alarm.com monitoring for your security system, you have another option for tracking Santa as he visits your home. You can set up a Santa Alert for your system. To do so, follow these steps:
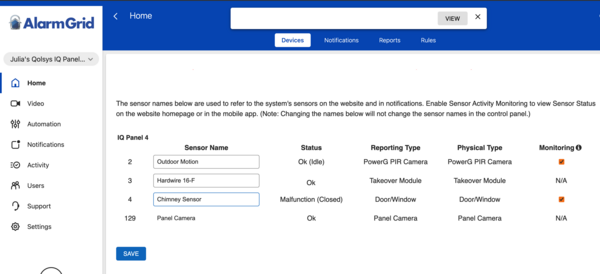
- Designate a sensor. Log into your Alarm.com security account. Tap the Sensors card and choose a sensor that is easy for you to open and close. Change the name of that sensor to something fun. If you have a chimney, you can call it Chimney Sensor. If not, you can name it Santa Sensor, or a similar fun name.
-
Create a notification. If you don't already have a zone open/close notification set up for the sensor you chose, tap the Notifications menu option, then click the "+ New Notification" icon. Looking at the Standard Notification options, you should see "Sensor Activity." Click on this option.


-
Complete the notification setup. When you click on the "Sensor Activity" option, you'll be taken to a configuration screen. First, name your notification. Check the box next to the sensor you renamed in Step 1. Configure all the required parameters to ensure you receive a notification when this sensor is opened. Remember, a notification will be sent every time this sensor is opened or faulted, so you probably want to wait until you're ready for Santa to visit, before you set this up. Otherwise, if this is a sensor you use often, you may be inundated with notifications until you set things back to normal. Presumably, you'll do this on Christmas Eve. Be sure you have at least one recipient for this notification enabled. When you've completed the configuration, click "Save."

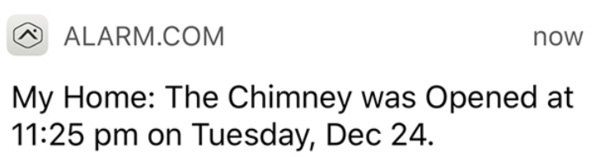
- Create the event. When it's time for Santa's visit, open the sensor you renamed in Step 1. You should receive a notification on your designated device that shows the Chimney Sensor, Santa Sensor, or whatever fun name you gave your sensor has been opened. In the morning, you can show your family proof that Santa Claus visited during the night.
- Revert to normal. Once you have your proof, you can reverse the above steps and put your system back to normal. There is no need to delete the notification. You can simply toggle it off, then it will be ready again next year, in case you want to use it again.