Wireless Touchscreen Alarm Panels Posts

Posted By

We want to inform 2GIG Edge users, especially those who may install their own system, to a special warning put out by 2GIG. The warning identifies a potential wiring mistake that could result in permanent damage to the 2GIG Edge Alarm Panel. The entire warning put out by 2GIG can be seen here.


The 2GIG Edge receives primary power from the 2GIG AC1 Plug-In Transformer. This transformer is rated at 14VDC, 1.7A. You must add your own alarm wire to complete the connection. Since DC power is being used, proper polarity must be observed, both at the transformer and at the panel. At the transformer, the red wire should connect to positive (+) terminal, and the black wire should connect to the negative (-) terminal.

Then, at the panel, the red wire for positive (+) power should connect to the DC IN+ terminal. The black wire for negative (-) power should connect to the DC IN- Terminal. Or alternatively, if you are using a Honeywell LT-Cable, then you can simply plug the barrel connector in the DC IN Barrel Port. Following this process correctly will help ensure that you do not accidentally damage your 2GIG Edge.

Where the concern arises is that there are actually two (2) sets of terminal blocks on the 2GIG Edge Panel for connecting wires. And unfortunately, 2GIG didn't exactly make it super clear as to which set of labels goes with which terminal block. The best way to figure it out is in the fact that one set of terminal blocks is shorter than the other terminal block set. The set for providing power is the smaller terminal block with six (6) terminals, not the larger terminal block set with eight (8) terminals. You can see this in the image above.

The DC IN+ and DC IN- Terminals, along with the DC IN Barrel Port, are identified as the Power In Terminals. Those are the ports you want to use when providing power, whether you are using traditional alarm wire and you use DC IN+ and DC IN- (making sure to observe polarity) or you have a Honeywell LT-Cable and simply plug into the DC IN Barrel Port. If you do use DC IN+ and DC IN-, then make absolutely sure you are connecting to the terminal block with only six (6) terminals.

The potential problem arises in the other, larger terminal block with eight (8) terminals. This is known as the DCOUT+ Terminal Bock. And to make matters confusing the top two (2) wire terminals on this set have names that may make you think they are used for providing primary power to the system. But in reality, connecting primary system power here could seriously damage the system. These two (2) misleading wire terminals are labeled GND and AUX+, but these are output terminals.

Simply put, you do NOT want to use these terminals for providing system power. Again, the easiest way to avoid doing this is to make sure you are using the smaller terminal block with only six (6) wire terminals, NOT the larger terminal block with eight (8) wire terminals. Of course, if you use a Honeywell LT-Cable and the panel's DC IN Barrel Port, then this isn't really a potential hazard. There is only one barrel port and no way to mix it up.

The lesson of the day here is to be very careful when you are connecting power wires to the 2GIG Edge. Use the DC IN+ and DC IN- Terminals on the smaller block with six (6) terminals. The red positive (+) wire should go to DC IN+, and the black negative (-) wire should go to DC IN-. Or use a Honeywell LT-Cable and the DC IN Barrel Port. Do NOT use the GND and AUX+ Terminals on the larger block with eight (8) terminals. Making that mistake could potentially damage your 2GIG Edge System. Always be safe and smart, and make the correct wiring connections!

If you have any thoughts on the 2GIG Edge, or if you have any personal experience in wiring the system for power, then please feel free to share what you would like in a comment down below. We would love to hear from you! And remember to stay tuned to the Alarm Grid Blog for more tips and security news coming soon.

Tags: , , , , , , , , , , , , , , , , ,

Comments


Posted By

After much waiting and anticipation, Resideo has delivered the firmware update we have all been wanting for ProSeries Panels. ProSeries System Update Version 3.591.92.0 for PROA7PLUS, PROA7PLUSC, PROA7, and PROA7C introduces local programming mode, as well as other system enhancements.

First, we want to cover how to receive the update. Only monitored ProSeries Systems can be updated. You must have your ProSeries System online and connected with the AlarmNet servers in order for the over-the-air (OTA) update to go through successfully. The system must be connected with a WIFI network, as the update cannot be sent across cellular. Remember that while the PROA7PLUS and PROA7PLUSC both come with integrated WIFI network cards, the PROA7 and PROA7C can only connect to WIFI if a PROWIFIZW or PROWIFI has been added separately.

As a one-time event Alarm Grid is planning to send down the new firmware update to all its monitored customers with ProSeries Panels sometime in the coming days. This OTA update is being done in one mass shot to try to update as many users as possible all at once. No special action should be required on your part. Just have your ProSeries Panel powered on and connected to WIFI. While this process isn't perfect, and there will inevitably be some users who miss out on the update for one reason or another, this is the best way for us to ensure that as many end-users as possible have their panels updated. Remember, we can only update ProSeries Systems that are actively monitored by Alarm Grid. If you have a different monitoring provider, then ask them to help you update your system.

If your automatic OTA update fails for whatever reason, or if you didn't have your panel ready at the time of the mass OTA update, then you can request that the update be sent down manually. Alarm Grid customers can email support@alarmgrid.com to request a manual OTA update. Please make sure that you have your ProSeries Panel powered on and connected to WIFI when we push down the OTA update, or else the update process will fail. Our support hours run from 9 am to 8 pm ET M-F, so keep that in mind when contacting us. Furthermore, we cannot push down a manual OTA update to your panel if you receive alarm monitoring service from a different provider. If you are monitored by a different company, then you should instead reach out to your provider for further assistance.

There are some big highlights here in ProSeries Firmware Update 3.591.92.0. Obviously, the elephant in the room is the introduction of local programming mode. Previously, users were forced to have all system programming completed remotely by their monitoring provider. This included basic system setup tasks like enrolling sensors and configuring zone settings. Not only will the introduction of local programming make activations easier for professional technicians, but it will also empower end-users and give them greater control over their systems. This is a huge deal, as it officially makes the ProSeries Panels DIY-friendly alarm systems.

There are other major introductions in ProSeries Firmware Update 3.591.92.0, though they are likely to be overshadowed by the introduction of local programming. Nonetheless, we are still very excited about these smaller, but still important, introductions. For one, there is a boost to system partitioning, as a common lobby partition option is now available. You can set Partition 3 or Partition 4 as the common lobby, depending on how many partitions are being used. The highest number partition will always be the common lobby, and you must have at least 3 partitions in order to enable the common lobby feature.

There are some principles to keep in mind regarding the lobby function. You cannot set both Partition 3 and Partition 4 as the common lobby. Only one can be the common lobby partition at any given time. The way that the common lobby partition works is that disarming any other partition will also disarm the common lobby partition. Additionally, if ALL other partitions are armed, then the common lobby will also automatically arm. The only way you can arm/disarm the common lobby partition independently is if all the other system partitions are in an armed state. All system users have authority over the common lobby partition. Finally, any 24-hour zones assigned to the common lobby partition will sound on keypads of all partitions, but you can only silence alarms and troubles from these zones using the common partition keypad. Any faulted zone in the common lobby partition will be automatically bypassed when the common lobby partition is armed, even if it is armed automatically due to all other partitions being armed.

The ProSeries Firmware Update 3.591.92.0 brings support for some upcoming PROSiX Sensors that we hope to have available on our site very soon. Specifically, we are talking about support for the PROSiX Wireless Repeater (PROSIXRPTR) and support for the PROSiX Wireless Heat (PROSIXHEAT).

A local alarm mode is now supported, meaning you can trigger a localized system alarm, complete with siren, but without the system reporting out. This can be good for scaring away on-site intruders, while also resting easy in knowing that the authorities will not be sent to the premises. This is basically how the system behaves if an intrusion alarm occurs on a system that is not being monitored. When local alarm mode is enabled, all communication to AlarmNet is halted, including access to Total Connect 2.0 features.

The panel will now provide severe weather alerts. This feature requires that the system is set up with Total Connect 2.0 and the corresponding weather package. Remember, this is only possible if the system is monitored and set up with Total Connect 2.0. Ask your monitoring company about receiving weather alerts on the panel.

If you are using the system in Canada, you can now use the PROTLE-CN Communicator. This communicator may be carried by Alarm Grid in the future. Alarm Grid is not provided with the option to sell the Resideo and Honeywell Home lineup of Canadian communicators, however, we can get potential customers in touch with a Canadian distributor. Once you obtain a PROLTE-CN elsewhere, then we will be able to set it up for monitoring.

On the PROA7PLUS and PROA7PLUSC only, you can now stream the live video feed for Total Connect 2.0 IP Cameras and SkyBell Video Doorbell Cameras from both the Panel, as well as any PROWLTOUCH or PROWLTOUCHC Keypad. The PROA7PLUS and PROA7PLUSC also now both support disarm photos from the PROWLTOUCH and PROWLTOUCHC Keypads. Again, these two (2) features are for use with the PROA7PLUS and PROA7PLUSC only.

For all ProSeries Panels, there is backlight timeout improvement. You can now set the backlight timeout for a ProSeries Panel or a PROWLTOUCH/PROWLTOUCHC Keypad to Disable and have the screen go completely dark. This is instead of going to the "inactivity screen" that shows the weather, time & date, 1st thermostat temperature, partition arming status, panic icons, and CELL/WIFI/AC/BLE status.

Other updates include:

  • You can now have Partition 1 Disarm automatically when a Z-Wave Door Lock is UNLOCKED.
  • There are improvements to the 7-Day Z-Wave Thermostat Schedule on Total Connect 2.0.
  • There is now optional device supervision for PROWLTOUCH & PROWLTOUCHC Keypads.
  • The PROSIX Wireless Technology is now more accurate in displaying signal strength and remaining battery life.
  • There is now improvement in enrollment range for PROSIXSMOKEV and PROSIXHEATV.
  • There is now improved multi-language display on the PROSIXLCDKP Keypads.
  • If you use a cellular communicator in Canada then you may notice Cellular Roaming Improvement.
  • Updates to the ProSeries Cyber Security.
  • The PROINDMV Indoor Motion Viewer and Z-Wave Devices are now supported during the AlarmNet360 Panel Replacement Process. This is only for the PROA7PLUS and PROA7PLUSC.

Are you excited about this new update? What do you think about local programming finally being available for the ProSeries Panels. Is there some other new feature that you're also really eager to check out. Let us know in a comment down below. And stay tuned to the Alarm Grid Blog for more news and updates coming soon.

Tags: , , , , , , , , , , , , , , , , , , , , , , , , ,

Comments


Posted

Update 12/30/21: The 2GIG GC3e has been discontinued and is no longer available. The 2GIG Edge w/ AT&T LTE or the 2GIG Edge w/ Verizon LTE have replaced it.

In an effort to clear out existing stock, the 2GIG GC3e Alarm Panel is now available at the bargain price of $189.99. This is an excellent chance to get a modern and reliable alarm panel for your home or business at a super low price. Act quickly, because supplies will run out very soon!

We announced earlier this month that the 2GIG GC3e was discontinued. However, due to existing stock, the GC3e Panel is effectively back from the dead for one final run. Once the limited stock runs out, the 2GIG GC3e will be discontinued forever. Room needs to be made for newer panels, so we're offering the 2GIG GC3e for the low price of $189.99. This is a rare opportunity to get a great alarm panel to build around. It can certainly fulfill all of your security and smart home automation needs once you get it set up and running!

The GC3e is fantastic for alarm monitoring. Just add either a 2GIG LTEA-A-GC3 AT&T LTE Communicator or a 2GIG LTEV1-A-GC3 Verizon LTE Communicator, and you will be able to connect the GC3e with the Alarm.com Servers for monitoring service. Since the 2GIG GC3e already has an internal WIFI card, adding the cellular communicator will make it into a dual-path system that will stay monitored even if one path goes down or becomes unavailable. Alarm.com requires cellular connectivity, so you will need a monitoring plan that includes cellular communication, such as an Alarm Grid Gold Plan (Self or Full).

Although the 2GIG GC3e doesn't support more advanced features like Bluetooth Disarming and Facial Recognition Disarming, the GC3e does support the robust lineup of 2GIG eSeries Encrypted Sensors. You can also supplement those encrypted sensors with non-encrypted sensors from the 2GIG 345 MHz Series and the Honeywell 5800 Series for good measure. The panel also has an integrated Z-Wave Plus controller so that you can start building a smart home network to make your life more convenient.

Overall, the 2GIG GC3e is an outstanding choice if you want more of a simple, no-frills panel that is still unmistakably modern and offers all the remote access and function through Alarm.com. If you do want something more advanced, than the 2GIG GC3e's effective replacement, the 2GIG Edge is available in AT&T LTE and Verizon LTE variants. Both the GC3e and the Edge connect with the same Alarm.com platform, and both offer the same sensor compatibility. The main benefit to going with the Edge is that you get access to some more advanced features, such as the aforementioned Bluetooth Disarming and Facial Recognition Disarming. If you don't mind missing out on those features, then the 2GIG GC3e is basically just as good. Both systems feature very similar menus and user interfaces (UIs), so if you know one, then you pretty much already know the other!

In addition, we are also offering special pricing on 2GIG GC3e System Kits. Each kit includes a cellular communicator for getting the system monitored a Honeywell LT-Cable for providing power, one (1) 2GIG PIR1e-345 Motion Sensor, and either three (3) or ten (10) VERSA-2GIG Door and Window Contact Sensors. Just decide whether you want AT&T LTE or Verizon LTE, and also whether you want three (3) door and window sensors or ten (10) door and window sensors. Then find the corresponding kit below. Hurry, before time runs out!

Remember, once supplies of the 2GIG GC3e run out, then the system is gone forever. If you have any questions about the GC3e, or any of the other security systems on our website, or if you want to speak with a security system expert who can help you build the perfect setup for your home or business, then please do not hesitate to send an email to our dedicated team at support@alarmgrid.com. We're here to check your emails from 9am to 8pm ET M-F. Whether you go with the 2GIG GC3e, its replacement, the 2GIG Edge, or a different system entirely, we will be there to help you every step of the way. Thank you for reading the Alarm Grid Blog, and we will be back with more news and promotions real soon!

Tags: , , , , , , , , , , , , , , , , , , ,

Comments


Posted

Being in the alarm industry, we get to test out some of the newest security systems first-hand. Today, we will briefly discuss three juggernauts in the DIY security realm - the 2GIG Edge, the Qolsys IQ Panel 2 Plus, and the Honeywell Home PROA7PLUS, and explain why they can all succeed.

Whenever you have multiple companies all putting their best offerings forward to compete in the same field, there is usually the expectation that there will be at least one winner, but also at least one loser. However, in this playing field of three wireless alarm panels, it really appears as though each company has put its best offering forward and presented something distinctly unique that can stand out and succeed in this competitive industry. Simply put, all three of these systems are winners. It was rough getting here at times. There were some mistakes and growing pains along the way. Some were really bad. We can definitely say that it took some perseverance, but we reached a point where our three most prominent security system manufacturers - 2GIG, Qolsys, and Honeywell Home - have all hit their strides. It really is a fantastic sight to behold.

Today, we're not doing an in-depth compare and contrast of these three great systems, nor are we going to provide a definitive "ranking" of these systems. Maybe that can happen another time. What we are going to give you today is just a look at one (1) feature or capability for each system that is not possible for the other two. That is a major reason why we believe all three of these systems will thrive - they each offer something that you aren't going to find or be able to achieve with their biggest competitors. In other words, each system we're discussing today has an important competitive advantage that should keep it relevant for quite some time. Also, note that we're focusing on the positive aspects today. This isn't a wish list, and we're also not going to pick apart these systems to point out any minor flaws or shortcomings. This is just a chance for us to talk about something we like about each system and why we think it's a benefit. Anyway, let's get started. Here is why the 2GIG Edge, the Qolsys IQ Panel 2 Plus, and the Honeywell Home PROA7PLUS can all win.


2GIG Edge - Facial Recognition Arming/Disarming


Our impression of the 2GIG Edge is that Nortek really wanted to bring the alarm industry to the future. The system is loaded with advanced features and functions that certainly work to turn heads and bring the wow factor. None of those features more so than the panel's facial recognition arming and disarming capability. Sure, the IQ Panel 2 Plus also has its own facial recognition capabilities, but their system just generates an email from Alarm.com letting you know that the panel didn't recognize the face the last time someone disarmed. Only with the 2GIG Edge can you have the front panel camera scan your face and automatically arm or disarm the system, all without needing to enter a code. Facial recognition arming comes in handy if the Quick Arm feature (Q113) is disabled in order to provide arming/disarming logs. By default, this feature is enabled, which means that the system can be armed simply by pressing the Arm Stay or Arm Away button. This is convenient, but in some circumstances, such as for a business, you may want to know which user is arming and disarming your system, as well as when the system is being armed and disarmed.

The facial recognition feature of the 2GIG Edge differs from the Qolsys IQ Panel 2 Plus in another way. With the Qolsys panel, all of the heavy lifting is done by Alarm.com. The facial profile and recognition processing all occur on the Alarm.com servers. With the 2GIG Edge, the user's facial profile is stored locally on the panel, and facial recognition processing also takes place locally. This means your facial biometric information stays safe within your own network and is never sent out into the cloud. If you're concerned about keeping your facial biometric information private, then this is very important!

On top of that, the feature works shockingly well and consistently when set up properly, and unless you have an identical twin or a doppelganger hanging around, it's not a security risk in any way. This is the kind of feature that you brag about to your friends, as it's actually cool. Plus, once you get used to it and learn how to position your face just right, the feature is super convenient as well. Being able to arm or disarm your system while your hands are full is something you will absolutely appreciate at some point or another. Manufacturers are always looking for ways to futurize their alarm systems. Well, the 2GIg Edge has done exactly that with its facial recognition feature. We recommend checking our prior blog post dedicated to 2GIG Edge Facial Recognition to learn more.


Qolsys IQ Panel 2 Plus - PowerG Sensor Range


As the Qolsys IQ Panel 2 Plus is the oldest security system on this list, features that were once exclusive and unique have since been replicated by their competition. That being said, one area where the IQ2+ still reigns supreme is in the wireless range of its PowerG Sensors. With a range of approximately 2,000 feet when used with the IQ2+, you just can't go wrong. Sure, that listed range is assuming a best-case scenario in an open-air environment, with no large metal objects or other obstacles around to cause interference. Still, it blows the other manufacturers out of the water. While we haven't done any of our own testing (that may be a fun experiment for a future blog), the reports we hear from customers seem to indicate that PowerG Sensors on the IQ2+ do indeed offer a noticeably longer transmitting range than what can be achieved with the other panels on this list. We have heard multiple stories of users who have managed to get PowerG Sensors to work in areas such as warehouses and storage facilities where wireless sensors were thought to be completely unviable. If that wasn't enough, there is also the DSC PG9920 PowerG Repeater, which boosts the theoretical maximum wireless range to a distance of up to 4,000 feet!

While all of this doesn't really matter much for most users, as most users don't really need a sensor to work from 2,000+ feet away, the users who do benefit from the extended wireless range find it to be a complete game-changer. Just imagine, an installation that was once only possible with a super complex hardwired polling loop panel can now be achieved wirelessly with the IQ Panel 2 Plus! Not to mention that the PowerG Sensors offer some of the very best protection we have seen, with 128-bit AES encryption and Frequency Hopping Spread Spectrum (FHSS) Technology. We're a bit surprised other manufacturers haven't followed suit and offered something comparable to PowerG. It's not to say that their alternative sensor offerings (e.g. Resideo PROSIX and SiX Series Sensors, 2GIG eSeries Sensors) aren't good devices in their own right, but the DSC PowerG Sensors are still at the top of the food chain... at least for now. As a result, there are still occasional installations where our only option is to recommend the IQ Panel 2 Plus with PowerG Sensors. It's totally cool though, as the IQ2+ remains a great panel that is loaded with tremendous features.


Honeywell Home PROA7PLUS - IP-Only Monitoring Option


We have an honorable mention with the PROA7PLUS. Namely, it's the only one of these three systems with replaceable components, meaning that you won't need to replace the entire panel if something like its WIFI & Z-Wave card or its added cellular communicator becomes damaged. While replaceable components are nice to have, they don't necessarily sell panels like the ability to monitor across internet protocol (IP) only. Although we love getting customers on our Gold Plan, and we can talk about the benefits of cellular monitoring until we're blue in the face, the fact remains that there are some customers who just want reliable monitoring service at a low price. We see it all the time - a customer just wants no-frills monitoring service to get a homeowner's insurance discount and to provide a basic layer of protection over their household. To them, the extra cost associated with cellular or dual-path monitoring isn't worth the benefit of their system staying monitored during internet outages. All we can do is try to give these customers what they want - an alarm panel that will allow them to keep their monitoring costs down. That is what they get with the PROA7PLUS, as it is the only one of these three systems that supports IP-only monitoring.

Technically, it's not the doing of the panel that makes IP-only monitoring possible, but rather it's the monitoring platform. The other panels on this list connect with Alarm.com, which mandates that cellular connectivity is set up on all their accounts. The PROA7PLUS on the other hand doesn't use Alarm.com, but rather it uses AlarmNet and Total Connect 2.0. For the most part, Alarm.com and Total Connect 2.0 are relatively equal, but in a rare area of difference, TC2 allows for IP-only service, while ADC requires a cellular connection. The result is that when a customer comes to us wanting low-cost monitoring, after we explain the benefits of cellular, and they still want IP-only anyway, we go ahead with recommending the PROA7PLUS. That's not a bad thing either, as the system is super sleek, and it offers an incredible mix of great features and reliable performance. Though when it comes to the area where the PROA7PLUS stands out the most, it's the system's ability to be set up for IP-only alarm monitoring service. Unless Alarm.com drops its cellular requirement, or 2GIG and/or Qolsys team-up with another monitoring platform, Resideo and the PROA7PLUS will continue to dominate this market segment. There will always be people wanting monitoring service at the lowest possible price, even if it means giving up cellular connectivity. Luckily for those frugal folks, they have an excellent panel that gives them that option in the PROA7PLUS. That alone gives the PROA7PLUS plenty of opportunity to succeed. Also, just to be clear, a user can always add a cellular communicator to a PROA7PLUS and upgrade to cellular monitoring later on. We have many customers who want to start out on a low-cost plan and then upgrade to a more expensive plan later. That's perfectly understandable, and the PROA7PLUS makes that option possible.


What Do You Think?


We mean it when we say that the Edge, IQ Panel 2 Plus, and PROA7PLUS are all fantastic alarm panels. We might do a ranking someday, but to us, they are all winners. The choice really comes down to your unique needs. If the convenience of arming or disarming using your face is most important, go with the Edge. If you need the extended wireless range of PowerG, go with the IQ Panel 2 Plus. If you want low-cost IP-only monitoring, go with the PROA7PLUS. Each panel has its own advantage. There are also many other talking points that we simply don't have time to get to today. However, you can start your own discussion in the comments below! We would love to hear your thoughts, opinions, viewpoints, and personal experiences. If you have used or tested out any of these panels, then we would love to know about it. Also, our comments section is a great place to ask questions. Maybe we have something that we didn't cover that you would like to learn more about? Our team of experts are happy to help you. Leave a comment below, and we will be sure to reply. Plus, don't forget to stay tuned to our blog for more security news and discussions coming soon!

Tags: , , , , , , , , , , , , , , , , , ,

Comments


Posted By

We have a relatively short post today, as we just wanted to say "Thank You" to 2GIG for featuring Alarm Grid on the 2GIG Instagram Page, @2gigsecurity. 2GIG posted our unboxing video of the new 2GIG Edge Security System. Thank you 2GIG, we're glad that you liked our unboxing video!


The 2GIG Edge is a wireless all-in-one alarm panel with a 7-inch touchscreen controller, built-in WIFI and LTE cellular, an integrated Z-Wave Plus V2 700-Series controller, support for up to 100 wireless zones, facial recognition disarming, Smart Area Partitions, optional Bluetooth disarming, full connectivity with the Alarm.com platform, and so much more! The system is available now on the Alarm Grid website in standalone AT&T and Verizon variants, or in one of our complete security system starter kits that include everything you need for alarm monitoring!

The unboxing video that 2GIG reposted is one of our very first in a new series by Alarm Grid, where "James the Video Guy" unboxes various alarm control panels and security system kits to show you exactly what's inside and what comes included. While James is usually known for his work behind the camera, this new series has given him a chance to step into the spotlight and showcase some of the most popular products offered by Alarm Grid. You can see the full 2GIG Edge Unboxing Video down below. We also made a blog post about our new unboxing videos back in April, which you can view here.

Thanks again to 2GIG for featuring us on their Instagram page. If you have any requests for what you would like to see in a future unboxing video from Alarm Grid, please let us know. You can leave a comment down below to make your request. We hope to have more videos like this available in the future. We will be sure to let you know as they come out. You can also leave a comment below to share your thoughts on our unboxing videos or any other videos featured on the Alarm Grid YouTube Channel. Thanks for reading, and we'll be back with more great security system content coming soon!

Tags: , , , , , , , , , , , , , , ,

Comments


Posted

A new alarm panel hitting the market often means an old one is discontinued. That is the case here today, as the 2GIG GC3e has been formally discontinued by Nortek Control. The GC3e has been replaced by the 2GIG Edge, which is available in both an AT&T variant and a Verizon variant.

As we look back on the 2GIG GC3e, we gotta admit that the panel was in an unfavorable position from the start. The system was a direct replacement to the 2GIG GC3, as it retained largely the same user interface, and its design only received a minor refresh. The big new addition with the GC3e was its ability to support 2GIG eSeries Encrypted Sensors. Along with the 2GIG GC2e, this marked the first time that 2GIG Alarm Panels could support encrypted sensors.

Unfortunately, 2GIG was late to the party, as other security systems like the Honeywell Lyric and Qolsys IQ Panel 2 Plus already had encrypted sensor support, not to mention a wide selection of sensors to choose from. Coupled with the fact that Qolsys continued to release new features for the IQ2+, and Resideo (formerly Honeywell) had the PROA7PLUS on the way, it quickly became clear that 2GIG would need to do better in order to keep up.

Thus began development on the 2GIG Edge. We first learned about the system in October of last year. With a bold new website and heavy promotion, hype around the Edge grew quickly. But this also brought questions in the back of our minds - what would happen to the GC2e and the GC3e? These panels had been on the market for less than two (2) years. Would 2GIG really abandon them so quickly? Well, today we have the verdict. The 2GIG GC2e stays, and the 2GIG GC3e heads off to the old alarm system graveyard in the sky.

First released in late July 2019, the 2GIG GC3e became known for its strong build quality and stark similarities to its GC3 predecessor. But it had a hard time competing with fellow Alarm.com Security System, the Qolsys IQ Panel 2 Plus. Buyers continued to flock to the IQ2+, which offered Automatic Bluetooth Disarming and Facial Recognition. Those features could not be easily added to the GC3e, so 2GIG decided to cut their losses and add those features into a new alarm panel, the 2GIG Edge. 2GIG even one-upped Qolsys by making it so that the Edge's Facial Recognition feature can be used for disarming the system!

With the Edge firmly in place as 2GIG's new flagship panel, and the 2GIG GC2e set as their "budget-friendly" option, some wondered if the 2GIG GC3e might be kept in production as a sort of "middle-of-the-road" offering. But nope, apparently, three panels is too many at 2GIG, and it's the GC3e biting the dust. And now, less than two years after hitting the market, and barely more than two years removed from its unveiling at ISC West 2019, we are saying goodbye to the 2GIG GC3e. It wasn't a long ride, but it was a good one.

If you have an existing 2GIG GC3e, then don't worry! The system will continue to be supported for alarm monitoring and service with the Alarm.com platform. Given the system's great build quality, it's fair to expect that existing GC3e Panels already out in the field will likely stay in service for quite some time, probably for the duration of LTE cellular networks. And speaking of LTE communication, Alarm Grid is continuing to offer LTE communicators for the 2GIG GC3 and 2GIG GC3e. These are the 2GIG LTEA-A-GC3 (AT&T LTE) and the 2GIG LTEV1-A-GC3 (Verizon LTE). If you need to get your GC3 updated, or your GC3e monitored, then either one of these modules is an excellent option. They're super easy to install, and they provide ultra-reliable cellular connectivity for the peace of mind that you deserve.

Meanwhile, the 2GIG GC2e will remain in production as the company's budget panel. However, we don't usually recommend that system for alarm monitoring, as it has no internet connectivity option to serve as an additional communication path, and it is relatively bare-bones in terms of features. But it is still an available option, and many users find that the GC2e is a strong offering as a replacement for the 2GIG GC2 or as a non-monitored system serving as a local noisemaker.

But for our top 2GIG pick, it should come as no surprise that we are recommending the new 2GIG Edge Alarm System. With its great features like 7-inch touchscreen controller, Facial Recognition, optional Automatic Bluetooth Disarming, Smart Area Partitioning support, 700-Series Z-Wave Plus V2 Smart Home Automation, and being dual-path ready right out of the box, we are proud to say that this system is available now on the Alarm Grid website. While we might miss the 2GIG GC3e, the 2GIG Edge certainly fills the void. Time will tell how the Edge fares against other competing systems like the Qolsys IQ Panel 2 Plus and Honeywell Home PROA7PLUS.

What do you think of the 2GIG GC3e? Will you miss the system? Are you surprised to see 2GIG discontinue the system after less than two years? Did you ever get to try the system out for yourself? Share your thoughts and experiences in a comment down below. We would love to hear what you have to say. And remember to stay tuned to the Alarm Grid Blog for more security system content coming soon. We promise, we don't discontinue systems every day, but when we do, we always make sure to say a proper goodbye. Farewell 2GIG GC3e!

Tags: , , , , , , , , , , , , , , , , , , , , ,

Comments


Posted By

We're back with another video recap! And this is a rather special video recap, because I have a guest joining me this time! It's someone you have never seen in Alarm Grid videos before, and we hope to have this person back and doing more videos soon. Five (5) new videos await! Let's go!

Alarm com Mobile App: Setting Up Multi System Access

I show you how you can set up multiple system access in Alarm.com. With this feature, you can access Alarm.com using a single username and password to control multiple security systems. There will be a dropdown menu in Alarm.com that you can use to navigate between the different systems linked with your account. This feature is excellent if you own multiple properties, or if you're a business owner with multiple locations. Now you can control all your systems from a single login!


2GIG Edge: Resetting the Master Code

In her triumphant Alarm Grid video debut, Aja shows you how to reset the Master Code on a 2GIG Edge Security System. The Master Code on a 2GIG Edge is used for arming and disarming and changing Master-level settings. The code should almost always be changed for security purposes. To change the Master Code, you can access the Users Menu and manually change the code. Additionally, if you perform a Factory Default of the Users Settings, then the Master Code will revert back to its default of 1111.


2GIG Edge: Resetting the Installer Code

I teach you how to reset the Installer Code on your 2GIG Edge Alarm System. The Installer Code on a 2GIG Edge is used for getting into deep-level programming. We recommend keeping the Installer Code at its default of 1561 so that you do not become locked out of programming. Keeping the Installer Code at the 1561 default does not represent a security risk because you cannot disarm the system with the Installer Code. If you ever forget the default code, you can always look it up later.


2GIG Edge: Factory Resetting

I show you how to factory reset your 2GIG Edge Alarm Panel. In order to perform a factory reset, also called a factory default, you need the system's Installer Code. This is because you must access the Installer Toolbox on the panel. Inside the Installer Toolbox is the Restore Defaults Menu. You can choose from multiple types of defaults to perform. The options include Sensors & Zones, Console, Users, Z-Wave Network, IP Cameras. You cannot "undo" a default after one has been performed.


2GIG Edge: Adding a User Code

I show you how to set up an additional user code on the 2GIG Edge Security Panel. The 2GIG Edge supports up to 100 different user codes. With this feature, you can give everyone who uses the system regularly their very own personalized user code. When you set up a code, you will be asked to provide the numeric code that will be used for disarming the system. If you have slots open for Automatic Bluetooth Disarming and Facial Recognition using personalized Facial Biometrics, then you can also set up those features when you create the new user.

Tags: , , , , , , , , , ,

Comments


Posted

Welcome to our PROA7PLUS Cheatsheet! This document will cover various procedures and information associated with the Honeywell Home PROA7PLUS, Honeywell Home PROA7, Resideo PROA7PLUSC, and Resideo PROA7C. First, we'll cover a preface, and then we'll dive deep into various system processes.

Table of Contents


Preface

The PROA7PLUS, along with its variants, represents the latest alarm panel from Honeywell Home and Resideo. Sometimes referred to as the ProSeries 7" All-In-One Systems, these are wireless all-in-one panels that connect with AlarmNet for alarm monitoring service. They can also be set up for use with the Total Connect 2.0 interactive platform, provided that access to the service is included in the user's alarm monitoring plan. Since AlarmNet supports IP-only alarm monitoring, cellular-only alarm monitoring, and dual-path alarm monitoring with both IP and cellular, you can technically use the PROA7PLUS and its variants with any alarm monitoring plan from Alarm Grid. To learn more about the Alarm Grid Monitoring Plans, please review this helpful post.

It should be mentioned that end-user programming for the ProSeries Panels is not available as of May 2021. The feature is currently in beta development and only available to those in the alarm industry. That is how we are able to provide information on how end-user programming looks and how it works. It is expected that the feature will be made available to the general public via a firmware update in the very near future. But please note that if your ProSeries System has not yet been updated to the firmware version that supports end-user programming, then the feature will not be available on your panel.

Right out of the box, the ProSeries Panels can support all of the Honeywell Home PROSIX Series Sensors and the Honeywell SiX Series Sensors that were originally built for use with the Honeywell Lyric Alarm System. It is important to note that once you pair a SiX Series Sensor with a ProSeries Panel, it will receive a firmware update and can never be reverted back to be used with a Lyric again. Once it goes to ProSeries Panel, it can never go back. The ProSeries Panels each have (127) zones available for the encrypted PROSIX and SiX Series Sensors.

Legacy sensor support is also available for the ProSeries Panels. If you add a Honeywell Home PROTAKEOVER Module to the panel, then you can pair sensors from one (1) of five (5) possible legacy frequency. The legacy frequency you decide to use is selected via an adjustable dial on the PROTAKEOVER Module. The available options include Honeywell 5800 Sensors (but not 2GIG), 2GIG 345 MHz Sensors (but not Honeywell), 319.5 MHz Sensors (Qolsys, Interlogix, GE), 433 MHz Sensors (DSC), and Bosch Sensors. You can only add one (1) PROTAKEOVER Module to a ProSeries Panel, so only one (1) legacy frequency can be used with the system at any given time. Up to (123) legacy zones are available on the ProSeries Panels. When combined with the encrypted zones for PROSIX and SiX Sensors, a maximum total of (250) zones are available on one of these systems.

One key characteristic of the PROA7PLUS is that the system is split into four (4) different variants, based on two (2) deciding factors, with each factor having two (2) options. First, you must decide whether you want the PLUS version or the BASE version. Most users ultimately go with the PLUS version, as the BASE version is more limited and requires an added communicator to get the system monitored. Second, you must decide whether you want the Honeywell Home version for residential use or the Resideo version for commercial use. Unlike the first decision, this second one really comes down to personal preference, and it won't really affect the performance of the system in any way.


PLUS Versions
BASE Versions
Honeywell Home Versions
Honeywell Home PROA7PLUS

Honeywell Home PROA7

Resideo Versions
Resideo PROA7PLUSC

Resideo PROA7C

PLUS vs. BASE

Most users who buy a ProSeries System opt for a PLUS Model. There are a few differences to be discussed between the PLUS Models and the BASE Models. A PLUS Model comes with a Honeywell Home PROWIFIZW Module already built-in for WIFI and Z-Wave Plus support. A BASE Model does not have this, but you can add one separately. If you only want WIFI support, and you don't care about Z-Wave Plus for home automation, then there is also a Honeywell Home PROWIFI that provides WIFI, but no Z-Wave Plus. Honeywell has chosen to go with a very modular design, so that users don't have to pay for features they may never intend to use.

A PLUS Model can be set up for IP-only monitoring (WIFI) right out of the box. You only need to add a cellular communicator if you want to set up a PLUS Model for dual-path monitoring with both IP and cellular. Conversely, a BASE Model cannot be set up for alarm monitoring right out of the box, as it does not have a built-in communicator. You must add an IP communicator and/or a cellular communicator to get the system monitored. If, for example, you want cellular-only monitoring, it may make sense for you to buy the BASE Model, and a cellular communicator, but only if you don't want any of the other features that are supported only on the PLUS Model. We'll cover those features in just a bit.

For reference, the IP communicators are WIFI modules that support wireless WIFI connectivity, and they cannot be used for wired ethernet connectivity. The options include the Honeywell Home PROWIFI, which adds WIFI only, and the Honeywell Home PROWIFIZW, which adds both WIFI and Z-Wave Plus. As of May 2021, only LTE modules are available for cellular connectivity. The options include the Honeywell Home PROLTE-A (AT&T LTE) and the Honeywell Home PROLTE-V (Verizon LTE). It's possible that a 5G cellular module might be released for the system someday, but that is not an option now.

There are two (2) other big differences between the PLUS Models and the BASE Models. One, a PLUS Model has a built-in camera for taking disarm photos on the system, while a BASE Model does not have an integrated camera. There is no way to add a panel camera to a BASE Model, so this will always be a feature you miss out on if you decide to get a BASE Model. Two, a PLUS Model supports Bluetooth LE connectivity for automatic Bluetooth disarming, while a BASE Model does not support Bluetooth. There is no way to add Bluetooth connectivity to a BASE Model, so again, this will be a feature you miss out on if you opt for a Base Model.

Honeywell Home vs. Resideo

Unlike the PLUS vs. BASE debate, the Honeywell Home vs. Resideo decision is more of a personal preference decision. The difference here is that the Honeywell Home Models say "Honeywell Home" across the front, while the Resideo Models say "Resideo" across the front. Other than that, they are exactly the same. Technically speaking, the Honeywell Home Models are intended for residential use, while the Resideo Models are intended for commercial or industrial use. But there is actually nothing stopping you from using a Resideo Model inside a home, or a Honeywell Home Model inside a business. For more information on the subject, we recommend checking out this blog we wrote on the subject.


General System Information

Below is some of the general information for the Honeywell Home and Resideo ProSeries Panels:

  • Panel Type: Wireless All-In-One
  • Voltage Input: 9VDC, 2.5A Transformer (Included - P/N 300-10260)
  • Backup Battery: 24 Hour Rechargeable Lithium Ion 3.6/4.2V, 5200mAH (Included - P/N 300-11186)
  • Total Zones: 250 Security Protection Zones
  • PROSIX and SiX Series Zones: 127 Zones
  • Legacy RF Support: 123 Zones, 319.5 MHz, 345 MHz, 433 MHz, or Bosch (with added takeover module)
  • Legacy RF Notes: Uni-Directional Only; Requires PROTAKEOVER Module
  • KeyFob Slots: 32 (ProSix & SiX Fobs)
  • User Codes: 96 (Master Code Hardcoded to Slot 1)
  • Partitions: 4
  • Automation: Z-Wave Plus (Automatically Included with PLUS Models Only)
  • Z-Wave Device Limit: 78 (Automatically Included with for PLUS Models)
  • Compatible Keypads: Resideo PROSIXLCDKP, Resideo PROWLTOUCH (Requires PROWIFIZW or PROWIFI)
  • Maximum Keypads: 8 per Partition
  • Event Log: 4,000 Events
  • Other Features: WIFI. The following features are supported on the PLUS Model only: Integrated Camera, Automatic Bluetooth Disarming, Wiselink (PROINDMV & PROOUTMV)
  • Package Contents: Panel, PROWIFIZW Module (installed, PLUS Models Only), Transformer (9VDC, 2.5A), Backup Battery, Manuals, Mounting Hardware w/ Wall Plate
  • Dimensions: 5.75"L x 7.875"W x 1.0"D
  • Mounting Options: Wall Mount or Desk Mount (Sold Separately)
  • Default Master Code: 1234 (should change for security purposes)
  • Default Installer Code: 4112 (recommended to keep at default)


Wiring

The ProSeries Alarm Panels include a transformer for powering on the system, but a user must supply their own wiring. The use of a prepared wire, such as a Honeywell LT-Cable is advised. However, traditional wiring is perfectly suitable. You should use a wire gauge between 16-gauge and 22-gauge. If you decide to use traditional wiring that you have prepared yourself, then please observe the following strict wire limits:

Wire Gauge Max Wire Run
16 AWG 110 Feet
18 AWG 70 Feet
20 AWG 45 Feet
22 AWG 25 Feet


Local Alarm Mode

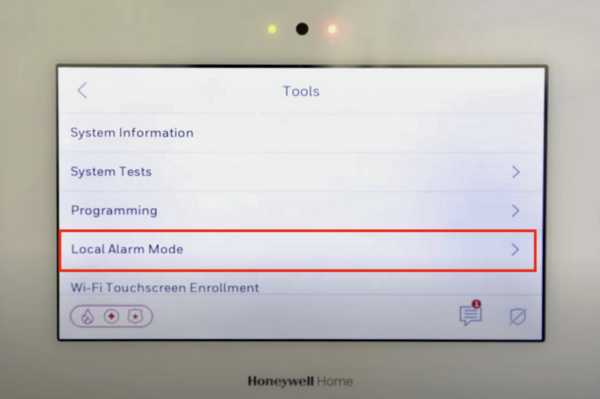
Local Alarm Mode is used when the system needs to be set up and tested, but it's not yet registered with the AlarmNet server. The PROA7PLUS is meant to be monitored in some fashion. If Local Alarm Mode is not enabled, then as soon as the panel powers up, it reaches out to the AlarmNet360 server in an attempt to register and retrieve its communicator programming. If an account does not yet exist on the server for the panel, it will return a communicator error which will not clear until registration occurs. When Local Alarm Mode is enabled, the communicator for the panel is disabled, and this process of attempting to register does not occur. Therefore, no communicator error will be displayed. To enable or disable Local Alarm Mode, select the Menu Icon from the bottom-center of the home screen, then scroll down to Tools. Enter the Installer Code (Default is 4112) when prompted for a code, then select Local Alarm Mode. The feature is toggled ON or OFF from this screen. Bear in mind, when this setting is changed the panel will reboot, and this process can take several minutes.


System Arming

Arming the security system puts it into a secured state. If activity is detected while the system is armed (e.g. a door/window being opened, movement being detected, etc.), then the system may go into immediate alarm or require that a user verify their identity with a valid code to prevent an alarm. Please note that this does not apply to 24-Hour Zones, which will trigger an immediate alarm when activated, even if the system is in a disarmed state. Common examples of 24-Hour Zones include smoke detectors, carbon monoxide detectors, and emergency exit doors.

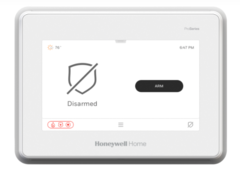
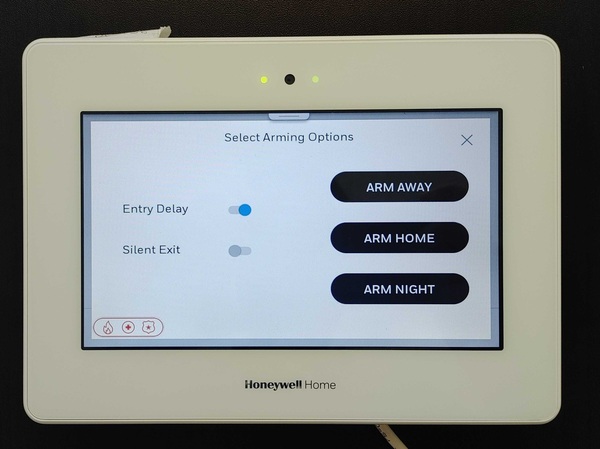
To arm a ProSeries Panel, click the ARM button on the main screen. Then choose the arming type to arm the system. You can Arm Away or Arm Home, with Arm Home being the system's version of Arm Stay. The difference between these arming modes is that interior sensors are automatically bypassed (ignored) when you choose Arm Home. This allows anyone still inside the building to move around freely, without triggering a false alarm. But in Arm Away, interior sensors are active and able to cause alarms on the system. There should be nobody remaining inside the building after you have enabled Arm Away mode. Please note that at least one (1) Entry/Exit Zone must be faulted during the Exit Delay countdown when Arming Away, or else the system will revert to Arm Home mode instead. This is because the system will assume no one left after arming, and that the user must have meant to Arm Stay. This is known as Auto-Stay Arming, and it is a false alarm prevention feature.

Keep in mind that if multiple partitions are set up with the system, then you will be able to select which partition you want to control before you press the ARM button on the main screen. You can select any of the four (4) partitions that are enabled on the system. A partition dropdown selection option will only be shown if multiple partitions are configured on the system. If partitions have not yet been configured, and the system still only has a single partition, then this dropdown option will not be displayed. Partitions are covered in greater detail later in this cheatsheet.

A feature called Quick Arm is enabled by default, but can be disabled by partition, in each partition's settings. This affects what happens after selecting your preferred arming method (Home or Away). When this feature is enabled, the PROA7PLUS will not prompt for a user code to complete arming. This can save time when arming. This also allows anyone to be able to arm the alarm. A valid user code is still always required to disarm. This poses little to no risk, as long as you remember your user codes. When armed with Quick Arm, the panel's event log shows that it was armed by a generic user. Some choose to disable this feature because they prefer to know who exactly armed the system. When disabled, the actual user number will be logged as the user who armed the partition.

Another option called Arm Night will also be available if you have at least one motion sensor programmed on the system with the Arm Night feature enabled. Arm Night is a more secure version of Arm Home (Stay), in which any interior motion sensor with the Arm Night feature enabled will NOT be automatically bypassed. That is, if that sensor detects activity while in Arm Night mode, it will trigger a response (e.g. an alarm) on the system. Meanwhile, motion sensors that have Arm Night disabled will be bypassed and ignored by the system.

Also when arming the system, you can choose to enable or disable Entry Delay and Silent Exit. The default selection is to enable Entry Delay, and disable Silent Exit. If Entry Delay is disabled it will result in the system going into immediate alarm when an Entry/Exit Zone is faulted, as opposed to going into an Entry Delay countdown, during which the user can disarm the system before an alarm occurs. Silent Exit being enabled will result in the panel not producing any sounds as the Exit Delay countdown occurs. Please note that if Silent Exit is enabled, then the Exit Delay countdown timer will be automatically doubled for that arming session. This will give the user extra time to vacate the building, as there won't be any countdown timer reminding them that they need to exit immediately.


Please note that you can also arm the system via Total Connect 2.0 if the system is monitored and set up with the service.


System Disarming

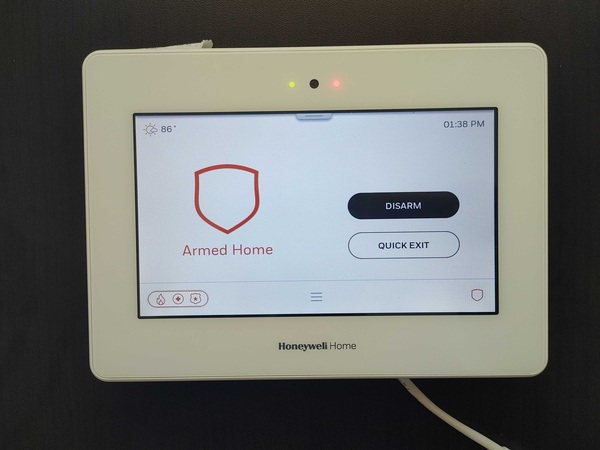
Disarming the system takes it out of a secured state and puts it into a Disarmed mode, in which only 24-Hour Zones are able to trigger system alarms. You can only disarm the system while it is in an armed mode. Please note that if you have Armed Home or Armed Night, then an option for Quick Exit will be available. This feature allows a user inside a location that is Armed Home or Armed Night to briefly step outside, for instance, to take out the trash, or to retrieve something from their car. When you press Quick Exit, the system begins the normal Exit Delay countdown. During this time, any Entry/Exit door can be opened without causing an alarm. As long as the door is secured again before the countdown expires, the system will return to its prior arming state at the end of the countdown. This prevents the user from having to disarm, then arm again.


In Arm Away mode, the only available option is to Disarm.


To disarm the system, you must have a valid code. This can be a regular user code, or the Master Code. Click the Disarm button to pull-up a numeric digital keypad. Then enter the valid code into the digital keypad. The system will disarm. Don't forget that if you need to disarm a different partition than the one displayed on the screen, then you should first select that partition from the dropdown menu and provide a user code with authority for the selected partition. This dropdown menu will only be present if multiple partitions are set up on the system.

Please note that you can also disarm the system via Total Connect 2.0 if the system is monitored and set up with the service.


Adding a Zone

To add a zone to a ProSeries Panel, you must have access to end-user programming. Otherwise, all zone programming is completed remotely by your monitoring company. To access the system's auto-enrollment mode, start from the main screen and click the small menu button (three horizontal bars) at the bottom of the home screen, and then choose Tools, enter the Installer Code (default 4112), and then choose Programming, and then choose Peripherals, and then press the + button at the top of the screen to put the system into its auto-enrollment mode.


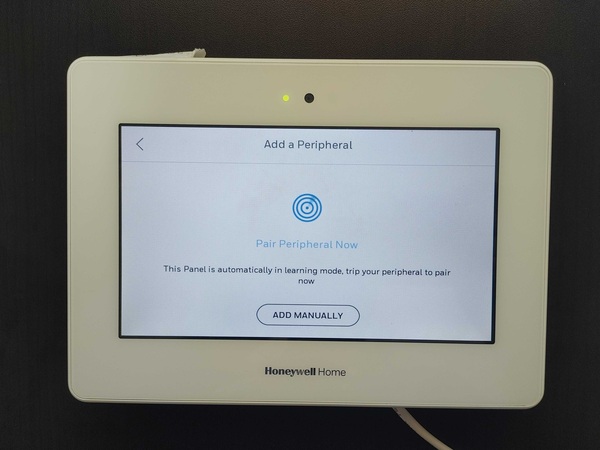
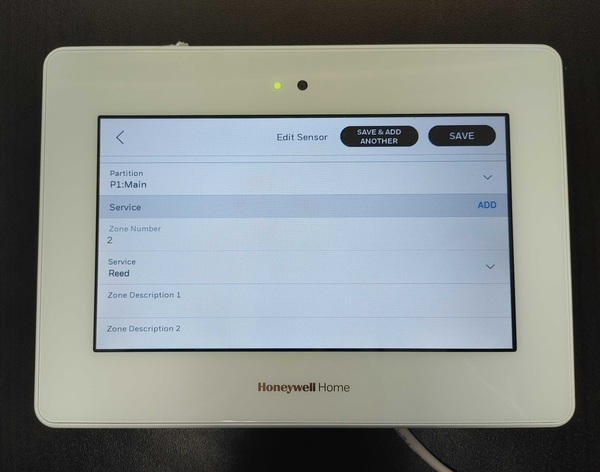
With the system in this mode, you can then fault (activate) a sensor to get it to auto-enroll. You will be taken to the Edit Sensor screen where you can configure the zone settings. The following programming fields are available:

  • Sensor Type: Set automatically during auto-enrollment. This is the model of sensor that was enrolled (e.g. SIX-Contact, SIX-Motion, etc.)
  • MAC: Set automatically during auto-enrollment. This serves as a Serial Number identifier for PROSIX and SiX Sensors. Please note that if you enroll a legacy sensor using the PROTAKEOVER Module, then this will instead be a Serial Number or a Sensor DL ID Field.
  • Partition: Allows you to assign the sensor to a specific system partition. Only enabled partitions can be selected.
  • Service (with grey background): Available on certain types of SiX and PROSIX Sensors. Allows you to add an additional (secondary) function for the sensor. An example is adding support for an external NC Contact that is wired into a PROSIXCT or SiXCT terminals when its primary function is the Reed Switch.
  • Zone Number: Cannot be changed. Shows which Zone Number the sensor is being assigned. Remember that the system supports (127) encrypted PROSIX and SiX zones, plus (123) non-encrypted legacy zones, for a total of (250) zones.
  • Service (with white background): Available on certain types of PROSIX and SiX Sensors. This allows you to set the primary function for the sensor. An example would be choosing between the Reed Switch function and the External Contact function on a PROSIXCT or SiXCT. If the Reed Switch is the primary function, the Contact Terminals would then be the secondary function.
  • Zone Descriptors (1 & 2): Used for naming the zone. The ProSeries Panel will speak the Zone Descriptors, plus the Device Type, when the sensor is faulted. For example, if you have Zone Descriptor 1 set as "East", Zone Descriptor 2 set as "Door" and Device Type as Door, then the panel will speak "East Door Door" when the sensor is faulted. In this case, Zone Descriptor 2 is unnecessary. Please note that you do not technically need to provide any Zone Descriptors for the zone. You can leave one or both of the fields blank. Many users will just program Zone Descriptor 1 and leave Zone Descriptor 2 blank. If you leave both of them blank, then the zone will only be known as whatever is set for Device Type.
  • Device Type: This is used to set the type of sensor you are adding (e.g. Door, Window, Flood, etc.) Along with the Zone Descriptors, the Device Type is spoken by the panel when voice annunciation is enabled and the sensor is faulted. Depending on the Device Type you choose, only certain types of Response Types will be available. If you want access to a certain Response Type that isn't available for the sensor's normal Device Type, then you may consider setting the Device Type to "Other", which will result in all Response Types being available. Please note that if you set the Device Type to "Other", then it will not be spoken when the sensor is faulted and voice annunciation is enabled. For example, if you had Zone Descriptor 1 set as "East" and Zone Descriptor 2 set as "Bedroom" and the Device Type set as "Other", then the panel would only speak "East Bedroom". Available Device Types include Door, Window, Garage Door, Other, Police, Environmental, Glassbreak, Flood, Medical, Motion Sensor, and Temperature.
  • Response Type: This option determines what action the system will take when the sensor is faulted or activated. Depending on the Device Type you set, only certain Response Type options will be available. If you want to choose from every available Response Type, set the Device Type to "Other", and you will have a complete selection of possible Response Types. Available Response Types include: Not Used, Entry Exit 1, Entry Exit 2, Perimeter, Interior Follower, Day/Night, 24 Hour Silent, 24 Hour Audible, 24 Hour Auxiliary, Interior Delay, Monitor, Trouble, Arm Stay, Arm Away, Disarm, No Response, Silent Burglary, Garage, Garage Monitor, and Local Alarm.
  • Supervised: Toggle ON or OFF. When Supervised is ON, the system will expect the sensor to check-in periodically to ensure that it is working properly. If Supervised is ON, and the sensor fails to check in (due to environment or range issues, the unit being powered down, or having a dead battery, or the device having been removed), then the system will display a trouble condition to alert the user.
  • Alarm Report: Toggle ON or OFF. When Alarm Report is ON, the system will report to AlarmNet when the zone causes an alarm on the system. AlarmNet then forwards the signals to the user's Central Station. This is assuming that the system is being monitored. If Alarm Report is OFF, then no alarm signal will be sent out if the zone causes an alarm on the system. However, if Total Connect 2.0 is enabled for the user, an email or text notification can still be sent.
  • Version: Cannot be changed. Shows the firmware version of the programmed sensor.
  • Chime: This is the sound the panel will make when the sensor is faulted. Choose from a variety of Chime options, or set to Disabled to turn OFF the chime for the zone.
  • Armed Night: Only available if a Device Type of Motion Sensor is selected. Toggle option for ON and OFF. If Armed Night is ON, then the sensor will remain active when the system is set to Armed Night mode, as opposed to being automatically bypassed as an interior sensor. Please note that you must have at least one programmed motion sensor with Armed Night turned ON in order for the Arm Night option to be selectable from the arming screen.
  • Supervision Time: Cannot be adjusted from this screen. If a sensor fails to check in with the system for longer than this period of time, the system will put that sensor into a Trouble or Check condition. The panel is literally telling you to check on that sensor.


When you are finished adjusting the zone settings, choose either Save or Save & Add Another to save the change. If you choose Save, then you will be taken to the Peripherals List. If you choose Save & Add Another, then you will be taken back to the Add a Peripheral Screen so you can enroll another sensor. You can edit the zone settings later by selecting the sensor within the Peripherals List.


Deleting a Zone

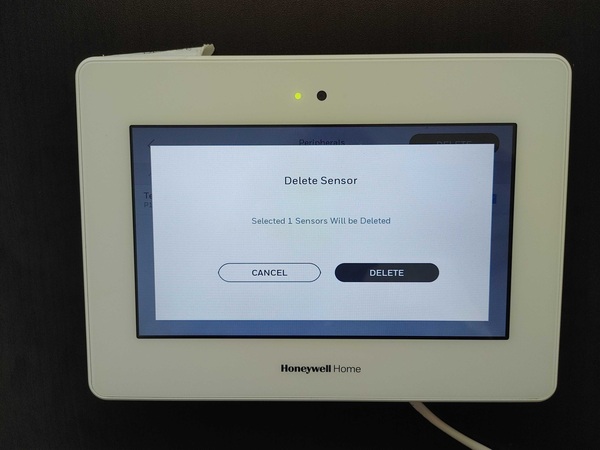
If you need to delete an existing zone, start from the main screen of the system, and click the menu button (three horizontal bars) at the bottom of the screen. Then choose Tools, and enter the system's Installer Code (default 4112). Then choose Programming, followed by Peripherals. This will access the Peripherals List. Find the zone you want to delete and check the box on the right-hand side. If you are deleting multiple zones, then check the box for each zone you want to delete. With all the necessary boxes checked, click the black "Delete" button in the upper-right corner. The system will ask you to confirm. Choose Delete on the right-hand side to confirm that you want to delete the sensor(s).


Adding a Z-Wave Device

You can only add a Z-Wave device if there is a PROWIFIZW Module inside of the ProSeries Panel. The PROA7PLUS and PROA7PLUSC have this module included out of the box, but it must be added separately to the PROA7 and PROA7C. When you add a Z-Wave device to the system it can then be controlled both locally at the panel and remotely from Total Connect 2.0 if the system is monitored with a plan that includes automation services. You can also include Z-Wave devices with smart scenes so that they activate automatically based on a set schedule or with predetermined system events.

To add a Z-Wave device, start from the main screen of the system, choose the menu button at the bottom (the three horizontal bars), followed by Tools. Enter the Installer Code for the system (default 4112). Choose Programming, and then Z-Wave Peripherals. It is advised that you clear (Exclude) the device from the panel first to wipe out any residual Z-Wave network data. You can do this even if the Z-Wave device in question is not enrolled with a Z-Wave controller. Many Z-Wave devices will have residual Z-Wave network data left over from the factory, so "excluding" first is almost always a good idea. Choose Exclusion Mode to put the panel into a mode for clearing Z-Wave devices. Then activate the inclusion/exclusion function on your Z-Wave device. There may be a button on the Z-Wave device for this purpose, or you may need to enter a specific programming code. Refer to the manual for your Z-Wave device for more information. The panel should show a device as excluded. Press done after the device has been excluded. Then choose Inclusion Mode to put the panel into a mode for adding Z-Wave devices. Activate the inclusion/exclusion function for the Z-Wave device again. This may be the same function you used when clearing the device from the network. The panel should show that a Z-Wave device was added. Press the done button when finished.


Deleting a Z-Wave Device

Deleting a Z-Wave device will clear it from the network so that it is no longer paired with the ProSeries Panel. You can then pair the Z-Wave device with a new Z-Wave network. Please note that deleting a Z-Wave device may also be referred to as clearing the device or excluding the device. Z-Wave devices are typically cleared from the network before pairing to ensure that any remaining Z-Wave network data is properly wiped out.

To delete a Z-Wave device, begin from the home screen of the panel, select the menu button at the bottom (the three horizontal bars), and then press Tools. Provide the Installer code for the system (default 4112). Select Programming, and then Z-Wave Peripherals. Choose Exclusion Mode to put the system into a mode for clearing Z-Wave devices. From there, activate the Inclusion/Exclusion function on the Z-Wave device. This process will vary depending upon the Z-Wave device in question. It may have an inclusion/exclusion button, or there may be a different process. Check the manual for the Z-Wave device to find out for sure. The panel should show that a device has been cleared from the network.


Changing the Master Code

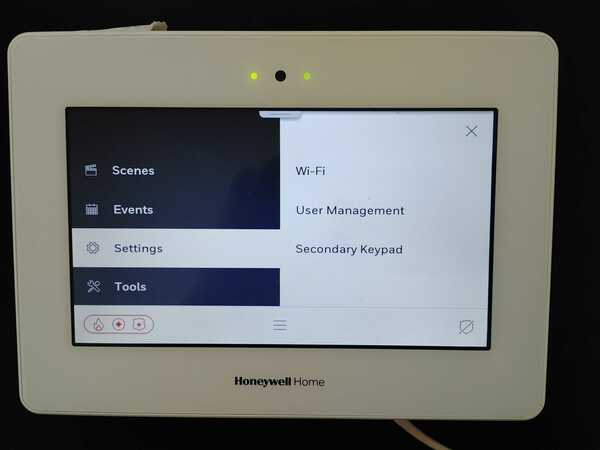
A ProSeries Panel will have a default Master Code of 1234. You will want to change this code for security purposes. Choose a different code that is easy for you to remember, but difficult for someone else to guess. To begin, start from the main screen of the panel. Click the menu button (the three horizontal bars), and then choose Settings. Select User Management. Then provide either the Master Code (default 1234) or the Installer Code (default 4112) for the system. This will allow you to access the Users Menu.

Click on the Master option from within the user list. This will take you to the Master User settings screen. Find the field for pin, and click the pencil icon on the right-hand side of that field. You will be asked to provide a new pin. Be sure the 4-digit code you enter is unique within the system. Enter the desired pin code. Then confirm that pin code by entering it a second time. Then press Save in the upper-right corner. You will be asked to enter the Master Pin to save. You should enter the EXISTING Master Code at the screen. If you are changing the code from the default of 1234, then you will enter in that 1234 default, and not the new code that you changed the Master Code to. After you enter the existing Master Code, the change will be saved and applied. The Installer Code can be used to get into this programming area, but it cannot be used in the final step, the existing Master Code must be known in order to change it.


Adding a User

There are (96) user slots available on the ProSeries Panels. When you add a new user code, you will be able to use that code for arming and disarming. To get started, click the Menu button (the three horizontal bars) at the bottom on the home screen of the panel, and then choose Settings, followed by User Management. Provide either the Master Code (default 1234) or the Installer Code (default 4112) to gain access to User Management. Click the + icon in the upper-right corner to begin adding a user. You will then provide a name for the user. After you save the name, you will be taken to a settings screen for that user. Make sure to provide and confirm a pin code for the user. Then at the bottom, you will need to set which partition(s) the user has access to. Make sure to set the partition access, or else the user code will not have any authority. In fact, the system will not let you add a code until you have set both a pin code and access authority. You can also set options for Bluetooth Disarming and Z-Wave Lock Control at this time, or you can save that for later. When you are finished, press Add in the upper-right corner. You will be asked to provide a pin to confirm the adding of the new user. Enter in the system's Master Code (default 1234). The Installer Code will not work for this. The new user will be added to the Users List. If you click on the user name, then you can edit its settings.


Deleting a User

After you delete a user, that code will no longer be able to disarm the system. To delete a code, you must access the User Management Menu. Begin from the main screen of the system. Click the three horizontal bars menu button at the bottom of the screen. Choose Settings, followed by User Management. Provide either the Master Code (default 1234) or the Installer Code (default 4112) to gain access. You will enter the User Management Menu. Find the user that you want to delete, and click the checkmark box on the right-hand side of that user. You can also delete multiple users at once by checking the box for every user you want to delete. Once you have selected the user(s), press the Delete button in the upper-right corner. You will be asked to provide the Master Code to confirm deletion. After entering the code, the user(s) you had selected will be deleted. Those user slots will be opened and available for assigning new codes.


Bluetooth Disarming

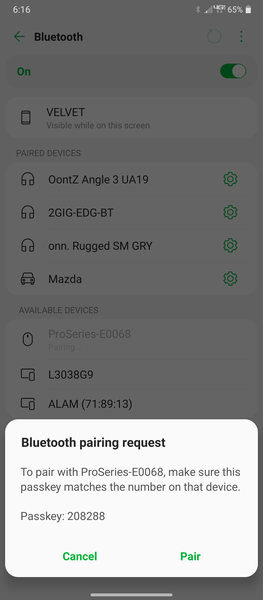
Automatic Bluetooth Disarming will allow the system to disarm from Armed Away mode automatically upon detecting a paired Bluetooth-compatible phone. Up to six (6) Bluetooth-compatible phones can be set up with this feature. Each of the 6 phones must be associated with a different user. The Master User can also be set up with a Bluetooth Phone for automatic disarming. A phone will only be able to disarm the system if it is removed from the area before the system is fully armed. If the Exit Delay countdown expires and the phone is still detected in the area, then it will be disabled and ignored for that arming session and unable to disarm the system. This prevents the system from disarming immediately due to someone forgetting their phone and accidentally leaving it behind. The feature will go into effect, and the system will immediately disarm upon the user faulting an Entry/Exit Zone with the phone properly connected across Bluetooth. You must set up the feature before it can be used. The feature is completely optional, and it can be turned OFF at any time.

You set up the Bluetooth Disarming feature within the User Management Menu. Begin from the main screen of the system. Click the three horizontal bars menu button at the bottom of the screen. Click Settings, followed by User Management. Provide either the Master Code (default 1234) or the Installer Code (default 4112). Click on the user you want to set up for Automatic Bluetooth Disarming. Then choose the field for Disarm With Bluetooth. At this time, you should activate Bluetooth pairing mode for the phone that is being paired. Press the blue Pair button in the top-right corner of the ProSeries Panel. On the phone, find the ProSeries Panel and click on it. The panel and the phone will both display pairing messages and a pairing key. Click pair on both devices to complete the pairing process. When you back out to the user settings screen, make sure to press Save in the upper-right corner. If you are saving the Master User, then you will be asked to provide its code for confirmation.


Partitions

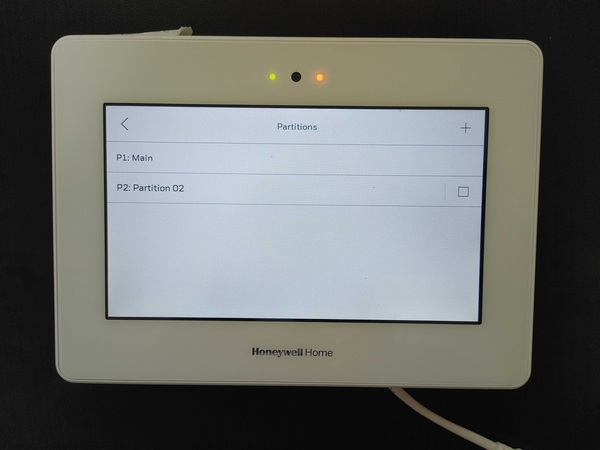
If you are unfamiliar with security system partitions in general, please read this FAQ. Basically, partitions allow you to "section-off" your alarm system so that certain sections (partitions) of the system can be armed or disarmed, while the other sections (partitions) remain in their current armed or disarmed state. Up to four (4) partitions can be configured on a ProSeries Panel. By default, only the first partition is enabled. Partition 2, Partition 3, and Partition 4 will only be used and in effect after they have been added. You need to first access the partition settings menu. Begin from the main screen of the ProSeries Panel. Click the three (3) horizontal bars menu button at the bottom. Then choose Tools, and enter the system's Installer Code (default 4112). Click Programming, followed by Partitions. The list of enabled partitions will be shown on the screen. To add a new partition, click the + icon in the upper-right. You will then be able to configure various settings for the partition. These are mostly arming settings that you should configure as needed based upon how the system is being used. You want to set Entry/Exit Delays to proper settings so that no false alarms occur on the system. When you are finished, press Save in the top-right. If you ever need to delete a partition, you can access the Partitions Menu, click on the checkmark box on the right-hand side of any partition that is being deleted to select it, and then press Delete in the top-right. Please note that you cannot delete the main Partition, which is Partition 1.


Whenever you are at the main screen of the system, you can set which partition you want to control. There will be a dropdown menu you can click on to choose a different partition to switch to. Whenever you go to switch partitions, you must provide a code with access to that partition. You can also provide the Master Code which has global authority and access to any system partition. Note that only enabled partitions will be present.


Advanced Settings

The Advanced Settings Menu is a programming menu that includes sub-categories for Communicator, System, and Reporter. Many of these options are fairly complex, and it is suggested that you not change them unless instructed by your monitoring provider, or you are formally trained in alarm systems and you know what you are doing. To access this menu, begin from the main screen of the system. Click the three horizontal bars menu button at the bottom. Press the Tools option. Provide the system's Installer Code (default 4112). Choose Programming. Then choose Advanced Settings. You will then be in the Advanced Settings Menu to make system changes. Once finished, press the Save button in the top-right to save any changes you have made.


Miscellaneous Settings

This section will very briefly cover other settings that haven't been covered earlier in this cheatsheet. This includes setting the WIFI network for the panel. To access the Settings Menu, begin from the main screen of the system. Click the three horizontal bars menu button at the bottom. Then choose Settings. You will have options for WI-FI, User Management, and Secondary Keypad. You may be asked to provide the Master Code (default 1234) or Installer Code (default 4112) before configuring these settings.


Please note that you can also configure settings for Backlight Timeout, Voice, Chime, Brightness, Volume, and Screen Cleaning right from the main screen. Just click or drag down the bar from the top of the system's home screen to access the primary settings. No access code is needed!


Total Connect 2.0

Total Connect 2.0 is the interactive security notification and automation platform used with the ProSeries Alarm Panels. You can access Total Connect 2.0 remotely using a web browser or by using the free Total Connect 2.0 Mobile App that you can download from the Google Play Store or Apple App Store. Your system must have some type of monthly monitoring plan to be used with Total Connect 2.0. Your monitoring company will help you get started with the Total Connect 2.0 service, usually by sending you a Total Connect 2.0 activation email after you are activated for alarm monitoring service. You will need to create a username and password for logging into Total Connect 2.0. For Alarm Grid customers, your username will typically be the email address associated with the monitored account. You can use Total Connect 2.0 to arm and disarm the system, check its current status, control programmed Z-Wave devices, and more!


Conclusion

We hope that you found this Honeywell Home PROA7PLUS Cheatsheet to be useful! We want you to get the very most out of your Resideo Alarm System. And keep in mind that this post may be updated in the future to include new information. It's very likely that Resideo will be updating the ProSeries Panels in the future to include new features and functions, and we will make sure to provide you with the resources you need to take advantage of whatever is offered. Also, if there's anything else that YOU would like to see included in this cheatsheet, please leave a comment down below, and we just might add it in. This is a living, breathing document, and we will likely update it as we learn more. And stay tuned to the Alarm Grid Blog for more great content coming soon!

Tags: , , , , , , , , , , ,

Comments


Posted By

We're back with more 2GIG Edge content today. First, if you haven't already seen our post about setting up 2GIG Edge Facial Recognition, then make sure to go check that out. We really want each new Edge user to get the most out of their system. But today's topic is Automatic Bluetooth Disarming.

Whether you prefer to call it Automatic Bluetooth Disarming, Bluetooth Low Energy, Bluetooth LE, or whatever, it's a pretty cool feature for the new 2GIG Edge Alarm System. It's actually pretty similar to what Qolsys offers on the Qolsys IQ Panel 2 Plus. I personally found the 2GIG Edge Bluetooth Disarming feature a little bit easier to set up, though I will admit that I also found the options associated with the feature to be a bit lacking. And by that I mean, there aren't really any options for the feature, other than turning it ON or OFF, or as 2GIG likes to call it, ACTIVE or INACTIVE.

You should also keep in mind that only a maximum of five (5) phones can be set up with the feature, and you can only have one (1) phone paired per user. If you want to have the maximum 5 phones set up for Automatic Bluetooth Disarming, then they will need to be set up with 5 different users. And we also want to mention that the feature can only be used when the system is Armed Away. It won't work when the system is Armed Stay. But all of that aside, we'll just have a fairly quick post today, I'm just going to give you a quick rundown of setting up the feature and putting it into action.

First, to get started setting up 2GIG Edge Automatic Bluetooth Disarming, you need to access the Users Menu. Start from the main screen of the 2GIG Edge Panel. Click the small Settings Icon (the gear) in the bottom-right corner. Then enter in the Master Code (default 1111, but usually changed) or the Installer Code (default 1561, not usually changed), or use Facial Recognition if you have the feature set up for the Master User. Once inside, choose Users to access the Users Menu.

In the Users Menu, find the user you want to set up Automatic Bluetooth Disarming for. You can do it for the Master User or any other valid user. You cannot set it up for the Installer Code, which makes sense because the Installer Code cannot disarm the system. And you cannot configure it for the Duress Code either, as that would certainly lead to countless false alarms, which we obviously don't want. But in any case, decide on a user that CAN be set up for Automatic Bluetooth Disarming, and click the pencil icon next to the name to access the edit screen for that user.

As you go down the list, you will see options for Display Name, Access Code, Facial Recognition, Bluetooth Disarming, and User Number. Obviously, the one we want is Bluetooth Disarming. And when you click that, you will be taken to the Bluetooth Disarming Edit Screen for the user you selected.


At this time, you should turn ON your phone's Bluetooth feature. You will very shortly be putting the panel into a scanning mode where it can find pairable Bluetooth devices. Remember that you can only pair certain Bluetooth devices, namely smartphones. You won't be able to pair something like a tablet or a laptop. Again, this makes sense based on how the feature is used.

When you are ready, click the blue PAIR button on the right-hand side. Then press the green Scan button on the following screen. The Edge will begin scanning for a pairable Bluetooth device. If everything was done correctly on the Edge, and your phone is in its Bluetooth pairing mode, then it should appear. In our example, the Bluetooth device is called VELVET.


You should also notice a Bluetooth pairing request on your smartphone.


Once you click the Pair button on your phone, you will get the notification on the panel. Press the green Pair Device button to complete the process.

And that's pretty much it! You can make the feature ACTIVE or INACTIVE within the settings menu for the assigned user. When active, the feature will always be in effect. However, there is one exception. If the panel detects that the phone is still present when the system officially becomes armed - in other words, immediately after the Exit Delay has expired - then that phone will be barred from activating the feature for the current arming session. This is designed intentionally to prevent the panel from being accidentally disarmed prematurely because of a forgotten or left-behind phone. If you realize you forgot your phone before you left, then don't expect that phone to be able to activate the feature and disarm the system. But, the feature can still be activated by a different phone, as long as that phone was properly programmed and it was outside of wireless Bluetooth range of the panel when the Exit Delay expired. One other note is that the phone must be disconnected from the 2GIG Edge for ten (10) full seconds to prevent being barred from activating the feature for that arming session.

As we mentioned earlier, a maximum of five (5) users on the 2GIG Edge can be set up with the Automatic Bluetooth Disarming feature, and each user can only have one (1) paired phone. The feature will only work in Arm Away mode. It will not work when the system is Armed Stay. Activating the feature is quite simple. Your phone should automatically connect with the Edge once it gets into Bluetooth range. But the system won't actually go and automatically disarm until you activate a delay period by faulting an Entry/Exit Zone, or in other words, opening a door used for coming and going, such as a front door, back door, or garage door. For the feature to work properly, the phone must "connect" with the panel before the Entry Delay is triggered. And with the phone already connected, the system should disarm immediately upon activating the Entry/Exit Zone.

There is a timer so that the feature won't activate right away. This is to prevent you from accidentally activating the feature while you are still nearby after already arming the system. This timer is five (5) minutes. In other words, 5 minutes after you arm your system, once the system detects the paired Bluetooth device, if the system is in its Entry Delay window, it will disarm. It's super convenient, and it's good to see that 2GIG accounted for the possibility of a forgotten phone so that it does not create a security risk. But it is a bit questionable that there's no way to change or adjust the 5-minute timer. Maybe 2GIG can make this an adjustable setting in a future update? We would sure appreciate that!

When actually using the feature, it is advised that you check and make sure that the Bluetooth on your phone is reconnected before faulting the Entry/Exit Zone and activating the Entry Delay Period. If it's not reconnected to Bluetooth, then the feature will not work, and the system will not disarm automatically. We also want to say that to prevent false alarms, you should always be prepared for the possibility that the feature may fail. Be prepared to disarm with a valid code if needed. It's true that you can also disarm with Facial Recognition if that is set up, but you should always be prepared for the worst. Out of the three - Bluetooth, Facial Recognition, and classic code entry - classic code entry is still the most dependable. But we can also say that when testing the Bluetooth Disarming feature at Alarm Grid, it worked flawlessly.

Have you gotten to try out 2GIG Bluetooth Disarming yet? What do you think of the feature? Leave your thoughts in a comment down below. And stay tuned for more security system content on the Alarm Grid blog coming soon!!

Tags: , , , , ,

Comments


Posted By

With the 2GIG Edge now available, users have access to some features we have never seen before in home security. One feature that really stands out is the system's facial recognition capabilities. This is the first ever panel from Alarm Grid to support facial recognition disarming!


The 2GIG Edge facial recognition feature is set up when you go to configure a user for the system. You can also configure it for the Master User, which is likely what you will want to do, along with changing the code away from its default of 1111. This is probably one of the first things you will do after getting the 2GIG Edge Security System, so consider this to be a bit of a starter's guide as well.

And don't forget that the feature is totally optional to use. If you don't want your 2GIG Edge System storing your "facial biometrics", then you don't have to. But if you do decide to set up the feature, we'll tell you right away, it works very well, and it's super convenient. It is also important to mention that all facial biometric information is only stored locally at the panel. This information is neither shared nor stored with Alarm.com in any fashion. Up to ten (10) users on a single 2GIG Edge Panel can be set up with the Facial Recognition feature, so do keep that in mind if you have a large number of users set up with your 2GIG Edge. But with that of the way, let's get started setting up the Facial Recognition feature on the 2GIG Edge!

What you need to do is access the User's Menu. Begin by clicking the Settings Icon (the gear) in the bottom-right corner. Then provide the Master Code (default 1111) or the Installer Code (default 1561). Then choose Users. And just like that, you are in the Users Menu.


You can click the Add User button in the bottom-right corner to create a new user. But if you haven't configured the Master User yet, then that's what you should do first. To configure the Master User, just click on the pencil icon next to it. You will be taken to the menu where you can adjust a variety of different settings.


From here, you can set a custom Display Name if you want a more personalized touch than "Master User". But today, we're going to focus on the facial recognition feature. You can see that it is disabled by default, so you should go and enable it by setting the toggle bar to green. And once you do, you will be greeted by the Facial Recognition Disclaimer Screen. Read through it, and assuming you agree, then click the Agree button in the bottom-right. You have to scroll all the way through it, or else you won't be able to click the Agree button, as it won't be illuminated.


Then you will need to capture your facial profile. You start by pressing the Begin button. You will need to position your head into the outlined box. Then once it recognizes your face, the outline will turn green. You will be asked to look to the right, and it will detect the movement. Then you will be asked to look to the left. Again, the movement will be detected. Oh, and when you go to do this yourself on your own 2GIG Edge, you don't need to have your phone in the photo. I was just trying (with varying degrees of success) to capture the moment in a series of photos. If you just complete the process normally as 2GIG intended, it's very easy.

You want to be very careful when capturing your facial profile - definitely more careful than me trying to pull double-duty by trying to take photos of the process at the same time! Make sure your face fits as nicely in the outline as possible. Feel free to move your head closer or further away from the panel if you need to. Then, when asked, turn slightly to the right, and then slightly to the left, and you will be all done! It only takes a matter of seconds. You will get the "Congratulations" message, and the feature will be in effect. And if you feel concerned that maybe you did a shoddy job, you can always reconfigure your 2GIG Edge Facial Profile later on. If you find that the system is having a tough time recognizing your face, then repeating this process (and doing it carefully) can make all the difference.


Once you click Next, you will be taken to a screen where you can choose to watch a tutorial video about how the Edge uses facial recognition. It may be helpful for you to get the very most out of the feature. Or you can skip it if you feel like this guide is sufficient. But you will still need to take an "Avatar" photo. Again, I'm a one-man team, so I tried to take a photo of myself trying to take a photo of myself (I never thought I'd write that sentence). Considering the circumstances, I think my "Avatar" turned out pretty nice!


If you're satisfied with your appearance, you can choose Use This Image. Or if you're a perfectionist, feel free to Retake Photo. If you decide that you can't take a good photo to save your life, then you can choose to Skip the step. But after that, facial recognition will be ready to go. If you did this for the Master User, you can even use facial recognition to get into Master-level programming. Whenever the system needs a code, the panel camera will activate. You just position your head, look left and right (like you're suspicious), and you will get in. Now the real question - can I take a photo of myself passing a facial recognition test?

Disclaimer - I cheated. That shot above is actually a video frame. The "User Master User Recognized" message only appears on the screen for a split-second, much too fast for an amateur self-cameraman like me to take a proper photo. But let's focus on what really matters here. This feature actually works VERY well. You can see it recognized me quite easily. And don't worry about it being a security risk. NOBODY else in the Alarm Grid Office could disarm with my facial profile. We had someone else try. They don't have the same "facial profile" as me, so the Edge wouldn't acknowledge them. But my face is able to trigger it quite easily.

You can use facial recognition to arm, disarm, and even enter into Master-level programming when a code is needed. Just be careful to set up your "facial profile" properly, and the 2GIG Edge will take care of the rest. If you have any thoughts on the feature, please share them down below in a comment. And stay tuned for more content from Alarm Grid coming soon!

Tags: , , , , , , , , , , , , , ,

Comments