Resideo has announced that there is an issue affecting certain Honeywell 6150 Keypads. This issue only affects 6150 Keypads manufactured within a certain time period. Any 6150 Keypad affected by this issue that was purchased through Alarm Grid should be returned to us for a free replacement.
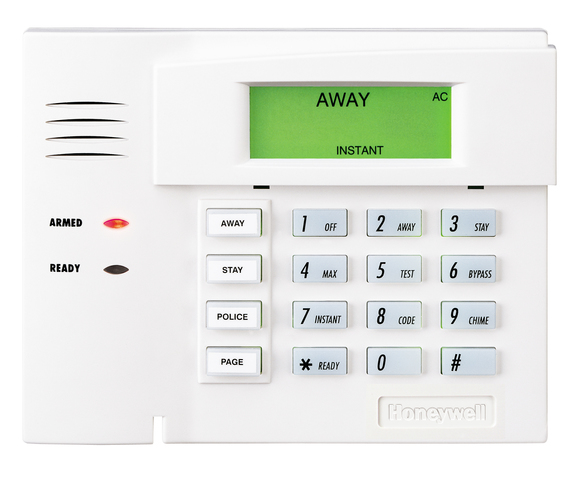
According to Resideo, this issue may affect Honeywell 6150 Keypads that have a date code starting with "C107". It is unknown if this issue affects all 6150 Keypad with this date code prefix or just certain models within the batch. This date code is relevant to any Honeywell 6150 Keypad manufactured between April 17, 2019 and July 19, 2019. For that reason, Resideo is instituting a shipping and manufacturing hold on the Honeywell 6150 Keypad, effective immediately.
Resideo states that the issue in question affects the panic functions of the keypad. When an affected keypad is programmed to enable its dual-button press panic functions, the device will not function as intended. Because of this defect, any affected 6150 Keypad will have its dual-button triggers for panics not work correctly. However, the associated single-button panic inputs should still work as intended, if they are enabled.
On the VISTA P-Series Systems, Zone 95 is, by default, not programmed. However, for Alarm Grid customers who choose to use this panic it is suggested that it be set as an audible Fire Panic. This audible fire panic is triggered by pressing both the [1] and [*] keys together, or by pressing and holding the [A] function key on the left side of the keypad. The [A] function key is the top of the four (4) function keys at the left side of the keypad.
On the VISTA-TURBO Panels, such as the Vista-128BPT or Vista-250BPT, this is programmed as Zone 995, and it is enabled by default. These panels differ slightly in the way that keypad panic keys are programmed. But in the end, the functionality is very similar. Once the panic key is programmed, pressing both the [1] and [*] keys together or pressing the [A] function key can initiate the panic.
On the VISTA P-Series Systems, Zone 99 is, by default, set as a silent police panic. This silent police panic is triggered by pressing both the [*] and [#] keys together, or by pressing and holding the [B] function key on the left side of the keypad. The [B] function key is the second of the four (4) function keys from the top. But on the VISTA-TURBO Panels, this is programmed as Zone 999. It is also set, by default, as a silent police panic. Once enabled, the functionality on the TURBO Panels is the same as on the VISTA P-Series Systems.
Lastly, Zone 96 is, by default, not enabled on the VISAT P-Series Systems. But it is enabled by default, as Zone 996, on the VISTA-TURBO Panels. On the VISTA P-Series Systems, this button is often programmed as an auxiliary medical panic. On the VISTA-TURBO Panels, it is configured as an auxiliary medical panic by default. When this panic is programmed, it is triggered by pressing both the [3] and [#] keys together, or by pressing and holding the [C] function key on the left side of the keypad. The [C] function key is the third of the four (4) function keys when moving from top to bottom.
Only the Zone 95/Zone 995 or [1] and [*], and Zone 96/Zone 996 or [3] and [#] panic options are affected!
It is possible that your system has none, some, or all of these inputs programmed. This depends on your programming settings. But because of this defect, even if you have these inputs programmed, they may not work as intended. It is strongly recommended that you have the single-button panics enabled - those being the [A], [B], and [C] function keys - as there do not appear to be any issues with these single-button inputs. We are happy to help any Alarm Grid monitored customer program these buttons if necessary.
In addition to the Honeywell 6150, the following other keypads are also affected by this same issue:
- 6150PL2
- 6150ADT
- V15PACK
- V20PACK
- V20PTISPKNA
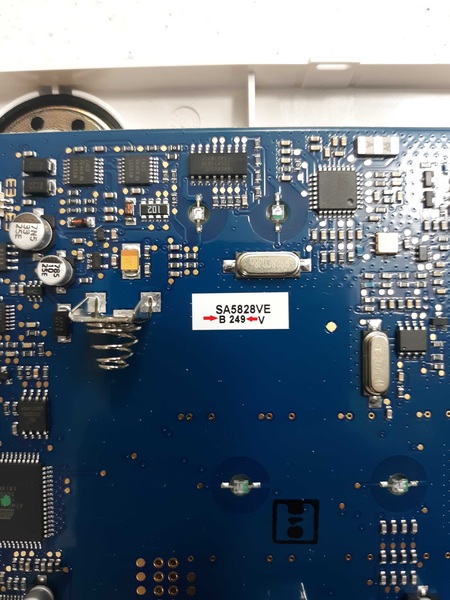
If you need to confirm the manufacture date on your 6150 Keypad, then there is a way to do this. However, it requires opening up the keypad. There are two (2) tabs at the bottom of the keypad that you will need to press in. We recommend using a small screwdriver to do this. Once the tabs have been pressed in, you will be able to separate the keypad from the back cover. Then on the circuit board, there will be a sticker with the date code printed in black. This date code consist of one (1) letter, followed by three (3) digits.
Resideo uses a unique process to decipher the date code. The letter C indicates that the 6150 was manufactured in 2019. If the code starts with any letter other than C, then your 6150 Keypad is unaffected. Then the three digit code corresponds to the day of the year. April 17th is the 107th day of the year. July 19th is the 200th day of the year. With that in mind if the date code reads any value between C107 and C200, then the 6150 may be affected.
The picture below shows the date code on a Honeywell 5828V Keypad. This keypad follows the same date code format as the 6150. Note that this date code reads B249, so it would NOT be affected by this problem.
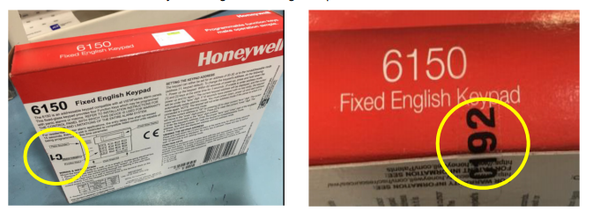
If the product is still in the box, then you can alternatively check the date code on the sticker on the outside of the box. This can be see in the following images below. Note that the date code in these images reads C192, so this keypad may be affected.
Remember, if the date code on your Honeywell 6150 falls between C107 and C200, then it MAY be affected. Just because it falls within this range does not mean for sure that it is affected. The only way to determine for certain is to test the keypad. If you have any of the [1 + *], [* + #], or [3 + #] functions programmed, then you should test them to make sure they work properly. Remember to place your system on test mode before doing this to prevent false alarms! If you get the proper panic response, then you are fine. If not, then you must return the keypad to us if you purchased it from Alarm Grid.
Every customer who returns an affected 6150 Keypad will receive a complimentary Honeywell 6150RF Keypad as a replacement. The 6150RF is the exact same keypad as the 6150, except that it includes a built-in 345 MHz wireless transceiver for supporting Honeywell 5800 Series Wireless Sensors. The 6150RF is basically an "upgraded" 6150, so you're really getting an even better keypad. Please note that this offer is only valid thru the end of the month. That is August 31, 2019.
If you are in the market for a new keypad for a Resideo VISTA System, then now is a great time to get a Honeywell 6160 Keypad. The 6160 is an even BETTER keypad than the 6150. This is because the Honeywell 6160 is an Alphanumeric Keypad, while the 6150 is a Fixed English Keypad. You need an Alphanumeric Keypad if you want to make menu-level programming changes. With a Fixed English Keypad like the 6150, you are operating blindly when you enter programming. For that reason, trying to program a system with a 6150 is strongly discouraged. With that in mind, the 6160 is the better keypad in every aspect. We actually offer the 6160 for a lower price than the 6150 ($52.99 vs $54.99) because we want our customers to have a keypad that they can use to confidently program their systems.
If you are indeed affected by this issue, then we urge you to contact us as soon as you can. The best way to reach us is to email support@alarmgrid.com. We will check your email at our earliest convenience and respond back as soon as possible. If you would prefer to call us, we can be reached at (888) 818-7728 during our regular business hours of 9am to 8pm EST M-F.
We sincerely apologize to anyone who may have been affected by this issue. But we promise to make things right and make sure that you have a keypad that works with all its functions as intended. Please reach out to us if you have any questions. As always, thank you for being a valued Alarm Grid customer.