Hi DIYers! We made a post last week that briefly discussed Firmware Version 2.4.0 for the Qolsys IQ Panel 2 and IQ Panel 2 Plus. We want to take a closer look at some of the great new features offered from this latest firmware update. Now is certainly a great time to get an IQ Panel 2 Plus!
Panel Scene Control
New with Firmware Version 2.4.0 is the ability to activate Alarm.com Smart Scenes directly from the IQ Panel 2. Previously, this could only be done from the Alarm.com website or mobile app. This is much more convenient than having to control each Z-Wave device and the system individually. You can also control scenes from the IQ Remote Keypad if you have one.
To get started, you will first need to have at least one smart scene created on your Alarm.com account. Remember, you can create smart scenes from the Alarm.com website or mobile app. When making the scene, make sure to include all of the relevant devices. This can include Z-Wave devices programmed with the system, as well as the system itself.
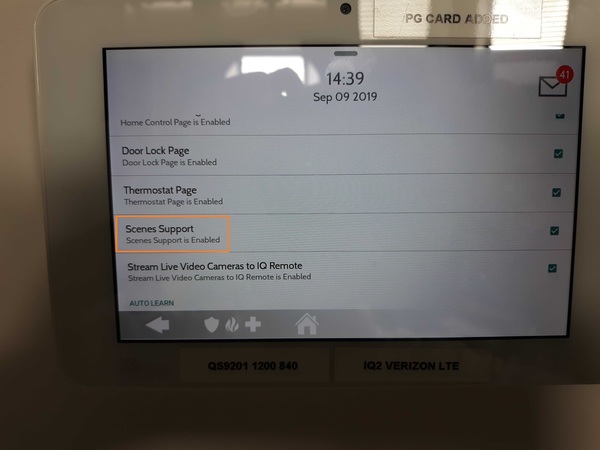
You must also enable the feature for the panel. This can be done at the panel itself. Start from the main screen of the panel, and click the small grey bar at the top. Choose Settings > Advanced Settings > enter Installer Code (default 1111) > Installation > Installer Settings > Check the box next to Scenes Support (you'll need to scroll down). Then return to the main screen by clicking the home button at the bottom.
You will now be able to run Alarm.com Smart Scenes from the panel itself. From the main screen, click the Scene Control button in the bottom-left corner:

Then choose the scene you want to run. We made a scene called "Test Scene", which locks a Z-Wave Lock, sets our Z-Wave Thermostat to 70 degrees Fahrenheit, and sets the system to Arm Stay. We can confirm that the new panel scene feature works perfectly!

IQ Remote Camera Streaming
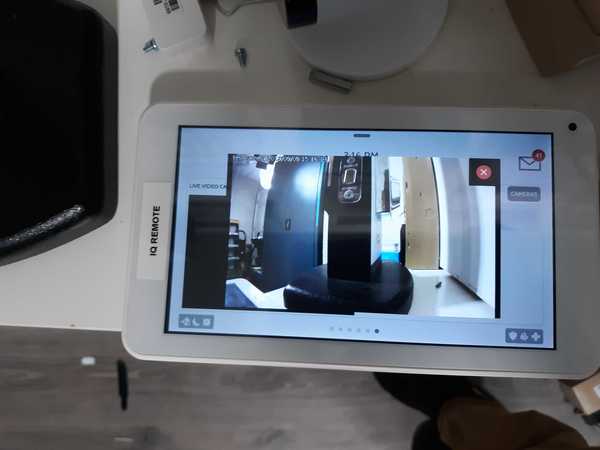
One new feature we are sure that many users are sure to be excited about is the ability to live-stream Alarm.com Cameras from the IQ Remote Touchscreen Keypad. We have previously discussed the ability to live-stream compatible ADC Cameras from the panel itself. But now you can do it from the IQ Remote. This is great for anyone with a surveillance camera setup who uses the IQ Remote as a secondary keypad for the system.
The same restrictions for streaming from an IQ Panel 2 apply when streaming from an IQ Remote. This means that only Alarm.com Cameras that support the panel streaming feature can be streamed from the IQ Remote. Additionally, it is only possible to stream video from the IQ Remote. You cannot stream audio like you can on the IQ Panel 2. For more information on setting up the camera streaming feature, please review this helpful FAQ. You must have the main panel streaming feature enabled to be able to stream from the IQ Remote.
You also have to enable panel streaming for the IQ Remote. You can do this from the main panel. Start from the main screen of the system. Click the small grey bar at the top. Choose Settings > Advanced Settings > enter Installer Code (default 1111) > Installation > Installer Settings > Check the box next to Stream Live Video Cameras to IQ Remote. Then return to the home screen by pressing the picture of the house at the bottom.

You will then be able to access the same menu option from the IQ Remote that you use on the main panel to stream video. Just swipe left or right on the IQ Remote home screen until you reach the option to choose a camera. You will have to excuse our desk clutter, but the image looks just as good on the IQ Remote as it does on the IQ Panel 2. Quite awesome!
Wellness & Check In/Out Screens
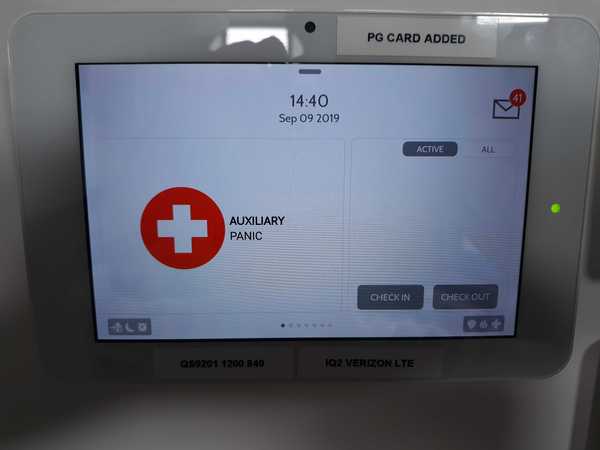
This feature is pretty unique. You can have the main screen of the IQ Panel 2 serve as an Auxiliary Panic button for triggering a medical alarm. This also allows you to set up a Check In/Out function for the system. This is great for anyone with a business who may want to monitor when employees come and go. The panel will take a picture whenever a user checks in or out. You can also get text and/or email alerts regarding this activity from Alarm.com. It really goes to show that Qolsys is working hard to make the IQ Panel 2 Plus the premier security system for small businesses!
There are a few things to keep in mind when using this feature. First is that Check-In & Check-Out can only be enabled if the Wellness Page is enabled. Second, enabling Check-In & Check-Out feature will also enable Settings Photos from the panel camera. This is so that a picture can be taken when a user checks in or out. Finally, you cannot enable the Wellness Page if Partitions are enabled for the system.
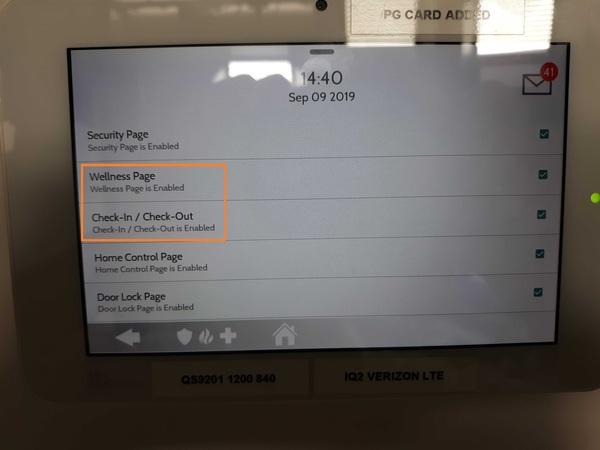
Again, the feature must be enabled from the Installer Settings Menu. From the main screen of the system, press the small grey bar at the top. Choose Settings > Advanced Settings > enter Installer Code (default 1111) > Installation > Installer Settings > Check the box by Wellness Page > Check the box by Check-In / Check-Out. You can then return to the home screen by clicking the picture of the house at the bottom.
When you return to the main screen, you will notice that you are at the Wellness Menu. This is where you can trigger an Auxiliary Medical Panic on the system. To get to the usual Arming/Disarming screen, just swipe left once.
Any Questions?
If you have any questions about Firmware Version 2.4.0 for the IQ Panel 2 Plus, please do not hesitate to reach out to us! Remember that we offer free online and phone support for our monitored customers. The best way to reach us is to email support@alarmgrid.com. We will check your email as soon as possible and reply back at our earliest convenience. You may also call us at (888) 818-7728 during our normal business hours of 9am to 8pm EST. We look forward to hearing from you and telling you all about the IQ Panel 2 Plus System!