In order to reboot a router remotely using a VISTA P-Series Panel, you will manually activate an output, which will fault a zone. The zone fault will be programmed to activate a Z-Wave switch, which is powering the internet router or modem. A cellular connection is required to do this.
And there you have it, that's how you do it! Just kidding! We're going to cover exactly what you need to do. Alarm Grid had this scenario come up recently and thought it would make a good case study to cover.
First, we wrote an FAQ that covers how to manually control a programmable output through the keypad. But then we thought that putting the FAQ together with information outlining the exact problem that we resolved by using the manual output command might add some much-needed context and show how this command can really come in handy. This also outlines one of the reasons why a cellular communicator is so important to have as a backup to an internet connection!
Let me set the scene: The hero in our case study spends several months each year away from his primary residence. The system installed in this residence is a Honeywell VISTA-20P with a Honeywell Home Tuxedo installed, as well as an LTE dual-path communicator. The Honeywell LTE-IA or the Honeywell LTE-IV are equally suitable for use in this scenario. In addition, any of the compatible automation controllers, such as the Honeywell VAM or the older Tuxedo Touch WIFI, could be used instead of the newer Honeywell Home Tuxedo.
The Problem
While our hero is enjoying his time away, he discovers that his internet connection at home is down. Of course, if he were at home, the first thing he would do, after verifying that his ISP isn't experiencing an outage, is reboot his router to see if the connection comes back up. But he's not at home, and furthermore, there is no one he can send to his home to perform this task for him. Now, since he has a dual-path communicator with the cellular connection enabled and active, he doesn't have to worry that his panel won't be able to communicate a signal if the alarm goes off. He's safe in that regard. However, in addition to the alarm panel's ability to send signals through the internet when it is available, the Tuxedo also uses the internet to provide a communication path to Total Connect 2.0 so that he can control his Z-Wave automation devices remotely. This is a problem, and it's the problem we're here to solve.
Just to recap, we have a VISTA-20P Panel that is working, and it can communicate alarm signals via the cellular path. It can also be controlled via Total Connect 2.0 through the cellular path. We have a Honeywell Home Tuxedo that is working, and it can communicate with the panel through its hardwired keypad bus connection, but it can't communicate to TC2 through the internet. This means there is no way to remotely control Z-Wave Automation devices. Finally, we have an LTE dual-path communicator that is working on the cellular path, but not on the internet path.
The Solution
Basically, what this requires is a way to send a command from Total Connect 2.0 to the VISTA-20P Panel through the communicator's cellular connection. This command must be something that the panel can perform based on an entry from a keypad. In this case, we are going to enter a command via the TC2 keypad that will cause a programmable output to change state. This output is connected to a zone on the panel. When the output changes state, it will fault the zone. Then, based on the programming in a scene, the Tuxedo will turn the Z-Wave Module that is connected and providing power to the router OFF. This will drop power to the router. After a few seconds, another command will be entered through the keypad which will restore the zone, and a second scene will tell the Tuxedo that a restore on the zone causes the Z-Wave module to turn back ON. This will restore power to the router.
Here are the full details for this solution:
The first step in setting this up is making sure that you have an available zone to use as your triggering zone. If you have one of the hardwired zones on the panel available, then you can actually use Output 18, Trigger 2 for this purpose. Any of the hardwired zones 2 thru 8 can be used with this trigger. You can also use Output 17, Trigger 1, but it provides more current than Trigger 2, so we recommend that you save it for other potential uses. If you don't have one of these zones available, then you can use a zone on a Honeywell 4219 or 4229 8-zone expander, but this will also require the use of a relay instead of a trigger. If you are using the 4229, it has two (2) programmable relays built into it. If you are using the 4219, then you will need to add a Honeywell 4204. It is also possible to use a zone input from a wireless zone, such as a Honeywell 5816, along with one of the above mentioned relays.
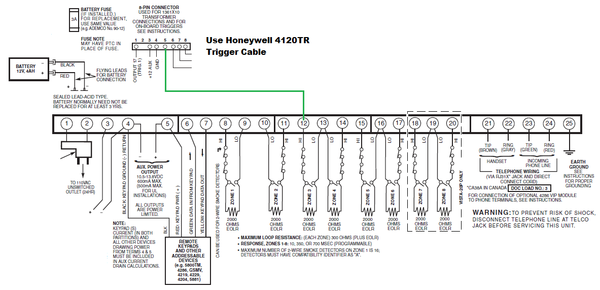
One reason we love using Trigger 2, Output 18 for this is because it's so simple. Output 18 is already enabled in panel programming location *79, and as long as its programming hasn't been changed from the default, no additional programming is required for the output to work. However, there is still the matter of programming the zone to be used. In our example, we show Output 18, Trigger 2 connected to Zone 03. As you can see in the diagram below, we have connected the trigger to the Hi side of the zone, on terminal 12. As mentioned before, you can use this configuration on any of the Zones 02 thru 08, connecting the trigger wire to the Hi side of the zone. The reason you can't use this on Zone 01 is because the Zone 01 negative is completely isolated from all other negative terminals on the board. In order for the trigger to work to fault the zone, it must be common to the zone negative when the trigger is activated.
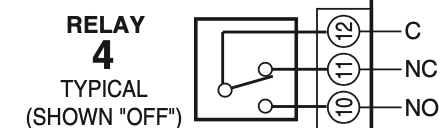
If you need to use a relay instead of the trigger, you will need to wire the relay to the zone so that when you turn the Relay ON, it faults the connected zone, and when you turn the Relay OFF, it restores that zone. The way this must be done will depend on the type of zone it is being connected to. When using a 5816 with the input terminals, you will need to wire one terminal of the transmitter to the relay's Common (C) and the other terminal to the relay's Normally Closed (NC). If you're using an expansion zone on a Honeywell 4219 or Honeywell 4229, then the wiring used for this zone, and whether or not an End-of-Line Resistor (EOLR) is used, will depend on how the rest of the zones on that expander are configured, as well as on the age of the expander. Earlier versions required an EOLR for each zone, while newer versions provide an option not to use the EOLR, based on the setting of a dip switch. The important thing to know here is that when a 4204 or 4229 relay is OFF, it has continuity between Common (C) and Normally Closed (NC). When it is ON, it has continuity between Common (C) and Normally Open (NO).
With the output wiring out of the way, we can move on to programming the zone. We're not going to go through the entire zone programming process. You can find information about how to program a zone on a VISTA-20P Panel in this FAQ. The two important things to know when it comes to zone programming are the Zone Type and the Hardwire Type. The Zone Type should be set to Zone Type 23, No Alarm Response. This Zone Type was specifically created to allow the panel to activate outputs based on a zone's change of state. Basically, Zone Type 23 allows the panel to recognize that a fault and/or fault restore has occurred on a zone, without it having to display a fault for that zone, or take any other action with regard to the zone itself. Zone Type 23 will never show a fault, and it will never cause an alarm condition. The Hardwire Type should be set to Normally Open (Entry 2 when prompted). Again, see the FAQ linked above for full details on zone programming. The Hardwire Type programming of Normally Open is specifically meant for use with the trigger connection shown above. If using a relay instead of a trigger, the Hardwire Type or Input Type setting may need to be different, depending on your wiring configuration, and the zone number.
The next step is to pair the Z-Wave module with the Honeywell Home Tuxedo. As always, we recommend that you first Exclude or Remove the Z-Wave device using the Tuxedo, before attempting to Include or Add the device. The reason we always recommend doing this is because devices are often joined to a Z-Wave network at the factory as part of Quality Assurance (QA). In many cases, once the device has been successfully joined to the test network, it is never cleared, and is simply packaged and sold as it is. Once a Z-Wave device has been paired with a network, it holds onto that network information until it receives a command telling it to forget the old network so that it can join a new one. The process of Excluding or Removing, is what tells a Z-Wave device to forget the old network. It's fortunate that any Z-Wave controller can tell any Z-Wave device to forget its old network!
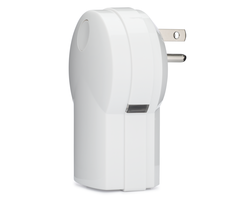
A word about which Z-Wave module to use. You can use either an in-wall switch, or a plug-in module. If your Z-Wave Automation Controller supports Z-Wave Plus, then we always recommend using a Z-Wave Plus device. Although any Z-Wave controller can support just about any Z-Wave module, a Z-Wave Plus module loses its Z-Wave Plus attributes, including extended range and battery life, when used with an older Z-Wave controller. We like the idea of using a plug-in module, as it allows you to easily move your router if you begin to have range or interference issues.
Once the Z-Wave module has been learned into the Tuxedo, VAM, or Tuxedo Touch WIFI you then need to create a scene which will tell the module to turn OFF when Zone 3 (or whatever zone you choose to use) is faulted. You will need to program a second scene to tell the same module to turn ON when Zone 3 is restored. The easiest way to perform this programming is through Total Connect 2.0. We like to program scenes using the website, the examples that follow will assume that is how the scenes are being setup.
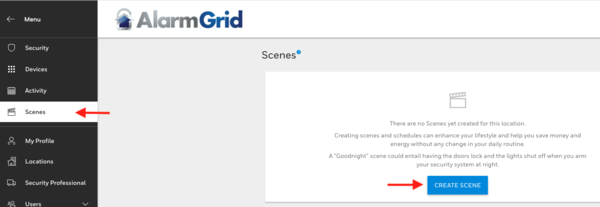
After logging into Total Connect 2.0, choose the menu option for scenes. If you do not see this option, contact your alarm dealer, and be sure that your account is properly configured, and that your monitoring plan includes access to Automation. For Alarm Grid customers, this would be our Silver Plan (Self or Full), or higher. After clicking on Scenes, choose Create Scene.
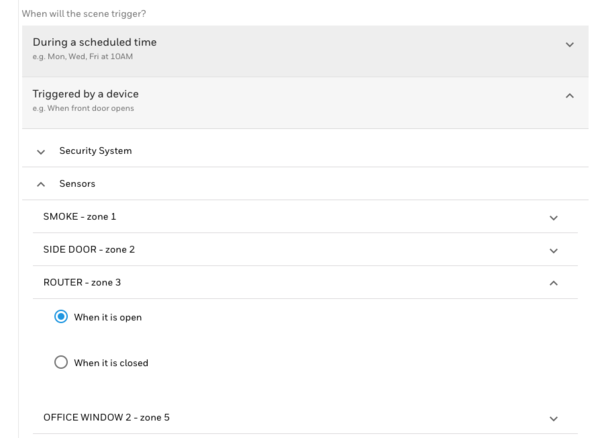
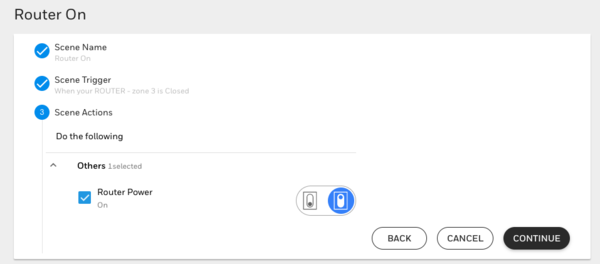
This will take you through a scene creation wizard. The first step is to name the Scene. This should be something easy to distinguish from other scenes, such as "Router Off". After choosing Continue, you will see where you can choose how the scene will be triggered. In our case, we want Triggered by a device, and when we expand this option, we then want to expand the section titled Sensors. Under Sensors, we see Zone 3, which we have named Router. When we expand this option, we can choose that this scene will activate when Zone 3 is Open (faulted) or Closed (restored). We intend to turn OFF the Z-Wave device when Zone 3 is faulted, so we will choose "When it is open".
After choosing which zone(s) you want to trigger the Z-Wave device, you will be taken to Step 3 of the scene creation wizard. In this step, you will choose which device (or devices) you want to control, and whether you want them to turn ON or OFF. This is our Router OFF scene, so we set our action accordingly.

Now that we have created an initial scene, in order to add the second scene (the one that will turn the router power back on) we need to click the + symbol in the upper right of the Scenes screen.

The programming for this scene will be almost identical to the first scene. We still want to trigger by device. The device is Sensor 3, which we named ROUTER, and we want the Z-Wave device to be turned ON when Sensor 3 is Closed, meaning the fault on the zone is restored. Here's the summary for the second scene.
That is the end of the programming and wiring for this solution. The final step is for our hero to manually activate Trigger 2, Output 18 through the keypad screen in Total Connect 2.0. Do this by entering the following command:
4-Digit Code + [#] + [7] + [18]
By entering this command, we're telling Output 18, Trigger 2 to activate. When it activates, it connects to ground. This ground is common to the Lo side of Zone 3. This causes a short on the zone (which is why we programmed it as Normally Open), which in turn causes it to fault. The fault on Zone 3 causes the Z-Wave device being used to power the router to turn OFF, powering the router down.
After around 20 seconds, our hero should enter the following command to restore Zone 3:
4-Digit Code + [#] + [8] + [18]
By entering this command, we are telling Output 18, Trigger 2 to deactivate. When it deactivates, the trigger disconnects from ground. This opens the circuit on Zone 3, causing it to restore from a faulted condition. This in turn causes the Z-Wave device being used to power the router to turn it back ON, powering the router back up. Once more, keep in mind that this option is only available because the customer in question, our hero, chose to use a dual-path communication method. If he had chosen to use an IP only connection, there would be no way for him to initiate the keypad command through Total Connect 2.0 that gets this ball rolling.
If you happen to be using a relay instead of the trigger output, there will be a few minor tweaks that you will need to make to this process. One of those tweaks will be the output number that you will use when performing this command. The FAQ that we linked in the second paragraph above goes into more detail on how to set this up using a relay, including covering the programming required in programming location *79.
If you need further assistance using this setup with a relay, feel free to reach out to us at support@alarmgrid.com. Our technical support staff are available M - F from 9:00 am to 8:00 pm Eastern. We will have some closures soon due to the holidays, so pay attention to our blog for information about when those will be. As always, we look forward to hearing from you!
 The Honeywell 5877 was widely seen as one of the most important automation accessories for the Lyric and LYNX Touch Systems. Thanks to this module, a user could integrate their garage door motor with their


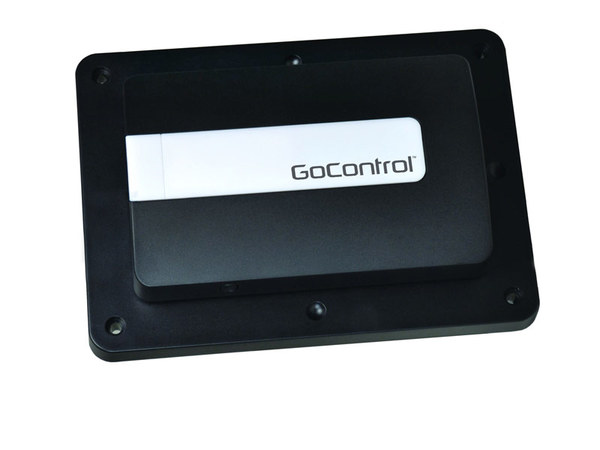 The GoControl and Linear brands are often used interchangeably. They are both used to identify automation offerings from