Wired Alarm Control Panels Posts

Posted By

We're back with another video recap! This time, we only published four (4) new videos, and they were all right at the end of the week. We hope to get more videos published in the upcoming week so that we can present a more robust video recap next time. But for now, here are our new videos.

Interlogix Simon XT: Setting Installer Code to Default

I show you how to reset the Installer Code on an Interlogix Simon XT Security System back to its default of 4321. You need this code or the Dealer Code to get into panel programming. Interestingly, the Dealer Code also has the same default of 4321. If you change the Installer Code, then you will not be able to change it back to 4321 unless you change the Dealer Code, or you factory default the system. Factory defaulting the Simon XT will reset the Installer Code back to 4321, and it will also reset the Dealer Code to 4321 as long as the Phone Lock setting for the system is OFF.


Honeywell VISTA: Custom Word or Phrase on Alpha Keypad

I show you how to set a custom word or phrase for the Alphanumeric Keypad used by your Honeywell VISTA Security System. You can set a custom word or phrase of up to (16) characters by accessing the system's Alpha Programming feature and configuring the custom word for the partition that your keypad is assigned with. After you do that, all of the Alphanumeric Keypads on that system partition will display the custom word or phrase. You may decide to change the custom word or phrase for a seasonal or holiday message, and it's great for adding a personalized touch to the system.


Wired Alarm System: Resetting

I show you how to reset your wired alarm system. When someone is talking about "resetting" a security system, they mean one of two (2) things. First, they could be talking about a power cycle reset, in which the system is turned OFF and then back ON. This is useful for safely making hardware changes, and it can also be used as a general and basic troubleshooting step. The other type of reset is a factory default reset. This will restore all settings and configurations for the system back to how they were when the system was brand new and hadn't yet been programmed.


Wireless Alarm System: Resetting

I show you how to reset your wireless alarm system. Just like a hardwired security system, a wireless system can receive the same two types of reset. Again, these are a power cycle reset and a factory default reset. The one big difference for a wireless alarm panel is that you can often perform both types of resets by choosing an option within the panel's programming menus. This varies between different types of wireless security systems, and you will likely need to refer to your system's manual to learn how to perform a power cycle reset or a factory reset for that particular system.

Tags: , , , , , , , , ,

Comments


Posted By

It's always a great start to the week when there's a new Alarm Grid video recap! We have six (6) new videos to check out this time. I had to step in front of the camera again, as others continue to work from home. It will be a bit longer before others return. But anyway, here are the videos.

Interlogix Simon XTi & XTi-5: Setting Installer Code to Default

I show you how to set the Installer Code on an Interlogix Simon XTi or Interlogix Simon XTi-5 to its default setting. The default Installer Code for these systems is 4321. This is actually the same default code as the default Dealer Code for these systems. The only way to have the same Installer Code and Dealer Code on an Interlogix Simon XTi or Interlogix Simon XTi-5 is to keep both of the codes at their default setting of 4321. If you change either code, then you must factory default the system to get both codes back to the default.


IQ Panel 2 Plus: Setting Installer Code to Default

I show you how to set the Installer Code on a Qolsys IQ Panel 2 Plus back to default. This system has a default Installer Code of 1111. Alarm Grid recommends keeping the code at its default so that you do not become locked out of programming. If you forget the default code, you can always look it up later. Keeping the Installer Code at the default does not present a security risk because you cannot disarm the system with that code. To reset the Installer Code, you must know either the current Installer Code or the current Dealer Code.


Connecting August Smart Lock Pro to WIFI

I show you how to connect the August Smart Lock Pro to a WIFI network. To do this, you will need an August Connect WIFI Bridge. Alarm Grid sells a bundled kit that comes with both devices. Connecting your August Smart Lock Pro to WIFI will allow you to control the lock remotely through the August Home App when your phone is outside of Bluetooth range. The only other ways to control the lock remotely are outside of the August App through Apple HomeKit or Z-Wave. The August App switches to WIFI automatically once you are outside of Bluetooth range.


Using August Smart Lock Pro With Apple HomeKit

I show you how to configure the August Smart Lock Pro for use with Apple HomeKit on an Apple iOS device. All HomeKit communication for the August Smart Lock Pro occurs through wireless Bluetooth connectivity between the lock itself and a dedicated HomeKit Hub. The dedicated HomeKit Hub can be an Apple iPad, an Apple HomePod, or an AppleTV Gen 4 or higher. You must keep the dedicated HomeKit Hub within Bluetooth range at all times for proper connectivity. The lock cannot use WIFI to communicate with the HomeKit Hub, even if an August Connect WIFI Bridge has been configured.


Wired Alarm System: Power Cycling

I show you how to power cycle your hardwired security system. Power cycling, or a power cycle reset, involves powering the system down and then powering it back on. There are a few reasons you might do this. If you are adding new hardware, such as a new keypad or a new alarm monitoring communicator, then you must power down your system first, and then power it back on after the hardware is installed. You might also power cycle as a general troubleshooting step. Most wired alarm panels require you to manually remove and restore power to fully power cycle.


Wireless Alarm System: Power Cycling

I show you how to power cycle your wireless security system. The reasons for power cycling a wireless system are usually the same reasons you would power cycle reset a wired alarm system. These reasons include making hardware changes and general troubleshooting. But for a wireless system, there is often a menu option you can use to reboot the system, without needing to manually drop and restore AC power and battery power. You should refer to the installation manual for your wireless alarm system to learn how to reboot through a menu selection, as it differs between systems.

Tags: , , , , , , , , , , , , , , , , ,

Comments


Posted By

Alarm Grid has learned about issues that may arise if you attempt to use an SIA PROM Chip on a Non-SIA Honeywell VISTA Panel. Doing so may prevent connected ECP devices from working properly. Issues may also arise if you attempt to use a Non-SIA PROM Chip on an SIA-approved VISTA Panel.

Before we discuss the issue itself, we will first cover some terminology to ensure that everyone is on the same page. Many Honeywell VISTA Alarm Panels come in both SIA and non-SIA variants. For example, there is the Honeywell VISTA-20PSIA and the Honeywell VISTA-20P, the Honeywell VISTA-15PSIA and the Honeywell VISTA-15P, etc. When you see SIA in the panel's name, that indicates that the alarm panel has been configured to meet various guidelines outlined by the Security Industry Association (SIA) for false alarm prevention. For all intents and purposes, SIA-Compliant VISTA Panels are basically the exact same as non-SIA VISTA Panels, except that the SIA-approved panels have various programming restrictions put into place to prevent false alarms. For example, an SIA-compliant VISTA Panel will not allow you to disable Entry and Exit Delay periods, and they will require you to set a minimum Dialer Delay for the system. There are various other restrictions that we won't cover in this post. Just know that an SIA-compliant system will have various restrictions in programming for the purpose of preventing false alarms.

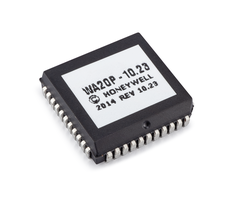
Meanwhile, the PROM Chip installed on a Honeywell VISTA System sets its firmware. You can easily locate the PROM Chip on your VISTA System's green circuit board. Just look for the small black square chip with the white sticker on it. The white sticker includes version information so the user can identify the type of VISTA System they are using and its current firmware. Users remove older PROM Chips and replace them with newer ones as a means of upgrading their VISTA Systems to support new features. Alarm Grid sells 15P PROM Chips, 20P PROM Chips, and 21iP PROM Chips for Honeywell VISTA Systems. We typically advise replacing a 15P or 20P PROM Chip with less than Firmware Version 9.12, as that is the minimum version needed to support Total Connect 2.0. Likewise, the minimum PROM Chip needed on a VISTA-21iP for Total Connect 2.0 is 3.13. For more information on replacing PROM Chips, please see this helpful FAQ.

Please note that it is only possible to replace a PROM Chip on a VISTA System with a firmware version or PROM Chip version of 2.0 or higher. If your VISTA System shows a PROM Chip version of less than 2.0, then it is not possible to replace its PROM Chip, and you must replace the panel entirely. Also note, that you should never attempt to remove or replace a PROM Chip while your VISTA Panel is powered on. Always power down the panel completely before replacing its PROM Chip.

For the longest time, it was believed that you could use an SIA PROM Chip on its non-SIA VISTA printed circuit board (PCB) without experiencing an issue. For example, if you removed the PROM Chip on a Honeywell VISTA-20P, and replaced it with a WA20PSIA PROM Chip, then it was believed that no issues would occur. The same was believed to be true if you used a non-SIA PROM Chip on an SIA-compliant VISTA board. An example there would be if you removed the PROM Chip on a Honeywell VISTA-20PSIA and replaced it with a 20P PROM Chip. Aside from determining what was allowable within programming, no other issues were believed to occur if you used an SIA PROM Chip on a non-SIA VISTA System PCB, or vice-versa.

But upon further testing, that is not the case starting with VISTA System Firmware Version 9.17 on VISTA-20P Panels. Any Honeywell VISTA-20P PCB (non-SIA) that is being upgraded to Panel Firmware Version 9.17 or higher must have a non-SIA 20P PROM Chip. Likewise, any Honeywell VISTA-20PSIA System PCB (SIA-Compliant) that is being upgraded to Panel Firmware Version 9.17 or higher must have a 20PSIA PROM Chip. If you try to use an SIA PROM Chip on a non-SIA VISTA System (or vice-versa), then it is possible that peripheral devices connected to the system's ECP bus may not work properly. ECP devices for a VISTA System include any wired keypads, any alarm monitoring communicators, and any wireless receivers. This same error is also believed to occur on any Honeywell VISTA-15P (or VISTA-15PSIA) that is being upgraded to Panel Firmware Version 9.17 or higher, though further testing is needed to verify if that is indeed the case.

You can determine whether your VISTA System is an SIA Panel PCB or a non-SIA Panel PCB by checking a sticker on the panel's terminal block. This is a small barcode sticker at the bottom of the terminal block, below the phone line terminals. Check for one of the following messages:

  • SAVS20PSIA - Regular VISTA-20P
  • SAV20P-SIAP - VISTA-20PSIA
  • SAVS15PSIA - Regular VISTA-15P
  • SAV15P-SIAP - VISTA-15PSIA

Long story short, if you are using a Honeywell VISTA-20P, VISTA-20PSIA, VISTA-15P, or VISTA-15PSIA and you wish to PROM upgrade it to System Firmware Version 9.17 or higher, then make absolutely sure to use a PROM Chip specifically designed for that particular board. Do not attempt to use an SIA-equivalent on a non-SIA board, or a non-SIA Chip on an SIA-Compliant VISTA board. Mixing an SIA Chip on a non-SIA board (or vice-versa) for 15P or 20P Systems (or SIA equivalents) when upgrading to Firmware Version 9.17 or higher can result in ECP devices not working properly. As long as you use a proper PROM Chip for your system, then no issues should arise. If you are ordering a PROM upgrade chip from Alarm Grid then place your order and be sure to specify which version you need by sending us an email using the email address listed below. If you purchase either the Honeywell LTEIA-TC2 or LTEIV-TC2 or any of our other upgrade kits for VISTA panels, then you will receive all four of the available upgrade chips. Just be sure to select the correct chip for your VISTA PCB.

If you have any further questions about Honeywell VISTA Systems and their PROM Chips, or if you want to learn more about alarm monitoring service for your Honeywell VISTA System, please send an email to support@alarmgrid.com. We're here to answer any questions or concerns you might have. Our hours for responding to emails run from 9am to 8pm ET M-F. We look forward to hearing from you!

Tags: , , , , , , , , , ,

Comments


Posted By

Our video team had a decent time last week, as five (5) new videos were released. This time, the videos feature myself and Jarrett. As always, we hope that you find them to be helpful, informative, and interesting. Remember, we make these videos to help you! Let's check out the videos.

Finding the Date Code On the FF345

I show you how to find the date code on the Encore FF345. The FF345 is a listening module for smoke detectors and CO detectors that alerts the system upon hearing the unique sound of an activated smoke detector or carbon monoxide sensor. The device is designed to be used with 2GIG Panels and Honeywell Panels. However, FF345 units from a certain batch had an error that prevented them from working with Honeywell Systems. Checking the date code is useful for determining if your unit is affected.


Cameras that Work w/ the Lyric and Total Connect

Jarrett explains which security cameras are compatible with the Honeywell Lyric and the Total Connect 2.0 platform. The only cameras that can work with TC2 are Honeywell IP Cameras. Of these cameras, only the legacy models that are no longer sold are able to interface with the Lyric for live-streaming on the panel. None of the current Honeywell HD Cameras can be streamed on the Lyric. One important note about the legacy IP cameras from Honeywell is that they had to be online to receive a critical firmware update to continue being used to this day.


The Lyric Built-In Camera Disarm Pictures Cannot be Used With HomeKit

Jarrett explains how the disarm photos that are taken using the front camera on the Honeywell Lyric will not appear on the Apple HomeKit platform. While there is a nice integration between the Lyric and HomeKit, it is only used for automation purposes and a very limited selection of security functions. Disarm photos are considered to be a security function, and they will not appear in HomeKit. The only platform that allows you to view disarm photos taken by the Lyric is Total Connect 2.0.


Night Stay On Qolsys IQ Panel 2 Plus

I explain how there is no Night Stay option for a Qolsys IQ Panel 2 Plus. Night Stay is a special type of Arm Stay. Normally, when you Arm Stay, interior zones are automatically bypassed. But when you Night Stay, motion sensors that are designated for Arm Night will remain active, instead of being bypassed. The feature is available on most Honeywell Panels, but it is not supported on the IQ2+. But there is an okay workaround for the IQ2+ that involves using specific Sensor Groups for programmed motion sensors that you want to remain active when Arming Stay.


Number of Zones On a Hardwired System Cannot be Increased

I explain why the number of zones on a hardwired alarm panel cannot be increased. The maximum number of zones that a system can support is built into its logic, and it cannot be increased. For a wired panel, only the on-board zones are initially accessible. You will need to add one or more wired expansion modules and/or a wireless receiver to open up the other zones. This will allow sensors to connect with the zones and interface with the system.

Tags: , , , , , , , , , , , , , ,

Comments


Posted By

It's Monday again, and it's time for another Alarm Grid video recap! We have six (6) new videos for you. Five (5) feature the DSC PowerSeries NEO, while the last one covers the Honeywell LTE-IA and LTE-IV Communicators for VISTA Systems. All videos feature yours truly. Let's check them out!

Alarm grid inside security stickers

Adding a DSC HS2TCHP Touchscreen Keypad to a DSC PowerSeries NEO

I show you how to add a DSC HS2TCHP Touchscreen Keypad to a DSC PowerSeries NEO Security System. Adding a touchscreen keypad like the DSC HS2TCHP to a system can be more inviting and easier for end users to understand than a traditional numeric keypad. The DSC HS2TCHP connects with the same on-board panel terminals as any other keypad for the system. Remember to power down your NEO Panel completely before adding a keypad or making any other hardware changes.


Adding Hardwired Zone to DSC PowerSeries NEO Security System

I show you how to add a wired sensor to a DSC PowerSeries NEO Security System. As a hardwired alarm panel, the DSC PowerSeries NEO can used wired sensors with no extra add-ons being required. All wired zones on the NEO will use end of line 5.6k ohm resistors, which are color coded green-blue-red-gold. This includes wired zones that are not actively being used with the system. New wired sensors will be connected with the panel, and the appropriate Zone Definition will be set at the corresponding zone.


Program a Wireless Zone to a DSC PowerSeries NEO

I show you how to add a wireless sensor to a DSC PowerSeries NEO Security System. The NEO cannot support wireless sensors right out of the box. Instead, a wireless transceiver must be added to the system. The NEO supports PowerG Transceivers that will allow you to use PowerG Wireless Sensors with the system. The advantage to using wireless sensors is that they are much easier to install than wired sensors. This is because you will not need to run wires for wireless sensors.


Enrolling a PowerG Sensor to a DSC PowerSeries NEO

I show you how to add a PowerG Sensor to a DSC PowerSeries NEO Security System. This will require that a PowerG Transceiver is added to the system, such as a DSC HS2LCDRF9 N Keypad or a DSC HSMHOST9 Standalone Transceiver. PowerG Sensors are widely seen as some of the best wireless sensors in the security industry. This is because these sensors offer a wireless signal range of up to 2km in an open air environment, and they utilize military grade 128-bit AES encryption for exceptional security.


Delete a Zone From a DSC PowerSeries NEO

I show you how to delete a zone from a DSC PowerSeries NEO. This process differs depending on whether the zone is wireless or hardwired. For a wireless zone, you are clearing the sensor from the system so that it is no longer recognized. For a wired zone, you are merely changing the Zone Definition for the associated wired zone to [000] for Null Zone. Deleting a zone from a DSC PowerSeries NEO will open up the zone so that it can be used with a different sensor.


Installing a Honeywell LTE-IA or LTE-IV Communicator to a VISTA-21iP System

I show you how to add a Honeywell LTE-IA or a Honeywell LTE-IV to a Honeywell VISTA-21iP Security System. The LTE-IA and the LTE-IV are dual-path communicators that use both IP connectivity (wired ethernet) and LTE cellular connectivity. When adding one of these communicators to a VISTA-21iP, you must first disable the internal IP communicator for the system. This is done by re-positioning the white jumper to the bottom two (2) prongs. Make sure to power down the panel before re-positioning the jumper and installing the communicator!

Tags: , , , , , , , , , , , ,

Comments


Posted By

Alarm Grid is back with another video recap, this time covering videos from July 21st thru July 24th. The highlights this week include a classic video from Jorge, as well as the start of a new video series where I teach you how to set up the DSC PowerSeries NEO. Let's check out the videos!

Connecting a Honeywell Tuxedo Touch to WIFI

Jorge shows you how to connect a Honeywell Tuxedo Touch to a local WIFI network. The Tuxedo Touch uses an internet connection for sending and receiving Z-Wave signals from Total Connect 2.0. It is important to understand that the Tuxedo Touch is not actually an AlarmNet Communicator for facilitating monitoring service. Its internet connection is merely for automation purposes and displaying the current weather forecast. Without a reliable internet connection, the current status of Z-Wave devices on TC2 cannot be updated.


Powering the DSC PowerSeries NEO Security System

I show you how to provide power to a DSC PowerSeries NEO Security System Primary power comes from a 16.5VAC, 40VA transformer. Since AC power is being used, polarity does not matter when connecting wires to the module. We recommend using 18-AWG, 2-Conductor wire for this job. But if you have existing wire lying around, then that should work fine, as long as maximum wire run limits are observed. The PowerSeries NEO also receives backup power from a connected battery.


Add Wired Keypad to DSC PowerSeries NEO Security System

I show you how to add a wired alphanumeric keypad to a DSC PowerSeries NEO Alarm System. The first keypad you add to your NEO Panel should be a wired alphanumeric model for programming purposes. In particular, we recommend using the DSC HS2LCDRF9 N for this purpose. That model includes a built-in PowerG Transceiver so that you can begin adding wireless PowerG Sensors with your system. The initial keypad allows for one-touch enrollment, while additional keypads must be added through the initial keypad.


Tags: , , , , , , , ,

Comments


Posted By

We have learned that DSC PowerSeries NEO Systems and the Alarm.com ADC-CSVR126 Commercial Stream Video Recorder have new updates available. Both updates are quite minor. The PowerSeries NEO update (Version 1.36) can be requested from ADC. The ADC-CSVR126 update will be pushed automatically.


You may recall last week that there was an update for PowerSeries NEO Communicators. Well this one is for the NEO panel itself. It includes a minor fix related to the operation of interconnected smoke and heat detectors and their visual verification feature. Alarm Grid customers can contact us to push the upgrade from Alarm.com. If the update is sent across cellular, then a small fee may be charged by Alarm.com, and will be applied to your next bill.

As for the Alarm.com ADC-CSVR126 Commercial Stream Video Recorder, its new update merely updates the certificates the device uses with the Alarm.com platform. End users should not notice any change in the device's performance. Updates will be pushed down automatically over time, but you can also have the update pushed down manually if desired. No charge is required to do so. For reference, the new firmware is Firmware V4.1.10.190628.

The best way for an Alarm Grid customer to request one of these updates is to email support@alarmgrid.com. We check email from 9am to 8pm ET M-F. And if you are interested in becoming an Alarm Grid customer with access to Alarm.com, please check out our monitoring page We look forward to hearing from you!

Tags: , , , , , , , , , , ,

Comments


Posted By

Alarm.com has announced that Firmware Update 189G is now available for DSC PowerSeries NEO Dual-Path Communicators. Both the DSC TL880LEAT N AT&T & IP Dual-Path Communicator and the DSC TL880LTVZ N Verizon & IP Dual-Path Communicator can receive the new update from the Alarm.com servers.

Dsc hs2016nk powerseries neo alarm control panel 16 zones

Firmware Update 189G provides multiple stability fixes, and it resolves some issues that have been known to affect DSC PowerSeries NEO Communicators. It is recommended that anyone using a DSC PowerSeries NEO with a dual-path communicator for use with Alarm.com has the update pushed down to their system as soon as possible. Any DSC PowerSeries NEO System with a DSC TL880LEAT N or a DSC TL880LTVZ N can receive the update. This includes the DSC HS2016NK, the DSC HS2032NK, the DSC HS2064NK, and the DSC HS2128NK, which are all sold by Alarm Grid.

As is the case with any Alarm.com Firmware Update, there may be a small fee to push this update down to your panel. This fee is applicable if the update is forced to be sent across a cellular network. If you are monitored by Alarm Grid, then we will simply add the fee to your next monitoring bill. If your NEO System is properly configured for both IP and cellular, then the update should be sent across the internet, and no fee should be applied.

Remember that this update is for the Alarm.com Dual-Path NEO Communicators only. The update is not for the cell-only communicators. If you have either the DSC TL880LEAT or the DSC TL880LTVZ (the non-N models), then you do not need to request this update. If you have a DSC PowerSeries NEO System that is monitored by Alarm Grid and you aren't sure which communicator you have, then you can email us, and we will be happy to check.

If you are an Alarm Grid monitored customer with a DSC PowerSeries NEO System and one of the Alarm.com Dual-Path Communicators, please email us at support@alarmgrid.com to request the firmware update. Please make sure that your NEO System is powered on and connected with Alarm.com servers so that the update can be pushed down successfully. Our support team checks email from 9am to 8pm ET M-F. We look forward to hearing from you!

Tags: , , , , , , , , , , , ,

Comments


Posted By

Hi DIYers! We haven't made an Alarm Grid Tips post in while, so we figured now was a good time. The tip for today is to always take pictures when swapping out a hardwired alarm control panel with a new one. A few clear and detailed pictures can help you greatly with rewiring later on.

Honeywell vista 20p wired alarm control panel

If you have an older alarm system, there may be many benefits to upgrading to a newer model. A more advanced panel will allow for a greater number of zones and support for new functions and features. Many people upgrade so that they can access an interactive service platform like Total Connect 2.0 or Alarm.com. This will allow you to control your system and check its status remotely using a smartphone.

When a person makes a system upgrade, they will usually want to bring their existing sensors to their new setup if possible. Even if the panel itself is old and outdated, the sensors may still be perfectly suitable for regular use. It can be very expensive to buy a complete new set of sensors. And the user won't even need to move their sensors. They can remain in the same location and just wire-in with the new panel.

Honeywell 943wg mini magnetic contact

But if you have a complete hardwired system, then there are likely many sensors and other pieces of equipment running from various locations on the circuit board. Certain devices like sirens can require a surprisingly intricate setup, and it can be difficult to remember where everything goes. Even if you are just transferring sensors and other devices from one panel to another, the task can be surprisingly challenging without a visual aid.

For that reason, we recommend taking pictures before trying to bring over equipment from one panel to another. You don't need to take many, just enough to see where everything goes and where every connection ends up. In many cases, a new panel will follow a very similar wiring setup to the one it is replacing. By using your images as a guide, you will have a much easier time making a successful transition.

This same principle also applies if you are upgrading to a wireless system from a hardwired system. Wireless systems can support hardwired sensors by using wired to wireless converters. A wired to wireless converter works by connecting directly with hardwired sensors and sending out wireless signals to the panel on their behalf. The system will then recognize these wired sensors just like any regular wireless sensor.

Honeywell 5800c2w hardwire to wireless system 9 zone conversion moduleWiring sensors to a converter is actually very similar to wiring to a panel. The pictures of your old hardwired setup will be surprisingly helpful when connecting to a wired to wireless converter. You can check the pictures to see which wire goes to which terminal and even make sure the backup power supply is connected correctly. By placing the converter in the old location of the previous panel, all the sensors can remain in the same spot and easily connect with the converter(s).

So if you are ever upgrading from an older hardwired system, make sure to take some pictures first! We hope this basic tip was helpful to some DIY installers out there. Keep checking our blog for more Alarm Grid Tips in the future.

Tags: , , , ,

Comments


Posted By

Hi DIYers! We know that many users take on the task of setting up their own hardwired security system. We think this is great, as it really lets a DIY user get to know their alarm panel. But there are some extra tools we recommend for setting up a wired system. One of which is a voltmeter.

Honeywell vista 20p wired alarm control panel

All alarm systems require electricity for basic operation. But this electricity is used for more than just powering the panel. Various equipment like sensors and keypads will also require power. With hardwired systems, the peripheral equipment will actually draw power from the panel. Not only is the system's plug-in transformer powering the panel, it is also keeping its many devices running as well. If the electricity goes out, the panel should also have a backup battery to ensure that everything remains powered.

The important thing to understand is that plugging in a transformer does not suddenly supply an infinite amount of electricity for an alarm system. There's a limit to how much power a system can provide. Each transformer can only provide a limited amount of current. There are also current limiting devices like fuses and breakers that are built into each of the output circuits on a system. These are used to prevent things like the bell circuit, the battery charging circuit and the auxiliary power circuit from allowing enough current through to damage the system. If you try to add too many devices to a system, you may find that they will not work properly. Worse yet, if you don't use the specified transformer and other manufacturer-specified peripheral devices, you could cause serious damage to the system.

For smaller applications, this is not usually a major concern. But as you add more powered devices to an alarm system, the chance for overload becomes greater. You may need to add a second power supply, along with an additional transformer and battery. However, you shouldn't be working blindly. Using a voltmeter with the ability to read current (technically a multi-meter) is very important for knowing the current load and making sure that the current power supply is adequate.

A voltmeter works by applying a known amount of current and resistance to a circuit. Ohm's Law tells us that if you know any two of three values (voltage, current or resistance), you can then calculate the third value. A hardwired zone on an alarm panel works largely in the same way. Voltage, along with a small amount of current, is fed through a zone circuit. Based on the Ohm's Law principle, if you know the amount of voltage being applied, and you know the amount of current being applied, you can then calculate the amount of resistance that is present on the circuit. This is how a zone with an end-of-line resistor works. When you make a zone Normally Open or Normally Closed, you simplify things even further. If current is flowing, the zone is open. If current is not flowing, the zone is shorted or closed. Without a voltmeter, troubleshooting wired zones becomes much more difficult. The voltmeter doesn't even have to be a big expensive model. It just needs to provide basic function.

Also keep in mind that many system problems occur due to electrical issues. Having a voltmeter on hand can save a user a lot of hassle in troubleshooting. We hear of users all the time who don't know why their system isn't working, only to find that it is because they aren't supplying enough power. Performing a simple check with a voltmeter can help you discover an issue that would otherwise have gone unnoticed. For that reason, everyone with a wired panel really should invest in an inexpensive voltmeter or multi-meter.

If you're just beginning to consider purchasing a panel, and you don't want the hassle of worrying about wired zones, then a wireless system may be a better option. Wireless sensors operate strictly on battery power, and a user won't have to worry about overloading circuits. We generally recommend wireless systems for DIY users in general, as they are much easier to use and install. But if you do decide to go the hardwired route, or you already have a working wired system, we certainly recommend you keep a voltmeter on hand!

If you're an Alarm Grid customer, and you need help using a voltmeter to check your system, don't hesitate to reach out to us! We are happy to help monitored customers get their systems up and running and perform any necessary troubleshooting. We invite you to check out our monitoring page for more information. If you ever need help, you can send an email to support@alarmgrid.com. You may also call us at (888) 818-7728 during our normal business hours of 9am to 8pm EST M-F. We look forward to working with you!

Tags: , , , , , , , , , , , ,

Comments