February 2019 Archives

Posted By

If you're like many system owners, you're looking for a way to add a new noisemaker to your security setup. Maybe you need a louder sounder or you want audible alarms to occur in a second location. In any case, a wireless siren may provide the perfect solution, especially for DIY users.

Qolsys iq siren z wave siren for qolsys iq and iq panel 2 qz2300

External alarm system sirens aren't just for users with hardwired alarm control panels. These devices make a great addition to almost any setup. Adding an external sounder is now easier than ever before thanks to the rise of wireless sirens. Unlike their hardwired predecessors, wireless sirens do not need a relay module or a complicated power supply. Most can receive power through regular batteries and stay operational for years on end. Programming is generally very easy even for novice users. And we're not talking about a conventional hardwired siren that is operated using a wireless relay like a Honeywell 5800RL We're talking about true wireless sirens that communicate directly with the security panel.

There remains a common misconception that hardwired sirens are significantly louder than their wireless counterparts. While there are still industrial and commercial locations that need hardwired sounders, the reality is that there are some extremely loud wireless sirens available for almost any alarm system. Nearly every home can get the results they need using a wireless sounder. And if you're a DIY user installing your own home security system, there's practically no reason to even consider using a hardwired device when you can get great results using a wireless sounder.

At the end of the day, there are still louder wired siren options than wireless sirens. But the difference is not as big as you might expect. We have encountered wired sirens that produce sounds of up to 120-125 dB. Meanwhile, the most powerful wireless sirens tend to top out at the 105-110 dB rang. But there are almost no residential applications that need the power of a hardwired siren! A 105 dB wireless siren will still alert everyone in the building to an alarm event. Keep in mind that 105 dB is about as loud as a powerful table saw. You will certainly hear it!

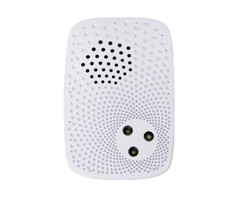
Once you decide that a wireless siren is right for you, the question becomes which one to get. It can be difficult to decide with all the great options available. But we're here to break down the options and point you in the right direction. One of the easiest devices to recommend is the Qolsys IQ Siren. This is a Z-Wave siren that operates at 105 dB. Since it communicates as a Z-Wave device, it can successfully pair with almost any alarm system with a functional Z-Wave controller. This makes it one of the most versatile and easy to use wireless sirens available. All you have to do is enroll it with your system and keep it plugged into a wall outlet.

A very similar wireless siren is the Linear WA105DBZ-1. This is a 105 dB Z-Wave siren manufactured by Linear, a company well-known for its Z-Wave offerings. This device also plugs into a wall outlet using an included transformer, and it has a backup battery for situations when the power is out. A white LED strobe light with red plastic cover provides visual indication of any alarms that occur. Just like the Qolsys option, the Linear WA105DBZ-1 can pair successfully with virtually any alarm system that has a functional Z-Wave controller.

If you're looking for a louder siren, then you might consider the DSC PG9911B. This siren communicates using PowerG RF signal, making it compatible with the Qolsys IQ Panel 2 Plus Systems and the DSC PowerSeries Neo Panels. Unfortunately, PowerG is not as widespread as Z-Wave, so there aren't as many panels that can use the PG9911B. But the upside to this device is that it offers an incredibly loud sound rating of 110 dB. PowerG sensors also boast a highly impressive signal range, making this siren perfect for spots like detached garages or barns located across the property. The PG9911B is also one of the few wireless outdoor sirens available, which only adds to its excellent versatility!

Not every user will need an external siren in the 105-110 dB range. Some users just want a second sounder to install in the second area of the property. Honeywell offers a couple of wireless sirens that fit this bill. These are the Honeywell 5800WAVE and the Honeywell SiXSIREN. Both devices operate at 85 dB, which is about as loud as the integrated sounder inside most wireless alarm panels. They are great for users with larger properties who need sounders in multiple areas. The 5800WAVE will work with LYNX Touch Systems, as well as VISTA Systems that have an added wireless transceiver. Meanwhile, the SiXSIREN works exclusively with the Lyric Controller. DSC also offers a similar siren, the DSC WT4901, which works with their 433 MHz systems.

If you're an Alarm Grid monitored customer looking for a wireless siren, our team is here to help. We invite you to email us at support@alarmgrid.com with any questions you might have. We also offer phone support for monitored customers at (888) 818-7728 during our regular business hours of 9am to 8pm EST M-F. We look forward to assisting you and helping you find the perfect wireless alarm siren for your needs!

Tags: , , , , , , , , , ,

Comments


Posted By

Hi DIYers! If you haven't heard yet, a new firmware version for the 2GIG GC3 System is now available. This update provides support for the system's screensaver feature, and it allows video demos to be uploaded to the panel. It also fixes a few minor bugs that were known to cause issues.

2gig gc3 diy wireless security system w slash 7 screenThe firmware update is version 3.2.1.6653. Although the changes it offers are relatively minor, it's still worth downloading for users who want to get the very most out of their GC3 Systems. The biggest change is the addition of the screensaver feature, which will also likely be referred to as the slideshow feature. Users can add personal photos to a USB drive and transfer them to their GC3 System or associated 2GIG SP1 Keypad. They can then arrange these pictures to appear in a slideshow, which will automatically go into effect if the system is left unused for a certain period of time. These options are available in a new My Photos Menu found within System Settings.

Also included in the update is the video demos feature. Although this feature was intended with alarm dealers in mind, there's no reason why it can't be used by end users as well. Users will transfer personal video clips to the panel through a USB drive. They can then use the new Demo Menu option within the Installer Toolbox to add demo videos to the panel. Just like with the slideshow feature, the demo videos can be viewed from both the GC3 System and the 2GIG SP1 Keypad. Both photos and videos are uploaded independently so that a user can have different slideshows and demo videos between their system and their SP1 Keypads.

Other updates included fixed to low-battery indications and problems with the Access Point mode. If you want to download this firmware update, please check our GC3 Firmware Update Page. Download the necessary file, and transfer it to the root directory of a USB drive. You can then insert the USB drive into the top of the GC3 System. Then confirm the update, and provide either the Master Code or the Installer Code (default 1561) to begin. The system will reboot, and the update will be applied. Alarm Grid customers can also ask us to push the update down manually. However, this will include added costs.

If you have any questions about this update please email support@alarmgrid.com. You may also call us at (888) 818-7728 during our normal business hours of 9am to 8pm EST M-F. We look forward to hearing from you!

Tags: , , , ,

Comments


Posted By

Hi DIYers! We've heard many reports that end users were having a tough time auto-enrolling their DSC PowerG Wireless Sensors with their Qolsys IQ Panel 2 Plus Systems. After doing some of our own research, we've found that it is possible. In this quick and easy post, we will show you how.

PowerG Sensors are somewhat unique because they don't learn-in with an IQ Panel 2 Plus by removing a tamper cover or by faulting the sensor. Each PowerG device actually has an enrollment button that is used for enrollment. But even then, this button isn't just simply pressed and held. It has to be activated in a very specific manner for the sensor to learn in.

First, you must locate the enrollment button on the PowerG Sensor. The location of this button can vary greatly between different pieces of equipment. For a key fob or panic button, the enrollment button is usually one of the primary inputs. But another sensor may have its enrollment button on its main board or beneath the battery cover. We recommend referring to the sensor's Installation manual for more information on where this button is located.

The picture below shows the enrollment button on a DSC PG9944 Outdoor Image Sensor. Notice how it is underneath the back cover next to the batteries.


Please keep in mind that the location of this button will vary between different sensors. Once you have located the button, put the IQ Panel 2 Plus System into its auto-enrollment mode like you would for any other sensor. You can access this mode by pressing the small grey bar at the top of the screen and choosing Settings > Advanced Settings > Installer Code (default 1111) > Installation > Devices > Security Sensors > Auto Learn Sensor.

From there, press and hold the enrollment button on the sensor. An LED light on the sensor should appear and then disappear. Keep holding down the button, and do not let it go. After a brief moment, the LED light should appear a second time. Release the button while the light is still illuminated in this second cycle. If performed successfully, the sensor should transmit a signal to the IQ Panel 2 Plus. The system should recognize the signal and learn-in the sensor. You can then proceed to adjust the programming settings for the zone.

Please note that there are some PowerG Sensors that require three (3) LED light cycles for auto-enrollment. For these sensors, try holding down the enrollment button. An LED light should appear. Continue to hold the button. The light will go out, and then a rapidly blinking LED light will appear. Again, continue to hold. Then a third LED light will appear. Release the button when this third LED light cycle begins. The device should auto-enroll. An example of a PowerG Sensor that uses this third cycle enrollment process is the PowerG Flood Sensor. We recommend trying this three cycle process if the regular two cycle process does not work.

We have also encountered some PowerG Sensors that enroll during the first LED light cycle. If that is the case, press and hold the enrollment button until the first LED light appears. Then release the button with the LED light still illuminated. The device should auto-enroll. This is also something to try if you are having repeated trouble enrolling a PowerG Sensor. One sensor where we encountered this is the PowerG Curtain Motion Sensor. Again, a single LED cycle is something to try if you are experiencing repeated problems enrolling a new PowerG Sensor.

We feel this helpful tip should make it easier for end users to enroll their PowerG Sensors without additional assistance. Remember, this is only for Qolsys IQ Panel 2 Plus Systems that have a PowerG daughtercard installed and operating properly. If you're a monitored customer with additional questions, please reach out to us by emailing support@alarmgrid.com, or call us at (888) 818-7728 during our normal business hours of 9am to 8pm EST M-F. We look forward to helping you!

Tags: , , , , , ,

Comments


Posted By

Hi DIYers! We're hitting you with a video recap, this time covering January 28th thru February 7th. It has been a couple of weeks since we have last done this, so we have many new videos this time. Your boys Joe, Jorge and Jarrett are all back and ready to help you learn to use your system!

Using the Qolsys IQ Siren with a 2GIG Alarm System

Jorge shows users how to use the Qolsys IQ Siren with a 2GIG GC3 Alarm System. This Z-Wave siren produces sounds of up to 105 dB, and it features a built-in strobe light to provide a visual indication of an alarm. It also has an integrated backup battery so that it will work even when the power is out. This is an easy-to-use siren that is great for boosting the volume of a 2GIG Security System, as well as many other alarm control panels that work with Z-Wave.


Disabling Auto-Stay on a Honeywell LYNX Touch

Chipper Alarm Grid Team Member Jarrett demonstrates how to disable the auto-stay arming feature when using a Honeywell LYNX Touch Alarm System. Auto-Stay Arming has the system automatically revert to Arm Stay Mode when Arming Away if no entry/exit zone is activated during the exit delay countdown. If you want to put your LYNX Touch System into Arm Away Mode, you must either disable this feature or open and close an entry/exit sensor during the exit delay countdown.


Why Can't I Use Z-Wave Security Sensors With My Alarm System?

Jorge talks about how Z-Wave security sensors cannot be used with security systems supported by Alarm Grid. Z-Wave technology is great for use with smart home automation, and we have many systems that support Z-Wave lights, locks and thermostats. However, the Z-Wave communication protocol still isn't considered to be reliable and consistent enough to support security applications. For that reason, most alarm system manufacturers specifically design their security panels so that they cannot use or support Z-Wave security devices.


Changing the Master Code Using the Installer Code on a Honeywell Lyric

Jarrett walks users through the process of changing the Master Code by using the Installer Code on a Honeywell Lyric Alarm System. From the Installer Tools Menu, there is an option for resetting the Master Code back to its default of 1234. The user can then use the default Master Code to access the Users Menu and change the Master Code to a different four-digit code of their choosing. The Installer Tools Menu should be easy to access with the system disarmed since most users keep their Installer Code at the default of 4112.


Using the Smart Areas Feature on the 2GIG GC3

Jorge demonstrates the Smart Areas feature on a 2GIG GC3 Alarm System. This feature allows the system to support partitioning. In this case, the partitions are referred to as "Smart Areas". The system will support four distinct Smart Areas after the feature has been enabled from within system programming. After enabling the feature, a Smart Areas menu option will appear on the main system screen. Please note that your GC3 System must be running firmware version 3.2 or higher to support the feature.


Streaming Alarm.com Cameras to the Qolsys IQ Panel 2

Joe shows users how they can stream Alarm.com Security Cameras directly to their Qolsys IQ Panel 2 System. This feature is only compatible with certain ADC Camera models. You will need to enable the feature within Alarm.com for this to work. In addition to streaming video, some camera models will also allow your to stream live audio on the panel as well. Please note that your IQ Panel 2 System will need to be running firmware version 2.2.1 or higher to support this feature.


How to Safely Remove an iControl from an Existing System

Joe walks users through the proper procedure for removing an iControl module from a Honeywell VISTA Panel. There have been many users who have removed iControl modules from their systems, only to find out later that their keypads do not function properly. This can be prevented by following the correct steps when removing an iControl device. The proper procedure involves powering down the VISTA System before removing and reconnecting the keypad cable to the ECP bus afterwards.


Is Monitoring Required to Use Home Automation with the Interlogix Simon XTi-XTi-5

Jorge talks about how alarm monitoring service is required to use smart home automation with an Interlogix Simon XTi or Simon XTi-5 Alarm System. The reason that these systems require alarm monitoring for home automation is because the Alarm.com Cellular Communicator is actually also the Z-Wave controller. The cellular communicator must be installed and activated with Alarm.com for Z-Wave functionality to work on the system. A user can then control their Z-Wave devices from the panel or through the Alarm.com website or mobile app.


Finding the Serial Number on a Honeywell 5800PIR-RES

Jorge mentions the possible ways to find the Serial Number on a Honeywell 5800PIR-RES Motion Sensor. The easiest option is to check a sticker on the back of the sensor that lists the Serial Number. If the sticker has been removed, you can also auto-enroll it to the panel. The Serial Number will be displayed on the screen after you have learned it in. This can also be useful for confirming that the Serial Number on the sticker is correct.


Honeywell Panels Compatible With the SEM

Jorge explains which of the Honeywell Panels will work with an Alarm.com System Enhancement Module (SEM). An SEM is a cellular communicator that allows a Honeywell System to work with the Alarm.com service. This is rather unique because Honeywell Systems would normally work with Total Connect 2.0 instead. The SEM devices will work with any of the lower VISTA P-Series Panels, as well as their First Alert equivalents. These modules also include built-in Z-Wave controllers for smart home functionality.


Updating the Firmware on a Vista-P Alarm System

Joe covers the process for updating the firmware on a Honeywell VISTA Series System. This is done by replacing the PROM chip. The PROM chip can be identified as a small black chip on the system board. Upgrading to a new one can be necessary for unlocking certain features. You should always make sure to power down the system entirely whenever you are replacing the PROM chip. Alarm Grid sells VISTA-15P PROM Chips, VISTA-20P PROM Chips and VISTA-21iP PROM Chips.


Bonus: Alarm Grid Intro Video

Okay, so this isn't really a video to help you use a security system. But it is a nifty introduction montage that our video team put together. Many of the Alarm Grid techs and employees are featured, including Jorge, Jarrett, Joe, Dylan and Bryce. I even make a brief appearance! We're very proud to have helped many people get the most out of their security systems. If you're a monitored customers and you ever need further help, please reach out to us by emailing support@alarmgrid.com. Also make sure to like us on YouTube, and subscribe for further updates!

Tags: , , ,

Comments


Posted By

Hi DIYers! Did you know that SkyBell Video Doorbells can be viewed from Total Connect 2.0 or Alarm.com? Many users prefer using one of these apps instead of the SkyBell App so that they can have all their security functions in one convenient location. This is great for Alarm Grid customers!


One of the biggest perks of having a video doorbell is being able to know immediately whenever there is activity in front of your house. The SkyBell will send you push notifications whenever its built-in motion sensor is activated or whenever someone rings the door bell. You will receive the alert from anywhere, even if you are away. Although you can still choose to receive these alerts through the SkyBell App, you can also choose to have them sent through TC2 or ADC. Keeping these alerts in TC2 or ADC is perfect for keeping all your security events nice and organized.

Once the user receives a push alert on their phone, they can press a button to immediately connect with their SkyBell Doorbell and see exactly who is at their door. Each SkyBell device also comes equipped with a microphone and speaker so that the user can have a live conversation with the present individual. This way, you can tell your friend that you'll unlock the door for them. Or you could ask a postal work to leave your package by the door. There are so many possible applications with SkyBell.

Additionally, a user can access their Total Connect 2.0 or Alarm.com account to pull up their video doorbell at any time and see if there is any activity occurring. This is excellent for getting a live look-in at the front of one's house. It doesn't matter if you are at home or across the country. With remote access, your home is at your fingertips from anywhere. The devices support video resolution of up to 1080p HD, so you know that the video will be crisp and clear every single time.

At this time, Alarm Grid offers four SkyBell models. Specifically, there are two models for Total Connect 2.0, along with another two for Alarm.com. Both TC2 and ADC have a round model and a trim model. The round and trim models perform the same functions, but the trim models are slightly more compact.

Our current lineup is as follows:

Honeywell SkyBell DBCAM - Round for TC2

Honeywell SkyBell DBCAM-TRIM - Trim for TC2

SkyBell ADC-VDB101 - Round for ADC

SkyBell ADC-VDB105 - Trim for ADC

You don't necessarily need an alarm monitoring plan with video surveillance to use one of these video doorbells. Alarm Grid can add the feature at no additional cost for any existing customer who has access to Total Connect 2.0 or Alarm.com. For that reason, the SkyBell Doorbell Cameras are a great cost-saving option for any user considering traditional security cameras and a monitoring plan with video surveillance. Simply let us know that you want to add a video doorbell to your monitoring account, and we will take care of the rest.

Please note that the TC2 versions can be used with TC2 or the native SkyBell App. But for the ADC models, it is different. The ADC models should not be used with the native SkyBell App in any capacity. For the round ADC model, if you pair it with the native SkyBell App and update the camera, then it will forever lose its ability to interface with Alarm.com! Meanwhile, the rectangular slimline ADC cannot pair with the native SkyBell App in the first place. It only has the ability to be used with Alarm.com.

If you want to learn more about our monitoring plans, you can always check out our monitoring page or reach out to us. The best way to contact us is by email at support@alarmgrid.com. You can also call us during our normal business hours of 9am to 8pm EST M-F. We look forward to helping you plan and design the perfect security system for your needs!

Tags: , , , , , , , , , ,

Comments


Posted By

Hi DIYers! We've learned that a new update to Total Connect 2.0 lets users enable a "Privacy When Disarmed" feature on their HD Cameras. This prevents the cameras from recording and capturing video clips while the system is Disarmed. It will then operate as normal when the system is Armed.

The Privacy When Disarmed feature is great for users who don't want to be bombarded with notifications that appear when their camera activates while they are around. This feature will automatically put the camera into Privacy Mode whenever the system is Disarmed. Once the system is Armed, the camera will exit Privacy Mode and begin operating normally. Many users don't need their camera to record and capture clips while their system is Disarmed, but having to go in and manually toggle the Privacy Mode option every single time can be inconvenient. Now there's an effective solution available!

Each Honeywell HD Camera can be set with the Privacy When Disarmed feature individually. There is currently no way to enable the feature for all the cameras at once. So if you want to use it with all your cameras, you must enable the option for each of them. Additionally, the feature right now turns off Privacy Mode for both Arm Stay and Arm Away settings. We're hoping that a future update will allow the option to be set for only Arm Away Mode. After all, we expect that some users won't want their camera to be taken off Privacy Mode after Arming Stay and remaining inside the building.

Before we get started demonstrating the feature, we do want to note that iOS users may need to log out of the Total Connect 2.0 Mobile App and log back in for the change to be implemented. But it should function normally from there on out. In our example, we will be using the app on an Android Phone.

Start by opening the Total Connect 2.0 App and logging in. Then select the Cameras tab:


We will be demonstrating the feature with our camera "B parking lot". Press the three dots next to the camera to access its advanced settings. Then toggle on the "Turn on camera privacy when security is disarmed". You will be backed out to the previous screen. However, you will notice that the camera's privacy option is still disabled, even if the system is currently in a Disarmed state:


But then try Arming (Away or Stay) and then Disarming from the App. When you navigate back to the Cameras tab, you will notice that Privacy Mode has been enabled automatically. Also the image preview will not be available:


Then if you Arm Away or Arm Stay, you will notice that Privacy Mode has been automatically turned off:


We will be sure to provide you with any additional updates regarding Total Connect 2.0 as we learn more information. If you're an Alarm Grid monitored customer and you have any questions, please reach out to us by emailing support@alarmgrid.com. You may also call us at (888) 818-7728 to during our normal business hours of 9am to 8pm EST M-F. If you would like to learn more about Alarm Grid monitoring and how you can start using Total Connect 2.0, please check out our monitoring page. We look forward to hearing from you!

Tags: , , , , , ,

Comments


Posted By

Hi DIYers! We hear from customers all the time wondering how they can improve upon their existing security setup. Even if you already have a good alarm system, there are still things you can do to make it even better. Here are 5 ways for you to improve upon your home security system:

1. Take advantage of Z-Wave. Most alarm systems today have some way of supporting home automation. Z-Wave is one of the most popular smart home protocols around, and it has been thoroughly embraced by many alarm manufacturers. To get started, find out whether or not your system has a built-in Z-Wave controller. The Honeywell Lyric Controller. 2GIG GC3. 2GIG GC2 and Qolsys IQ Panel 2 all come with one installed. Meanwhile, the Honeywell LYNX Touch and Honeywell VISTA Panels can have a module added separately. From there, you can add Z-Wave devices like lights, locks and thermostats to expand upon your setup. All Z-Wave devices can be controlled remotely using an interactive service platform like Alarm.com or Total Connect 2.0. They can also be set up to activate with certain system events or on a schedule. For example, you can have your lights turn on and have your smart thermostat activate automatically as soon as you return home and disarm your system!


2. Install security cameras. If you want to truly know what is happening in your home at any time, there is simply no alternative to security cameras. If you already use Alarm.com or Total Connect 2.0, then getting a robust and reliable security camera setup is easier than you would think. You just need to upgrade to a Platinum-level monitoring plan and start including the cameras with your network. Alarm Grid offers both Alarm.com Cameras and Total Connect Cameras for you to use in your home. Many of these cameras can be simply rested on a desk or table so that no tools are needed for installation. If you do choose to mount your camera, all the hardware comes included, and the process is super easy. It's even possible to view these security cameras remotely by checking Alarm.com or Total Connect 2.0 from your mobile device. And if your camera captures any clips, you'll be sure to know about it thanks to text, email and push alerts!


3. Add a second keypad. A second alarm keypad can be a great for your to more easily operate your security system from a second area of your house or property. This is a very common practice for homes with multiple entrances, since a user will often want to quickly disarm from wherever they enter. Other users might put a keypad in their master bedroom so that they can conveniently set their system to Arm Stay mode before going to sleep. A security system in the bedroom is also a great way to quickly and discreetly activate a silent panic alarm if you hear an intrusion downstairs. Some keypads like the 2GIG SP1 and the Qolsys IQ Remote can perform automation functions as well. This is great if you want to quickly control or check the status of your devices without having to walk to your main panel. Larger properties might even include third or fourth keypads as well!


4. Upgrade your communication path. The communicator is often seen as the unsung hero of an alarm system. After all, a system needs some way of reporting out in the event of an alarm. A faster communication path means a quicker response from the central monitoring station. This can be absolutely crucial in an emergency. You might also notice that your smart home devices respond a little bit faster as well. In other cases, it isn't about increasing speed, but rather improving reliability. Adding a cellular communicator will allow your system to send outbound signals even when there is a power outage. It is also a known fact that cellular service is usually a lot more consistent than an IP connection, which can sometimes go down for seemingly no reason. Users in rural areas might also consider using a cellular antenna or an amplifier to further improve upon their cellular signal strength so that signal reach their destination reliably every single time. Whether you're adding a new communicator or replacing an older CDMA communicator with an LTE model, a communicator upgrade can be arguably the most important investment you make for your system!

5. Enroll a key fob. Do you find yourself racing to disarm your system as soon as you return home? Do you want a quick way to arm your system without having to pull up Total Connect or Alarm.com? If so, then a key fob might be the perfect solution for you. These compact devices can be attached to a key ring and stored in a pocket or purse for easy access. Many users attach their security key fobs to their car keys so that all their keys are in one convenient spots. Just a press off a button can disarm your system or set it to either Arm Stay or Arm Away mode. You can even program a key fob to trigger an immediate panic, and some systems will let you use key fob button presses to activate smart scenes. And if that weren't enough, many key fobs will let you program more than four inputs by using dual-button presses. You can even give each regular system user their own personal key fob so that you know who used the system last!

If you need help finding ways to improve your security system, please reach out to us! We love helping our customers get the best security systems possible. You can reach us at support@alarmgrid.com, or call us at (888) 818-7728 from 9am to 8pm EST M-F. We look forward to working with you and showing you all the great options available!

Tags: , , ,

Comments


Posted By

Hi DIYers! As you may know, backup batteries represent one of the most important components for any alarm system. These devices keep the panel running during a power outage so that the user stays monitored. This is crucial in case an emergency occurs while the electricity is out.

A backup battery for an alarm system works by continuously storing a charge while the system is running on plug-in transformer power. If the power goes out, then the backup battery will have power ready to keep the system running for as long as possible. Once the system loses both battery power and plug-in power, it will shut-down entirely. For that reason, batteries are just a temporary solution. But they are still extremely useful for short-term outages.

Batteries are actually very easy to work with, and they can be quickly swapped out and replaced by any DIY user. Most wireless panels use a special type of battery pack that plugs into the system board. The user can simply unplug the old battery and then plug-in the new one. Hardwired panels generally use larger batteries, that can usually be identified as a black box inside the metal enclosure. Just disconnect the wiring from the old one, and connect it to the new one. Please note that many hardwired panels can also use a shared transformer when using an alarm system communicator. More information is available here.

A big thing to understand about batteries is that they do not last forever. As a battery is used inside an alarm system, it will very slowly lose its ability to store a charge. Its maximum capacity will gradually begin to decrease until it is unsuitable for use. At that point, the user will need to get a replacement. A user will know that this is the case because a low-battery trouble condition will appear on their system.

Remember though that not all low-battery warnings are a sign of a dead battery. If this warning appears after a power outage, it could just mean that the battery needs time to restore its charge. Once the battery charge reaches a sufficient level, the condition should clear on its own. We recommend waiting at least 24 hours with the system running on continuous AC power to see if the problem goes away. If it does, then the battery still has some life remaining.

It also never hurts to be prepared and keep an additional backup battery or two in a safe area. That way, when your current battery reaches the end of its lifespan, you can quickly replace it with a new one. Since the new battery won't have a charge, it will take it awhile to regain power. But eventually, the battery should work just like a new one. Additionally, most of the batteries for hardwired panels have universal connector terminals, and you can actually keep them continuously charged with a Battery Tender device. Keeping multiple charged batteries around is great for users who live in an area where extended power outages may occur.

When looking for a new battery, you'll want to make sure it is compatible with your system. We have many of our batteries and their compatible systems listed below:

Battery Compatible Systems
Notes
2GIG BATT1X 2GIG GC2 Provides 4 to 6 hours of backup power.
2GIG BATT2X 2GIG GC2 Up to 24 hours of backup power.
2GIG BATTERY GC3 2GIG GC3 Standard backup battery for GC3.
DSC SCWBATTERY DSC Impassa Up to 24 hours of backup power.
Honeywell LCP500-4B Honeywell Lyric Controller Up to 4 hours of backup power.
Honeywell LCP500-24B
Honeywell Lyric Controller
Up to 24 hours of backup power.
Honeywell LYNXRCHKIT-SC Honeywell LYNX Panels Up to 4 hours of backup power.
Honeywell LYNXRCHKIT-HC Honeywell LYNX Panels
Works longer than standard capacity battery.
Honeywell LYNXRCHKIT-SHA Honeywell LYNX Panels
Up to 24 hours of backup power.
Interlogix 600-XTI-BAT Simon XTi and Simon XTi-5 Rated at 6V, 2.1Ah.
Qolsys IQ Battery Qolsys IQ Panel Will not work with IQ Panel 2.
Qolsys IQ2 Battery IQ Panel 2 and IQ Panel 2 Plus Up to 24 hours of backup power.
UltraTech 1240 Hardwired Panels Rated at 12V, 4.5Ah
UltraTech 1270 Hardwired Panels Rated at 12V, 7.0Ah

If you have any questions about batteries or if you need help choosing a battery, don't hesitate to reach out to us! You can email us at support@alarmgrid.com, or call us at (888) 818-7728 during our business hours of 9am to 8pm EST M-F. We look forward to hearing from you!

Tags: , , , , , , , , , , , , , , , , ,

Comments


Posted By

Hi DIYers! There was a recent report that revealed the 10 United States cities where property crime levels are the highest. Anyone residing in these cities might want to consider purchasing a security system. This information is also great for those with vacation or investment properties.

2gig gc3pk lte v a wireless security system w slash verizon lte The report measured the number of property crimes that occur in each city for every 1,000 people. It used statistics from 2017, which is the most recently released data from the FBI. Any burglary or larceny was considered a property crime for the study. Motor vehicle theft was not included in the report, as the intention was to provide catered results for homeowners, renters and investors. Only cities with at least 100,000 residents were included.

The 10 cities with the highest property crime levels were:

  1. Springfield, MO
  2. Salt Lake City, UT
  3. Spokane, WA
  4. Little Rock, AR
  5. Albuquerque, NM
  6. Memphis, TN
  7. San Francisco, CA
  8. Chattanooga, TN
  9. St. Louis, MO
  10. Baton Rouge, LA

Of course, this report isn't meant to scare anyone, and it's a well-known fact that robberies and home invasions can occur anywhere. But it never hurts to know the statistics for your city. Taking steps to prevent property theft is the best thing you can do as a homeowner, renter or investor. One of the most effective methods for keeping your home and your loved ones safe is to install a security system.

If you're looking into a new security system, you might want to consider Alarm Grid monitoring services. We are a DIY security company that puts the customer in control. Nearly anyone can install their own alarm system with just a little bit of help online or over the phone from one of our trained security experts. Customers purchase all the equipment outright, and it is theirs to keep if they ever decide to leave Alarm Grid at a later time. Every system we support is non-proprietary, and it can be taken to a new company if that is what the customer wants.

Alarm Grid also offers no added fees. This means no installation fees, no activation fees, and no cancellation fees. Customers are always free to cancel before their next monthly bill if they are relocating or if they no longer wish to use our services. There are no contracts, and the only thing keeping our customers with us is the excellent quality of our service. As an Alarm Grid customer, you only receive the very best, and you are always in control.

We invite you to check out our monitoring page by checking the orange "Alarm Monitoring" button at the top of this page. If you have any questions about us, you are always welcome to reach out to us. The best way to make sure we see your message is to send an email to support@alarmgrid.com. We also accept phone calls at (888) 818-7728 during our normal business hours of 9am to 8pm EST M-F. We look forward to helping you meet all your security needs!

Tags:

Comments


Posted By

Hi DIYers! If you're looking to get started with home security, we urge you to make sure your system has a cellular communication path. This is the best way to ensure that your system remains monitored and protected at all times. All you need is the right communicator and monitoring plan.

Qolsys iq panel 2 at and t wireless security system with at and

When it comes to alarm monitoring, cellular communication is the undisputed champion. This is due in large part to its exceptional reliability. Do you ever notice how the WIFI in your home or at work goes out from time to time. This almost never happens with cellular. Even lost calls really only occur in spotty coverage areas or due to changes in location. As long as you get good coverage and your system stays put, you can be sure that service will almost never go down.

With the widespread availability of cellular networks, almost everyone in the country receives strong cellular service in their area. If you are ever unsure, you can always check various coverage maps offered from cellular service providers. And even if you do live in a rural area with poor service, you may still be able to get the results you want using a cellular amplifier. Not only will this boost signal strength for your security system, it will also help you receive better cell service in general while you are at home.

One of the most important benefits of having cellular monitoring is that it will keep your home protected when the power is out. This is especially useful for those who live in areas with inclement weather that may frequently cause electrical outages. Cellular service does not require electricity, and it does not use a router. This is why your cell phone continues to work when the power is out. The same cannot be said for internet, which often goes down when the power is out. Most people don't have battery backup for their at-home WIFI routers.

Nearly all alarm systems use some type of backup battery setup. This keeps them running even when the power is out. But it's only useful if the system can still communicate outward. Cellular communication makes this possible. Just imagine if the power was out and an intruder were to break into your home. With cellular service, you will know you're protected.

Cellular communication also provides all of the same benefits that are offered by IP. It is relatively fast, and it supports interactive service platforms like Alarm.com and Total Connect 2.0. A user can access these services on their smartphone to arm and disarm their system, check current system status, and to control smart home devices. And fast communication speeds mean that any remote commands will go through nice and quickly. You can even add a cellular communicator to a panel that already supports WIFI to achieve an extra reliable dual-path communication setup!

You may be wondering what you need to get cellular communication for an alarm system. Well really it's as simple as having an alarm system with a cellular communicator and an appropriate alarm monitoring plan. Some panels, like the Qolsys IQ Panel 2 come with one already installed. Others, like the Honeywell Lyric Alarm System, need to have one added separately. If you decide to go with Alarm Grid Monitoring, you will want to make sure you choose a Gold-level plan or higher.

But you don't have to design a cellular security system on your own. The fantastic support at Alarm Grid is here to assist. We'll help you choose the perfect system and equipment for your needs so that you have proper peace of mind. Just send an email to support@alarmgrid.com. You can also call us at (888) 818-7728 during our normal business hours of 9am to 8pm EST M-F. We look forward to hearing from you and helping you design an effective and reliable security system with cellular communication!

Tags: , , , ,

Comments