July 2019 Archives

Posted By

We have received news that T-Mobile and Rogers are both scheduled to shut down their 2G networks at the end of 2020. This is important for anyone using Alarm.com who is still using one of these communicators. Time is running out to upgrade your communicator and keep your system monitored!


We have talked about the ongoing 3G sunset on numerous occasions. Most 3G networks are set to be shut down by the end of 2022. Well the 2G sunset is even more pressing. Most of the 2G networks have already been shut down, and very few people are still using a 2G communicator for monitoring service. However, these people are still out there. They need to understand that if they don't take action soon, their panel will no longer provide monitoring service.

At this time, Alarm Grid only has a small number of customers using 2G communicators with their systems. These customers are using the 2G T-Mobile Network or the 2G Rogers Network in Canada to connect with the Alarm.com Servers. We want to make it very clear to these customers that if they do not replace their communicators by the end of 2020, they will no longer have active monitoring service.

We would also like take this opportunity to remind all our 3G customers that they will also have to switch to LTE in the coming years. Although the end of 2022 might seem far away, it certainly doesn't hurt to get a head start. An LTE communicator will provide faster and more reliable monitoring service, making it a great upgrade to make as soon as possible. And we're here to help you make the switch as easily as possible.

Fortunately, most Alarm.com Security Panels allow users to easily upgrade the cellular communicator for their systems. If you are still running a 2G communicator, then now is the time to make the transition to LTE. You can do this with an LTE cellular communicator. Start by powering down your panel by disconnecting its backup battery and unplugging its transformer. Then open it up (if necessary), and remove the old communicator. Install the new LTE communicator in its place, and power your panel back on. You can then contact us to activate your new communicator. If you already had cellular alarm monitoring, then there will be no need to change your monitoring plan.

Most of the LTE communicators available on our site connect with either the AT&T LTE Network or the Verizon LTE Network. You should choose whichever network provides better service in your area. Remember, this has nothing to do with your mobile service provider. Your smartphone and your security system are mutually exclusive devices. You can use a completely different cellular service provider for your alarm system.

If you are in the United States, then you should have no problem using an AT&T LTE communicator or a Verizon LTE communicator in your area. Just go with whichever service works better in your area. If you are currently using a Rogers 2G Communicator in Canada, then things are a little more complicated. We recommend checking this post we made on Alarm Monitoring in Canada.

And if you aren't sure of which communicator to get, you can always ask us for help. The best way to reach us is to email support@alarmgrid.com. We will check your email at our earliest convenience and reply back as soon as possible. You may also call us at (888) 818-7728 during our normal business hours of 9am to 8pm EST M-F. We look forward to hearing from you and helping you determine the perfect security option for your needs.

Tags: , , , ,

Comments


Posted By

Hi DIYers! Many of our customers have been using Chamberlain and LiftMaster MyQ Garage Door Controllers with Total Connect 2.0. These smart garage door controllers are perfect for use with the TC2 platform. They offer a great way to integrate your garage door into your smart home network.


The Chamberlain and LiftMaster MyQ integration is great for tying in remote control for your garage doors to your Total Connect 2.0 account. By using this integration, you can consolidate your garage door control into one single app, instead of two separate ones. However, there is a limitation. The integration does not allow you to add the MyQ garage doors into a TC2 Smart Scene for automated control based on security system actions. For instance, you cannot create a scene that will automatically disarm your Resideo System if your garage door is opened. But fortunately, we now have a solution for this problem.

When you integrate your MyQ Garage Door Controller in with Total Connect 2.0, you can control your garage door remotely through the platform. You can also receive text and/or email alerts when the garage door opens or closes. However, if you try to integrate your MyQ Controller with smart scenes, you will be unable to do so. But we recently came up with a solution for this issue that will work for the Lyric Controller and all LYNX Touch Systems. This solution will also provide your system with the ability to truly monitor the activity of your garage door.

The answer is to add a sensor to your garage door. You will want to use either a tilt sensor or a contact sensor with a wide spacing gap. The Honeywell 5822T is a wireless tilt sensor that can easily pair with a Lyric or LYNX Touch System. Another option is the Honeywell 958. This is a hardwired contact designed for overhead garage doors. You can either wire the Honeywell 958 back to the panel, or you can connect it to a wireless sensor that accepts a wired input, such as a 5816 or a SiXCT. Whether you go with the 5822T or the 958 is really up to you, as they are both perfect options for this job.

You should program the sensor into one of the designated wireless garage door zones. The designated garage door zones for an L5100, L5200, or L5210 are Zones 46 thru 48. For an L7000, they are Zones 45 thru 48. And for the Lyric, they are Zones 127 thru 130. You should give the Zone Descriptor a name that allows you to easily recognize it as your garage door.

Please note that each garage door zone is associated with a particular garage door slot. The table below outlines this:


Garage Door 1
Garage Door 2
Garage Door 3
Garage Door 4
L5100, L5200, or L5210
Zone 46 Zone 47 Zone 48 N/A
L7000
Zone 45 Zone 46 Zone 47 Zone 48
Lyric Controller
Zone 127 Zone 128 Zone 129 Zone 130

From there, you should program a "virtual" Honeywell 5877 Relay Module into the system through the Automation Menu. The 5877 is a Honeywell Wireless Relay Module that provides remote control for garage doors. However, it is not compatible with MyQ Garage Door Controllers. With this trick, you don't actually need a 5877 Relay, but you will program your system as if you are using one.

What you want to do is start from the main screen of your panel. Choose Automation > down arrow > Garage Door Setup. From there, choose the garage door slot associated with the zone you set up with the tilt sensor or the contact sensor. Click on "Assign Device". Then go to the "Enter Serial Number" field. Since you aren't actually using a real 5877, you can just enter a fake serial number like "1111111". Click "Done" in the bottom-right corner when you have finished. This will make the system think that a 5877 Relay has been enrolled. You can then return to the main screen by repeatedly pressing the return arrow in the upper-right.

You can then create TC2 Smart Scenes to have the system respond automatically based on the status of the garage door. For example, you might have a smart scene to disarm your system automatically when you open your garage door. To do this, you will want to use the garage door slot that you set up on the system when creating the smart scene. The system will know to change the status of the garage door (opened or closed) based on the activity of the associated zone.

Now, you might be wondering why you need the "fake 5877" setup with the system. The reason for that is because you can't create smart scenes to Arm or Disarm your system based on zone faults. So even if you have sensor programmed for your garage door, you cannot use it as a trigger for arming or disarming your system. But you can use a garage door as a trigger. By making your system think that it has a true garage door programmed, you can use that as a trigger for smart scenes.

It must be mentioned that there are a couple of limitations to this setup. For one, you cannot use this work-around to have your garage door respond automatically based on system activity. This is because there is no real relay module to tell the garage door what to do. So if you want to have the garage door automatically open/close when you arm/disarm your system, it will not work. Second, this will not work with Honeywell VISTA Systems, as those systems do not support the 5877. As a result, you cannot program a "fake 5877" on a VISTA Panel. But other than these limitations, this is a pretty good work around. You also get the benefit of enabling your system to truly monitor your garage door for activity.

If you have any questions about this work-around, please reach out to us. The best way to contact us is to email support@alarmgrid.com. We will check your email at our earliest convenience and respond as soon as possible. We look forward to helping you.

Tags: , , , , , ,

Comments


Posted By

Hi DIYers! A few months ago, we blogged about the upcoming encrypted systems from 2GIG. Well the first one is here, as you can now buy the 2GIG GC2e Wireless Encrypted Security System from the Alarm Grid website! We are certainly very excited about this new panel, and we're sure you are too.


The 2GIG GC2e is essentially an upgraded version of the older 2GIG Go!Control GC2. The original GC2 has served as an effective and reliable alarm system for many years, and users who are just now getting into the market now have a great new option available to them. The GC2e offers a user interface (UI) and overall design that original GC2 users will be familiar and comfortable with. This makes it super easy to transition over to the new GC2e System for your home or business.

The main highlight of the GC2e is the ability to support the upcoming lineup for encrypted sensors from 2GIG. These will be the first-ever encrypted wireless sensors from 2GIG, and users will appreciate the added protection that these devices provide. Encrypted sensors are virtually impossible to defeat or takeover wirelessly. This is very important in a world where savvy intruders are able to use advanced technology to hack and take control of non-encrypted sensors.

With a GC2e System and encrypted sensors, you can put these concerns to rest. Please note that the 2GIG Encrypted Sensors are not yet available for purchase. However, we expect them to be available very soon. In the meantime, you can still use the GC2e System with the existing 2GIG 345 MHz Sensors and the Honeywell 5800 Sensors. The GC2e is backwards compatible to support these devices. Just be aware that the system will only utilize encryption when it is paired with the upcoming encrypted 2GIG Sensors.

But the GC2e offers more upgrades than just support for encrypted sensors. It features an updated design that looks cleaner and more modern than the original GC2 System. Users will also appreciate the larger touchscreen, which now measures 5" across. By retaining the existing UI, existing GC2 users will know exactly what they start using the GC2e. If you ever owned the GC2 System in the past and are now looking to get back into the market, then the GC2e is a great choice.

The system also has some internal upgrades as well. The system now supports Z-Wave Plus technology with its 500-Series Chipset. This means that all Z-Wave Plus devices paired with the system will be able to utilize their maximum wireless range and battery life. You can also use classic Z-Wave devices with the system without issue. Just remember that you will only get the extended range and increased battery life with Z-Wave Plus devices.

Anyone who purchases the GC2e will want to make sure they get an Alarm.com Cellular Communicator for the system as well. This will provide the system with fast and reliable connectivity across a cellular network. The GC2e System actually supports the same existing cellular communicators used with the older GC2 System. We strongly recommend choosing an LTE cellular communicator for the system. Cellular service providers have stated that they plan to support their LTE networks well into the very distant future. With an LTE communicator, you can keep your GC2e monitored for many years to come.

We recommend using one of the following cellular communicators with the GC2e:

A cellular communicator is also necessary for getting the system connected with Alarm.com. This is an interactive monitoring and automation platform that you can access from a web browser or remotely using the Alarm.com Mobile App. The service will allow you to arm and disarm your system, check current system status, and control your Z-Wave smart home devices from virtually anywhere in the world. Please be aware that you will also need a Gold or Platinum Level Plan from Alarm Grid to access ADC. More information can be found here.

As far as some basic specifications go, the system offers support for up to 60 wireless zones, a single hardwired zone, eight (8) remote control keyfobs, a total of four (4) keypads (2GIG TS1 and/or 2GIG PAD1-345), a wired siren output, and up to 64 user codes. The system is powered using a 1.7A 14VDC transformer that comes included. No wiring is included to connect the transformer to the panel. But you can get a Honeywell LT-Cable for this task. The system receives firmware updates over-the-air (OTA) from Alarm.com, or you can apply updates locally using a compatible updater tool.

We also know that many customers are eagerly awaiting the release of the 2GIG GC3e as well. This will be the successor to the current 2GIG GC3, and it will also provide support for the upcoming encrypted sensor lineup. Unfortunately, the 2GIG GC3e is not yet available for purchase. But we believe that it will be arriving before the end of summer. So please keep checking out blog for further updates.

If you have any questions about the 2GIG GC2e, you can send an email to support@alarmgrid.com. We will check your email at our earliest convenience and reply back as soon as possible. We look forward to hearing from you and answering all your questions about this exciting new system!

Tags: , , , , , , , , , ,

Comments


Posted By

Hi DIYers! We promised last week that new videos would be coming. Well we have four (4) new videos for you to enjoy. Jorge was the big winner this week with three (3) videos. And I actually contributed a rare video of my own. Let's take a look at the newest videos from our video team.


Pairing the Honeywell T6 Pro Thermostat with a Residio Lyric Controller

I show you how to pair a Honeywell T6 Pro Z-Wave Plus Thermostat with a Resideo Lyric Controller. By pairing the T6 Pro with your Lyric System, you will be able to adjust the temperature right from the Lyric Panel. You will also be able to control the T6 Pro from Total Connect 2.0 if you have a Silver Level monitoring plan or higher. TC2 will also allow you to create smart scenes to have the T6 Pro activate automatically with certain system events or on a predetermined schedule.


Turning Off the Siren on a Qolsys IQ Panel 2 Plus

Jorge explains how to disable a siren on a Qolsys IQ Panel 2 Plus System so that it does not sound when an intrusion alarm occurs. This is great for testing the system so that you do not activate a loud siren when you need to test various sensors. You might also do this if you want all burglary alarms to be silent. In order to disable the siren, you will need to enter system programming. Please note that alarms for life-safety events will still activate a siren.


Enrolling a VERSA-GE Sensor into a Qolsys IQ Panel 2 Plus

Jorge teaches users how to enroll a VERSA-GE Sensor with a Qolsys IQ Panel 2 Plus System. The VERSA-GE is a wireless door and window contact sensor that operates at 319.5 MHz. As a result, the sensor will only work with the 319.5 MHz version of the IQ2+. This is the version that comes in a white and gold box. If you have a 345 MHz IQ2+ (silver and white box), you can use the VERSA-2GIG Sensor. If you have a 433 MHz IQ2+ (red and white box), you can use the VERSA-DSC Sensor.


Siren Timeout on the Qolsys IQ Panel 2 Plus

Jorge discusses the siren timeout feature on the Qolsys IQ Panel 2 Plus. This feature will have any siren programmed with the IQ Panel 2 Plus automatically stop sounding after a set period of time, even if the alarm is not properly cleared. This will prevent the siren from sounding indefinitely and annoying everyone in the area. This feature may also be referred to as a "bell timeout" period. The standard set siren timeout period is usually around four (4) minutes.

Tags: , , , , ,

Comments


Posted By

Hi DIYers and future DIYers! If you've spent any time on our site, you have likely come across Total Connect 2.0 (TC2). Maybe you know all about it. Maybe you know nothing about it. But did you know that you can "Test Drive" TC2 to check out the platform? Today, we're gonna show you how.


For the uninitiated, Total Connect 2.0 is an interactive service platform designed exclusively for use with Resideo Alarm Systems. You can access this platform using a web browser or by using the Total Connect 2.0 Mobile App on an Android or iOS device. From there, you must login to your TC2 account using your username and password. Make sure to keep this information a secret. After logging in, you can control your system in a number of different ways.

TC2 allows users to do all sorts of different actions. You can access TC2 to arm and disarm your system, bypass sensors, view the live feed for Total Connect 2.0 IP Cameras, control Z-Wave smart home devices, and more. What's great about this service is that you can quickly and conveniently access the platform from almost anywhere. As long as you have your smartphone, you can get on TC2 and control your system from across the street or across the world.

But maybe you want to see how great TC2 is for yourself? With the Total Connect 2.0 Test Drive feature, you certainly can. You don't need to sign-up for anything, and the feature is completely free to use. All you have to do, is go to the Total Connect 2.0 website or mobile app, and click the Test Drive button. Please note that the button will appear slightly different depending on whether you are using the website or mobile app.


After clicking the Test Drive button, you will be taken to an identical representation of the TC2 platform. You can then check out all of its features and see exactly how the platform looks and responds. This will show you first-hand exactly what the platform can do you for you. This way, you can make an informed decision as to whether or not TC2 is right for you.

If you decide that TC2 is for you, then getting started with the service is easy. You will need to obtain a Resideo Alarm System with an AlarmNet Communicator. You will then need to get an alarm monitoring plan from Alarm Grid. You will choose a time slot to activate your system. Make sure to follow these tips to make your activation as easy as possible. One of our trained activators will call you at the scheduled time to activate your system. After that, you will receive an email to set up a Total Connect 2.0 account.

If you want to learn more about Total Connect 2.0 or our monitoring service, please reach out to us! The best way to contact us is to email support@alarmgrid.com. We will check your email as soon as possible and reply back at our earliest convenience. We look forward to hearing from you!

Tags: , , , ,

Comments


Posted By

Hi DIYers! We are happy to announce that we have some new long-range motion sensor options available on our website. These long-range motions are good for long, narrow areas such as hallways. You now have more options in choosing the perfect motion sensor for your home or business.

Optex wnx 40hw wireless pet friendly pir motion detector for hon

The first new product we would like to discuss may seem relatively minor, but it actually opens up a whole new world of possibilities for motion detection. We are now pleased to offer the Optex FL-60N Long-Range Lens. This convenient device replaces the stock lens for an Optex WNX-40 Series Motion Sensor. Once the lens is added, the motion sensor will enjoy a long-range coverage area of 60 feet by 6 feet. It's very easy to swap out the old lens, and the process can be completed by any DIY user.

Alarm Grid offers four (4) different Optex WNX-40 Series Motion Detectors. We have an option available for nearly every wireless alarm panel that we carry. If you don't have one of these sensors yet, make sure you choose the correct model when purchasing. You need to make sure that the frequency the sensor uses for wireless communication is compatible with your security system.

The following motion sensors from our website are compatible with the Optex FL-60N:

In addition to the Optex FL-60N Long-Range Lens, we now offer the complete Honeywell DT900-Series lineup of hardwired, long-range DUAL TEC motion sensors. Before, we only offered the Honeywell DT906. Now we offer the DT900, DT901, and DT907 long-range motion sensors as well. These are all hardwired motion sensors that connect directly with a hardwired alarm panel or a compatible wired to wireless converter. The motion sensor use these wired connections for both power and data transmissions.

If you're wondering how these four DT900-Series motion sensors differ, it is actually quite simple. Both the DT906 and the DT907 have the same selectable detection ranges. You can choose between a coverage area of 200 feet by 15 feet, or 120 feet by 10 feet. However, only the DT906 has an anti-masking feature. The DT907 does not. Meanwhile, with the DT900 and the DT901, you can choose between a coverage area of either 90 feet by 70 feet, or 50 feet by 40 feet. But in this case, the DT900 has anti-masking, while the DT901 lacks this feature. Other than that, these are mostly the same sensors.

If you have any questions about these new long-range motion sensor options, or if you want to find out if a long-range motion sensor is right for you, please reach out to us. The best way to contact us is to email support@alarmgrid.com. Our team will check your email as soon as possible and reply back as soon as we can. We look forward to hearing from you and helping you find the perfect motion sensor for your needs.

Tags: , , , , , , , , , , , ,

Comments


Posted By

Hi DIYers! Today, we're taking a look at one of our newest and most exciting products, the August Video Doorbell Cam Pro. This is smart video doorbell camera that is easy to use in nearly any home. It supports integrations with some of the most versatile and robust smart home platforms.

We hear all the time of end users looking for an effective video doorbell camera that they can add to their homes. They want a device that is easy to use and setup and offers all of the excellent features that they expect out of a modern smart home device. The August Video Doorbell Cam Pro checks all of these boxes, making it the perfect addition for anyone looking to unlock the great potential of a video doorbell camera.

To unlock the full potential of the August Video Doorbell Cam Pro, you will definitely want to get started with the August Home App. This is a free app for Android and iOS devices that lets you view the live feed of your doorbell cam from anywhere. The app can also send push notifications right to your phone whenever the device detects motion or when someone rings the doorbell. This is perfect for knowing about any activity that occurs in front of your home.

There are many awesome features that make the August Video Doorbell Cam Pro an excellent doorbell camera for all types of users. The device offers 1080p HD video, and an integrated flood light lets the camera capture video in the darkest of settings. Real-time motion alerts ensure that you are alerted to any activity in front of your home, This includes package thieves and suspicious loiterers. The device also integrates with your August Smart Lock Pro, as well as Amazon Alexa, Google Assistant, and IFTTT.

The August Video Doorbell Cam Pro is very easy to install, making it perfect for DIY users. To get started, you just need to cut power to your existing hardwired doorbell at the breaker, and disconnect your existing doorbell. Then wire the August Video Doorbell Cam Pro in its place. Apply power to the device at the breaker, and complete the setup process using the August Home App. This will involve connecting the device to your local WIFI network and associating it with your August account.

If you don't have a hardwired doorbell set up with your home, you might consider using the August View Wire-Free HD Video Doorbell instead. This device offers similar functionality as the August HD Video Doorbell Cam Pro, but it doesn't integrate with a hardwired setup. Both devices can be purchased right from the Alarm Grid website. If you have any questions about either doorbell camera, please email us at support@alarmgrid.com. We look forward to hearing from you!

Tags: , , , , , , ,

Comments


Posted By

Hi DIYers! Today we're looking at three (3) smart home devices that can make a great addition to nearly any home. Half the fun of owning an alarm system is getting into the exciting world of home automation. These devices are all easy to use, and they are all available from Alarm Grid.

August Smart Lock Pro

August smart lock pro dark gray z wave deadbolt lock 3rd generat

The August Smart Lock Pro is very unique in being one of the few Z-Wave Plus Smart Locks that is also compatible with Apple HomeKit. It also works with great voice-based platforms like Google Home and Amazon Alexa, and it can be used for automatic Bluetooth unlocking. All of this makes the August Smart Lock Pro extremely versatile. It is a great choice no matter what interactive platform you are building around. The lock comes Z-Wave Plus ready right out of the box. You can also pair it with an August Connect WIFI Bridge for enhanced remote access. You can still use the lock with HomeKit without the Connect Bridge, but it will need to be within Bluetooth range of the HomeKit Hub (Apple iPad, Apple TV Gen 4 or higher, or Apple HomePod). Overall, this is a fantastic smart lock for your home and great for many scenarios.

Check out all of our fantastic smart locks here.

Honeywell T6 Pro Z-Wave Thermostat

Honeywell t6 z wave thermostat smart thermostat


The Honeywell T6 Pro is arguably our favorite Z-Wave thermostat right now. Its biggest selling point is its ability to connect to an HVAC system and remain powered on without common power from a C-wire. This is excellent for DIY installers, as it prevents them from having to work with high voltage wiring. The Honeywell T6 Pro Z-Wave version is certified Z-Wave Plus for extended wireless range and improved battery life. There is also a HomeKit-compatible T6 Pro that uses WIFI instead of Z-Wave Plus. However, most Alarm Grid customers get the Z-Wave Plus model so that they can control the thermostat through the same interactive service platform used with their security systems. Although the T6 Pro was designed with Total Connect 2.0 in mind, it will work just fine with Alarm.com and associated systems.

Check out all our smart thermostats here.

Lutron Caseta P-BDG-PKG1W Starter Kit

Lutron caseta p bdg pkg1w unboxed single in wall dimmer starter


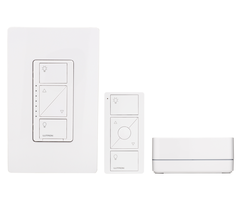
Lutron Caseta is a great option if you are looking to establish a smart lighting network for your home or business. In order to get started, you will need a Lutron Caseta Smart Bridge to serve as the central hub for the setup. The kit linked above include the smart bridge, along with an in-wall dimmer switch and a Pico Remote for controlling the device from up to 60 feet away in open air. Other great starter kits from Lutron include the P-BDG-PKG2P with a lamp dimmer module, and the P-BDG-PKG2W with dual in-wall dimmer switches. A great aspect of Lutron Caseta devices is that you can build a network of lights without having to run traveler wires to connect load-bearing light switches to a master switch. Instead, all communication occurs wirelessly through the Lutron Caseta Smart Bridge. Lutron integrates with Apple HomeKit, Amazon Alexa, and Google Home with ease. This makes this smart lighting network perfect for many different smart home setups.

Check out all of our smart lighting options here.

Build Your Smart Home!


Alarm Grid is here to help you build your ideal smart home. Whether you're looking for locks, thermostats, or lights, we have what you need to help you get started. Remember, we offer free support for all Alarm Grid monitored customers. You can build your smart home network around one of our security systems and make your life more convenient than ever. Alarm Grid customers should email us at support@alarmgrid.com with any questions. And if you haven't joined Alarm Grid quite yet, you can get started by clicking the orange Alarm Monitoring button at the top of this page. We look forward to helping you design the perfect smart home.

Tags: , , , , , , , , , , , , , , , , ,

Comments


Posted By

Hi DIYers! We know that we haven't done a video recap lately. Our video department has been on a well-deserved break, as the team has been focusing on other priorities. Well the same team will be back at work this week to make new videos. Expect new videos from Jarrett, Jorge and Joe soon!

Remember, the best way to find out about new videos as soon as possible is to subscribe to our YouTube channel. We upload new videos almost every day, and we would love your support on YouTube. You can also expect a regular video recap by checking this blog. We usually like to post video recaps on Mondays, but it can vary based on recent activity.

Our video team looks forward to getting back to work and making some great new videos to help you learn how to get the most our of your security system. We apologize that we haven't been putting out new videos in recent weeks, but we will have some new ones very soon. We hope that you are looking forward to some helpful new videos just as much as we are, and we are eager to show you what our team can do.

Tags: , , ,

Comments


Posted By

Alarm Grid will be closed Thursday July 4th, 2019 in observance of Independence Day. We will not be checking emails or answering calls during this time. If you have any issues during this time, you can email support@alarmgrid.com. We will read your email as soon as possible after we reopen.

The Alarm Grid support and planning departments will both resume normal operation on Friday July 5th, 2019. This means that our office will be checking emails and answering phone calls. However, there will be limited shipping available on July 5th. Some products will be unable to be sent out until the following Monday. Keep this in mind if you order anything on July 4th or 5th.

Additionally, our content department will have the 5th off. This means that there will be no new blog post for July 5th. You can expect a new blog post from Alarm Grid on Monday July 8th. Keep in mind that our regular office hours are 9am to 8pm EST M-F, and our phone number is (888) 818-7728.

From all of us at Alarm Grid, we wish you happy and safe Independence Day, no matter how you plan to enjoy the holiday. Our support and planning departments look forward to working with you on Friday.

Tags: ,

Comments