Technology Posts

Posted By

Hi DIYer! As you probably know by now, we're huge fans of PowerG Sensors. We figured it was time we started highlighting some of the best equipment from the PowerG sensor lineup. And what better place to start than an excellent door and window contact? Today, we present the DSC PG9975.

Dsc pg9975 powerg 915mhz vanishing wireless door slash window coThere are many reasons to be impressed with PowerG technology. Most notable is the insane range of PowerG Sensors. In open air, a PowerG Sensor will communicate from up to two kilometers away from the alarm system. This is roughly four times the range of a traditional wireless sensor. And since they are protected by 128-bit AES encryption, PowerG Sensors are extremely secure and almost impossible to take over.

The PG9975 fits these functions into an ultra-thin device that is less than 8 millimeters thick. The full dimensions for the device in inches are 2.45"" x 1"W x 0.3"D. This makes the PG9975 extremely unobtrusive when used. It's no wonder that it is often referred to as a "vanishing" door and window sensor; you won't even know it's there! The device can be easily mounted with screws or with the double-sided foam tape that comes included. No installation tools are needed if using double-sided foam tape. Also included is a 3V CR2032 lithium battery that has an average life of three years.

The sensor operates in virtually the same manner as any other door and window contact. The sensor is installed on the door or window frame, and the included magnet is secured on the door or window itself within a quarter-inch of the sensor. When the door or window is opened, the magnet will separate from the sensor. This will cause a reed switch inside the sensor to activate, telling the sensor to alert the system. The system will then perform the programmed Response Type for that zone.

As a PowerG Sensor, the DSC PG9975 communicates at a wireless frequency of 915 MHz, and it will work with any compatible alarm system. This includes the brand-new IQ Panel 2 Plus. You can purchase the DSC PG9975 from Alarm Grid. Get yours today!

Tags: , ,

Comments


Posted By

Intro to the 2GIG GC2

The 2GIG Go!Control, also referred to as the GC2, is an incredibly versatile security panel with many uses and capabilities. But as an alarm system, its main function consists of interacting with a variety of different sensors. Each sensor is programmed with the GC2 System individually. The system can readily interface with a large number of wireless sensors as needed. However, the sensor programming process for the GC2 System is a little different from most other wireless security panels. This guide will help you with every step necessary to get sensors up and running with a 2GIG GC2 Alarm System.

The Panel - Basic Information

Before attempting to program a 2GIG GC2 Panel, it is helpful to know a little bit about the system. The GC2 is an all-in-one alarm system with a built-in 3.75" by 2.25" touchscreen controller. This makes it easy for the user to navigate between menus and make programming adjustments. The panel includes an integrated wireless receiver, allowing any sensor with a wireless frequency of 345 MHz to interface with the system. This is famously the same wireless frequency used by Honeywell 5800 Series Sensors. This means that any Honeywell 5800 Series Sensor and any 2GIG Sensor can communicate with the system. Finally, the GC2 Panel provides 60 different wireless zones for setting up wireless sensors with the system. It also includes two built-in hardwired zones and a Z-Wave controller for smart home devices.

2gig cp21 345 front

Accessing System Configuration - Zone Programming

In order to set up any wireless sensor with a GC2 System, the user must access the System Configuration Menu. The System Configuration Menu is also sometimes referred to as Zone Programming. This menu serves as the primary hub for learning-in new sensors. Accessing this menu is key for setting up a GC2 Panel.

To access System Configuration, start from the home screen of the GC2 System. Press the Go!Control icon in the bottom-right corner of the screen. Then enter the Installer Code for the system. The default Installer Code for a GC2 Panel is 1561. We recommend keeping the Installer Code at the default so that you do not become locked out of programming later. After entering in the Installer Code, choose the option "System Configuration". This will take you to the System Configuration Menu.

Navigating System Configuration - Selections, Questions and Sub-Questions

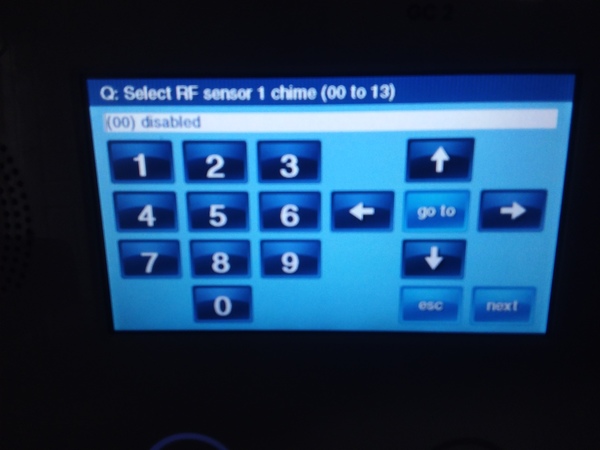
The System Configuration screen (shown in the picture below) consists of a numerical keypad, four arrows, and buttons labeled "go to", "skip", "sum", "esc" and "end". Depending upon the current selection, different buttons may be available. The system uses question-based programming that may seem a little confusing to new users. But once you know how to navigate this menu, the process becomes more intuitive. A good way to think about this is that each "Question" represents a different menu option for the GC2 System
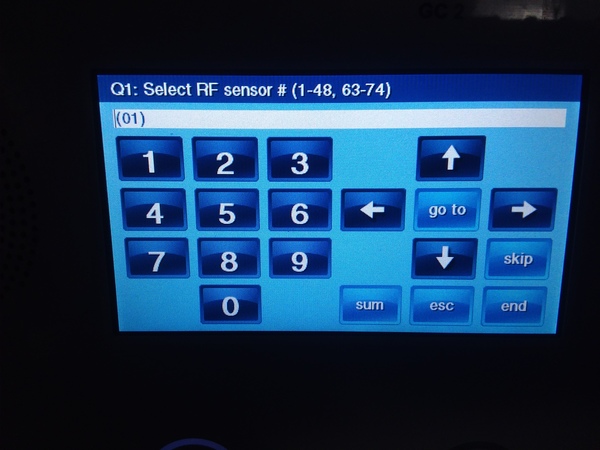

When navigating the System Configuration menu, you should always pay attention to the "Question" at the top of the screen. This is indicated by the letter Q, followed by a number, and then the current menu option (Question). Checking this information will let you know what setting you are currently configuring. For example, the first Question is as follows:

Q1: Select RF Sensor # (1-48, 63-74)

For this Question, you are choosing the wireless zone that is being configured. A zone can be assigned a wireless zone numbered 1 through 48, or 63 through 74. The white rectangular box below the Question shows the current selection.

Pressing the right and left arrows will allow you to navigate between different possible selections for that Question. For example, let's say that you are on Q1: Select RF Sensor # (1-48, 63-74), with a current selection of (02). Pressing the right arrow will take you to the next possible selection of (03). Pressing the left arrow will take you to the previous possible selection of (01). Keep scrolling through the possible selections until you reach the one needed. You will stay within the same question while doing this.

Alternatively, you can also use the numerical keypad on the left to put in the digits associated with the desired selection. For example, if you are on Q1: Select RF Sensor # (1-48, 63-74), entering in "05" will automatically adjust the current selection to (05). This can be a quick way to make a selection, without having to manually scroll between different options. Again, you will stay within the same question.
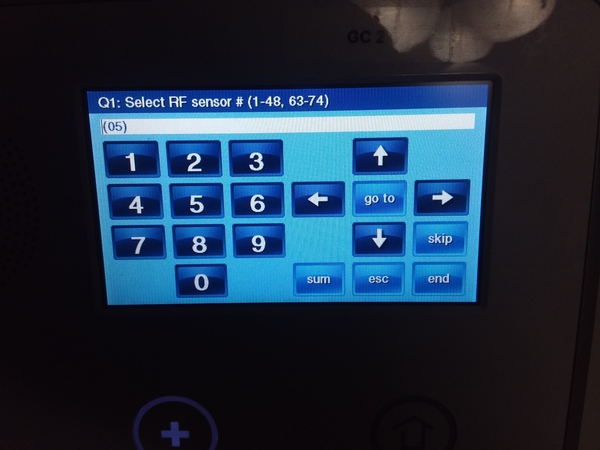
Within Questions numbered 1 through 4 on the GC2 System, there are various Sub-Questions. These Sub-Questions are used to provide additional options for the menu selection that is being programmed. Pressing the up and down arrows will take you to a different Sub-Question for the current setting that is being configured. A Sub-Question can be identified by having no number following the letter Q. Pressing the down arrow will take you to the next Sub-Question. Pressing the up arrow will take you to the previous Sub-Question within the sequence.

Please note that in some cases, pressing the up or down arrows will simply take you to the next Question in the sequence, rather than a Sub-Question. That is why it is always important to keep a close eye on the current Question at the top of the screen when programming a GC2 System. Remember, you will only have to consider Sub-Questions for Questions 1 through 4 on the system.

There also other ways to navigate between Questions. Pressing the "skip" button will automatically take you to the next Question in the sequence. For example, if you are on Q4, pressing the "skip" button will take you to Q5. Please note that the "skip" button will no longer be available for Q5 onward. At this point, pressing the down arrow will take you to the next Question in sequence. The "skip" button is removed for Question 5 onward due to the fact that these Questions have no available Sub-Questions. Instead, pressing the down arrow accomplishes the same goal.

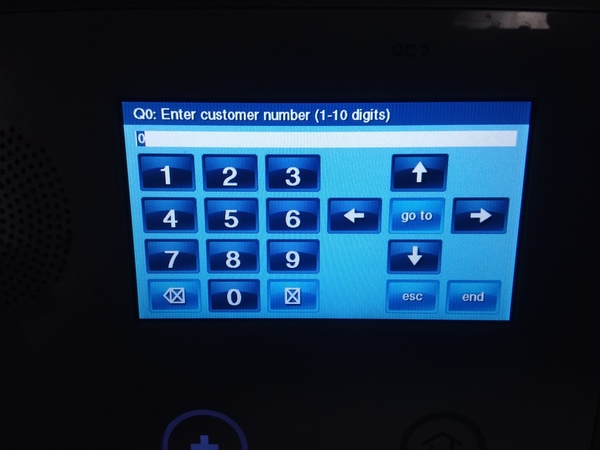
You can also press the "go to" button to manually enter a 2-digit Question number and be taken to that Question. A single-digit Question number will be entered with a 0 in front of it - e.g. 07 for Q7. Please note that there are a total of 97 possible Questions on a 2GIG GC2 System. Entering in a 2-digit Question number higher than 97 (98 or 99) will take you to Q97. There is also a Q0 on the system for Question 0.

Using Question 1 to Learn-In Wireless Sensors

With 97 different Questions available on a GC2 System and various Sub-Questions available as well, programming a GC2 System can certainly seem intimidating at first glance. But fortunately, the vast majority of sensor programming is accomplished through Question 1 and its set of Sub-Questions. This makes learning-in a new sensor with the system a relatively easy process. To thoroughly explain the process, we will go through Question 1 and its Sub-Questions in their entirety.

As explained in the previous section, the main selection of Question 1 involves choosing RF Sensor Number, also called the Zone Number. A Sensor Number of 1 through 48 or 63 through 74 can be selected, for a total of 60 possible wireless sensors. Enter in the 2-digit Sensor Number to choose which Zone Number you will be working with. Once you have made the selection, you can press the down arrow to move on to the first Sub-Question of Question 1.

Setting the Sensor Type

The first Sub-Question is the Sensor Type, which might also be called the Response Type. There are many options available. You can scroll between different options by pressing the right and left arrows. We will now go through each and every one:

(00) Unused - This means that no sensor is being used for that Sensor Number. In other words, this wireless zone is open.

(01) Exit/Entry 1 - If the sensor is activated while the system is armed stay or armed away, then the system must then be disarmed within the system's entry delay 1 period (set in Question 6 of programming). If the system is not disarmed within this time period, an alarm will occur.

(02) Exit/Entry 2 - If the sensor is activated while the system is armed stay or armed away, then the system must then be disarmed within the system's entry delay 2 period (set in Question 7 of programming). If the system is not disarmed within this time period, an alarm will occur.

(03) Perimeter - If the sensor is activated while the system is armed stay or armed away, an instant alarm will occur.

(04) Interior Follower - If the sensor is activated while the system is armed away, an instant alarm will occur, unless an Entry/Exit zone was activated first. If the system is set to armed stay, then the sensor will be bypassed and unable to cause an alarm.

(05) Day Zone - If the sensor is activated while the system is armed stay or armed away, an instant alarm will occur. Additionally, if the sensor is activated while the system is disarmed, a trouble condition will occur.

(06) 24-Hour Silent Alarm - If the sensor is activated, an instant alarm will occur. However, no siren or strobe will occur on the system. This will always occur, regardless of whether the system is armed or disarmed.

(07) 24-Hour Audible Alarm - If the sensor is activated, an instant alarm will occur. Any siren that has been set up with the system will activate. This will always occur, regardless of whether the system is armed or disarmed.

(08) 24-Hour Auxiliary Alarm - If the sensor is activated, the system sounder will activate, and an instant alarm will occur. However, any external siren or strobe programmed with the system will not activate. This will always occur, regardless of whether the system is armed or disarmed.

(09) 24-Hour Fire - If the sensor is activated, an instant alarm will occur. Any siren that has been set up with the system will activate. This will always occur, regardless of whether the system is armed or disarmed.

(10) Interior with Delay - If the sensor is activated while the system is armed away, then the system must be disarmed within the system's entry delay 1 period (set in Question 6 of programming). If the system is not disarmed within this time period, an alarm will occur. If the system is armed stay, then the sensor will be bypassed and unable to cause an alarm.

(14) 24-Hour Carbon Monoxide - If the sensor is activated, an instant alarm will occur. Any siren that has been set up with the system will activate. This will always occur, regardless of whether the system is armed or disarmed.

(16) 24-Hour Fire with Verification - If the sensor is activated twice within a two minute period, or if the sensor is activated and remains activated for 30 straight seconds, an instant alarm will occur. Any siren that has been set up with the system will activate. This will always occur, regardless of whether the system is armed or disarmed.

(23) No Response Type - The sensor will not be able to cause any system events, including alarm conditions. However, the sensor can still be monitored by a central station, and activity alerts can still be sent to Alarm.com.

(24) Silent Burglary - If the sensor is activated while the system is armed stay or armed away, a silent alarm will occur. A distress signal will be sent out to a central station. However, the system sounder, along with any sirens or strobes, will not activate.
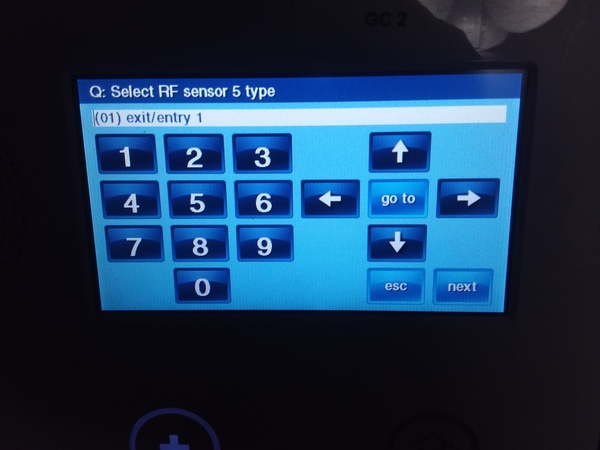

Upon setting the Sensor Type, you can press the down arrow to move on to the next Sub-Question.

Setting the Equipment Type

The options available for the next Sub-Question of Q1 will depend upon the Sensor Type that was selected in the previous Sub-Question. In some cases, you will be prompted to choose a specific equipment code. You can use the right and left arrows to scroll through the possible selections.

For other Sensor Types, you may be asked to select a generic equipment type, such as a contact or a motion. The selections available will depend on the Sensor Type that was chosen.

Once you have made the appropriate section, press the down arrow to move on to the next Sub-Question.

Setting the Serial Number

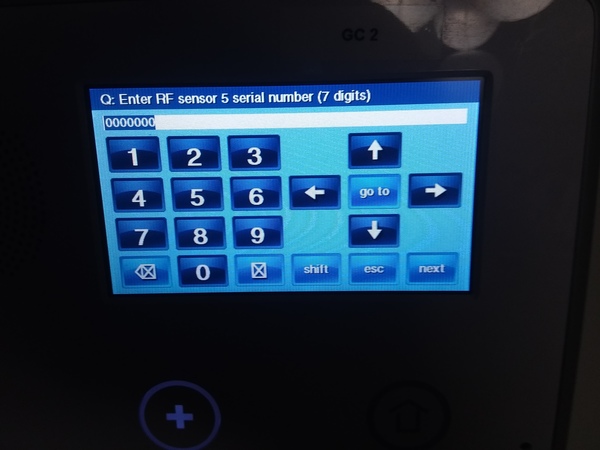
The serial number is a 7-digit code that is unique to each individual sensor. The serial number is usually located somewhere on the sensor, and it can be manually entered into the system. However, we strongly recommend auto-enrolling any sensor to have the serial number learned-in automatically. Not only will this prevent you from mis-entering the serial number, it will also ensure that the sensor is able to communicate properly with the GC2 System.

To auto-enroll the sensor, first press the "shift" key. Then press the "learn" key that will appear on the left side of the screen. You will be taken to a screen titled "Activate a sensor to learn its ID", along with the message "Waiting for RF sensor # transmission...". From this screen, activate the sensor you want to learn-in.

The process for activating the sensor will depend on the type of sensor that is being used. For example, a door and window contact will require you to separate the sensor from its magnet, while a smoke detector will have you activate the device's tamper switch.

Once the sensor has been detected, its Type and ID Number will be displayed on the screen. Verify that the information is correct, and press the OK button in the bottom-right corner of the screen. Then press the down arrow to move on to the next Sub-Question.

Continue Programming the Sensor

As you continue to move through the various Sub-Questions, you be able to apply various programming settings for the sensor.

Equipment Age has no affect on the performance of the sensor. The idea is that you can choose 0 if the sensor is brand-new, and 1 if the sensor was used previously. Either selection will work just fine.

The Loop Number is important for ensuring that the sensor performs as it should. Many sensors can perform multiple functions by setting a different Loop Number for the device. Check the manual for the sensor to determine which Loop Number should be used.

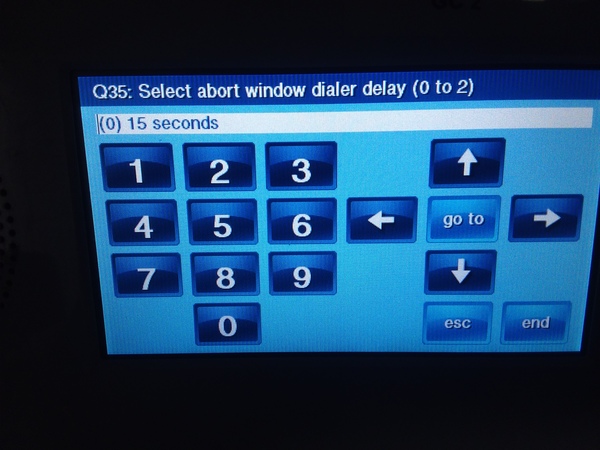
The Dialer Delay option determines whether or not dialer delay will be enabled for the sensor. This feature instructs the sensor to delay the process of sending out a notification signal to the user or a central station. Setting this option to 0 will have Dialer Delay disabled, while setting it to 1 will have the feature enabled. A user can set the Dialer Delay for their GC2 Panel by going to Question 35 of System Configuration. Selections of 15 seconds, 30 seconds and 45 seconds are available.

Setting the Voice Descriptor

The Voice Descriptor is the audio annunciation the system will use to verbally identify the sensor. The GC2 Panel includes a built-in voice function that it uses to read out the Voice Descriptor for any given sensor. The Voice Descriptor for a sensor is determined by choosing a set of preprogrammed words for the panel to read out. Up to five individual words can be applied to a single Voice Descriptor. Because of the amount of options available setting the Voice Descriptor can seem challenging at first. But the process is actually very simple.

To add a new word to the Voice Descriptor, press the "insert" button. With a word highlighted, you can the choose the desired word in one of two ways. You can either use the left and right arrows to scroll through the list of available words. Or you can also enter in the 3-digit code for any given word to have that word applied. Once you have entered the 3-digit code, the new word will automatically replace the highlighted one. The entire list of available words and their respective 3-digit codes is available on pages 38 and 39 of the 2GIG GC2 Programming Guide.

Remember, any additional words that you plan on including for the Voice Descriptor must be added by pressing the "Insert" button. To scroll between words, press the "fwd" button to move to the right, and press the "back" button to move to the left. To delete a word, highlight the word you want to delete, and press the picture of the box with an X in it.
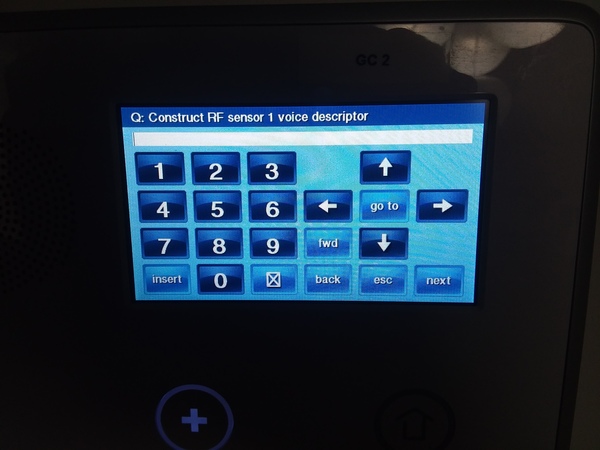

Once you have finished setting the Voice Descriptor, press the down arrow to move on to the next Sub-Question in the sequence.

Setting the Final Sensor Options

The Sensor Reports option will determine whether or not the sensor will send out a report to a central station in the event that it causes an alarm. Set Sensors Reports to 0 for disabled and 1 for enabled. If you want the sensor to send a signal to a central station, this option should be set to 1 for enabled.

The Sensor Supervised option determines whether or not the GC2 System will periodically look for check-in signals from the sensor. If the Sensor Supervised option is enabled, the system will experience a trouble condition if the sensor is ever unable to communicate with panel. This could be caused by the sensor being taken out of range of the panel or by a dead battery on the sensor. However, even if Sensor Supervised is disabled, the GC2 System will still alert the user about a low sensor battery and for an activated tamper cover.

The Chime option is used to set an audible alert that will emit from the system whenever the sensor is activated. The Chime will play whenever the sensor is activated, even if no alarm is set to occur. You can use the right and left arrows to scroll between different Chime options. Any Chime with voice will have the Voice Descriptor spoken when the sensor is activated.

Finish Programming the Sensor

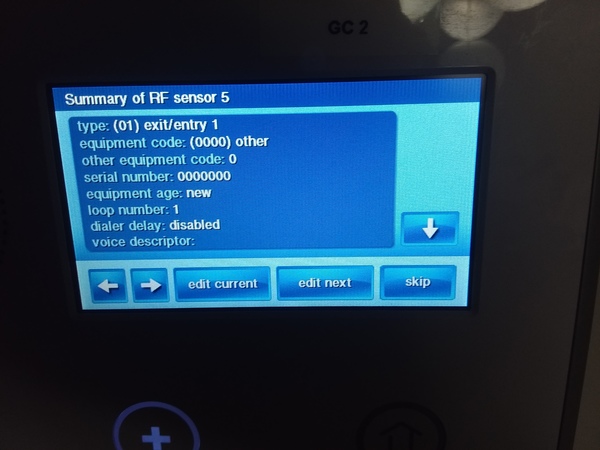
After pressing the down arrow from the Chime setting, you will be taken to a summary screen where you can view all of the selections you made for the configurations for that sensor.

Use the up and down arrows on the right side of the screen to view all of the selections. Use the left and right arrows in the bottom-left corner of the screen to scroll between the summary screens for different RF Sensors on the GC2 System (1-48 and 63-74).

Press the "edit current" button to make changes to the RF Sensor that is currently selected. Press the "edit next" button to make changes to the next RF Sensor in the numerical sequence.

Press "skip" to continue on to Q2: Select Wired Sensor # (1 to 2), which is used for programming the two hardwired zones that can be set up with the GC2 Panel.

Save Your Changes

If you are finished programming, press either of the "edit" buttons or the "skip" button. Then press the "end" button in the bottom-right corner of the screen. You will be taken to a summary screen that shows all of the current settings for Questions 5-97 in System Configuration. You can use the up and down arrows on the right side of the screen to review these settings. Pressing the "back" button in the bottom-left corner of the summary screen will have the system return to the System Configuration Menu so that you can make any additional changes that are necessary.

To finish and save your changes, make sure that the box next to "save changes" is checked. If it isn't, click on the box to apply a yellow checkmark next to the "save changes" setting. Then press the "exit" button in the bottom-right corner of the screen. The GC2 System will automatically reboot. Upon reloading, all of the changes that were made in the System Configuration Menu will be automatically applied and taken into effect.

Tags: , , ,

Comments


Posted By

An exciting new feature is now available for users of the Qolsys IQ Panel 2. It is now possible to view the live video feed for Alarm.com Cameras directly from the panel itself. This is made possible through firmware update 2.2.1, which can be easily downloaded to the IQ Panel 2 System.

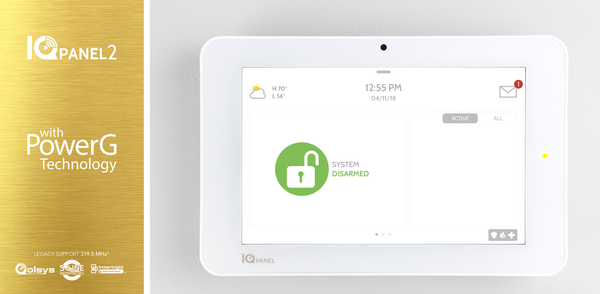
Qolsys iq panel 2 at and t wireless security system with at and The feature is compatible with both the IQ Panel 2 Plus and the standard IQ Panel 2 System. There are a few things to keep in mind about the live video feature. First, the panel must be connected to an active WIFI network in order for the feature to work. If the WIFI goes down, the panel will be unable to stream live video.

Second, the feature only works with compatible Alarm.com Cameras. Some cameras will allow the IQ Panel 2 to stream both video and audio, while others are for video only. The compatible cameras are listed below:

Note: The ADC-V521IR needs Firmware IP8137-ALAM-0100d1 or higher for two-way audio. The ADC-V522IR Must be Hardware Version 0101 with Firmware IP8168-ALAM-0100b9 or higher for two-way audio.

Additionally, the cameras below are for video only:

Third, a user will need to have an alarm monitoring plan that supports video. For Alarm Grid customers, these are the Platinum Level Plans. For two-way audio, the feature "Audio for Non-Doorbell Cameras" must be enabled on the user's Alarm.com account.

Remember, Firmware Version 2.2.1 is needed on the IQ Panel 2 System to support this feature. The IQ Panel 2 Plus should arrive with this firmware update already applied. But the standard IQ Panel 2 may need to have the firmware update applied. The panel should be connected with a WIFI network, have its transformer plugged-in and have a charged battery before performing the update to the system. If you need to upgrade the firmware, complete the following steps first:

1. Access the upgrade menu. Start from the home screen of the Qolsys IQ Panel 2. Press the small grey bar at the top. Choose Settings > Advanced Settings > Enter Installer Code (default 1111) > Upgrade Software. This will take you to the upgrade menu.

2. Provide the Patch Tag. Press "Patch Tag". Then enter in "iqpanel2.2.1". Press OK. This will provide the Patch Tag associated with the update.


3. Perform the update. Click "Upgrade Using Network". The update should begin to install. Press OK when prompted. The panel should reboot, and the update will be applied. This will take about five minutes. The home screen should be displayed once the update has been successfully applied.

Next, the feature must be enabled for the IQ Panel 2. This is done from Alarm.com. Login to Alarm.com website. Then choose the "Video" option on the left, followed by "Settings" at the top. Then choose "Stream Video to Security Panel Screen". Every compatible camera will have an "Authorize" toggle switch that must be selected to be used with this feature. Once all the cameras have been enabled, you can log-out of Alarm.com.

Finally, you can try streaming the live video feed from your Qolsys IQ Panel 2. Swipe left on the screen until you reach the "Live Video Cameras" page. Find the camera you want to view, and press the Play button. The panel will begin streaming the live video of the camera.

Firmware Version 2.2.1 also provided some other fixes and changes for the IQ Panel 2. These include:

  • Improved reliability and performance for Live Answer and Live View features
  • Filtering out unneeded "Motion Activated" messages sent from Alarm.com
  • Corrects a Chime and Voice problem that resets settings to "Nighttime Mode" after performing a Software Update
  • Corrects an issue where extra zones numbered 130 - 136 could be present on Alarm.com
  • Corrects a problem where the panel was reporting cellular strength signals when disconnected fro the network

If you have any questions about this new feature, please reach out to us at support@alarmgrid.com. Or call us at 888-818-7728 from 9am thru 8pm Monday thru Friday. We hope you enjoy using the video feature with your IQ Panel 2!

Tags: , , , , , , , , , , , , , , ,

Comments


Posted By

Hi DIYers! Today we're highlighting the Qolsys IQ Siren. This easy-to-use system add-on is great for IQ Panel 2 users who want to increase the siren volume for their system. The device communicates using Z-Wave Plus technology, and it is offers exceptional functionality and versatility.

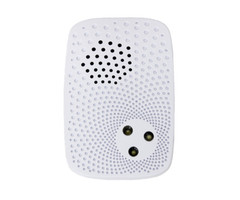
Qolsys iq siren z wave siren for qolsys iq and iq panel 2 qz2300There are many advantages to using a Qolsys IQ Siren. The most obvious is that it will increase the siren volume for the IQ Panel 2 Security System. The internal siren for the IQ Panel 2 is 85 dB, the minimum volume level for an alarm system. But the IQ Siren is rated at an astounding 105 dB. This is the volume equivalent to a jackhammer or a helicopter. Once the IQ Siren has been activated, everyone in the building will be made immediately aware of the emergency.
The great thing about the IQ Siren is its ease-of-use. Wired sirens can be tricky to install with wireless alarm panels, and extra equipment is usually required. But the IQ Siren can be installed by simply plugging it into a standard wall outlet. From there, it can be programmed with the IQ Panel 2 System in the same manner as any standard Z-Wave smart home device. Should the power go out, the IQ Siren will still be able to activate thanks to its 430 mAh rechargeable lithium backup battery.

In addition to the 105 dB sounder, the IQ Siren also includes a built-in strobe light for providing a visual indication of an alarm. This can be good for hearing-challenged or deaf users. Since the IQ Siren is a certified Z-Wave Plus device, it will serve as a viable repeater for other Z-Wave and Z-Wave Plus devices. Remember, it's always smart to add new Z-Wave devices to strengthen your Z-Wave mesh network!

At just 3.25" tall and 1" deep, the siren is unobtrusive, and it will only require a single wall outlet. And of course, it's compatible with the brand-new IQ Panel 2 Plus Systems! This makes the siren an exceptional add-on for any Qolsys user who wants to easily and effectively increase their system's siren volume.

The IQ Siren is available for purchase right now from Alarm Grid. Get yours today!

Tags: , , , , , ,

Comments


Posted By

Hi DIYers! We're back with another video recap, covering August 18th through 23rd. This time we have four videos - two from Jorge and two from Joe. The team has been working hard as usual to make new videos that will help users learn how to use their systems. Let's take a closer look:

Can I Connect A Wired Smoke To My 2GIG GC3?

Joe explains how the 2GIG GC3 System cannot support a hardwired smoke. The two wired terminals on the system are used with normally closed security devices only, and they cannot be used with hardwired smoke detectors. However, the 2GIG GC3 can support 345 MHz wireless smokes, including those from the 2GIG and the Honeywell 5800 Series. But an Encore FF345 can essentially integrate an existing hardwired smoke with a GC3 System. The FF345 will listen for the sound of an activated smoke detector and alert the system.


Using the Lyric Alarm System w/o Total Connect

Jorge discusses using the Honeywell Lyric Controller without Total Connect. While this is possible, it would severely limit the functionality of the system. For example, self-monitoring is impossible without access to Total Connect. But the system could still report out to a central monitoring station, or it could be used as a local sounder. But the Lyric Controller does not need a cellular module to access Total Connect, though adding one is recommended. Instead, it can use a WIFI connection from its built-in WIFI card to access Total Connect. The user will just need an appropriate monitoring plan.


Can I Use a Honeywell L7000 System Without Monitoring?

Jorge talks about using a Honeywell L7000 without alarm monitoring services. Without monitoring, the system will be unable to be used with Total Connect. The user will not be able to receive text or email alerts regarding system events, and they will not be able to receive automatic emergency dispatch from a central monitoring station. Instead, the system will only serve as a local sounder. This can be useful for alerting on-site occupants to an emergency.


Changing the Installer Code on an a LYNX Touch Security System

Joe shows users how to change the Installer Code for a Honeywell LYNX Touch Alarm System. While this is easy to do, we generally advise users to keep the Installer Code for a Honeywell System at its default of 4112. This will prevent the user from being locked out of programming later. If they ever forget the code, it will be okay because they can just look up the default. But while we recommend keeping the Installer Code at the default, changing the Master Code is very important. Remember, an Installer Code can only disarm if it was the code used to arm the system.

Tags: , ,

Comments


Posted By

Hi DIYers! Today we are extremely pleased to announce that the brand-new Qolsys IQ Panel 2 Plus Security Systems are here! Three different versions of the system are currently available on the Alarm Grid website. This is truly very exciting news, as we are sure you will love these systems.


With the IQ Panel 2 Plus, Qolsys has raised the bar for wireless all-in-one Alarm Systems. These are definitely some of the most robust and powerful panels we have ever offered from Alarm Grid. Currently, there are three versions of the system available:

All of the IQ Panel 2 Plus Systems provide support for the top-of-the-line PowerG Wireless Sensors. These sensors operate at 915 MHz, and they can be used from up to 2,000 feet away from the IQ Panel 2 Plus in open air. This will allow users to setup their sensors from virtually anywhere on the property, regardless of where their alarm system is located. The sensors are also protected by 128-bit AES encryption, making them nearly impossible to be hacked or taken over by others. These are definitely some of the most versatile and secure alarm sensors that we have ever encountered.

In addition to PowerG, each IQ Panel 2 Plus System will provide support for a sensor lineup at a lower wireless frequency. There are three different "flavors" that a user can choose from. These are support for 319 MHz Qolsys Sensors and Interlogix/GE Sensors, 345 MHz Honeywell 5800 Series Sensors and 2GIG Sensors, and 433 MHz legacy DSC Sensors. The 319 MHz and 345 MHz options are already available, and the 433 MHz option should be available soon. Also note that a Verizon LTE version of the 345 MHz sensor option should also be arriving in the near future.


Every IQ Panel 2 Plus System comes with a built-in WIFI card and an LTE cellular communicator. This will provide an immediate dual-path communication setup for the system. The only thing that an end user will need is an appropriate alarm monitoring plan. If either path ever goes down, the IQ Panel 2 Plus will still be able to use the other communication path and remain monitored. Both AT&T and Verizon LTE options for cellular monitoring are available.


The Qolsys IQ Panel 2 Plus has also made great strides in video surveillance. Users can view the live feed for their Alarm.com Security Cameras right from the panel itself. And Qolsys worked to better-integrate the system with the SkyBell Doorbell Cameras. Now, a users can answer their SkyBell doorbell from their panel. They can even have a live conversation with the person at their door from their IQ Panel 2 Plus! This is also possible for any ADC Camera that supports two-way voice.

The IQ Panel 2 Plus also supports a plethora of other features. These include Bluetooth disarming, an integrated glass break detector, a built-in 5MP camera, an integrated Z-Wave Plus Controller and an easy-to-use setup wizard for getting started with the system. All of this makes the IQ Panel 2 Plus one of the best systems we have ever had the pleasure of using.


The Qolsys IQ Panel 2 Plus is available from Alarm Grid now. If you have any questions, please feel free to contact us at support@alarmgrid.com, or call us at 888-818-7728 from 9am to 8pm EST Monday through Friday. We hope that you will enjoy this system as much as we do, and we look forward to hearing from you!

Tags: , , , , , , , , , , ,

Comments


Posted By

Hi DIYers! As you all know by now, home security is important. But like many important things in life, home security isn't free. Fortunately, the cost for a home security system is probably not as much as you think. Today, we're breaking it down, to show you the true cost of home security.

Alarm grid inside security stickers

Now first of all, we can't speak for other alarm monitoring companies. They may offer monitoring service and equipment that is more or less expensive than what is offered from Alarm Grid. But keep in mind that Alarm Grid has no-contracts, no added fees, and all of the equipment is non-proprietary and yours to keep. With Alarm Grid, what you see is exactly what you get, and customers choose to stay with us because of the top-level service and support that we provide. However, if you ever do choose to leave Alarm Grid, you can certainly bring your equipment to a different monitoring company.

So with that out of the way, let's focus on what a customer can expect to pay with Alarm Grid. First, they will need equipment. This includes a control panel, security sensors and any additional add-ons, like a keypad or a cellular communicator. Some customers might already own security equipment that they can use to get monitored with Alarm Grid. But let's assume the customer is starting from scratch. In this situation, the cheapest option is generally to obtain a security system kit.

Qolsys iq panel 2 verizon 3 1 kit wireless alarm system 3 door sA security system kit includes everything a new user needs to get started with home security. This usually includes a wireless all-in-one (AIO) panel, a few door and window contacts, a motion sensor and a cellular communicator. Of course, more sensors can be added, like smoke detectors, glass break detectors, flood sensors and more. But for a basic setup, a kit is a great start.

So how much does a kit cost? Well, it depends on the kit. Let's assume that the user has a small home or an apartment and they want the reliability and performance of an LTE cellular communicator. Let's also assume that they want the panel to have a built-in Z-Wave controller so that they have the option for adding Z-Wave devices later on.

In this case, the cheapest option is the 2GIG GC2 Verizon-LTE 3-1 Kit. This kit comes with a 2GIG GC2 System, 3 door and window contacts, a motion sensor, a Verizon LTE Communicator and a Honeywell LT-Cable for powering the system. The panel also has a built-in Z-Wave controller for operating up to 232 Z-Wave devices. Yes, there are more-advanced panels available. But all things considered, the GC2 will still get the job done in most situations. The complete kit linked above costs just $339. Add in an optional desk stand to make the installation even easier, and the cost is just under $350 dollars. So a complete security system can be obtained for just $350, assuming that the user cannot find any cheaper used equipment somewhere else.

2gig cp21 345 front

Once a user has a system, they just need a monitoring plan. Again, Alarm Grid has no activation fees, and since a desk mount was purchased, the hypothetical user will not need to pay an installer to set up their system. The most popular monitoring plan from Alarm Grid is the Gold Plan. This will provide the user with service from a central monitoring station, remote Z-Wave control, access to the Alarm.com interactive service and text and email alerts for system events. This plan is just $35 per month. Multiply that by 12, and the cost is just $420 per year. So adding things up, a user can achieve a complete and robust security setup with top-of-the-line alarm monitoring for just $770 the first year and $420 every following year.

But things can get even less expensive. If a user doesn't need central station monitoring, they can get a Self-Monitoring Plan. With this type of plan, a user will receive email and text alerts regarding any system events. They can then contact the authorities on their own. The Self-Gold Plan is just $25 per month, or $300 per year. So with that setup, a user will pay just $650 the first year, and $300 every year after.

Keep in mind, this is just assuming one type of scenario. If a user requires a more-advanced system, additional sensors or video surveillance, the costs will probably be higher. Likewise, if a user already has equipment or they can get by without cellular monitoring, the costs can be even less. But if you want a basic estimate of how much home security costs, it's just $350 down, and then $420 annually.

Of course, some people get stuck into long-term contracts with their security company, and they might pay upwards of thousands of dollars in installation and activation fees. But not with Alarm Grid! We provide top-quality alarm monitoring, exceptional customer service and support, and non-proprietary equipment at an affordable price. Remember, paying a small price to protect your home or business can save you a huge amount of hassle and expenses later. Sign-up for alarm monitoring today!

Tags: , , ,

Comments


Posted By

Hey there DIYers! As you probably know by now, we're huge fans of Z-Wave smart home devices. Nothing beats being able to control the devices in your home remotely and having them activate based on a schedule or with system events. This is one of the best perks of owning an alarm system.

Many newer alarm systems come with a built-in Z-Wave controller for operating Z-Wave devices. But what if you have an older Honeywell VISTA System that you are perfectly happy with? How would you add Z-Wave functionality to your system. Sure, you could always purchase a Honeywell Tuxedo Touch Keypad. But that add-on is expensive, and many users are absolutely content with using a normal touch-button keypad. Fortunately, there's another way, with the Honeywell VAM.

Honeywell vista automation module vam wifi z wave controller for

The Honeywell VAM, or VISTA Automation Module, is an advanced user interface device that allows a Honeywell VISTA System to work with Z-Wave smart home devices. This includes Z-Wave lights, locks, thermostats and more. But please note that the VAM is only a standard Z-Wave controller, not a Z-Wave Plus controller. Z-Wave Plus devices can still be used with the VAM, but they will only have the range of non-plus Z-Wave devices.

The devices can be controlled through a web browser by connecting with the VAM itself. But most users will operate the devices through Total Connect 2.0. This can also be done through a web browser, but it also is possible to do remotely using the Total Connect Mobile App on Android and iOS devices. Remember, the VISTA will need either an IP or cellular communicator, and the user will need a monitoring plan that includes access to Total Connect and remote Z-Wave control capabilities to do this.

Overall, using a VAM represents an ideal solution for VISTA users who want to use Z-Wave devices without paying several hundred for a Tuxedo Touch Keypad. The Honeywell VAM is available on the Alarm Grid site. Get one for your VISTA System and start using Z-Wave devices today!

Tags: , , , ,

Comments


Posted By

If you don't already have a security system, you may be wondering "well why do I need one?" If your goal is to provide the best possible protection for your home, then having a security system is very important. The benefits of a home security system make the investment worthwhile.

An alarm system is the best way to know what happens in your home while you are away. A modern security system can send alerts right to your phone whenever something occurs in your house. This could include a door being open, someone walking into a particular room, or something being broken. This is possible using an interactive service like Total Connect 2.0 or Alarm.com. All a user needs is a system, the right sensors, and an alarm monitoring plan. A user can also install security cameras that will integrate with their system and provide them with a live look at their property at any time.

Most people who sign-up for alarm monitoring have their systems connected with a central station. If an alarm even ever occurs, the alert will be sent to a 24/7 monitoring station. The station can then request emergency dispatch to be sent out to the home. This can provide great peace of mind for end users in knowing that even if they aren't able to respond to an alarm event, a trusted and qualified operator at a central station will on their behalf. Again, this can be very important for people who are often away from their homes. Keep in mind that if a robbery occurs while you're away and you don't have a security system, there is very little that can be done.

But alarm systems are for more than just security purposes. A user can also integrate smoke and heat detectors into their setup as well. If a fire ever occurs, they can receive automatic fire dispatch, assuming that their system is set up with a central station. And this can even save a user's life if a fire occurs in their building while they are sleeping. There are also other life-safety and environmental sensors that monitor a home for other conditions as well. Some examples of hazards that an alarm system can monitor for include flooding, unusually low or high temperatures, and an outbreak of lethal carbon monoxide gas.

An alarm system can also be useful if a user wants to get started with home automation. Many panels double as Z-Wave controllers for operating smart home devices. These can include lights, locks, thermostats and more. A user can control these devices from their security panel or remotely using an interactive service like Total Connect 2.0 or Alarm.com. They can even have their devices respond automatically based on a set schedule or with predetermined system events. Not only is this very cool to show-off to others, it can also be extremely helpful for saving money on energy bills. So any user who wants to get the most out of the devices in their home can benefit significantly from an alarm system.

There are many reasons to get a security system and to sign-up for monitoring. There truly is no other way to protect yourself, your home and your loved ones. And an alarm system will provide a few other nice perks as well. All of this means that having a security system is very important for almost anyone. Alarm Grid can provide you top-quality monitoring services at a competitive price and no longterm contract. We feature the best customer support in the industry, and our central station partner Criticom is second-to-none. Protect your home with a brand-new security system and a monitoring plan from Alarm Grid today!

Tags: ,

Comments


Posted By

Hi DIYers! Are you ready for another Alarm Grid video recap? Our support technicians Joe, Jorge and Dylan have all been keeping busy making great new videos for our viewers. We've got some tremendous content this time around to help DIY users get the very most out of their security systems.

This is a particularly special video recap for our team, as we have just reached the 10,000 subscriber mark on YouTube. It's pretty incredible that 10,000 viewers love security systems enough to subscribe to our YouTube Channel to receive notifications about new videos. We would like to thank all of our YouTube Subscribers and monitored Alarm Grid customers for their continued support!


Security Cameras Compatible with LYNX Touch Security Systems

Joe discusses the security camera options available for use with a Honeywell LYNX Touch System. As long as the system is set up with Total Connect 2.0, any Total Connect Camera can be used. These cameras include both the legacy Honeywell IP Cameras and the newer HD Lyric Cameras. All cameras can be viewed and managed from the Total Connect 2.0 platform. But keep in mind that an alarm monitoring plan that includes video surveillance is needed to use these cameras.


Wholesale Home Alarm Monitoring w Alarm Grid

Dylan talks about wholesale alarm monitoring for home security systems. Wholesale monitoring refers to a situation where a person has multiple locations set up with a single monitoring account. This can be useful if a person has multiple residences, such as both a primary home and a summer home. By having multiple systems on the same account, a user can access all their systems from the same Total Connect 2.0 or Alarm.com account. These services have a locations tab for this specific purpose.


Changing the User Code on Partition 2 In a Honeywell VISTA Alarm System

Jorge goes through the process for changing a user code that has been set up with Partition Number 2 on a Honeywell VISTA Security System. Having multiple partitions on an alarm system allows the zones for one partition to remain armed while the zones on other partitions are disarmed. User codes that are designed to be used with Partition 2 exclusively are assigned code numbers 33 and up. Any code that is going to be used with Partition 2 should be assigned a user slot of 33 or higher.


Dual Path Monitoring on a Lyric

Dylan discusses how the Honeywell Lyric Controller can use a dual-path communication setup for alarm monitoring. This involves using WIFI as the primary communication path and cellular communication as the backup. This will provide the ultra-fast speeds of WIFI, along with the outstanding reliability of cellular. The system comes WIFI-ready with a built-in WIFI communicator. But a separate cellular radio will need to be added for cellular communication. We recommend using the Honeywell LYRICLTE-A Cellular communicator for this purpose.


Programming a 5816 Sensor

Jorge shows users how to program a Honeywell 5816 Door and Window Contact with various security panels. The Honeywell 5816 is actually Honeywell's best-selling security sensor of all-time. It is a relatively simple door and window contact that operates using a built-in reed switch and an included magnet. The sensor can also be used as a wireless transmitter for a single normally closed wired security device. The 5816 operates at 345 MHz, and it will learn-in with any compatible alarm system.


Difference Between Alpha-Numeric Programming Keypads and Fixed-English Keypads

Joe discusses the differences between Alphanumeric Keypads and Fixed-English Keypads. Both keypads can be used for performing basic panel functions, such as arming and disarming. But only an Alphanumeric Keypad should be used for deep level programming functions. This is because an Alphanumeric keypad will display actual English text and real programming information. A Fixed-English Keypad will only display numbers. If a user tries to perform programming functions on a Fixed-English Keypad, they will be operating blindly throughout the entire process, and they could easily mess up the panel settings.


Pairing the 2GIG SP2 Keypad with the 2GIG GC3

Joe shows users how to pair the 2GIG SP2 Keypad with the 2GIG GC3 Alarm System. The 2GIG SP2 is a wireless touchscreen keypad designed exclusively for use with the GC3. The keypad provides a great secondary access point for a GC3 System. Many users will install one of these keypads by their back door or their garage door so that they can conveniently arm and disarm their system from one of these locations. However, programming functions cannot be performed using the SP2, and they must be completed from the GC3 Panel, or from the more advanced SP1 Keypad.


Wiring a Trigger on a Lyric Alarm System

Dylan discusses how a trigger cannot be wired to a Honeywell Lyric Controller. The Lyric has two built-in hardwired inputs that can only support wired contacts. There is no voltage trigger available on the Lyric Controller. A trigger is an output that a system can activate under certain conditions. It can sometimes be used to activate a relay to power another device, such as a siren. Triggers are more commonly used with wired panels than wireless systems. If a user does want to use an external siren with the Lyric Controller, we usually recommend using the Honeywell SiXSIREN.

Tags: , , ,

Comments